Note
Access to this page requires authorization. You can try signing in or changing directories.
Access to this page requires authorization. You can try changing directories.
Azure Service Bus supports using Microsoft Entra ID to authorize requests to Service Bus entities (queues, topics, subscriptions, or filters). With Microsoft Entra ID, you can use Azure role-based access control (Azure RBAC) to grant permissions to a security principal. The security principal can be a user, group, application service principal, or managed identity for Azure resources.
A key advantage of using Microsoft Entra ID with Azure Service Bus is that you don't need to store your credentials in the code anymore. Instead, you can request an OAuth 2.0 access token from the Microsoft identity platform. If the authentication succeeds, Microsoft Entra ID returns an access token to the application. The application can then use the access token to authorize requests to Service Bus resources.
You can disable local or shared access signature (SAS) key authentication for a Service Bus namespace and allow only Microsoft Entra authentication. For step-by-step instructions, see Disable local authentication.
Overview
When a security principal (a user, group, or application) attempts to access a Service Bus entity, the request must be authorized. With Microsoft Entra ID, access to a resource is a two-step process:
- The security principal's identity is authenticated, and an OAuth 2.0 token is returned. The resource name to request a token is
https://servicebus.azure.net. - The token is passed as part of a request to the Service Bus service to authorize access to the specified resource.
The authentication step requires that an application request contains an OAuth 2.0 access token at runtime. If an application is running within an Azure entity such as an Azure virtual machine, a virtual machine scale set, or a function app, it can use a managed identity to access the resources. To learn how to authenticate requests that a managed identity makes to the Service Bus service, see Use managed identities with Azure Service Bus.
The authorization step requires the assignment of one or more Azure roles to the security principal. Service Bus provides Azure roles that encompass sets of permissions for Service Bus resources. The roles that are assigned to a security principal determine the permissions that the principal has on Service Bus resources. To learn more about assigning Azure roles to Service Bus, see Azure built-in roles for Azure Service Bus.
Native applications and web applications that make requests to Service Bus can also authorize with Microsoft Entra ID. This article shows you how to request an access token and use it to authorize requests for Service Bus resources.
Azure built-in roles for Azure Service Bus
Microsoft Entra authorizes access rights to secured resources through Azure RBAC. Azure Service Bus defines a set of Azure built-in roles that encompass common sets of permissions used to access Service Bus entities. You can also define custom roles for accessing the data.
When an Azure role is assigned to a Microsoft Entra security principal, Azure grants access to those resources for that security principal. Access can be scoped to the level of subscription, resource group, Service Bus namespace, or entity (queue, topic, or subscription). A Microsoft Entra security principal can be a user, a group, an application service principal, or a managed identity for Azure resources.
For Azure Service Bus, the Azure RBAC model helps protect the management of namespaces and all related resources through the Azure portal and the Azure resource management API. Azure provides the following built-in roles for authorizing access to a Service Bus namespace:
- Azure Service Bus Data Owner: Use this role to give full access to the Service Bus resources.
- Azure Service Bus Data Sender: Use this role to give sending access to Service Bus namespace and its entities.
- Azure Service Bus Data Receiver: Use this role to give receiving access to Service Bus namespace and its entities.
Resource scope
Before you assign an Azure role to a security principal, determine the scope of access that the security principal should have. Best practices dictate that it's always best to grant only the narrowest possible scope.
The following list describes the levels at which you can scope access to Service Bus resources, starting with the narrowest scope:
Queue, topic, or subscription: Role assignment applies to the specific Service Bus entity. Currently, the Azure portal doesn't support assigning users, groups, or managed identities to Service Bus Azure roles at the topic subscription level.
Service Bus namespace: Role assignment spans the entire topology of Service Bus under the namespace and to the queue or topic subscription associated with it.
Resource group: Role assignment applies to all the Service Bus resources under the resource group.
Azure subscription: Role assignment applies to all the Service Bus resources in all of the resource groups in the subscription.
Keep in mind that Azure role assignments can take up to five minutes to propagate.
For more information about how built-in roles are defined, see Understand Azure role definitions. For information about creating Azure custom roles, see Azure custom roles.
Authentication from an application
A key advantage of using Microsoft Entra ID with Service Bus is that your credentials no longer need to be stored in your code. Instead, you can request an OAuth 2.0 access token from the Microsoft identity platform.
Microsoft Entra authenticates the security principal (a user, a group, a service principal, or a managed identity for Azure resources) running the application. If authentication succeeds, Microsoft Entra ID returns the access token to the application. The application can then use the access token to authorize requests to Service Bus.
The following sections show how to configure your native application or web application for authentication with Microsoft identity platform 2.0. For more information about the platform, see What is the Microsoft identity platform?.
For an overview of the OAuth 2.0 code grant flow, see Microsoft identity platform and OAuth 2.0 authorization code flow.
Register your application with a Microsoft Entra tenant
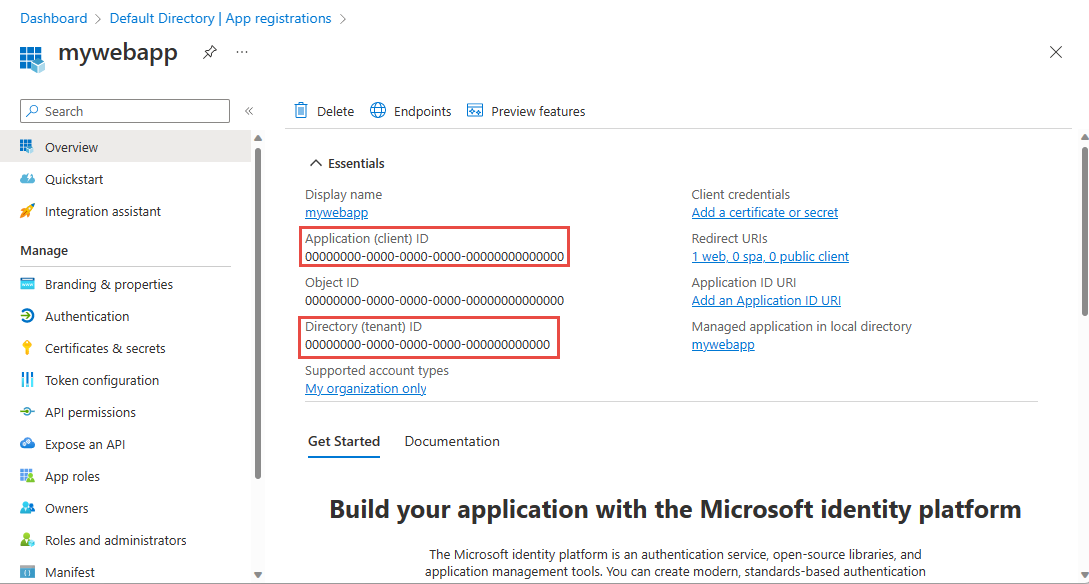
The first step in using Microsoft Entra ID to authorize Service Bus entities is registering your client application with a Microsoft Entra tenant from the Azure portal. When you register your client application, you supply information about the application to Active Directory. Microsoft Entra ID then provides a client ID (also called an application ID) that you can use to associate your application with the Microsoft Entra runtime. To learn more about the client ID, see Application and service principal objects in Microsoft Entra ID.
To register your application with Microsoft Entra ID, follow the steps in Register an application in Microsoft Entra ID.
Note
If you register your application as a native application, you can specify any valid URI for the redirect URI. For native applications, this value doesn't have to be a real URL. For web applications, the redirect URI must be a valid URI, because it specifies the URL to which tokens are provided.
After you register your application, Application (client) ID and Directory (tenant) ID appear under Settings. Make note of these values. You'll need them to run the application.
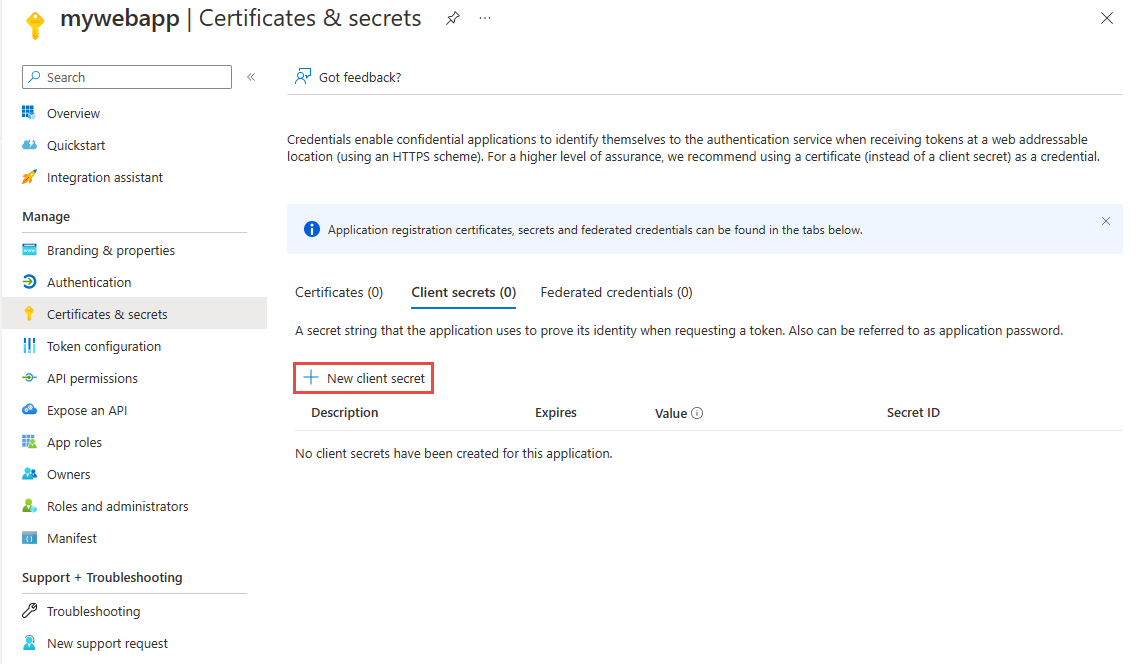
Create a client secret
The application needs a client secret to prove its identity when requesting a token. To add the client secret, follow these steps:
In the Azure portal, go to your app registration if you aren't already on the page.
On the left menu, select Certificates & secrets.
Under Client secrets, select New client secret to create a new secret.
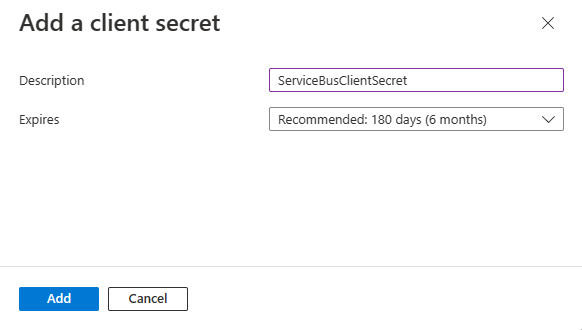
Provide a description for the secret, choose the expiration interval, and then select Add.
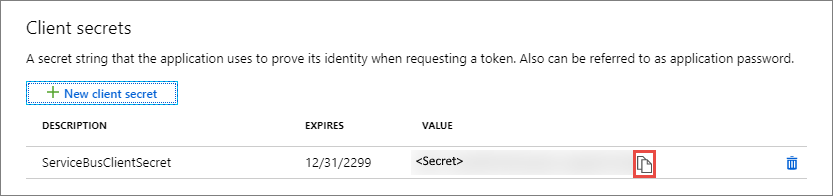
Immediately copy the value of the new secret to a secure location. The full value appears only once.
Add permissions for the Service Bus API
If your application is a console application, you must register a native application and add API permissions for Microsoft.ServiceBus to the set of required permissions.
Native applications also need a redirect URI in Microsoft Entra ID, which serves as an identifier. The URI doesn't need to be a network destination. Use https://servicebus.microsoft.com for this example, because the sample code already uses that URI.
Assignment of Azure roles via the Azure portal
Assign one of the Service Bus roles to the application's service principal at the desired scope (entity, Service Bus namespace, resource group, or Azure subscription). For detailed steps, see Assign Azure roles using the Azure portal.
After you define the role and its scope, you can test this behavior with the sample on GitHub.
Authentication of the Service Bus client
After you register your application and grant it permissions to send/receive data in Azure Service Bus, you can authenticate your client with the client secret credential. This authentication enables you to make requests against Azure Service Bus.
For a list of scenarios for which acquiring tokens is supported, see the Scenarios section of the Microsoft Authentication Library (MSAL) for .NET GitHub repository.
By using the latest Azure.Messaging.ServiceBus library, you can authenticate ServiceBusClient with ClientSecretCredential, which is defined in the Azure.Identity library.
TokenCredential credential = new ClientSecretCredential("<tenant_id>", "<client_id>", "<client_secret>");
var client = new ServiceBusClient("<fully_qualified_namespace>", credential);
If you're using the older .NET packages, see the Azure RBAC samples for Service Bus on GitHub.
Related content
To learn more about Azure RBAC, see What is Azure role-based access control (Azure RBAC)?.
To learn how to assign and manage Azure role assignments by using Azure PowerShell, the Azure CLI, or the REST API, see these articles:
To learn more about Service Bus messaging, see these articles: