Note
Access to this page requires authorization. You can try signing in or changing directories.
Access to this page requires authorization. You can try changing directories.
This quickstart shows you how to create a Service Bus namespace and a queue using the Azure CLI. It also shows you how to get authorization credentials that a client application can use to send/receive messages to/from the queue.
What are Service Bus queues?
Service Bus queues support a brokered messaging communication model. When you use queues, components of a distributed application don't communicate directly with each other; instead they exchange messages via a queue, which acts as an intermediary (broker). A message producer (sender) hands off a message to the queue and then continues its processing. Asynchronously, a message consumer (receiver) pulls the message from the queue and processes it. The producer doesn't have to wait for a reply from the consumer in order to continue to process and send further messages. Queues offer First In, First Out (FIFO) message delivery to one or more competing consumers. That is, messages are typically received and processed by the receivers in the order in which they were added to the queue, and each message is received and processed by only one message consumer.
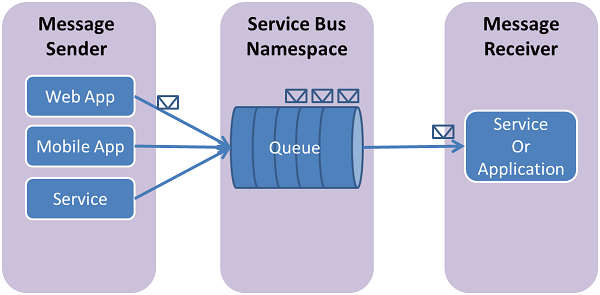
Service Bus queues are a general-purpose technology that can be used for a wide variety of scenarios:
- Communication between web and worker roles in a multi-tier Azure application.
- Communication between on-premises apps and Azure-hosted apps in a hybrid solution.
- Communication between components of a distributed application running on-premises in different organizations or departments of an organization.
Using queues enables you to scale your applications more easily, and enable more resiliency to your architecture.
Prerequisites
If you don't have an Azure subscription, you can create a free account before you begin.
In this quickstart, you use Azure Cloud Shell that you can launch after signing in to the Azure portal. For details about Azure Cloud Shell, see Overview of Azure Cloud Shell. You can also install and use Azure PowerShell on your machine.
Provision resources
Sign in to the Azure portal.
Launch Azure Cloud Shell by selecting the icon shown in the following image. Switch to Bash mode if the Cloud Shell is in PowerShell mode.

Run the following command to create an Azure resource group. Update the resource group name and the location if you want.
az group create --name ContosoRG --location eastusRun the following command to create a Service Bus messaging namespace.
az servicebus namespace create --resource-group ContosoRG --name ContosoSBusNS --location eastusRun the following command to create a queue in the namespace you created in the previous step. In this example,
ContosoRGis the resource group you created in the previous step.ContosoSBusNSis the name of the Service Bus namespace created in that resource group.az servicebus queue create --resource-group ContosoRG --namespace-name ContosoSBusNS --name ContosoOrdersQueueRun the following command to get the primary connection string for the namespace. You use this connection string to connect to the queue and send and receive messages.
az servicebus namespace authorization-rule keys list --resource-group ContosoRG --namespace-name ContosoSBusNS --name RootManageSharedAccessKey --query primaryConnectionString --output tsvNote down the connection string and the queue name. You use them to send and receive messages.
Next steps
In this article, you created a Service Bus namespace and a queue in the namespace. To learn how to send/receive messages to/from the queue, see one of the following quickstarts in the Send and receive messages section.