Introduction to Autoscaling on Service Fabric managed clusters
Autoscaling gives great elasticity and enables addition or reduction of nodes on demand on a secondary node type. This automated and elastic behavior reduces the management overhead and potential business impact by monitoring and optimizing the number of nodes servicing your workload. You configure rules for your workload and let autoscaling handle the rest. When those defined thresholds are met, autoscale rules take action to adjust the capacity of your node type. Autoscaling can be enabled, disabled, or configured at any time. This article provides an example deployment, how to enable or disable autoscaling, and how to configure an example autoscale policy.
Requirements and supported metrics:
- The Service Fabric managed cluster resource apiVersion should be 2022-01-01 or later.
- The cluster SKU must be Standard.
- Can only be configured on a secondary node type in your cluster.
- After enabling autoscale for a node type, configure
vmInstanceCountproperty to-1when redeploying the resource. - Only Azure Monitor published metrics are supported.
Note
If using Windows OS image with Hyper-V role enabled, ie. the VM will be configured for nested virtualization, the Available Memory Metric will not be available, since the dynamic memory driver within the VM will be in a stopped state.
A common scenario where autoscaling is useful is when the load on a particular service varies over time. For example, a service such as a gateway can scale based on the amount of resources necessary to handle incoming requests. Let's take a look at an example of what those scaling rules could look like and we'll use them later in the article:
- If all instances of my gateway are using more than 70% on average, then scale the gateway service out by adding two more instances. Do this every 30 minutes, but never have more than twenty instances in total.
- If all instances of my gateway are using less than 40% cores on average, then scale the service in by removing one instance. Do this every 30 minutes, but never have fewer than three instances in total.
Example autoscale deployment
This example will walk through:
- Creating a Standard SKU Service Fabric managed cluster with two node types,
NT1andNT2by default. - Adding autoscale rules to the secondary node type,
NT2.
Note
Autoscale of the node type is done based on the managed cluster VMSS CPU host metrics. VMSS resource is autoresolved in the template.
The following will take you step by step through setup of a cluster with autoscale configured.
Create resource group in a region
Login-AzAccount
Select-AzSubscription -SubscriptionId $subscriptionid
New-AzResourceGroup -Name $myresourcegroup -Location $location
Create cluster resource
Download this sample Standard SKU Service Fabric managed cluster sample Execute this command to deploy the cluster resource:
$parameters = @{
clusterName = $clusterName
adminPassword = $VmAdminPassword
clientCertificateThumbprint = $clientCertificateThumbprint
}
New-AzResourceGroupDeployment -Name "deploy_cluster" -ResourceGroupName $resourceGroupName -TemplateFile .\azuredeploy.json -TemplateParameterObject $parameters -Verbose
Configure and enable autoscale rules on a secondary node type
Download the managed cluster autoscale sample template that you will use to configure autoscaling with the following commands:
$parameters = @{
clusterName = $clusterName
}
New-AzResourceGroupDeployment -Name "deploy_autoscale" -ResourceGroupName $resourceGroupName -TemplateFile .\sfmc-deploy-autoscale.json -TemplateParameterObject $parameters -Verbose
Note
After this deployment completes, future cluster resource deployments should set the vmInstanceCount property to -1 on secondary node types that have autoscale rules enabled. This will make sure cluster deployments do not conflict with autoscale.
Enable or disable autoscaling on a secondary node type
Node types deployed by Service Fabric managed cluster do not enable autoscaling by default. Autoscaling can be enabled or disabled at any time, per node type, that are configured and available.
To enable this feature, configure the enabled property under the type Microsoft.Insights/autoscaleSettings in an ARM Template as shown below:
    "resources": [
            {
            "type": "Microsoft.Insights/autoscaleSettings",
            "apiVersion": "2015-04-01",
            "name": "[concat(parameters('clusterName'), '-', parameters('nodeType2Name'))]",
            "location": "[resourceGroup().location]",
            "properties": {
                "name": "[concat(parameters('clusterName'), '-', parameters('nodeType2Name'))]",
                "targetResourceUri": "[concat('/subscriptions/', subscription().subscriptionId, '/resourceGroups/',  resourceGroup().name, '/providers/Microsoft.ServiceFabric/managedclusters/', parameters('clusterName'), '/nodetypes/', parameters('nodeType2Name'))]",
                "enabled": true,
            ...
To disable autoscaling, set the value to false
Delete autoscaling rules
To delete any autoscaling policies setup for a node type you can run the following PowerShell command.
Remove-AzResource -ResourceId "/subscriptions/$subscriptionId/resourceGroups/$resourceGroup/providers/microsoft.insights/autoscalesettings/$name" -Force
Set policies for autoscaling
A Service Fabric managed cluster does not configure any policies for autoscaling by default. Autoscaling policies must be configured for any scaling actions to occur on the underlying resources.
The following example will set a policy for nodeType2Name to be at least 3 nodes, but allow scaling up to 20 nodes. It will trigger scaling up when average CPU usage is 70% over the last 30 minutes with 1 minute granularity. It will trigger scaling down once average CPU usage is under 40% for the last 30 minutes with 1 minute granularity.
    "resources": [
            {
            "type": "Microsoft.Insights/autoscaleSettings",
            "apiVersion": "2015-04-01",
            "name": "[concat(parameters('clusterName'), '-', parameters('nodeType2Name'))]",
            "location": "[resourceGroup().location]",
            "properties": {
                "name": "[concat(parameters('clusterName'), '-', parameters('nodeType2Name'))]",
                "targetResourceUri": "[concat('/subscriptions/', subscription().subscriptionId, '/resourceGroups/',  resourceGroup().name, '/providers/Microsoft.ServiceFabric/managedclusters/', parameters('clusterName'), '/nodetypes/', parameters('nodeType2Name'))]",
                "enabled": "[parameters('enableAutoScale')]",
                "profiles": [
                    {
                        "name": "Autoscale by percentage based on CPU usage",
                        "capacity": {
                            "minimum": "3",
                            "maximum": "20",
                            "default": "3"
                        },
                        "rules": [
                            {
                                "metricTrigger": {
                                  "metricName": "Percentage CPU",
                                  "metricNamespace": "",
                                  "metricResourceUri": "[concat('/subscriptions/',subscription().subscriptionId,'/resourceGroups/SFC_', reference(resourceId('Microsoft.ServiceFabric/managedClusters', parameters('clusterName')), '2022-01-01').clusterId,'/providers/Microsoft.Compute/virtualMachineScaleSets/',parameters('nodeType2Name'))]",
                                  "timeGrain": "PT1M",
                                  "statistic": "Average",
                                  "timeWindow": "PT30M",
                                  "timeAggregation": "Average",
                                  "operator": "GreaterThan",
                                  "threshold": 70
                                },
                                "scaleAction": {
                                  "direction": "Increase",
                                  "type": "ChangeCount",
                                  "value": "5",
                                  "cooldown": "PT5M"
                                }
                            },
                            {
                                "metricTrigger": {
                                  "metricName": "Percentage CPU",
                                  "metricNamespace": "",
                                  "metricResourceUri": "[concat('/subscriptions/',subscription().subscriptionId,'/resourceGroups/SFC_', reference(resourceId('Microsoft.ServiceFabric/managedClusters', parameters('clusterName')), '2022-01-01').clusterId,'/providers/Microsoft.Compute/virtualMachineScaleSets/',parameters('nodeType2Name'))]",
                                  "timeGrain": "PT1M",
                                  "statistic": "Average",
                                  "timeWindow": "PT30M",
                                  "timeAggregation": "Average",
                                  "operator": "LessThan",
                                  "threshold": 40
                                },
                                "scaleAction": {
                                  "direction": "Decrease",
                                  "type": "ChangeCount",
                                  "value": "1",
                                  "cooldown": "PT5M"
                                }
                            }
                            ]
                    }
                    ]
                }
            }

    ]
You can download this ARM Template to enable autoscale which contains the above example
View configured autoscale definitions of your managed cluster resource
You can view configured autoscale settings by using Azure Resource Explorer.
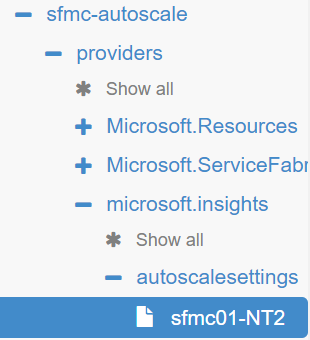
Go to Azure Resource Explorer
Navigate to
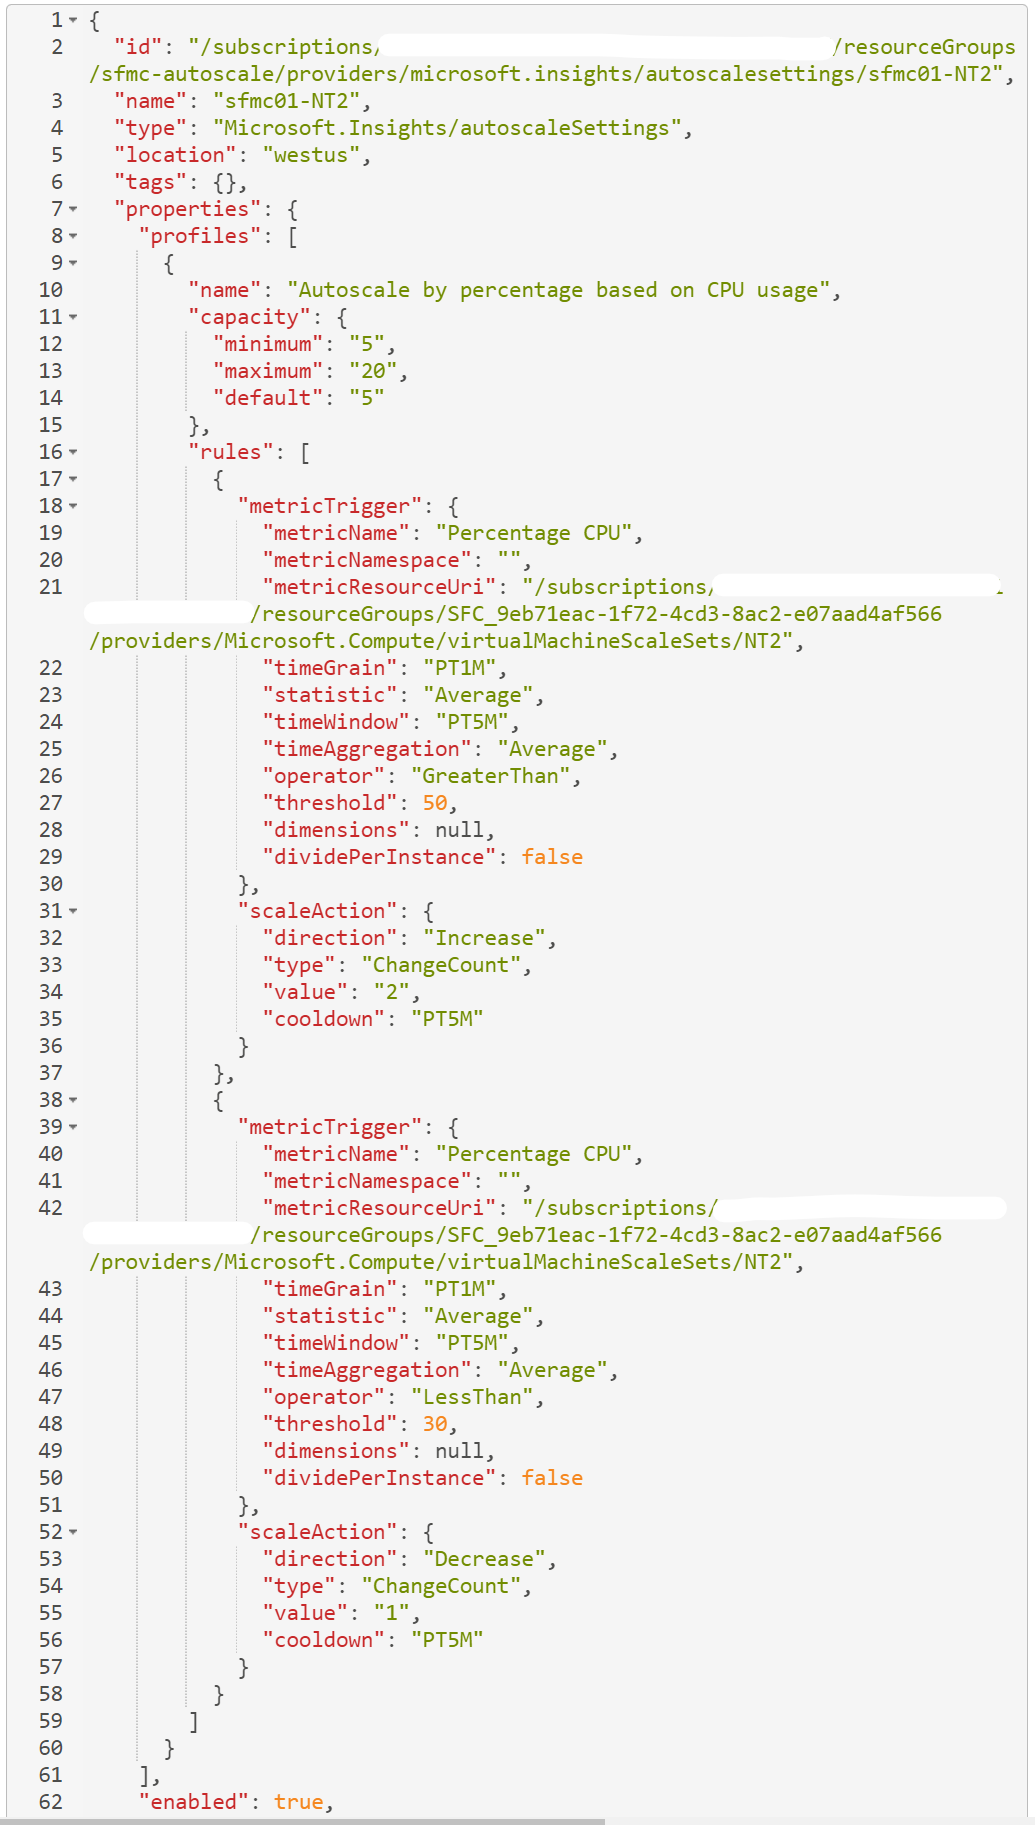
subscriptions->SubscriptionName->resource group->microsoft.insights->autoscalesettings-> Autoscale policy name: e.g.sfmc01-NT2.You'll see something similar to this on the navigation tree:
On the right-hand side, you can view the full definition of this autoscale setting.
In this example, autoscale is configured with a CPU% based scale-out and scale-in rule.
Troubleshooting
Some things to consider:
Review autoscale events that are being triggered against managed clusters secondary node types
- Go to the cluster Activity log
- Review activity log for Autoscale scale up/down completed operation
How many VMs are configured for the node type and is the workload occurring on all of them or just some?
Are your scale-in and scale-out thresholds sufficiently different?
Suppose you set a rule to scale out when average CPU is greater than 50% over five minutes, and to scale in when average CPU is less than 50%. This setting would cause a "flapping" problem when CPU usage is close to the threshold, with scale actions constantly increasing and decreasing the size of the set. Because of this setting, the autoscale service tries to prevent "flapping", which can manifest as not scaling. Therefore, be sure your scale-out and scale-in thresholds are sufficiently different to allow some space in between scaling.
Can you scale in or out a node type? Adjust the count of nodes at the node type level and make sure it completes successfully. How to scale a node type on a managed cluster
Check your Microsoft.ServiceFabric/managedclusters/nodetypes, and Microsoft.Insights resources in the Azure Resource Explorer
The Azure Resource Explorer is an indispensable troubleshooting tool that shows you the state of your Azure Resource Manager resources. Click on your subscription and look at the Resource Group you are troubleshooting. Under the
ServiceFabric/managedclusters/clusternameresource provider, look underNodeTypesfor node types you created and check properties to validateprovisioningStateisSucceeded. Then, go into the Microsoft.Insights resource provider underclusternameand check that the autoscale rules look right.Are your emitted metric values as expected? Use the
Get-AzMetricPowerShell module to get the metric values of a resource and review
Once you've been through these steps, if you're still having autoscale problems, you can try the following resources: Log a support request. Be prepared to share the template and a view of your performance data.
Next steps
Feedback
Coming soon: Throughout 2024 we will be phasing out GitHub Issues as the feedback mechanism for content and replacing it with a new feedback system. For more information see: https://aka.ms/ContentUserFeedback.
Submit and view feedback for