Tutorial: Package and deploy containers as a Service Fabric application using Yeoman
Article
This tutorial is part two in a series. In this tutorial, a template generator tool (Yeoman) is used to generate a Service Fabric application definition. This application can then be used to deploy containers to Service Fabric. In this tutorial you learn how to:
Install Yeoman
Create an application package using Yeoman
Configure settings in the application package for use with containers
Build the application
Deploy and run the application
Clean up the application
Prerequisites
The container images pushed to Azure Container Registry created in Part 1 of this tutorial series are used.
Service fabric provides scaffolding tools to help create applications from terminal using Yeoman template generator. Follow the steps below to ensure you have the Yeoman template generator.
Install nodejs and Node Package Manager on your machine. If you use macOS X, you'll have to use the package manager Homebrew.
Install Yeoman template generator on your machine from Node Package Manager:
Bash
npm install -g yo
Install the Service Fabric Yeoman container generator
Bash
npm install -g generator-azuresfcontainer
Package a Docker image container with Yeoman
To create a Service Fabric container application, in the 'container-tutorial' directory of the cloned repository, run the following command.
Bash
yo azuresfcontainer
Please type in "TestContainer" to name your application
Please type in "azurevotefront" to name your application service.
Provide the container image path in ACR for the frontend repo - for example '<acrName>.azurecr.io/azure-vote-front:v1'. The <acrName> field must be the same as the value that was used in the previous tutorial.
Press Enter to leave the Commands section empty.
Specify an instance count of 1.
The following shows the input and output of running the yo command:
Bash
? Name your application TestContainer
? Name of the application service: azurevotefront
? Input the Image Name: <acrName>.azurecr.io/azure-vote-front:v1
? Commands:
? Number of instances of guest container application: 1
   create TestContainer/TestContainer/ApplicationManifest.xml
   create TestContainer/TestContainer/azurevotefrontPkg/ServiceManifest.xml
   create TestContainer/TestContainer/azurevotefrontPkg/config/Settings.xml
   create TestContainer/TestContainer/azurevotefrontPkg/code/Dummy.txt
   create TestContainer/install.sh
   create TestContainer/uninstall.sh
To add another container service to an application already created using Yeoman, perform the following steps:
Change directory one level to the TestContainer directory, for example, ./TestContainer
Run yo azuresfcontainer:AddService
Name the service 'azurevoteback'
Provide the container image path for Redis - 'redis:alpine'
Press Enter to leave the Commands section empty
Specify an instance count of "1".
The entries for adding the service used are all shown:
Bash
? Name of the application service: azurevoteback
? Input the Image Name: redis:alpine
? Commands:
? Number of instances of guest container application: 1
   create TestContainer/azurevotebackPkg/ServiceManifest.xml
   create TestContainer/azurevotebackPkg/config/Settings.xml
   create TestContainer/azurevotebackPkg/code/Dummy.txt
For the remainder of this tutorial, we are working in the TestContainer directory. For example, ./TestContainer/TestContainer. The contents of this directory should be as follows.
Bash
$ ls
ApplicationManifest.xml azurevotefrontPkg azurevotebackPkg
Configure the application manifest with credentials for Azure Container Registry
For Service Fabric to pull the container images from Azure Container Registry, we need to provide the credentials in the ApplicationManifest.xml.
Sign in to your ACR instance. Use the az acr login command to complete the operation. Provide the unique name given to the container registry when it was created.
Azure CLI
az acr login --name<acrName>
The command returns a Login Succeeded message once completed.
Next, run the following command to get the password of your container registry. This password is used by Service Fabric to authenticate with ACR to pull the container images.
Azure CLI
az acr credential show -n<acrName>--querypasswords[0].value
In the ApplicationManifest.xml, add the code snippet under the ServiceManifestImport element for the front end service. Insert your acrName for the AccountName field and the password returned from the previous command is used for the Password field. A full ApplicationManifest.xml is provided at the end of this document.
Configure communication and container port-to-host port mapping
Configure communication port
Configure an HTTP endpoint so clients can communicate with your service. Open the ./TestContainer/azurevotefrontPkg/ServiceManifest.xml file and declare an endpoint resource in the ServiceManifest element. Add the protocol, port, and name. For this tutorial, the service listens on port 80. The following snippet is placed under the ServiceManifest tag in the resource.
XML
<Resources><Endpoints><!-- This endpoint is used by the communication listener to obtain the port on which to
listen. Please note that if your service is partitioned, this port is shared with
replicas of different partitions that are placed in your code. --><EndpointName="azurevotefrontTypeEndpoint"UriScheme="http"Port="80"Protocol="http"/></Endpoints></Resources>
Similarly, modify the Service Manifest for the backend service. Open the ./TestContainer/azurevotebackPkg/ServiceManifest.xml and declare an endpoint resource in the ServiceManifest element. For this tutorial, the redis default of 6379 is maintained. The following snippet is placed under the ServiceManifest tag in the resource.
XML
<Resources><Endpoints><!-- This endpoint is used by the communication listener to obtain the port on which to
listen. Please note that if your service is partitioned, this port is shared with
replicas of different partitions that are placed in your code. --><EndpointName="azurevotebackTypeEndpoint"Port="6379"Protocol="tcp"/></Endpoints></Resources>
Providing the UriSchemeautomatically registers the container endpoint with the Service Fabric Naming service for discoverability. A full ServiceManifest.xml example file for the backend service is provided at the end of this article as an example.
Map container ports to a service
In order to expose the containers in the cluster, we also need to create a port binding in the 'ApplicationManifest.xml'. The PortBinding policy references the Endpoints we defined in the ServiceManifest.xml files. Incoming requests to these endpoints get mapped to the container ports that are opened and bounded here. In the ApplicationManifest.xml file, add the following code to bind port 80 and 6379 to the endpoints. A full ApplicationManifest.xml is available at the end of this document.
For Service Fabric to assign this DNS name to the backend service, the name needs to be specified in the ApplicationManifest.xml. Add the ServiceDnsName attribute to the Service element as shown:
The frontend service reads an environment variable to know the DNS name of the Redis instance. This environment variable is already defined in the Dockerfile that was used to generate the Docker image and no action needs to be taken here.
Dockerfile
ENV REDIS redisbackend.testapp
The following code snippet illustrates how the front-end Python code picks up the environment variable described in the Dockerfile. No action needs to be taken here.
Python
# Get DNS Name
redis_server = os.environ['REDIS']

# Connect to the Redis store
r = redis.StrictRedis(host=redis_server, port=6379, db=0)
At this point in the tutorial, the template for a Service Package application is available for deployment to a cluster. In the subsequent tutorial, this application is deployed and ran in a Service Fabric cluster.
Create a Service Fabric cluster
To deploy the application to Azure, you need a Service Fabric cluster to run the application. The following commands create a five-node cluster in Azure. The commands also create a self-signed certificate, adds it to a key vault, and downloads the certificate locally as a PEM file. The new certificate is used to secure the cluster when it deploys and is used to authenticate clients.
Azure CLI
#!/bin/bash# Variables
ResourceGroupName="containertestcluster"
ClusterName="containertestcluster"
Location="eastus"
Password="q6D7nN%6ck@6"
Subject="containertestcluster.eastus.cloudapp.azure.com"
VaultName="containertestvault"
VmPassword="Mypa$$word!321"
VmUserName="sfadminuser"# Login to Azure and set the subscriptionaz loginaz account set --subscription<mySubscriptionID># Create resource groupaz group create --name$ResourceGroupName--location$Location# Create secure five node Linux cluster. Creates a key vault in a resource group# and creates a certficate in the key vault. The certificate's subject name must match # the domain that you use to access the Service Fabric cluster. # The certificate is downloaded locally as a PEM file.az sf cluster create --resource-group$ResourceGroupName--location$Location \
--certificate-output-folder . --certificate-password$Password--certificate-subject-name$Subject \
--cluster-name$ClusterName--cluster-size5--os UbuntuServer1804 --vault-name$VaultName \
--vault-resource-group$ResourceGroupName--vm-password$VmPassword--vm-user-name$VmUserName
Note
The web front end service is configured to listen on port 80 for incoming traffic. By default, port 80 is open on your cluster VMs and the Azure load balancer.
You can deploy the application the Azure cluster using the Service Fabric CLI. If Service Fabric CLI is not installed on your machine, follow instructions here to install it.
Connect to the Service Fabric cluster in Azure. Replace the sample endpoint with your own. The endpoint must be a full URL similar to the one below. The PEM file is the self-signed certificate that was previously created.
Use the install script provided in the TestContainer directory to copy the application package to the cluster's image store, register the application type, and create an instance of the application.
Bash
./install.sh
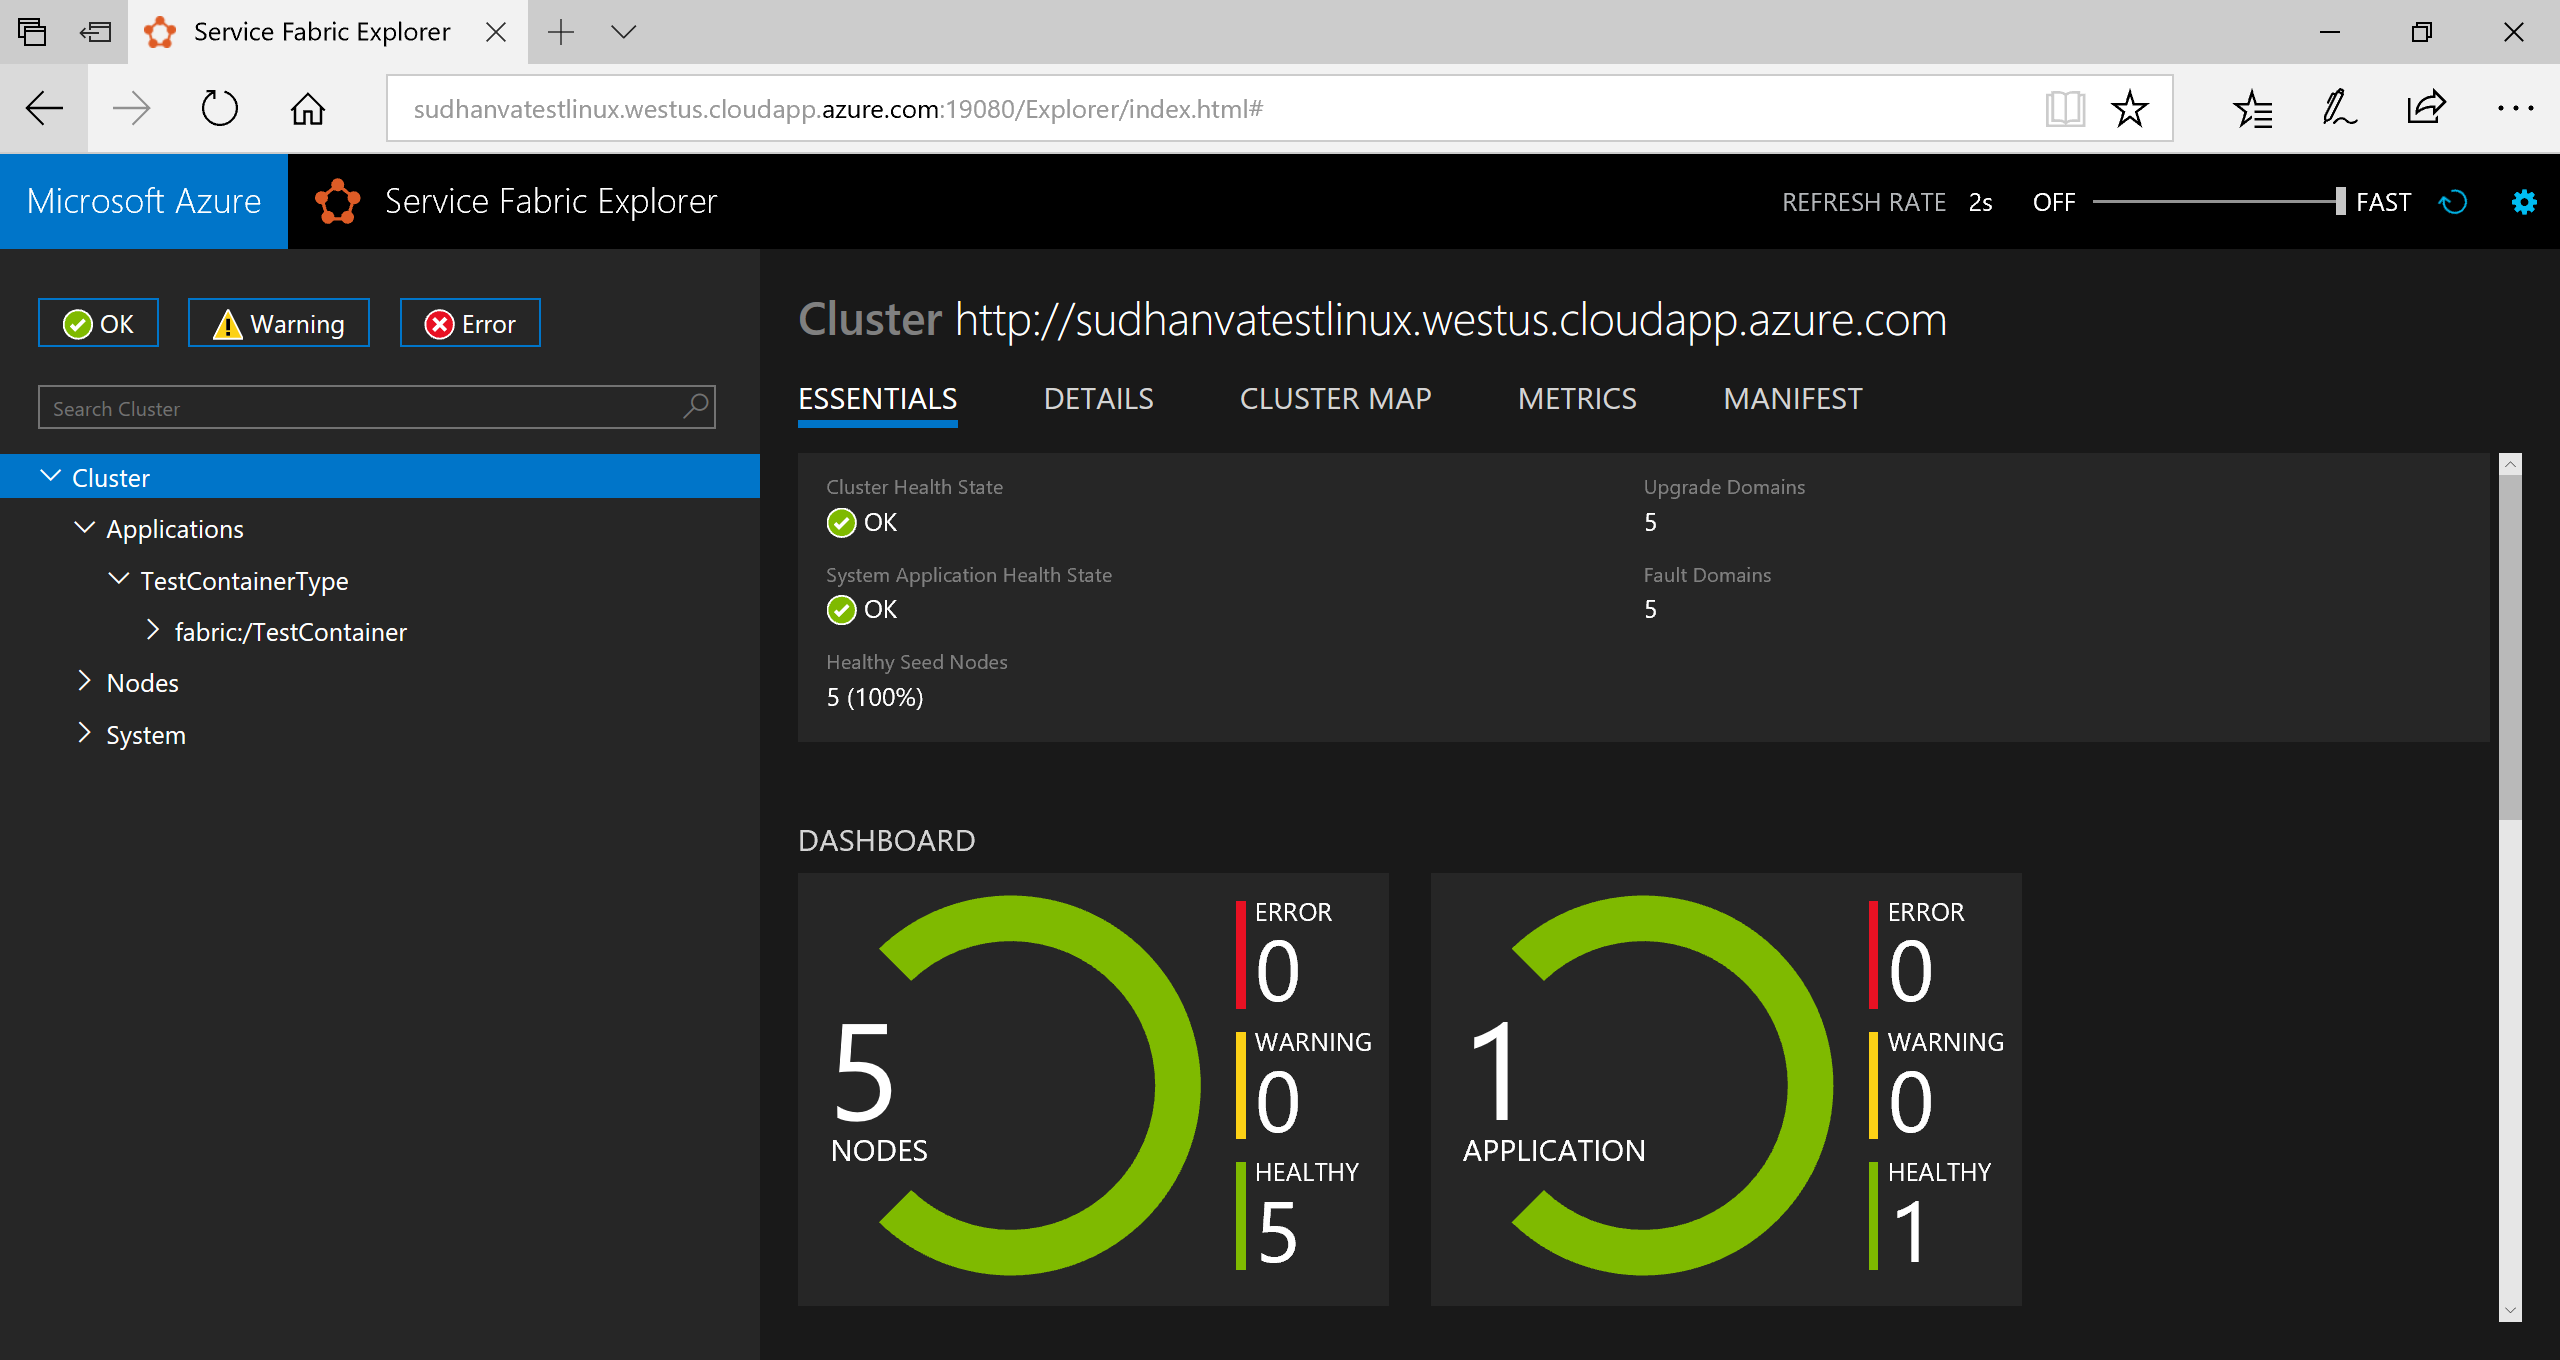
Open a browser and navigate to Service Fabric Explorer at https://containertestcluster.eastus.cloudapp.azure.com:19080/Explorer. Expand the Applications node and note that there is an entry for your application type and another for the instance.
In order to connect to the running application, open a web browser and go to the cluster url - for example http://containertestcluster.eastus.cloudapp.azure.com:80. You should see the Voting application in the web UI.
Clean up
Use the uninstall script provided in the template to delete the application instance from the cluster and unregister the application type. This command takes some time to clean up the instance and the 'install.sh' command cannot be run immediately after this script.
<?xml version="1.0" encoding="utf-8"?><ServiceManifestName="azurevotefrontPkg"Version="1.0.0"xmlns="http://schemas.microsoft.com/2011/01/fabric"xmlns:xsd="https://www.w3.org/2001/XMLSchema"xmlns:xsi="https://www.w3.org/2001/XMLSchema-instance" ><ServiceTypes><StatelessServiceTypeServiceTypeName="azurevotefrontType"UseImplicitHost="true"></StatelessServiceType></ServiceTypes><CodePackageName="code"Version="1.0.0"><EntryPoint><ContainerHost><ImageName>acrName.azurecr.io/azure-vote-front:v1</ImageName><Commands></Commands></ContainerHost></EntryPoint><EnvironmentVariables></EnvironmentVariables></CodePackage><Resources><Endpoints><!-- This endpoint is used by the communication listener to obtain the port on which to
listen. Please note that if your service is partitioned, this port is shared with
replicas of different partitions that are placed in your code. --><EndpointName="azurevotefrontTypeEndpoint"UriScheme="http"Port="80"Protocol="http"/></Endpoints></Resources></ServiceManifest>
Redis ServiceManifest.xml
XML
<?xml version="1.0" encoding="utf-8"?><ServiceManifestName="azurevotebackPkg"Version="1.0.0"xmlns="http://schemas.microsoft.com/2011/01/fabric"xmlns:xsd="https://www.w3.org/2001/XMLSchema"xmlns:xsi="https://www.w3.org/2001/XMLSchema-instance" ><ServiceTypes><StatelessServiceTypeServiceTypeName="azurevotebackType"UseImplicitHost="true"></StatelessServiceType></ServiceTypes><CodePackageName="code"Version="1.0.0"><EntryPoint><ContainerHost><Commands></Commands></ContainerHost></EntryPoint><EnvironmentVariables></EnvironmentVariables></CodePackage><Resources><Endpoints><!-- This endpoint is used by the communication listener to obtain the port on which to
listen. Please note that if your service is partitioned, this port is shared with
replicas of different partitions that are placed in your code. --><EndpointName="azurevotebackTypeEndpoint"Port="6379"Protocol="tcp"/></Endpoints></Resources></ServiceManifest>
Next steps
In this tutorial, multiple containers were packaged into a Service Fabric application using Yeoman. This application was then deployed and run on a Service Fabric cluster. The following steps were completed:
Install Yeoman
Create an application package using Yeoman
Configure settings in the application package for use with containers
Build the application
Deploy and run the application
Clean up the application
Advance to the next tutorial to learn about failover and scaling of the application in Service Fabric.
This module guides users through creating, configuring, and managing Container Apps and their environments. It also explores ingress options, scaling, instance management, and security considerations with best practices for configuring Azure Container Apps.