Note
Access to this page requires authorization. You can try signing in or changing directories.
Access to this page requires authorization. You can try changing directories.
Azure Site Recovery supports churn (data change rate) up to 100 MB/s per virtual machine. You'll be able to protect your Azure virtual machines having high churning workloads (like databases) using the High Churn option in Azure Site Recovery, which supports churn up to 100 MB/s per virtual machine. You may be able to achieve better Recovery Point Objective performance for your high churning workloads. With the default Normal Churn option, you can support churn only up to 54 MB/s per virtual machine.
Note
Support beyond 100 MB/s is now in Preview, allowing data change up to 500 MB/s per VM in selected regions. Learn more.
Limitations
- Available only for disaster recovery of Azure virtual machines.
- Virtual machine SKUs with RAM of min 32 GB are recommended.
- Source disks must be Managed Disks.
Note
This feature is available in all regions where Azure Site Recovery is supported and Premium Blob storage accounts are available. When using High Churn with any other regions outside the supported regions, replication and/or reprotection may fail.
Data change limits
- These limits are based on our tests and don't cover all possible application I/O combinations.
- Actual results may vary based on your app I/O mix.
- There are two limits to consider:
- per disk data, churn
- per virtual machine data churn.
- Limit per virtual machine data churn - 100 MB/s.
The following table summarizes Site Recovery limits:
| Replica Disk type | Avg I/O Size | Avg Churn Supported |
|---|---|---|
| Standard | 8 KB | 2 MB/s |
| Standard | 16 KB | 4 MB/s |
| Standard | 24 KB | 6 MB/s |
| Standard | 32 KB and later | 8 MB/s |
| Premium SSD with disk size 128 GiB or more | 8 KB | 10 MB/s |
| Premium SSD with disk size 128 GiB or more | 16 KB | 20 MB/s |
| Premium SSD with disk size 128 GiB or more | 24 KB and later | 30 MB/s |
| Premium SSD with disk size 512 GiB or more | 8 KB | 10 MB/s |
| Premium SSD with disk size 512 GiB or more | 16 KB | 20 MB/s |
| Premium SSD with disk size 512 GiB or more | 24 KB and later | 30 MB/s |
| Premium SSD with disk size 1TiB or more | 8 KB | 20 MB/s |
| Premium SSD with disk size 1TiB or more | 16 KB | 35 MB/s |
| Premium SSD with disk size 1TiB or more | 24 KB and later | 50 MB/s |
Enable High Churn support
From Recovery Service Vault
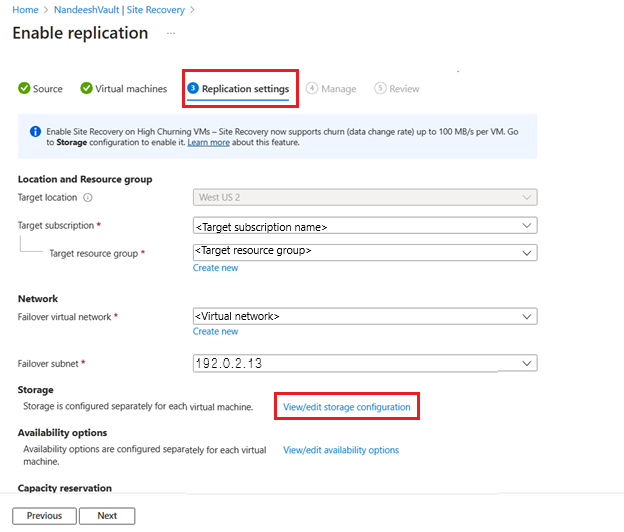
Select source virtual machines on which you want to enable replication. To enable replication, follow the steps here.
Under Replication Settings > Storage, select View/edit storage configuration. The Customize target settings page opens.
Under Churn for the VM, there are two options:
Normal Churn (this is the default option) - You can get up to 54 MB/s per virtual machine. Select Normal Churn to use Standard storage accounts only for Cache Storage. Hence, Cache storage dropdown lists only Standard storage accounts.
High Churn - You can get up to 100 MB/s per virtual machine. Select High Churn to use Premium Block Blob storage accounts only for Cache Storage. Hence, Cache storage dropdown lists only Premium Block blob storage accounts.

Select High Churn from the dropdown option.
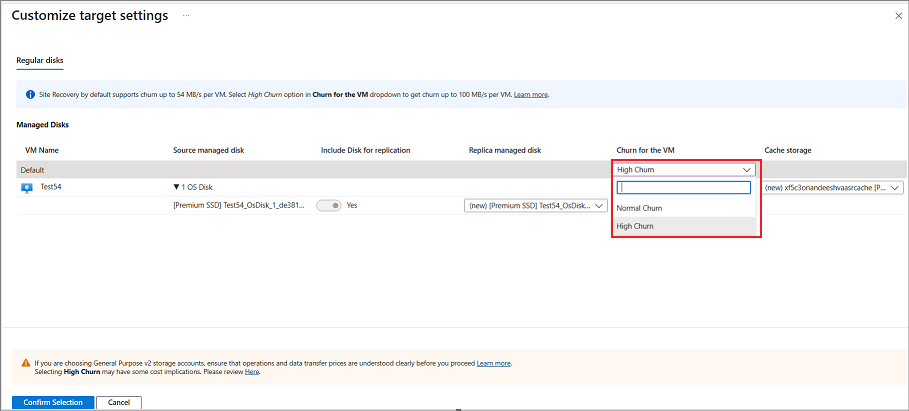
If you select multiple source virtual machines to configure Site Recovery and want to enable High Churn for all these virtual machines, select High Churn at the top level.
After you select High Churn for the virtual machine, you'll see Premium Block Blob options only available for cache storage account. Select cache storage account and then select Confirm Selection.

Configure other settings and enable the replication.

From Azure virtual machine screen
In the portal, go to Virtual machines and select the virtual machine.
On the left pane, under Operations, select Disaster recovery.
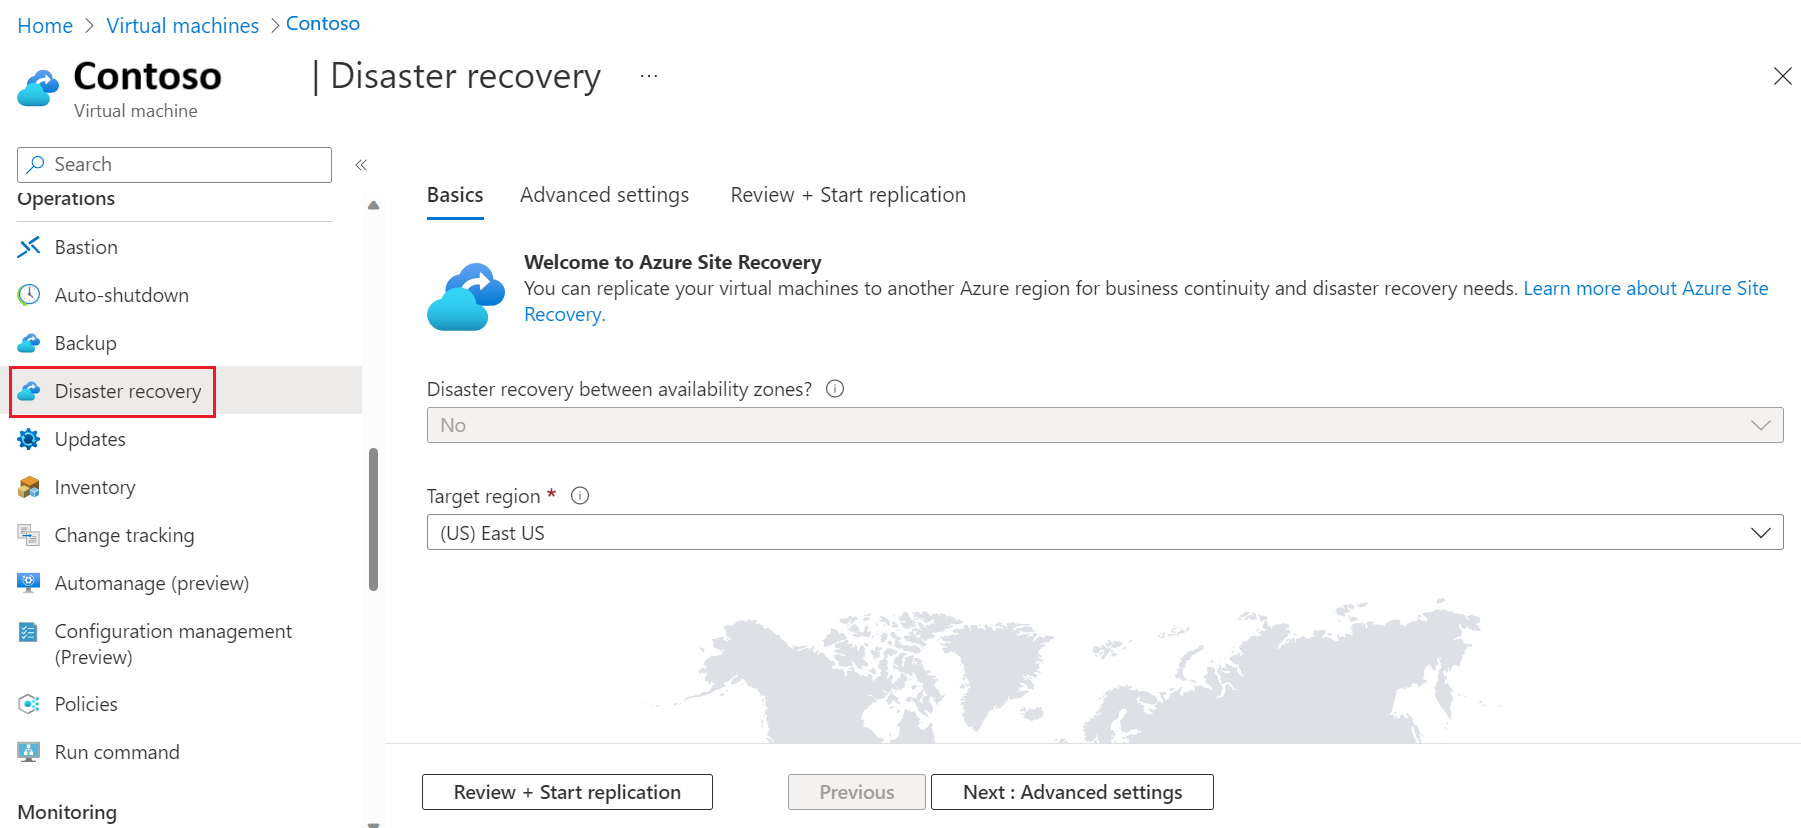
Under Basics, select the Target region and then select Next: Advanced settings.
Under Advanced settings, select Subscription, VM resource group, Virtual network, Availability, and Proximity placement group as required.
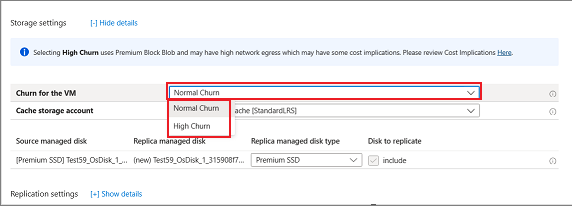
Under Advanced settings > Storage settings, select [+] Show details.
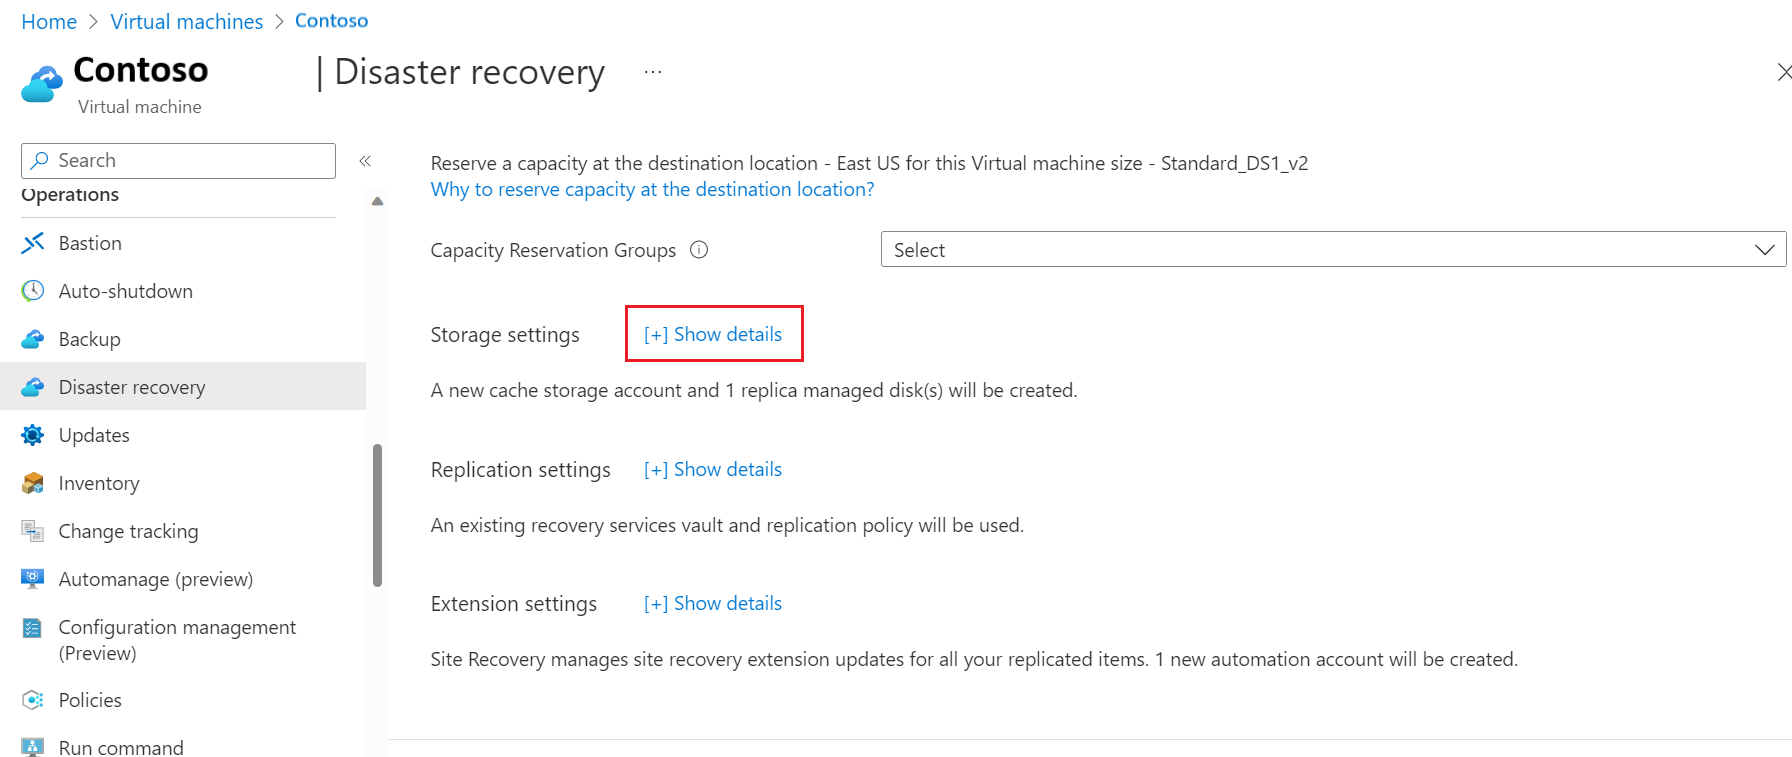
Under Storage settings > Churn for the VM, select High Churn. You are able to use Premium Block Blob type of storage accounts only for cache storage.
Select Next: Review + Start replication.
Note
- You can only enable High Churn only when you enable replication while configuring Azure Site Recovery on a virtual machine.
- If you want to enable High Churn support for virtual machines already protected by Azure Site Recovery, disable replication for those virtual machines and select High Churn while enabling replication again. Similarly, disable and enable replication again to switch back to Normal Churn.
Cost implications
- High Churn uses Premium Block Blob storage accounts, which may have higher cost implications as compared to Normal Churn which uses Standard storage accounts. For more information, see pricing.
- For High churn virtual machines, more data changes may get replicated to target for High churn compared to Normal churn. This may lead to more network cost.
Enhanced Churn support up to 500 MB/s per VM (preview)
Enhanced Churn Support: With Azure Site Recovery, you can now protect workloads with churn (data change) rates up to 250 MB/s per disk and up to 500 MB/s per VM. This allows increased flexibility, makes it easier to run high throughput, demanding workloads while ensuring their protection.
Configuration: Follows the same process used to select the existing High Churn configuration. If your churn exceeds 100 MB/s, Azure Site Recovery can support it through this preview, provided it stays within 500 MB/s per VM. Premium Block Blob storage account is used for cache storage account.
Updated Disk performance limits: Based on the disk size of your replicated disks, the supported churn changes.
Support matrix
- Scenario: This is only for Azure-to-Azure disaster recovery scenario.
- Region availability: This capability is currently available in selected Azure regions.
- RAM: Azure VM must have RAM of 256 GB or more to support churn up to 500 MB/s. If RAM is less than 256 GB, churn limit will be 100 MB/s. Site Recovery reserves up to 6.25% of RAM, maximum of 16 GB.
- Operating System: Windows. Linux – RHEL 9, SLES 15, Ubuntu 24.04.
- Disk size: Churn limit is based on source disk type and size.
- Networking and CPU – Ensure there is enough networking and CPU on Azure VM for Site Recovery to be able to replicate data changes from the source.
Note
If you already have an Azure VM protected using Azure Site Recovery High Churn option before this Preview, its churn limit will be 100 MB/s only even if it is meeting all support requirements. If you want to get churn support up to 500 MB/s (Preview), you need to disable Site Recovery and re-enable Site Recovery with High Churn option as documented here.
Updated limits by Source disk size and IO size
Source Disk must be of Premium v1 SSD or Premium v2 or Ultra disk type.
| Source disk size (in GiB) | 8 KB IO Size | 16 KB IO Size | 32 KB IO Size | 64 KB IO Size | 128KB IO Size | 256 KB & More |
|---|---|---|---|---|---|---|
| 128 | 3.9 MB/s | 7.8 MB/s | 11.5 MB/s | 33.1 MB/s | 66.1 MB/s | 100 MB/s |
| 256 | 8.6 MB/s | 17.2 MB/s | 34.4 MB/s | 68.8 MB/s | 125 MB/s | 125 MB/s |
| 512 | 18.0 MB/s | 35.9 MB/s | 71.9 MB/s | 143.8 MB/s | 150 MB/s | 150 MB/s |
| 1,024 | 39.1 MB/s | 78.1 MB/s | 156.3 MB/s | 200.0 MB/s | 200 MB/s | 200 MB/s |
| 2,048 | 58.6 MB/s | 117.2 MB/s | 234.4 MB/s | 250.0 MB/s | 250 MB/s | 250 MB/s |
| 4,096 | 58.6 MB/s | 117.2 MB/s | 234.4 MB/s | 250.0 MB/s | 250 MB/s | 250 MB/s |
| 8,192 | 125.0 MB/s | 250.0 MB/s | 250 MB/s | 250 MB/s | 250 MB/s | 250 MB/s |
| 16,384 | 140.6 MB/s | 250 MB/s | 250 MB/s | 250 MB/s | 250 MB/s | 250 MB/s |
| 32,767 | 156.3 MB/s | 250 MB/s | 250 MB/s | 250 MB/s | 250 MB/s | 250 MB/s |
Note
The maximum churn supported in Public Preview is 500 MB/s per VM, but actual limits depend on the disk size and type for the source disks.
Region availability
Source region and target region must be in the following regions only.
Enhanced churn support for 500 MB/s is currently available in the following regions:
- West Central US
- Central US
- North Central US
- West US
- West US 2
- West US 3
- East US 2
- East Asia
- Southeast Asia
- Australia East
- Australia Southeast
Enable preview
Use the same configuration steps as documented here and select High Churn.
No additional setup is required for Preview; the feature is automatically enabled in the supported regions, if churn on Azure VM exceeds 100 MB/s and all support matrix requirements are met.
The associated cost implications are detailed in this section.