Note
Access to this page requires authorization. You can try signing in or changing directories.
Access to this page requires authorization. You can try changing directories.
Note
The information in this article applies to Azure Site Recovery - Modernized. For information about configuration server requirements in Classic releases, see this article.
Ensure you create a new and exclusive Recovery Services vault for setting up the ASR replication appliance. Don't use an existing vault.
Important
Microsoft recommends that you use roles with the fewest permissions. This helps improve security for your organization. Global Administrator is a highly privileged role that should be limited to emergency scenarios when you can't use an existing role.
You deploy an on-premises replication appliance when you use Azure Site Recovery for disaster recovery of VMware VMs or physical servers to Azure.
- The replication appliance coordinates communications between on-premises VMware and Azure. It also manages data replication.
- Learn more about the Azure Site Recovery replication appliance components and processes.
Prepare Azure account
To create and register the Azure Site Recovery replication appliance, you need an Azure account with:
- Contributor or Owner permissions on the Azure subscription.
- Permissions to register Microsoft Entra apps.
- Owner or Contributor plus User Access Administrator permissions on the Azure subscription to create a Key Vault, used during registration of the Azure Site Recovery replication appliance with Azure.
If you just created a free Azure account, you're the owner of your subscription. If you're not the subscription owner, work with the owner for the required permissions.
Required permissions
Here are the required permissions:
- Microsoft.OffAzure/*
- Microsoft.Recoveryservices/*
Note
In case different users are configuring the appliances registered to a single recovery services vault, each of the user should be added as an owner to AAD app of that vault. To do so, in Azure portal, navigate to App registrations, search for the AAD app > Manage > Owners > Add Owners and select the user to add them as an owner to the AAD app.
Follow these steps to assign the required permissions:
In the Azure portal, search for Subscriptions, and under Services, select Subscriptions search box to search for the Azure subscription.
In the Subscriptions page, select the subscription in which you created the Recovery Services vault.
In the selected subscription, select Access control (IAM) > Check access. In Check access, search for the relevant user account.
In Add a role assignment, select Add, select the Contributor or Owner role, and select the account. Then Select Save.
To register the appliance, your Azure account needs permissions to register Microsoft Entra apps.
Follow these steps to assign required permissions:
In Azure portal, navigate to Microsoft Entra ID > Users > User Settings. In User settings, verify that Microsoft Entra users can register applications (set to Yes by default).
In case the App registrations settings is set to No, request the tenant/global admin to assign the required permission. The Application Developer role cannot be used to enable registration of Microsoft Entra App.
Prepare infrastructure
You need to set up an Azure Site Recovery replication appliance in the on-premises environment to enable recovery on your on-premises machine. For detailed information on the operations performed by the appliance, see this section
Go to Recovery Services Vault > Getting Started. In VMware machines to Azure, select Prepare Infrastructure and proceed with the sections detailed below:
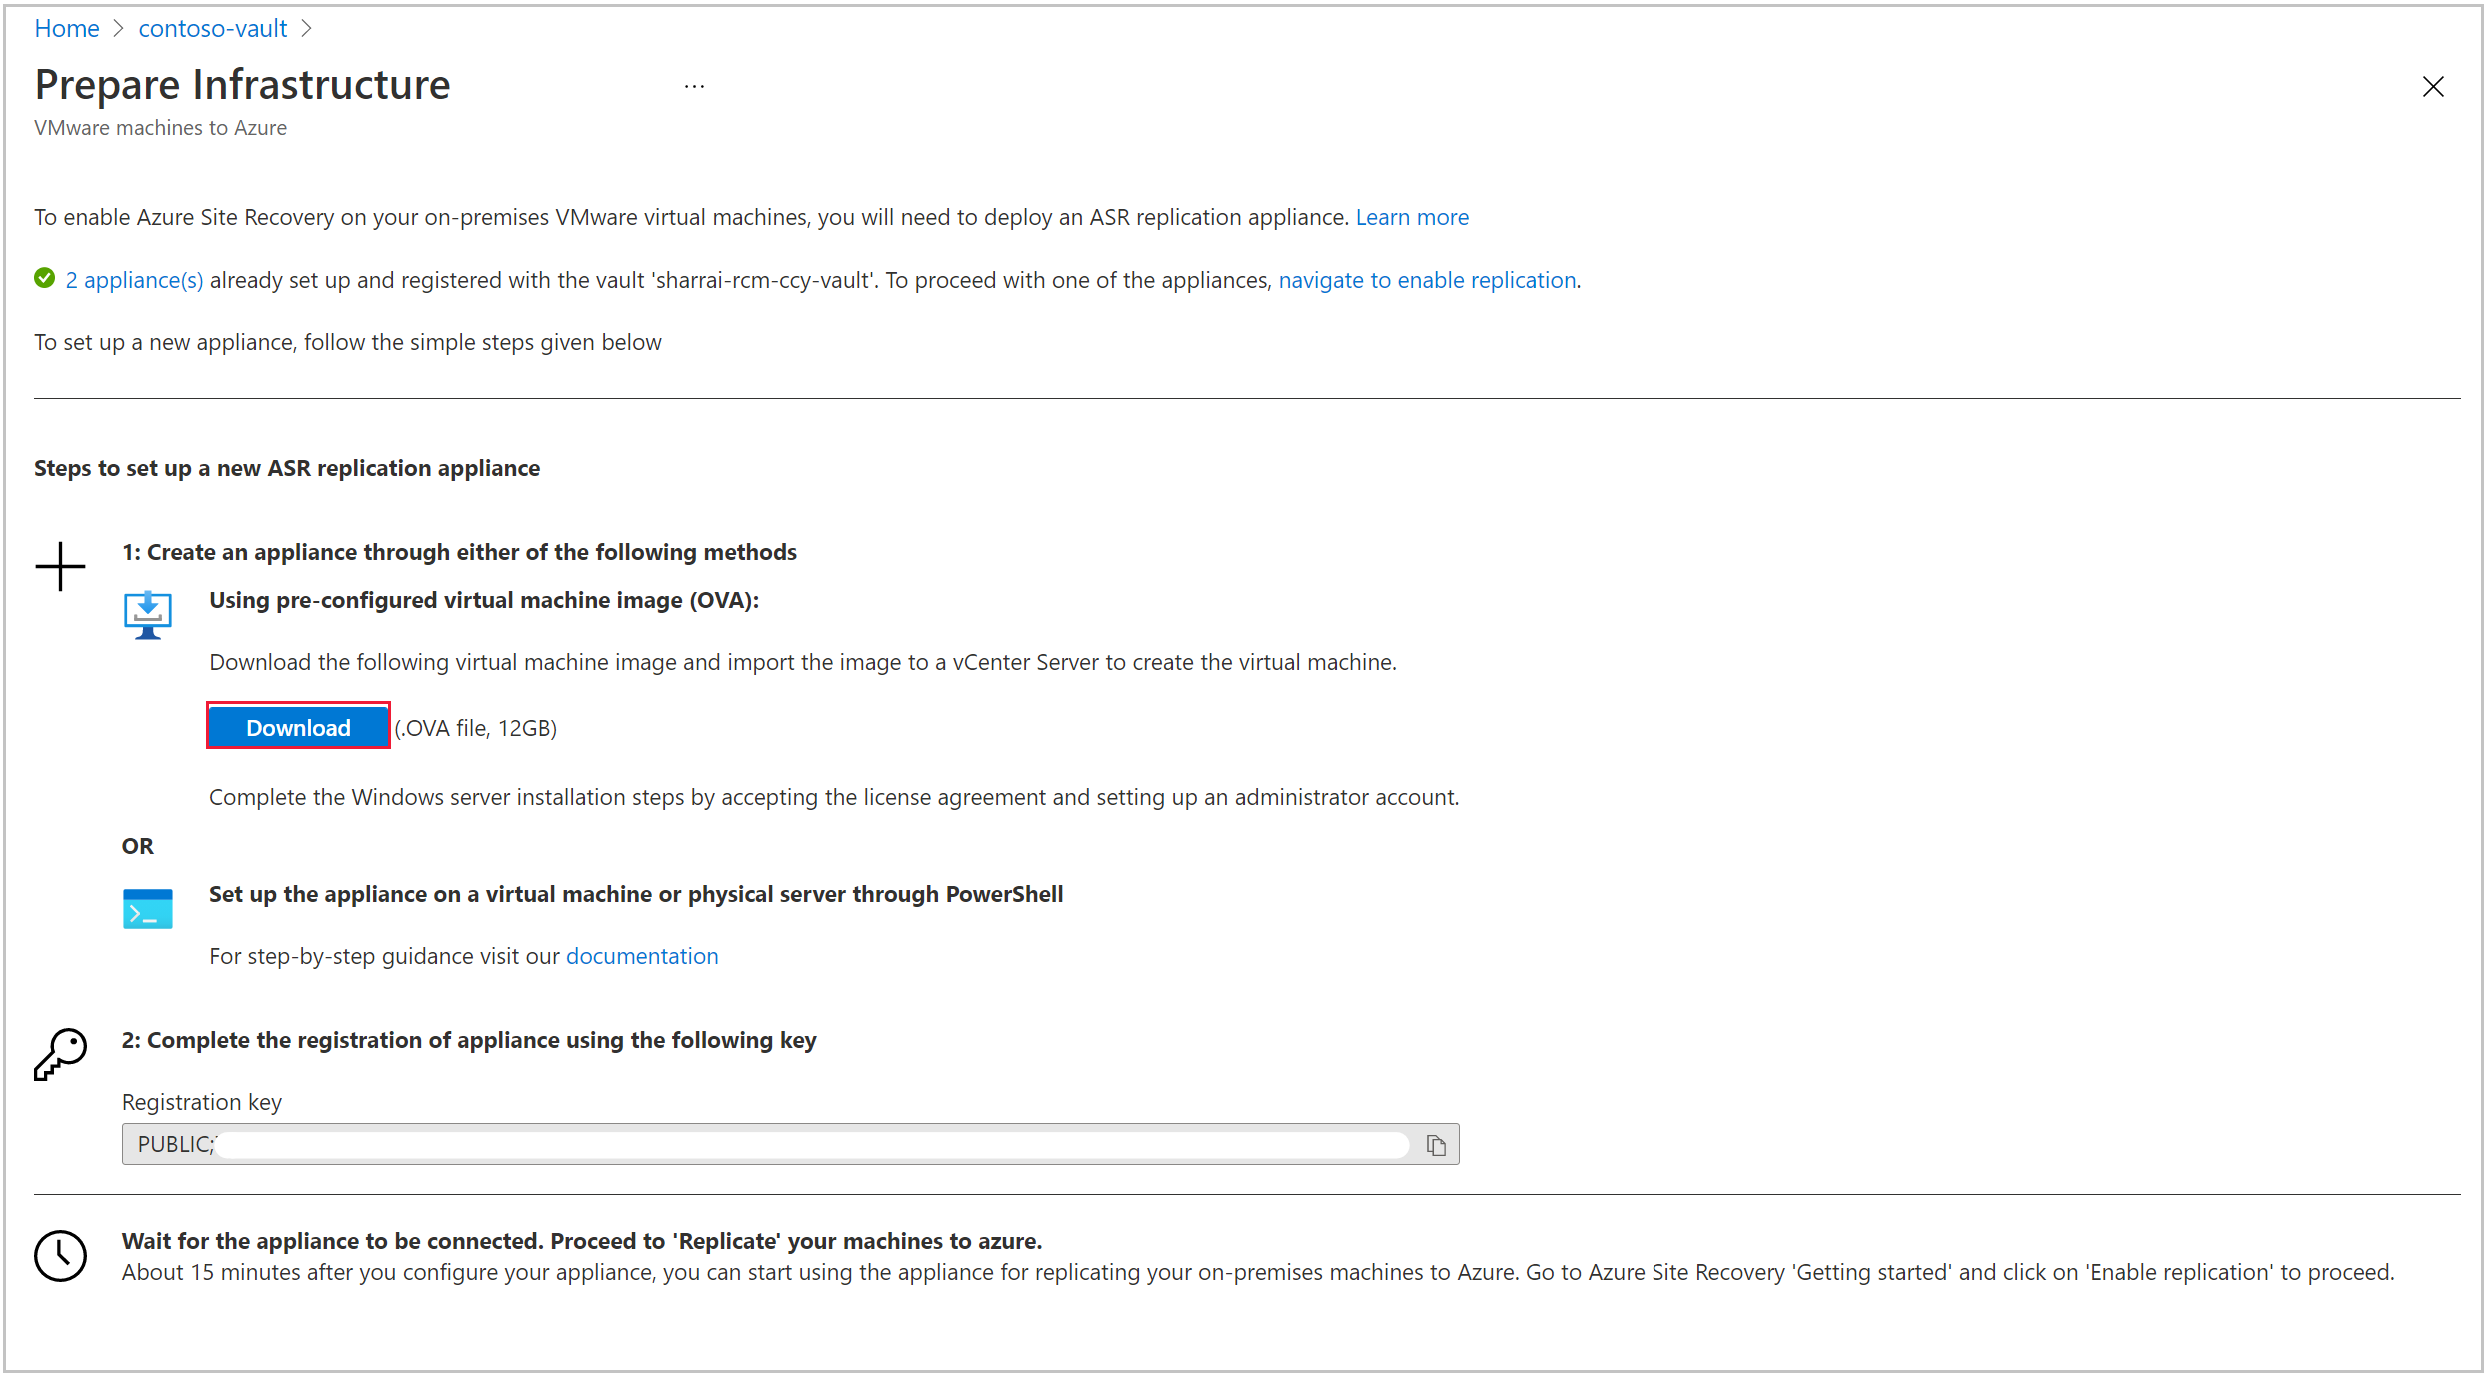
To set up a new appliance, you can use an OVF template (recommended) or PowerShell. Ensure you meet all the hardware and software requirements, and any other prerequisites.
Create Azure Site Recovery replication appliance
You can create the Site Recovery replication appliance by using the OVF template or through PowerShell.
Note
The appliance setup needs to be performed in a sequential manner. Parallel registration of multiple appliances cannot be executed.
Create replication appliance through OVF template
We recommend this approach as Azure Site Recovery ensures all prerequisite configurations are handled by the template. The OVF template spins up a machine with the required specifications.
Follow these steps:
- Download the OVF template to set up an appliance on your on-premises environment.
- After the deployment is complete, power on the appliance VM to accept Microsoft Evaluation license.
- In the next screen, provide password for the administrator user.
- Select Finalize, the system reboots and you can log in with the administrator user account.
Set up the appliance through PowerShell
If there are any organizational restrictions, you can manually set up the Site Recovery replication appliance through PowerShell. Follow these steps:
Download the installers from here and place this folder on the Azure Site Recovery replication appliance.
After successfully copying the zip folder, unzip and extract the components of the folder.
Go to the path in which the folder is extracted to and execute the following PowerShell script as an administrator:
DRInstaller.ps1
Register appliance
Once you create the appliance, Microsoft Azure appliance configuration manager is launched automatically. Prerequisites such as internet connectivity, Time sync, system configurations and group policies (listed below) are validated.
CheckRegistryAccessPolicy - Prevents access to registry editing tools.
- Key: HKLM\SOFTWARE\Microsoft\Windows\CurrentVersion\Policies\System
- DisableRegistryTools value should be equal 0.
CheckCommandPromptPolicy - Prevents access to the command prompt.
- Key: HKLM\SOFTWARE\Policies\Microsoft\Windows\System
- DisableCMD value should be equal 0.
CheckTrustLogicAttachmentsPolicy - Trust logic for file attachments.
- Key: HKLM\SOFTWARE\Microsoft\Windows\CurrentVersion\Policies\Attachments
- UseTrustedHandlers value shouldn't be equal 3.
CheckPowershellExecutionPolicy - Turn on Script Execution.
- PowerShell execution policy shouldn't be AllSigned or Restricted
- Ensure the group policy 'Turn on Script Execution Attachment Manager' isn't set to Disabled or 'Allow only signed scripts'
Use the following steps to register the appliance:
If the appliance uses a proxy for internet access, configure the proxy settings by toggling on the use proxy to connect to internet option. All Azure Site Recovery services will use these settings to connect to the internet. Only HTTP proxy is supported.
Proxy settings can be updated later also using the "Update proxy" button.
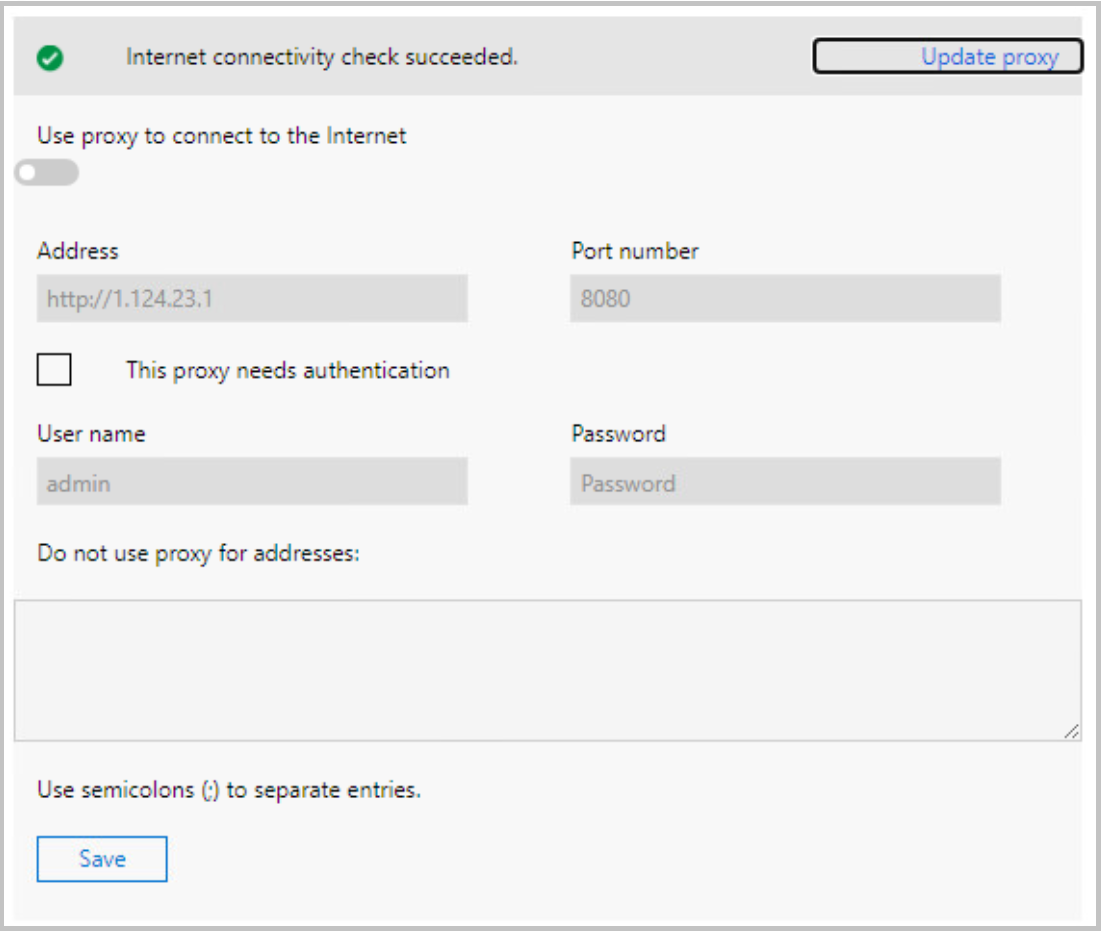
Ensure the required URLs are allowed and are reachable from the Azure Site Recovery replication appliance for continuous connectivity.
Once the prerequisites have been checked, in the next step information about all the appliance components will be fetched. Review the status of all components and then select Continue.
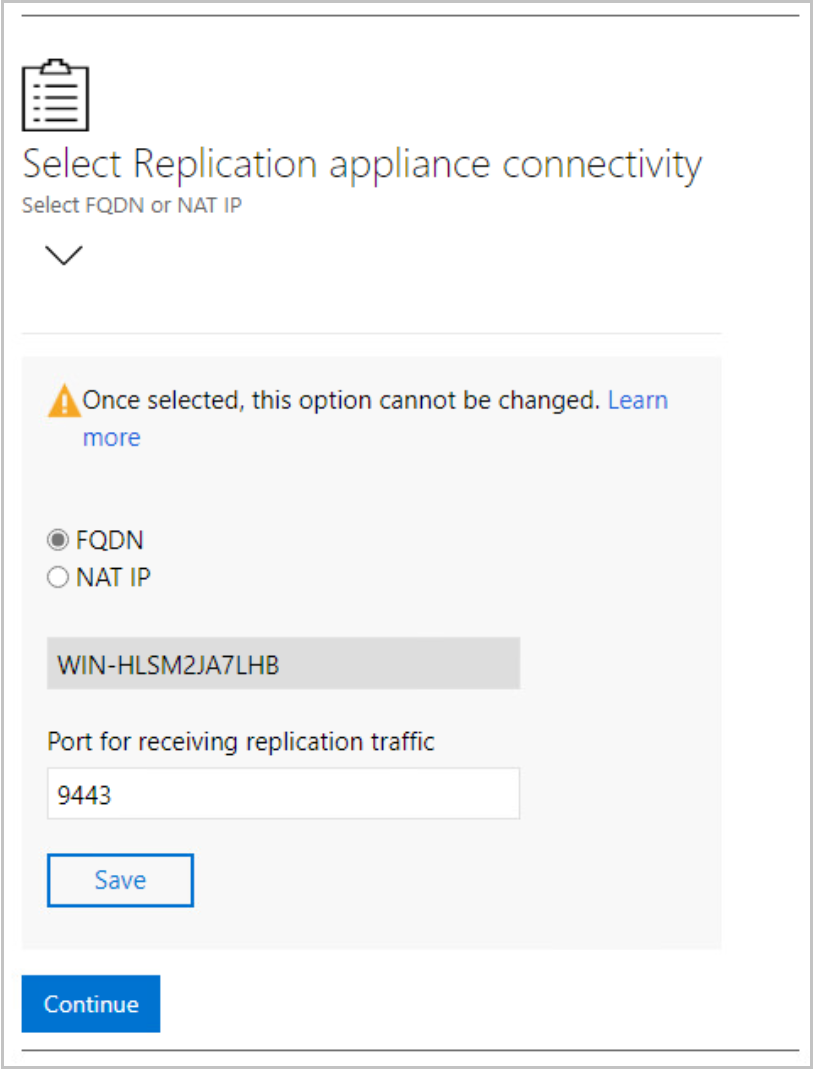
After saving the details, proceed to choose the appliance connectivity. Either FQDN or a NAT IP can be selected to define how the communication with the appliance would happen.
After saving connectivity details, select Continue to proceed to registration with Microsoft Azure.
Ensure the prerequisites are met, proceed with registration.
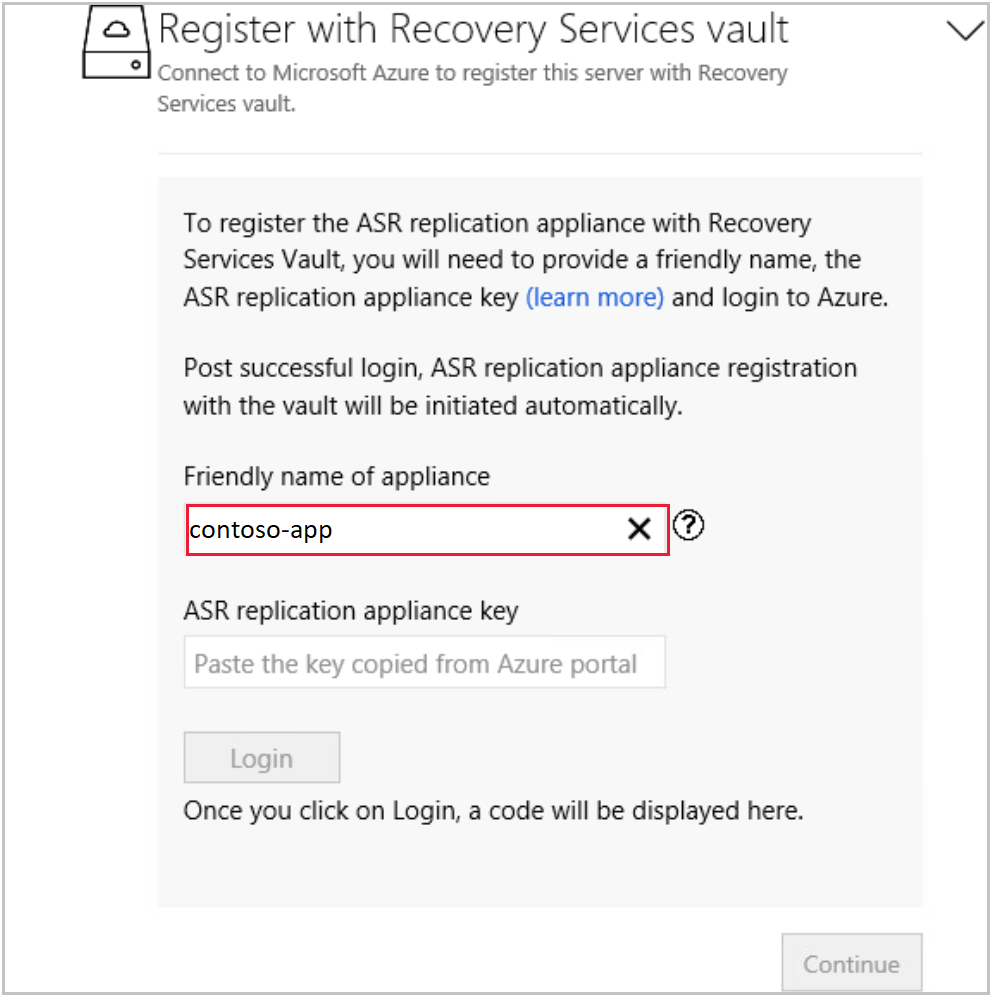
Friendly name of appliance: Provide a friendly name with which you want to track this appliance in the Azure portal under recovery services vault infrastructure. This name cannot be changed once set.
Azure Site Recovery replication appliance key: Copy the key from the portal by navigating to Recovery Services vault > Getting started > Site Recovery > VMware to Azure: Prepare Infrastructure.
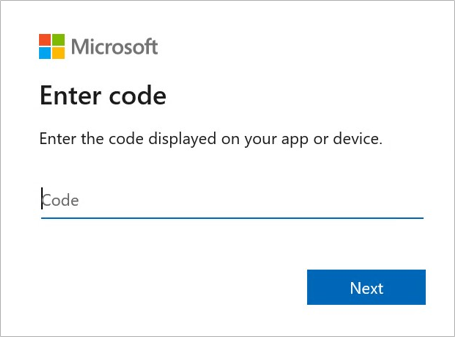
After pasting the key, select Login. You're redirected to a new authentication tab.
By default, an authentication code is generated as highlighted below, in the Appliance configuration manager page. Use this code in the authentication tab.
Note
During Azure Site Recovery modernized appliance deployment, you must use the device code flow for authentication during registration.
Enter your Microsoft Azure credentials to complete registration.
After successful registration, you can close the tab and move to appliance configuration manager to continue the setup.
Note
An authentication code expires within 5 minutes of generation. In case of inactivity for more than this duration, you will be prompted to login again to Azure.
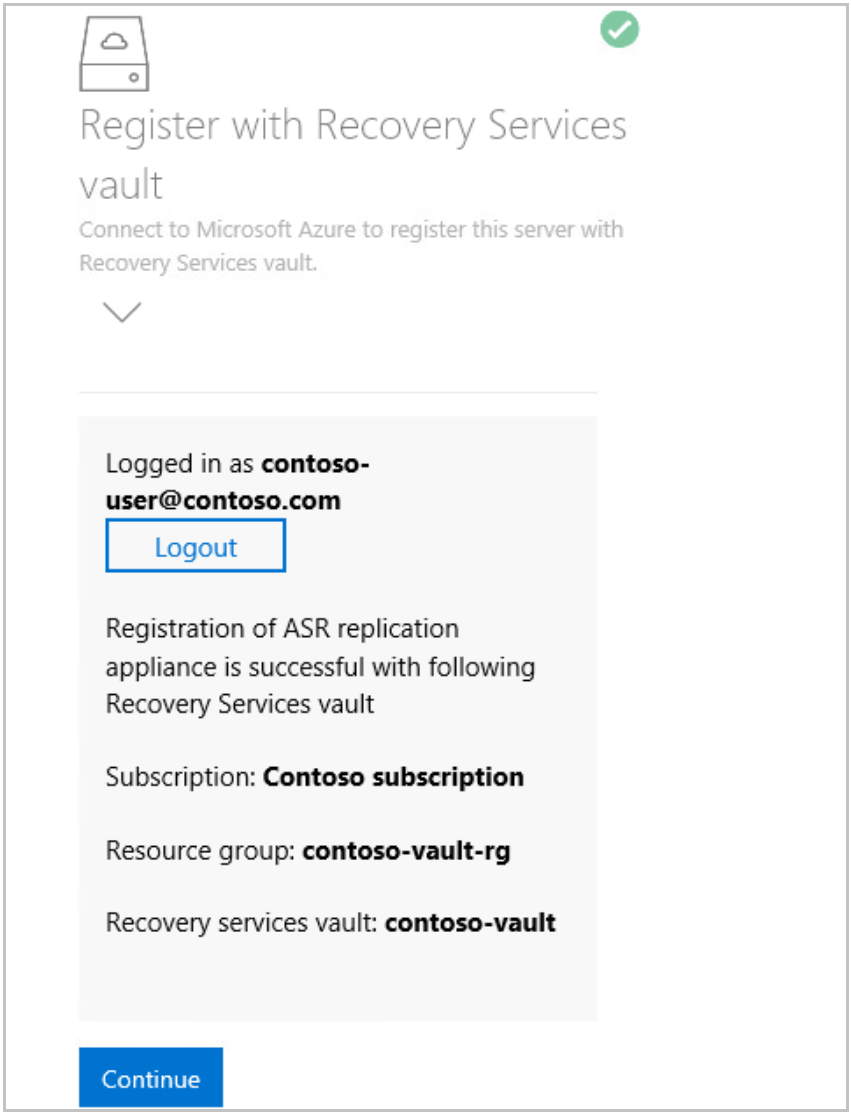
After successful sign in, Subscription, Resource Group and Recovery Services vault details are displayed. You can sign out in case you want to change the vault. Else, select Continue to proceed.
After successful registration, proceed to configure vCenter details.
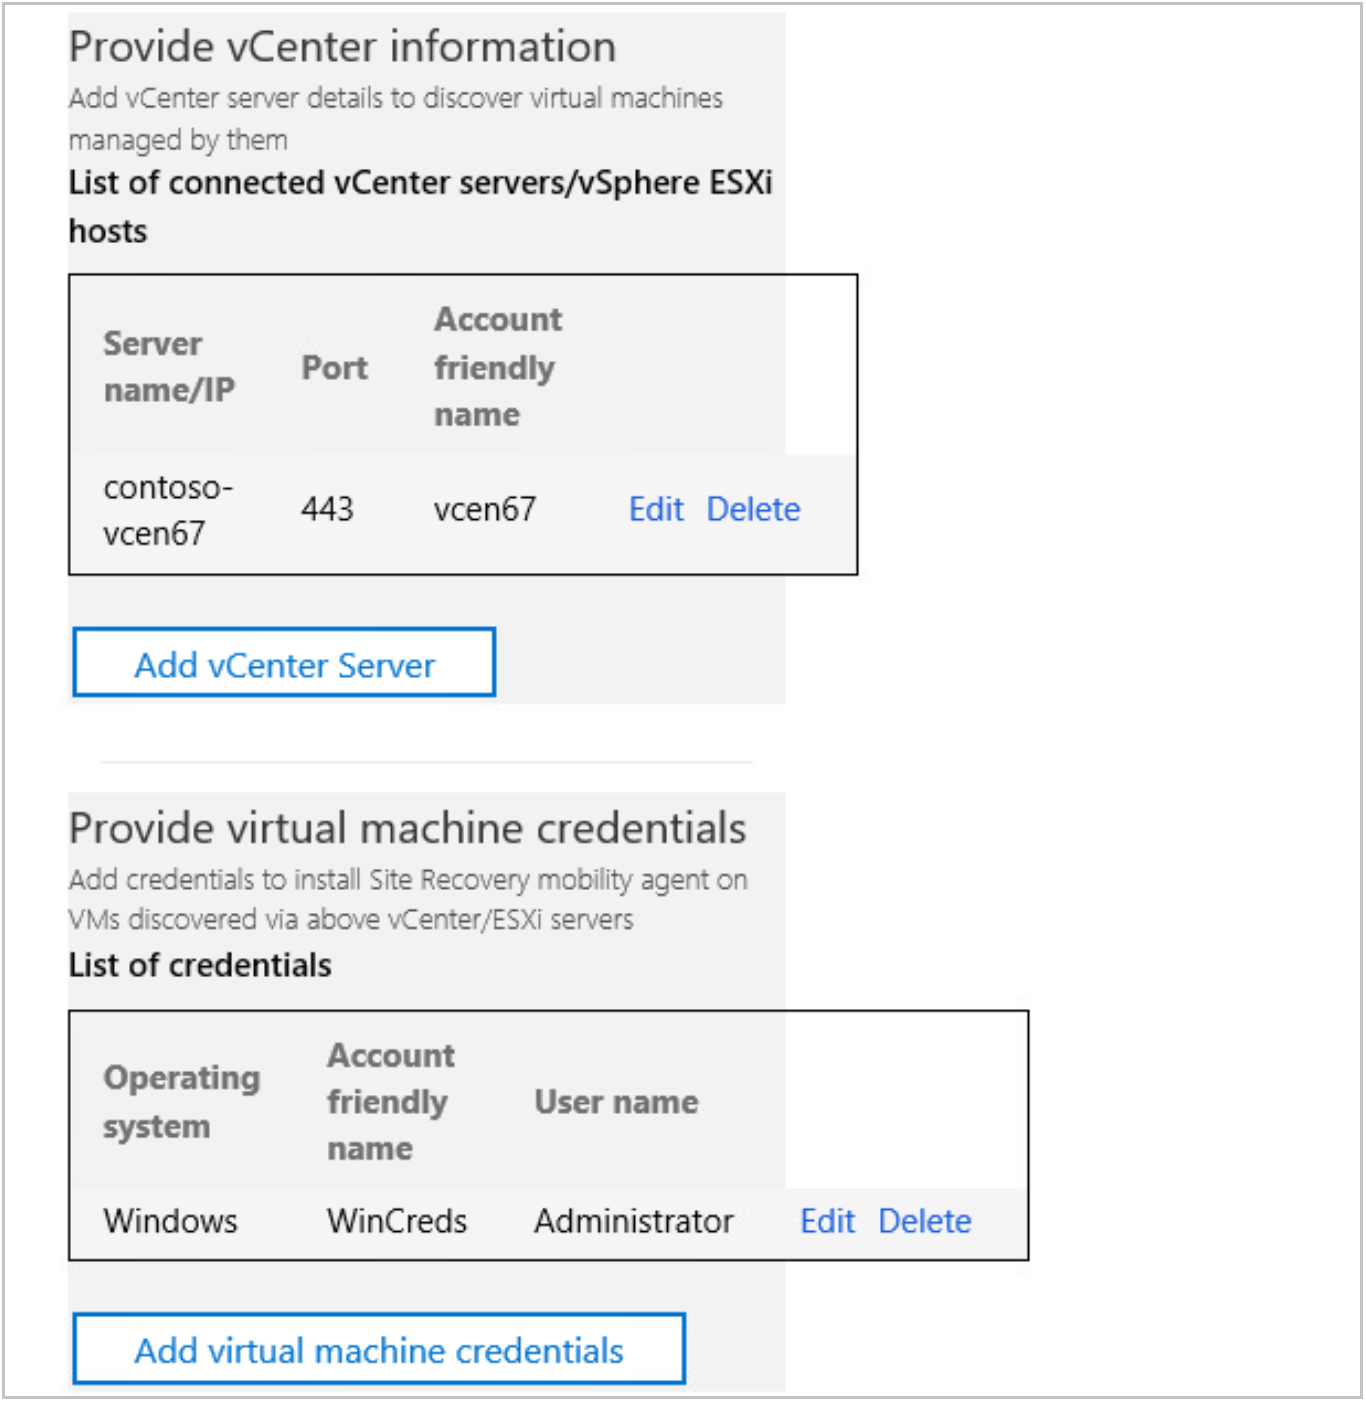
Select Add vCenter Server to add vCenter information. Enter the server name or IP address of the vCenter and port information. Post that, provide username, password, and friendly name. This is used to fetch details of virtual machine managed through the vCenter. The user account details are encrypted and stored locally in the machine.
Note
If you're trying to add the same vCenter Server to multiple appliances, then ensure that the same friendly name is used in all the appliances.
After successfully saving the vCenter information, select Add virtual machine credentials to provide user details of the VMs discovered through the vCenter.
Note
- For Linux OS, ensure to provide root credentials and for Windows OS, a user account with admin privileges should be added, these credentials will be used to push install mobility agent on to the source VM during enable replication operation. The credentials can be chosen per VM in the Azure portal during enable replication workflow.
- Visit the appliance configurator to edit or add credentials to access your machines.
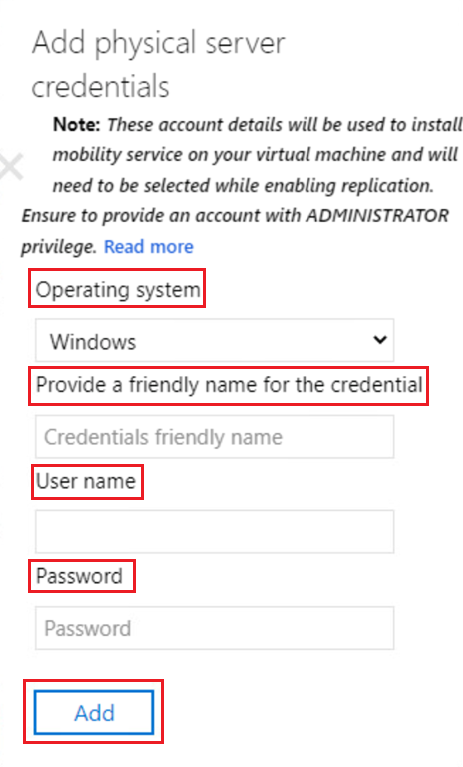
After you add the vCenter details, expand Provide Physical server details to add the details of any physical servers you plan to protect.
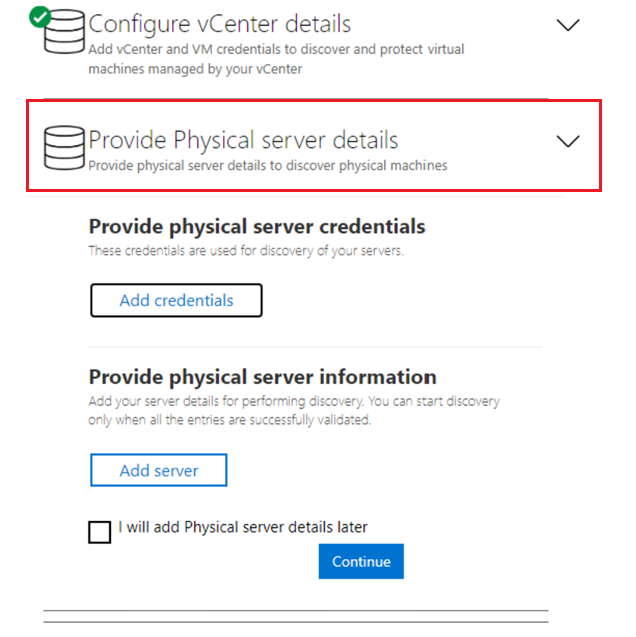
Select Add credentials to add the credentials of the machine(s) you plan to protect. Add all the details such as the Operating system, Provide a friendly name for the credential, Username, and Password. The user account details will be encrypted and stored locally in the machine. Select Add.
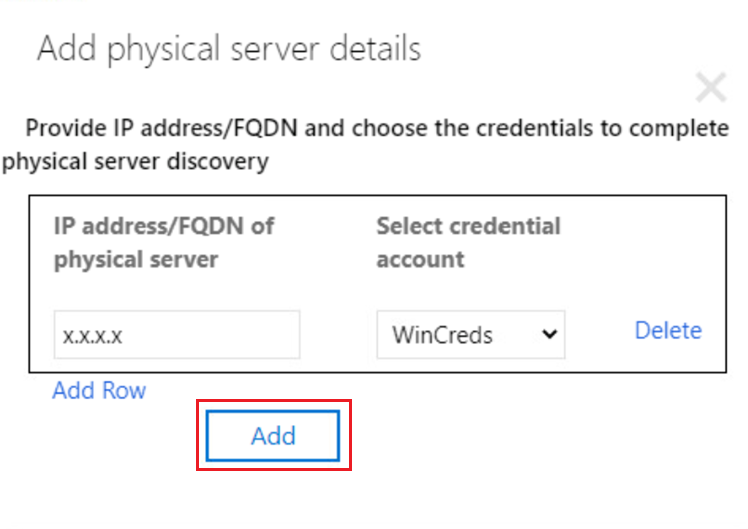
Select Add server to add physical server details. Provide the machine’s IP address/FQDN of physical server, Select credential account and select Add.
After successfully adding the details, select Continue to install all Azure Site Recovery replication appliance components and register with Azure services. This activity can take up to 30 minutes.
Ensure you don't close the browser while configuration is in progress.
Note
Appliance cloning is not supported with the modernized architecture. If you attempt to clone, it might disrupt the recovery flow.
View Azure Site Recovery replication appliance in Azure portal
After successful configuration of Azure Site Recovery replication appliance, navigate to Azure portal, Recovery Services Vault.
Select Prepare infrastructure (Modernized) under Getting started, you can see that an Azure Site Recovery replication appliance is already registered with this vault. Now you're all set! Start protecting your source machines through this replication appliance.
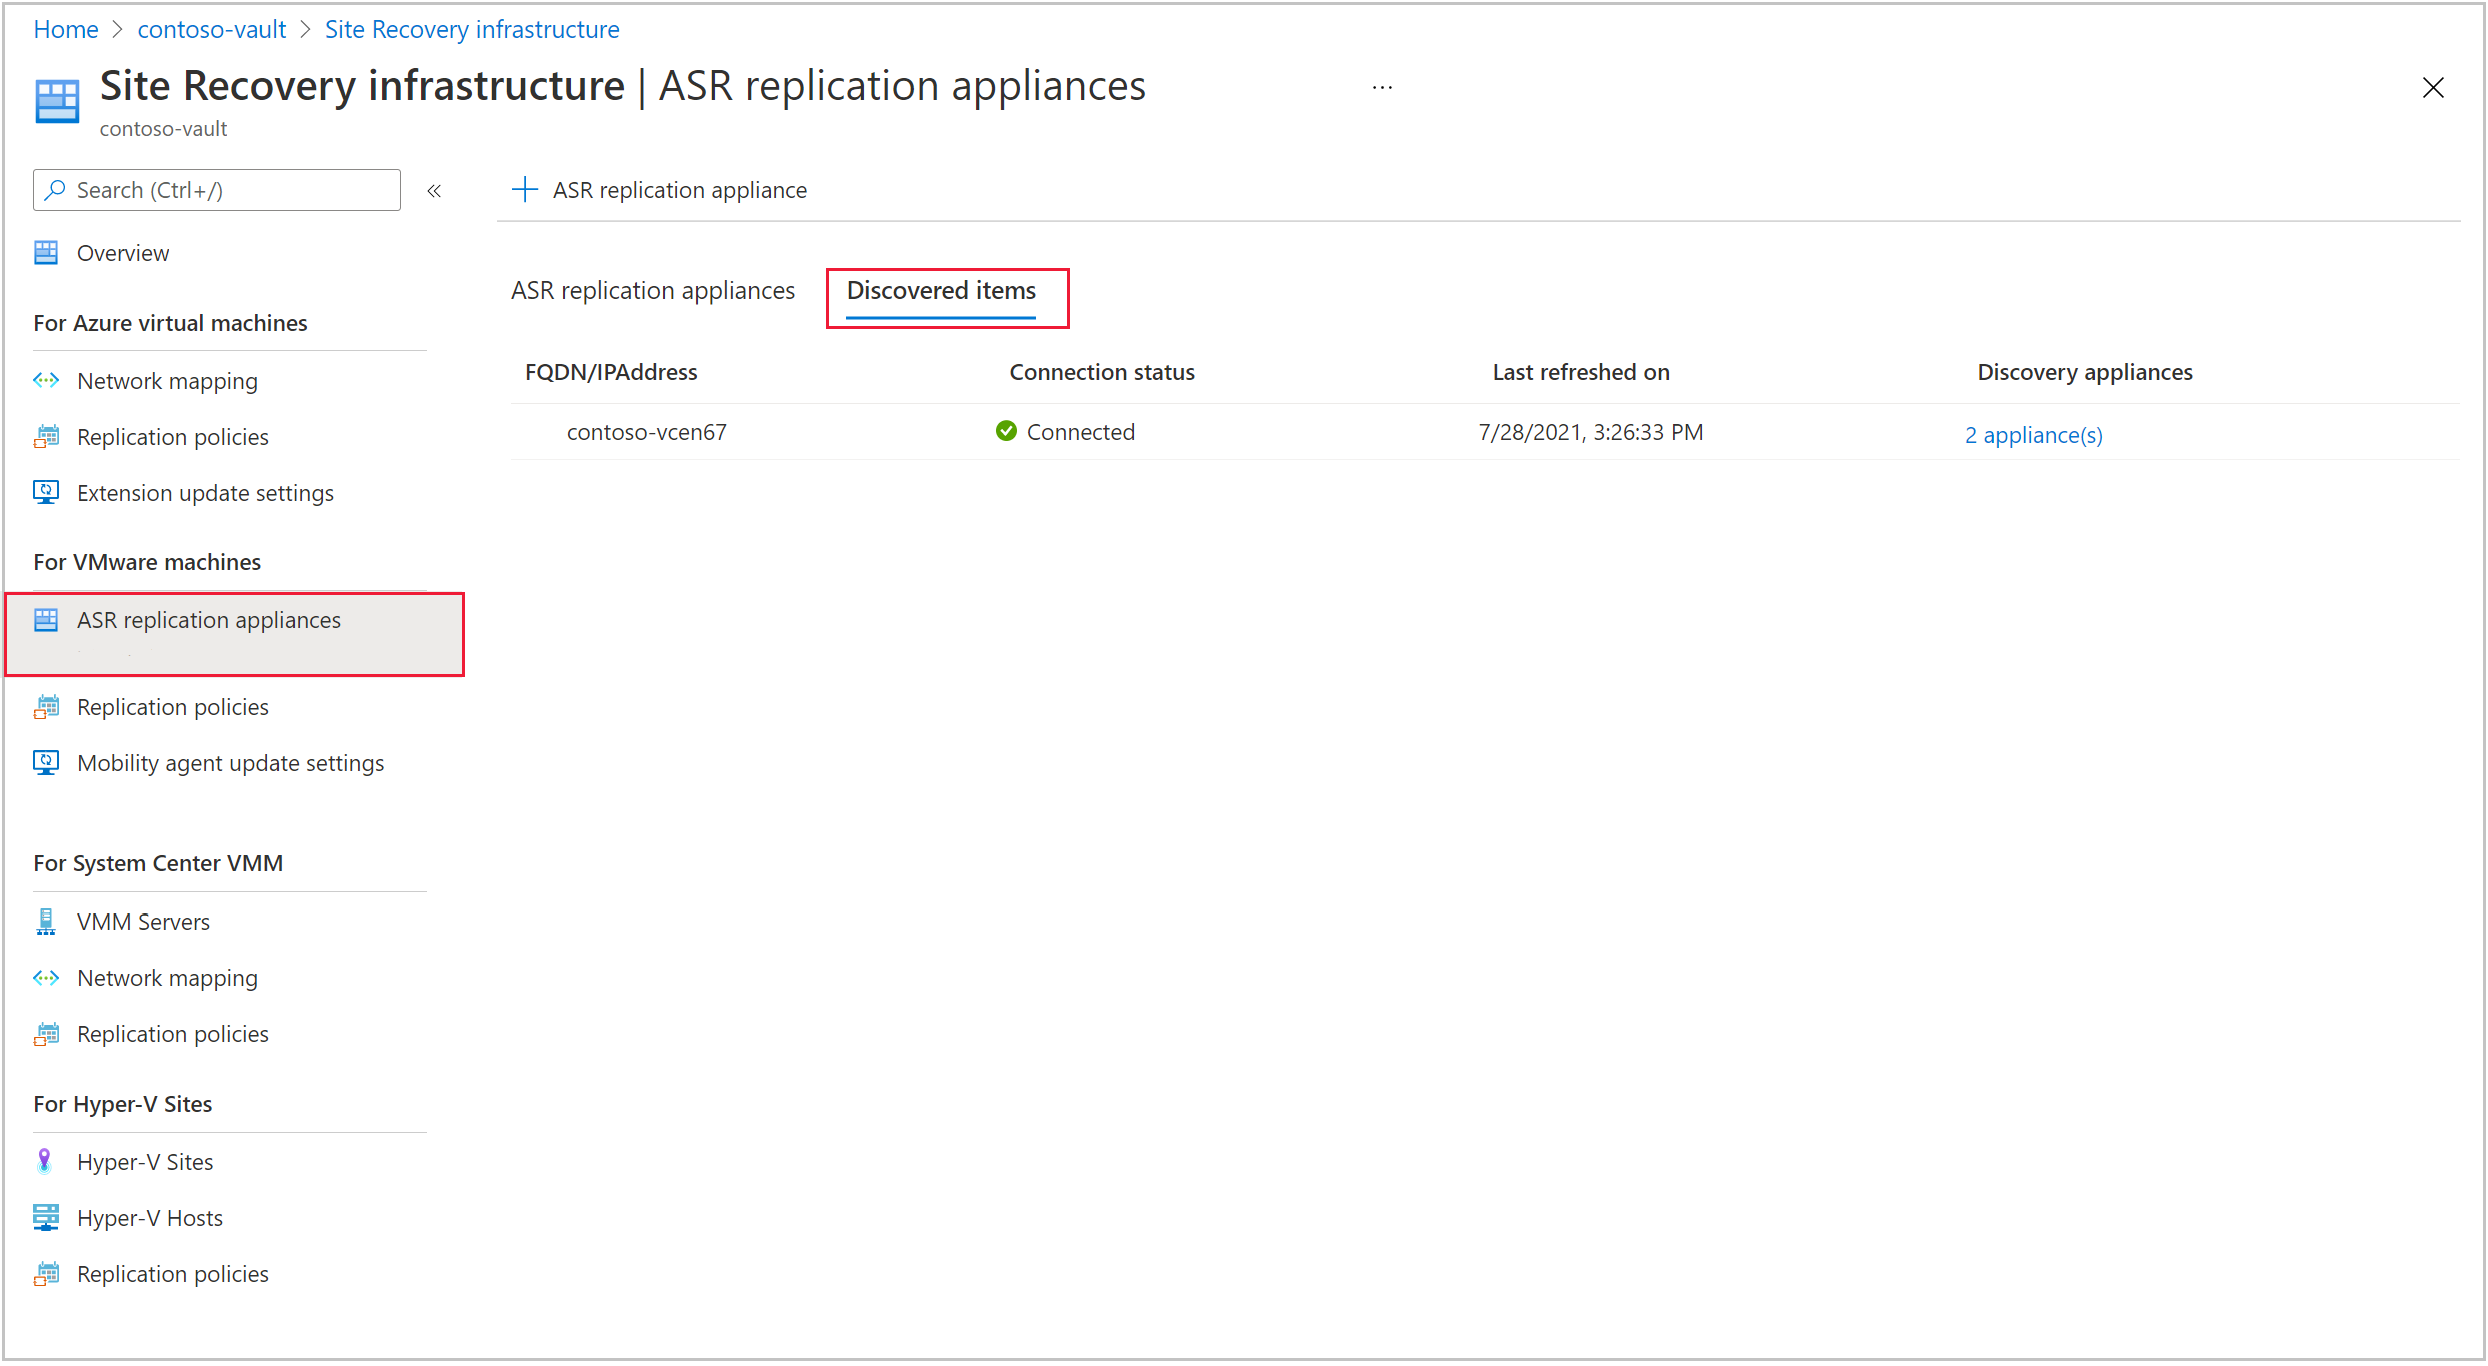
When you select Select 1 appliance(s), you'll be redirected to Azure Site Recovery replication appliance view, where the list of appliances registered to this vault is displayed.
You'll also be able to see a tab for Discovered items that lists all of the discovered vCenter Servers/vSphere hosts."
Next steps
- Set up disaster recovery of VMware VMs to Azure.
- Learn about the support requirements for Azure Site Recovery replication appliance.