Migrate an Azure Spring Apps Basic or Standard plan instance to the Enterprise plan
Note
The Basic, Standard, and Enterprise plans will be deprecated starting from mid-March, 2025, with a 3 year retirement period. We recommend transitioning to Azure Container Apps. For more information, see the Azure Spring Apps retirement announcement.
The Standard consumption and dedicated plan will be deprecated starting September 30, 2024, with a complete shutdown after six months. We recommend transitioning to Azure Container Apps. For more information, see Migrate Azure Spring Apps Standard consumption and dedicated plan to Azure Container Apps.
This article applies to: ✔️ Basic/Standard ✔️ Enterprise
This article shows you how to migrate an existing application in the Basic or Standard plan to the Enterprise plan. When you migrate from the Basic or Standard plan to the Enterprise plan, VMware Tanzu components replace the open-source software (OSS) Spring Cloud components to provide more feature support.
This article uses the Pet Clinic sample apps as examples of how to migrate.
Prerequisites
- An Azure subscription. If you don't have a subscription, create a free account before you begin.
- Azure CLI version 2.45.0 or higher.
-
The Azure Spring Apps Enterprise plan extension. Use the following command to remove previous versions and install the latest Enterprise plan extension. If you previously installed the
spring-cloudextension, uninstall it to avoid configuration and version mismatches.az extension add --upgrade --name spring az extension remove --name spring-cloud - Git.
Provision a service instance
In the Azure Spring Apps Enterprise plan, VMware Tanzu components replace the OSS Spring Cloud components to provide more feature support. Tanzu components are enabled on demand according to your needs. You must enable the components you need before creating the Azure Spring Apps service instance.
Note
To use Tanzu Components, you must enable them when you provision your Azure Spring Apps service instance. You can't enable them after provisioning at this time.
Use the following steps to provision an Azure Spring Apps service instance:
Open the Azure portal.
In the top search box, search for Azure Spring Apps.
Select Azure Spring Apps from the results and then select Create.
On the Create Azure Spring Apps page, set your Subscription, Resource group, and Name for the instance.
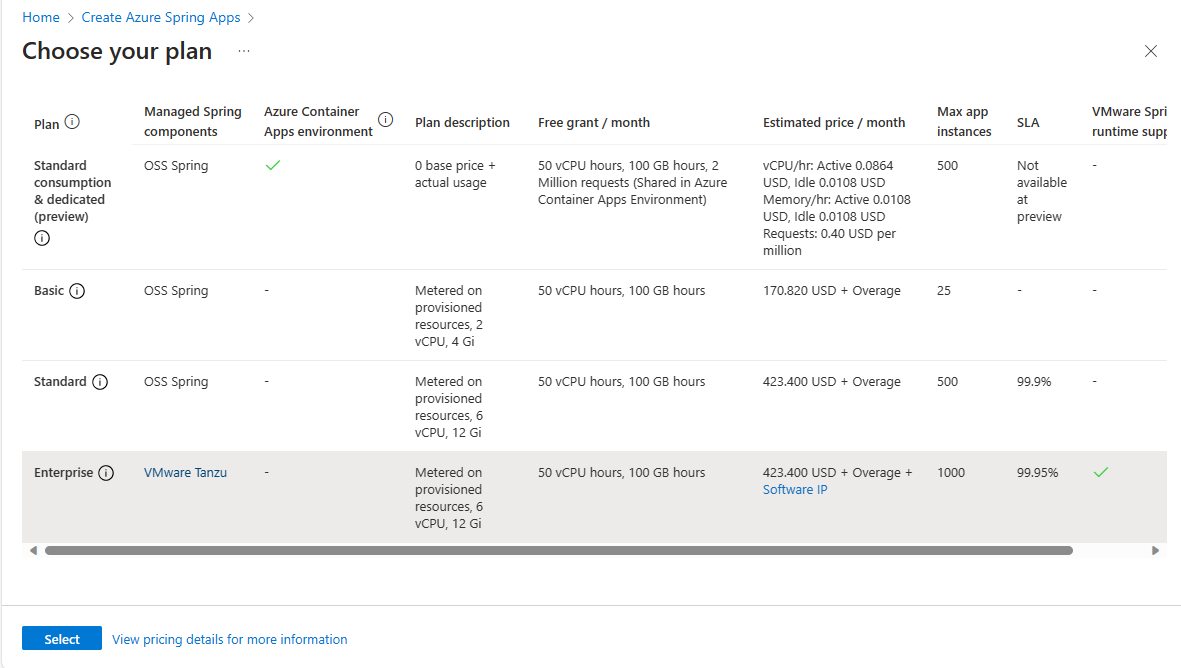
For Plan in Service Details, select Change.

On the Choose your plan page, select the Enterprise row in the table, and then select Select.
Back on the Create Azure Spring Apps page, select Terms to agree to the legal terms and privacy statements of the Enterprise plan offering in the Azure Marketplace.
Select Next: VMware Tanzu settings.
On the VMWare Tanzu settings tab, scroll through the list to review the Tanzu components. All components are enabled by default.
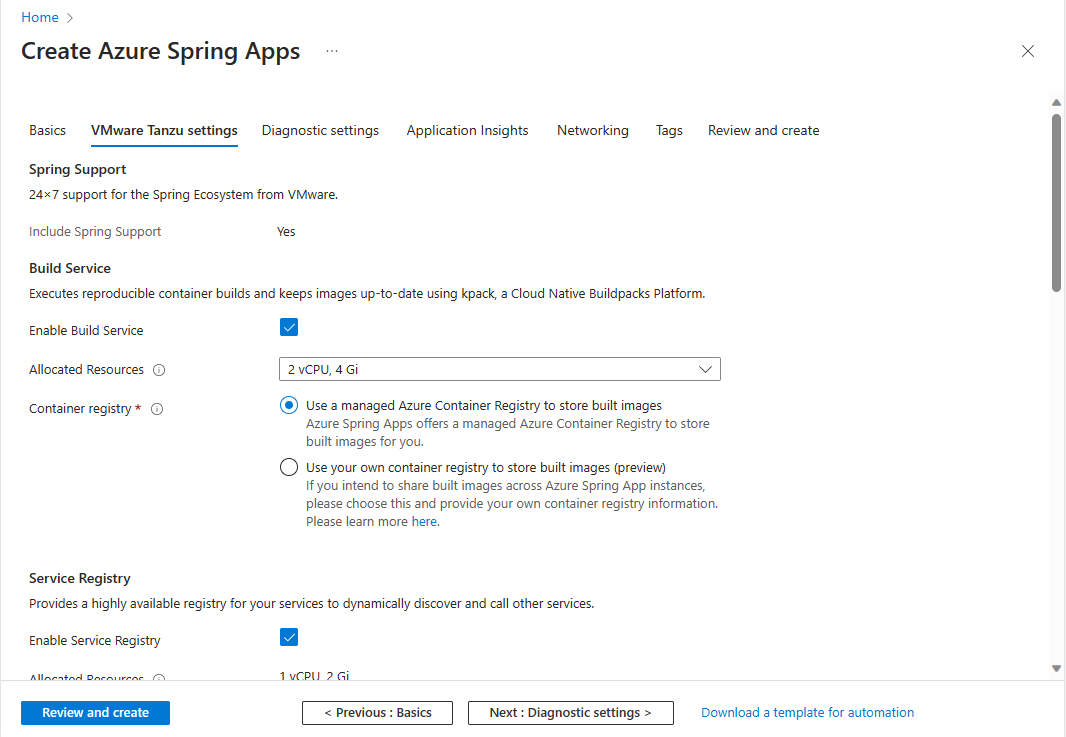
Note
Carefully consider which Tanzu components you want to use or enable during the provisioning phase. After provisioning the Azure Spring Apps instance, you can't enable or disable Tanzu components.
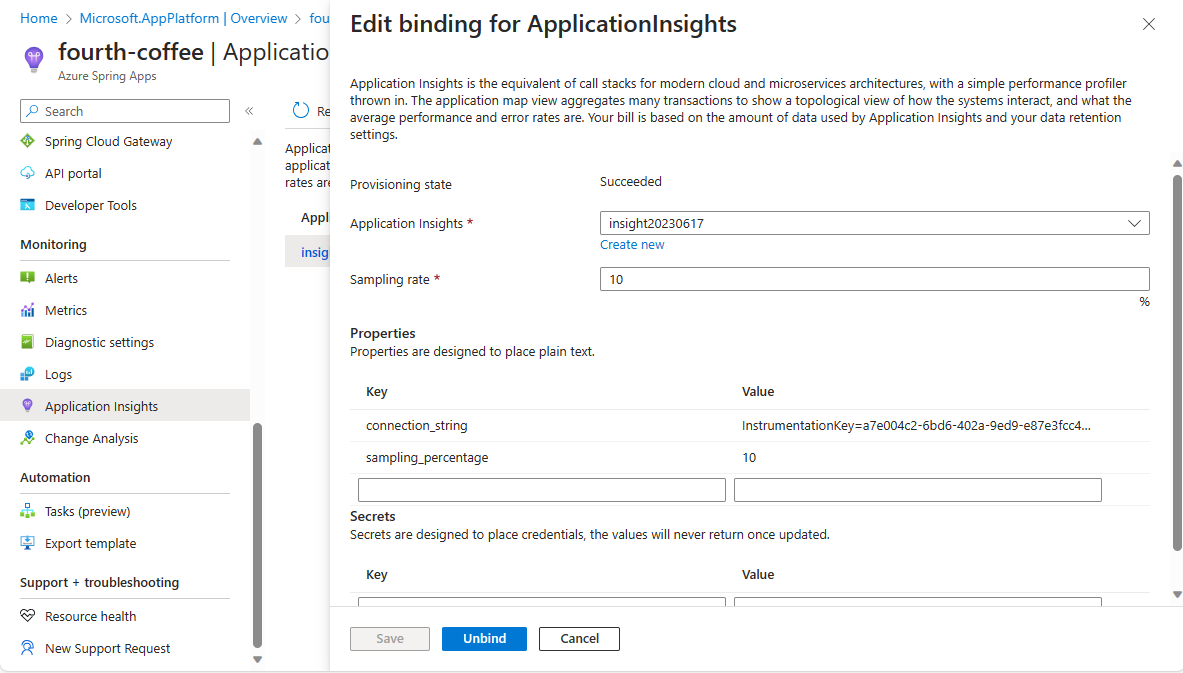
Select the Application Insights tab and then select Enable Application Insights. Review the following settings:
- Enable Application Insights should be selected.
- Choose an existing Application Insights instance or create a new Application Insights instance.
- Enter a Sampling rate in the range of 0-100, or use the default value 10.
You can also enable Application Insights after you provision the Azure Spring Apps instance. For more information about Application Insights pricing, see the Application Insights billing section of Azure Monitor Logs cost calculations and options.
Note
You'll pay for the usage of Application Insights when integrated with Azure Spring Apps.
Select Review and create and wait for validation to complete, then select Create to start provisioning the service instance.


It takes about 5 minutes to finish the resource provisioning.
Create and configure apps
The app creation steps are the same as Standard plan.
Use the following command to set Azure CLI defaults. Be sure to replace the placeholders with your own values.
az config set defaults.group=<resource-group-name>
az config set defaults.spring=<Azure-Spring-Apps-service-instance-name>
Use the following commands to create the two core applications for PetClinic,
api-gatewayandcustomers-service:az spring app create --name api-gateway --instance-count 1 --memory 2Gi --assign-endpoint az spring app create --name customers-service --instance-count 1 --memory 2Gi
Use Application Configuration Service for external configuration
For externalized configuration in a distributed system, managed Spring Cloud Config Server (OSS) is available only in the Basic and Standard plans. In the Enterprise plan, Application Configuration Service for Tanzu provides similar functions for your apps. The following table describes some differences in usage between the OSS config server and Application Configuration Service.
| Component | Support plans | Enabled | Bind to app | Profile |
|---|---|---|---|---|
| Spring Cloud Config Server | Basic/Standard | Always enabled. | Auto bound | Configured in app's source code. |
| Application Configuration Service for Tanzu | Enterprise | Enable on demand. | Manual bind | Provided as config-file-pattern in an Azure Spring Apps deployment. |
Unlike the client-server mode in the OSS config server, Application Configuration Service manages configuration by using the Kubernetes-native ConfigMap, which is populated from properties defined in backend Git repositories. Application Configuration Service can't get the active profile configured in the app's source code to match the right configuration, so the explicit configuration config-file-pattern should be specified at the Azure Spring Apps deployment level.
Configure Application Configuration Service for Tanzu
Follow these steps to use Application Configuration Service for Tanzu as a centralized configuration service.
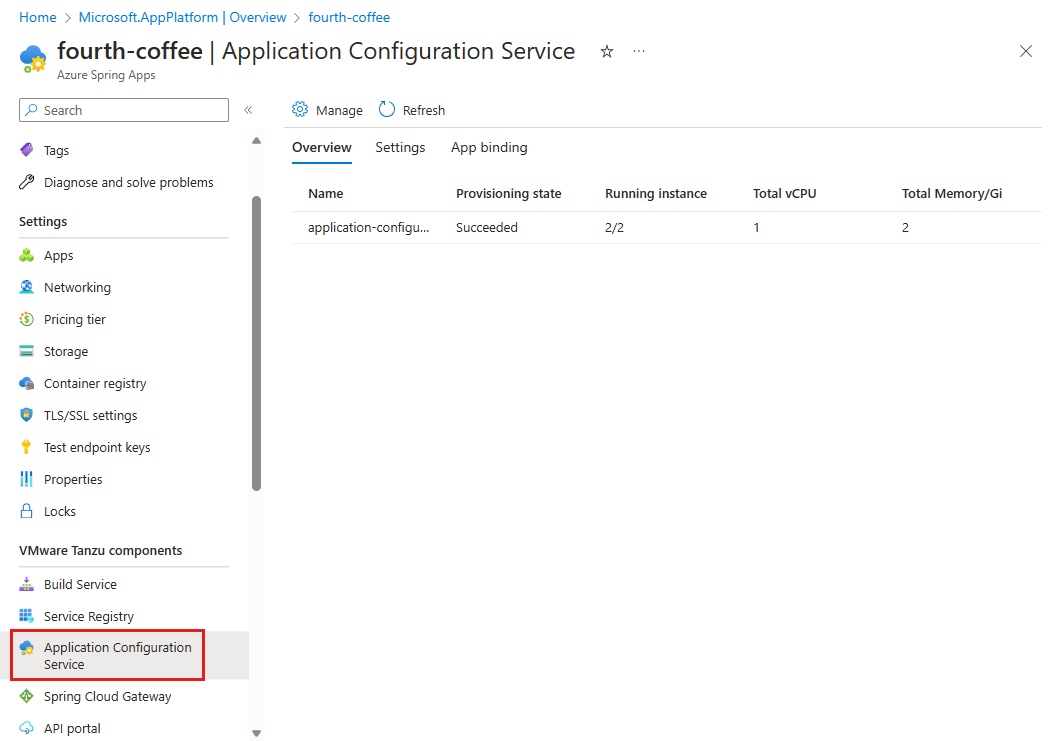
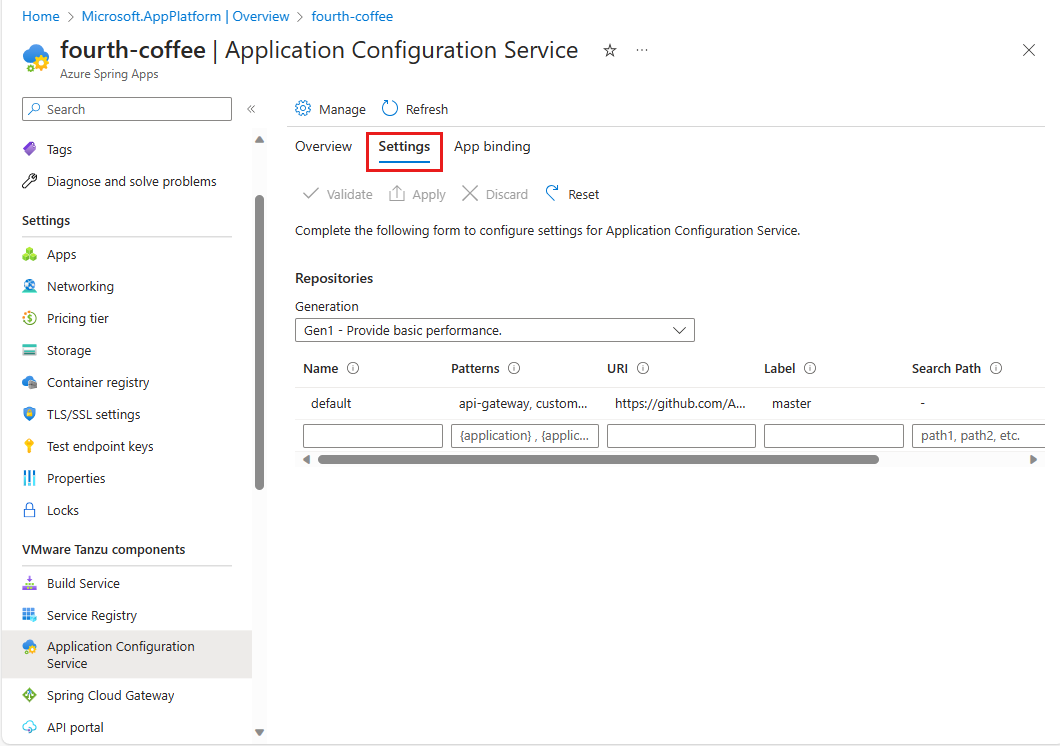
In your Azure Spring Apps Enterprise instance, select Application Configuration Service in the navigation pane. View the running state and resources allocated to Application Configuration Service for Tanzu.
Select Settings and complete the form in Repositories to add a new entry with the following information:
- Name:
default - Patterns:
api-gateway,customers-service - URI:
https://github.com/Azure-Samples/spring-petclinic-microservices-config - Label:
master
- Name:
Select Validate to validate access to the target URI.
After validation completes successfully, select Apply to update the configuration settings.


Bind applications to Application Configuration Service for Tanzu
When you use Application Configuration Service for Tanzu with a Git backend, you must bind the app to Application Configuration Service for Tanzu. After binding the app, you'll need to configure which pattern is used by the app. Use the following steps to bind and configure the pattern for the app.
Use the following steps to bind apps to Application Configuration Service for VMware Tanzu.
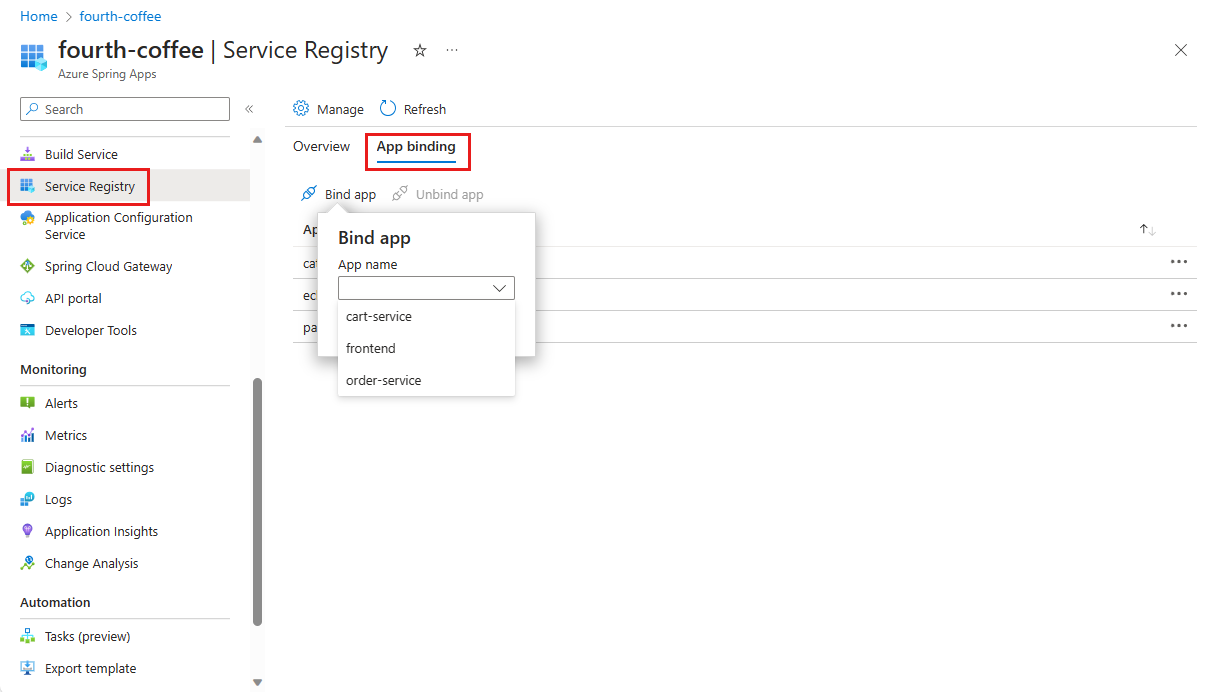
In your Azure Spring Apps Enterprise instance, select Application Configuration Service in the navigation pane.
Select App binding and then select Bind app.

Select an app in the dropdown menu and then select Apply to bind the application to Application Configuration Service for Tanzu.

For more information, see Use Application Configuration Service for Tanzu.
Using Service Registry for Tanzu
Service Registry is one of the proprietary VMware Tanzu components. It provides your apps with an implementation of the Service Discovery pattern, one of the key concepts of a microservice-based architecture. In the Enterprise plan, Service Registry for Tanzu provides service registry and discover support for your apps. Managed Spring Cloud Eureka is available only in the Basic and Standard plan and isn't available in the Enterprise plan.
| Component | Standard plan | Enterprise plan |
|---|---|---|
| Service Registry | OSS eureka Auto bound (always injection) Always provisioned |
Service Registry for Tanzu Needs manual binding to app Enable on demand |
Bind an application to Tanzu Service Registry
To bind apps to Application Configuration Service for VMware Tanzu, follow these steps.
In your Azure Spring Apps Enterprise instance, select Service Registry.
Select App binding. Currently bound apps appear under App name.
Select Bind app.
Select an app in the dropdown menu and then select Apply to bind the application to Tanzu Service Registry.

Note
When you change the bind/unbind status, you must restart or redeploy the app to make the change take effect.
For more information, see Use Tanzu Service Registry.
Build and deploy applications
In the Enterprise plan, Tanzu Build Service is used to build apps. It provides more features like polyglot apps to deploy from artifacts such as source code and zip files.
To use Tanzu Build Service, you need to specify a resource for build task and builder to use. You can also specify the --build-env parameter to set build environments.
If the app binds with Application Configuration Service for Tanzu, you need specify an extra argument —config-file-pattern.
For more information, see Use Tanzu Build Service.
Build applications locally
Use the following steps to build locally:
Use the following commands to clone the sample app repository in your Azure account, change the directory, and build the project:
git clone -b enterprise https://github.com/azure-samples/spring-petclinic-microservices
cd spring-petclinic-microservices
mvn clean package -DskipTests
Compiling the project can take several minutes. When complete, you have individual JAR files for each service in its respective folder.
Use the following commands to deploy the JAR files built in the previous step:
az spring app deploy \
    --name api-gateway \
    --artifact-path spring-petclinic-api-gateway/target/spring-petclinic-api-gateway-2.3.6.jar \
    --config-file-patterns api-gateway
az spring app deploy \
    --name customers-service \
    --artifact-path spring-petclinic-customers-service/target/spring-petclinic-customers-service-2.3.6.jar \
    --config-file-patterns customers-service
Use the following command to query the application status after deployment:
az spring app list --output tableThis command produces output similar to the following example:
Name                  Location    ResourceGroup       Public Url                                                 Production Deployment    Provisioning State    CPU    Memory    Running Instance    Registered Instance    Persistent Storage    Bind Service Registry    Bind Application Configuration Service
--------------------  ----------  ---------------  ---------------------------------------------------------  -----------------------  --------------------  -----  --------  ------------------  ---------------------  --------------------  -----------------------  ----------------------------------------
api-gateway           eastus      <resource group>   https://<service_name>-api-gateway.asc-test.net                    default                  Succeeded             1      2Gi       1/1                1/1                    -                     True                     True
customers-service     eastus      <resource group>                                                                      default                  Succeeded             1      2Gi       1/1                1/1                    -                     True                     True
Use Application Insights
The Azure Spring Apps Enterprise plan uses buildpack bindings to integrate Application Insights with the type ApplicationInsights instead of In-Process Agent. For more information, see How to configure APM integration and CA certificates.
The following table lists the APM providers available the plans.
| Standard plan | Enterprise plan |
|---|---|
| Application insight New Relic Dynatrace AppDynamics |
Application insight New Relic Dynatrace AppDynamics ElasticAPM |
To check or update the current settings in Application Insights, use the following steps:
In your Azure Spring Apps Enterprise instance, select Application Insights.
Enable or disable Application Insights by selecting Edit binding or Unbind binding.
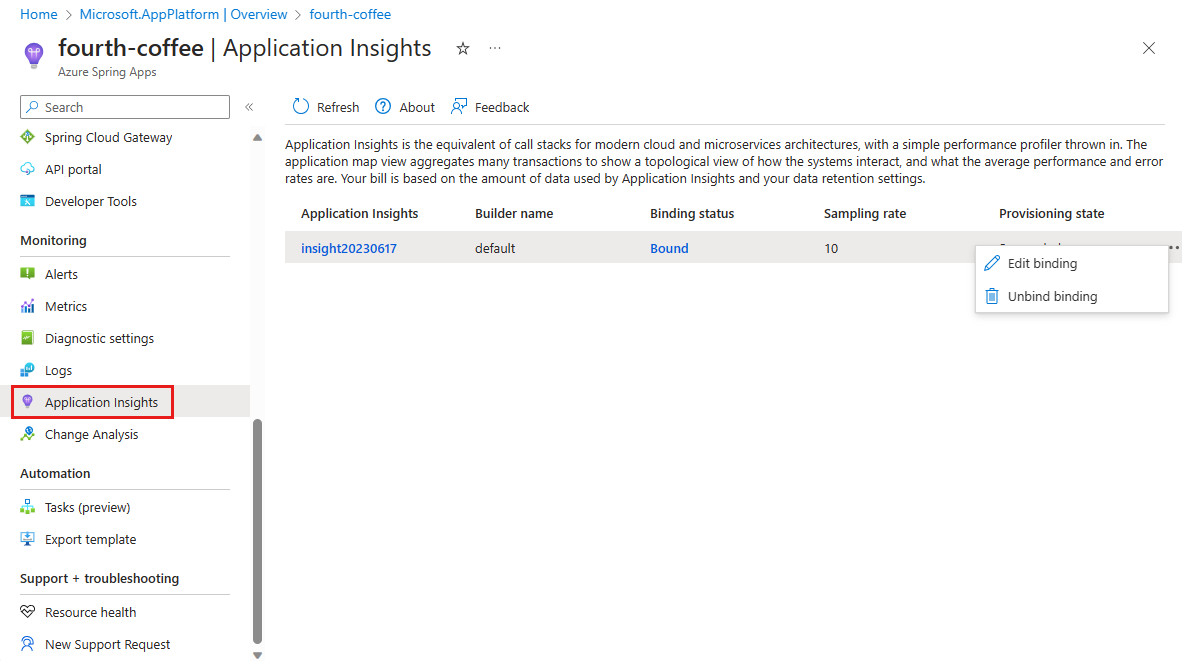
Select Edit binding. Edit the binding settings and then select Save.