Note
Access to this page requires authorization. You can try signing in or changing directories.
Access to this page requires authorization. You can try changing directories.
When published to the cloud, an Azure Static Web Apps site links together many services that work together as if they're the same application. These services include:
- The static web app
- Azure Functions API
- Authentication and authorization services
- Routing and configuration services
These services must communicate with each other, and Azure Static Web Apps handles this integration for you in the cloud.
However, when you run your application locally these services aren't automatically tied together.
To provide a similar experience as to what you get in Azure, the Azure Static Web Apps CLI provides the following services:
- A local static site server
- A proxy to the front-end framework development server
- A proxy to your API endpoints - available through Azure Functions Core Tools
- A mock authentication and authorization server
- Local routes and configuration settings enforcement
Note
Often sites built with a front-end framework require a proxy configuration setting to correctly handle requests under the api route. When using the Azure Static Web Apps CLI the proxy location value is /api, and without the CLI the value is http://localhost:7071/api.
How it works
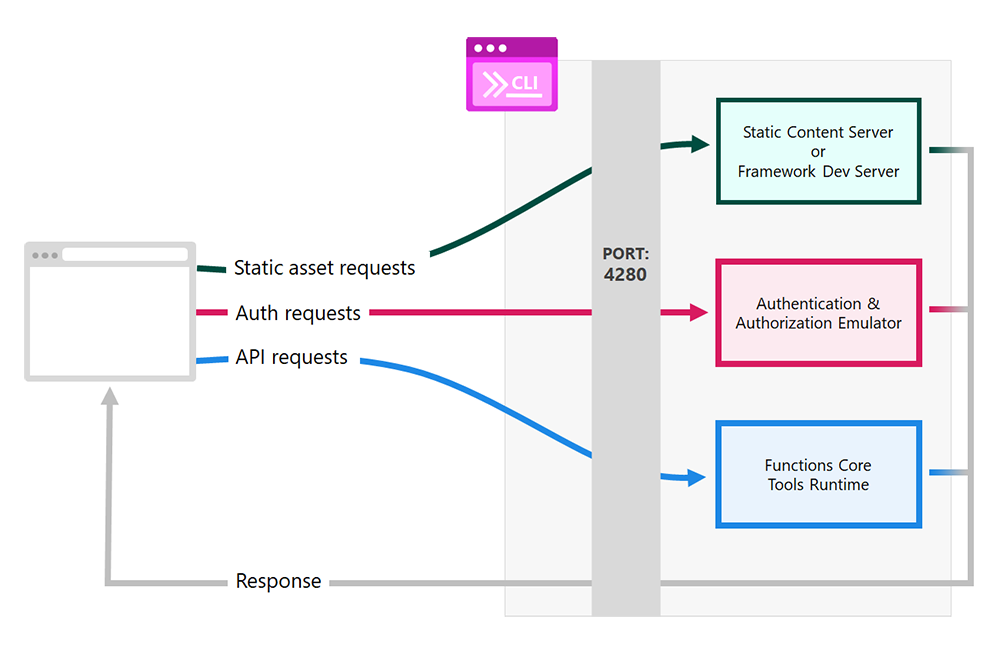
The following chart shows how requests are handled locally.
Important
Go to http://localhost:4280 to access the application served by the CLI.
Requests made to port
4280are forwarded to the appropriate server depending on the type of request.Static content requests, such as HTML or CSS, are either handled by the internal CLI static content server, or by the front-end framework server for debugging.
Authentication and authorization requests are handled by an emulator, which provides a fake identity profile to your app.
Functions Core Tools runtime1 handles requests to the site's API.
Responses from all services are returned to the browser as if they were all a single application.
Once you start the UI and the Azure Functions API apps independently, then start the Static Web Apps CLI and point it to the running apps using the following command:
swa start http://localhost:<DEV-SERVER-PORT-NUMBER> --api-location http://localhost:7071
Optionally, if you use the swa init command, the Static Web Apps CLI looks at your application code and build a swa-cli.config.json configuration file for the CLI. When you use the swa-cli.config.json file, you can run swa start to launch your application locally.
1 The Azure Functions Core Tools are automatically installed by the CLI if they aren't already on your system.
The following article details the steps for running a node-based application, but the process is the same for any language or environment.
Prerequisites
- Existing Azure Static Web Apps site: If you don't have one, begin with the vanilla-api starter app.
- Node.js with npm: Run the Node.js LTS version, which includes access to npm.
- Visual Studio Code: Used for debugging the API application, but not required for the CLI.
Get started
Open a terminal to the root folder of your existing Azure Static Web Apps site.
Install the CLI.
npm install -D @azure/static-web-apps-cliTip
If you want to install the SWA CLI globally, use
-gin place of-D. It is highly recommended, however, to install SWA as a development dependency.Build your app if required by your application.
Run
npm run build, or the equivalent command for your project.Initialize the repository for the CLI.
swa initAnswer the questions posed by the CLI to verify your configuration settings are correct.
Start the CLI.
swa startGo to
http://localhost:4280to view the app in the browser.
Other ways to start the CLI
| Description | Command | Comments |
|---|---|---|
| Serve a specific folder | swa start ./<OUTPUT_FOLDER_NAME> |
Replace <OUTPUT_FOLDER_NAME> with the name of your output folder. |
| Use a running framework development server | swa start http://localhost:3000 |
This command works when you have an instance of your application running under port 3000. Update the port number if your configuration is different. |
| Start a Functions app in a folder | swa start ./<OUTPUT_FOLDER_NAME> --api-location ./api |
Replace <OUTPUT_FOLDER_NAME> with the name of your output folder. This command expects your application's API to have files in the api folder. Update this value if your configuration is different. |
| Use a running Functions app | swa start ./<OUTPUT_FOLDER_NAME> --api-location http://localhost:7071 |
Replace <OUTPUT_FOLDER_NAME> with the name of your output folder. This command expects your Azure Functions application to be available through port 7071. Update the port number if your configuration is different. |
Authorization and authentication emulation
The Static Web Apps CLI emulates the security flow implemented in Azure. When a user logs in, you can define a fake identity profile returned to the app.
For instance, when you try to go to /.auth/login/github, a page is returned that allows you to define an identity profile.
Note
The emulator works with any security provider, not just GitHub.
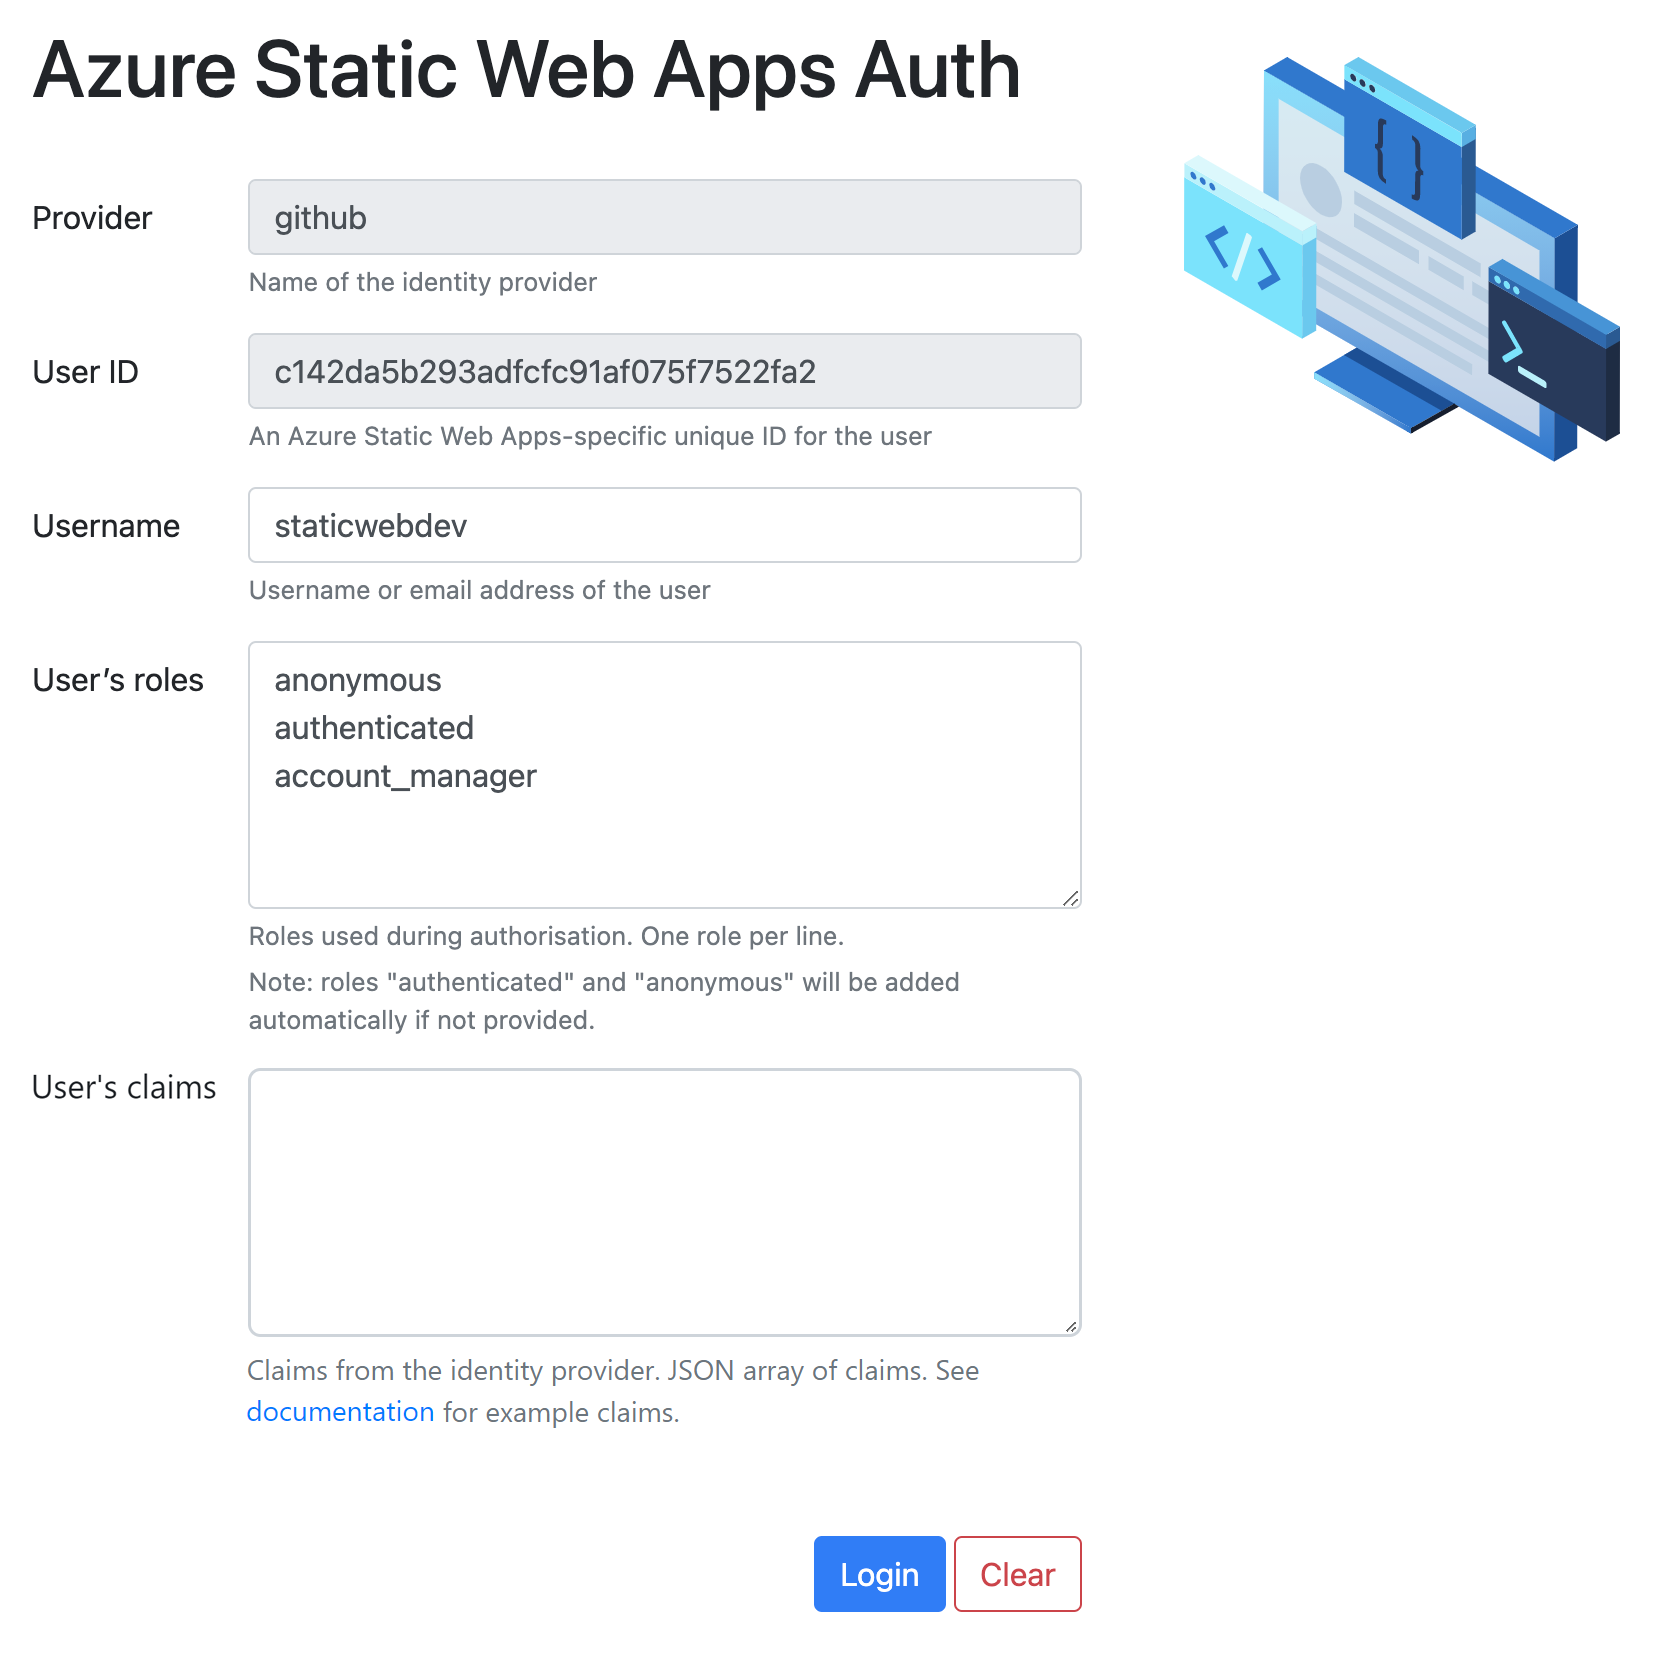
The emulator provides a page allowing you to provide the following client principal values:
| Value | Description |
|---|---|
| Username | The account name associated with the security provider. This value appears as the userDetails property in the client principal and is autogenerated if you don't provide a value. |
| User ID | Value autogenerated by the CLI. |
| Roles | A list of role names, where each name is on a new line. |
| Claims | A list of user claims, where each name is on a new line. |
Once logged in:
You can use the
/.auth/meendpoint, or a function endpoint to retrieve the user's client principal.Navigating to
/.auth/logoutclears the client principal and signs out the mock user.
Debugging
There are two debugging contexts in a static web app. The first is for the static content site, and the second is for API functions. Local debugging is possible by allowing the Static Web Apps CLI to use development servers for one or both of these contexts.
The following steps show you a common scenario that uses development servers for both debugging contexts.
Start the static site development server. This command is specific to the front-end framework you're using, but often comes in the form of commands like
npm run build,npm start, ornpm run dev.Open the API application folder in Visual Studio Code and start a debugging session.
Start the Static Web Apps CLI using the following command.
swa start http://localhost:<DEV-SERVER-PORT-NUMBER> --appDevserverUrl http://localhost:7071Replace
<DEV_SERVER_PORT_NUMBER>with the development server's port number.
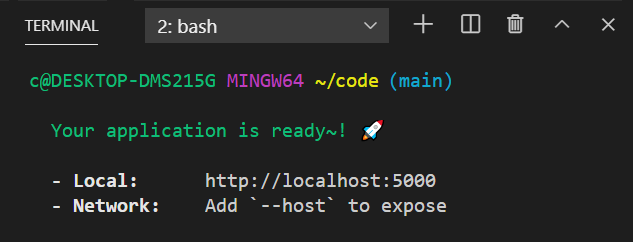
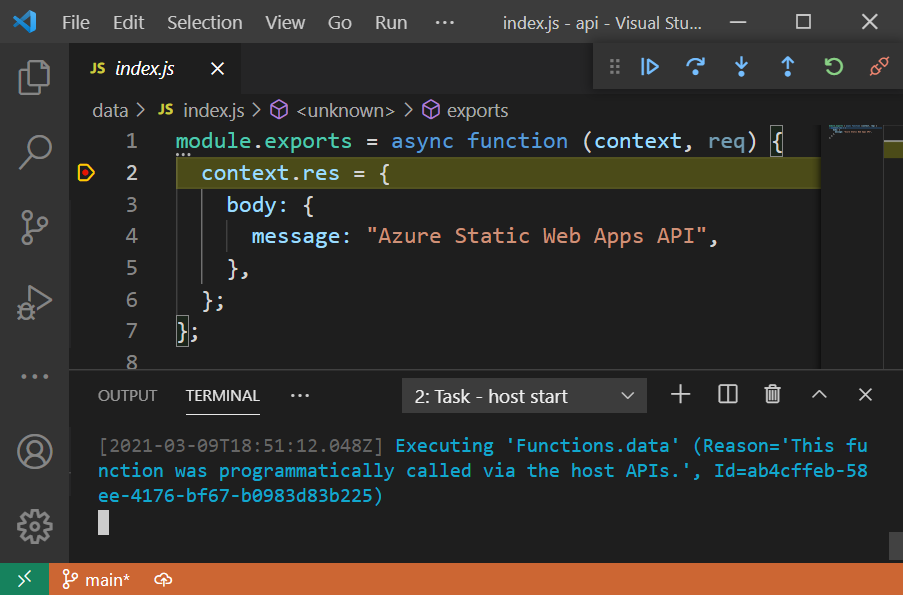
The following screenshots show the terminals for a typical debugging scenario:
The static content site is running via npm run dev.
The Azure Functions API application is running a debug session in Visual Studio Code.
The Static Web Apps CLI is launched using both development servers.
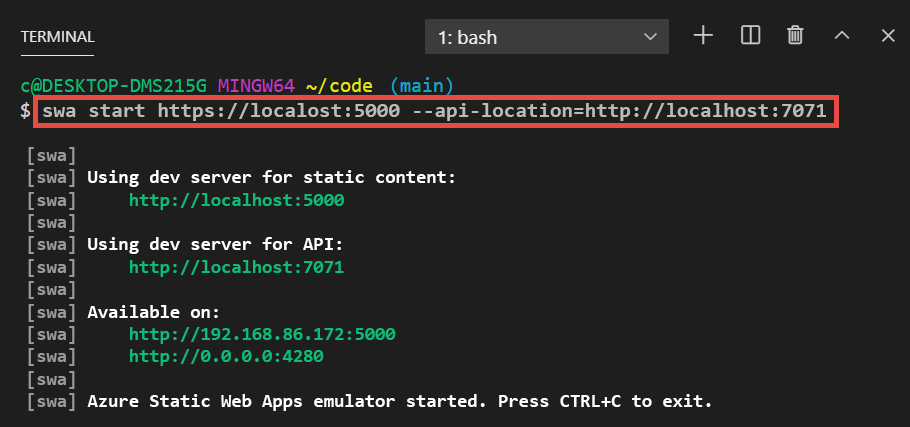
Now requests that go through port 4280 are routed to either the static content development server, or the API debugging session.
For more information on different debugging scenarios, with guidance on how to customize ports and server addresses, see the Azure Static Web Apps CLI repository.
Sample debugging configuration
Visual Studio Code uses a file to enable debugging sessions in the editor. If Visual Studio Code doesn't generate a launch.json file for you, you can place the following configuration in .vscode/launch.json.
{
    "version": "0.2.0",
    "configurations": [
        {
            "name": "Attach to Node Functions",
            "type": "node",
            "request": "attach",
            "port": 9229,
            "preLaunchTask": "func: host start"
        }
    ]
}