Transfer objects to/from Azure Blob storage using PHP
In this quickstart, you learn how to use PHP to upload, download, and list block blobs in a container in Azure Blob storage.
Prerequisites
To access Azure Storage, you'll need an Azure subscription. If you don't already have a subscription, create a free account before you begin.
All access to Azure Storage takes place through a storage account. For this quickstart, create a storage account using the Azure portal, Azure PowerShell, or Azure CLI. For help creating a storage account, see Create a storage account.
Make sure you have the following additional prerequisites installed:
Download the sample application
The sample application used in this quickstart is a basic PHP application.
Use git to download a copy of the application to your development environment.
git clone https://github.com/Azure-Samples/storage-blobs-php-quickstart.git
This command clones the repository to your local git folder. To open the PHP sample application, look for the storage-blobs-php-quickstart folder, and open the phpqs.php file.
Copy your credentials from the Azure portal
The sample application needs to authorize access to your storage account. Provide your storage account credentials to the application in the form of a connection string. To view your storage account credentials:
In to the Azure portal go to your storage account.
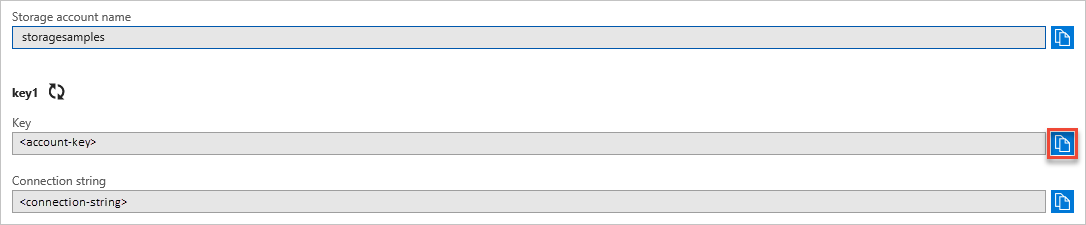
In the Settings section of the storage account overview, select Access keys to display your account access keys and connection string.
Note the name of your storage account, which you'll need for authorization.
Find the Key value under key1, and select Copy to copy the account key.
Configure your storage connection string
In the application, you must provide your storage account name and account key to create the BlobRestProxy instance for your application. It is recommended to store these identifiers within an environment variable on the local machine running the application. Use one of the following examples depending on your Operating System to create the environment variable. Replace the youraccountname and youraccountkey values with your account name and key.
Configure your environment
Take the folder from your local git folder and place it in a directory served by your PHP server. Then, open a command prompt scoped to that same directory and enter: php composer.phar install
Run the sample
This sample creates a test file in the '.' folder. The sample program uploads the test file to Blob storage, lists the blobs in the container, and downloads the file with a new name.
Run the sample. The following output is an example of the output returned when running the application:
Uploading BlockBlob: HelloWorld.txt
These are the blobs present in the container: HelloWorld.txt: https://myexamplesacct.blob.core.windows.net/blockblobsleqvxd/HelloWorld.txt

This is the content of the blob uploaded: Hello Azure!
When you press the button displayed, the sample program deletes the storage container and the files. Before you continue, check your server's folder for the two files. You can open them and see they are identical.
You can also use a tool such as the Azure Storage Explorer to view the files in Blob storage. Azure Storage Explorer is a free cross-platform tool that allows you to access your storage account information.
After you've verified the files, hit any key to finish the demo and delete the test files. Now that you know what the sample does, open the example.rb file to look at the code.
Understand the sample code
Next, we walk through the sample code so that you can understand how it works.
Get references to the storage objects
The first thing to do is create the references to the objects used to access and manage Blob storage. These objects build on each other, and each is used by the next one in the list.
- Create an instance of the Azure storage BlobRestProxy object to set up connection credentials.
- Create the BlobService object that points to the Blob service in your storage account.
- Create the Container object, which represents the container you are accessing. Containers are used to organize your blobs like you use folders on your computer to organize your files.
Once you have the blobClient container object, you can create the Block blob object that points to the specific blob in which you are interested. Then you can perform operations such as upload, download, and copy.
Important
Container names must be lowercase. See Naming and Referencing Containers, Blobs, and Metadata for more information about container and blob names.
In this section, you set up an instance of Azure storage client, instantiate the blob service object, create a new container, and set permissions on the container so the blobs are public. The container is called quickstartblobs.
    # Setup a specific instance of an Azure::Storage::Client
    $connectionString = "DefaultEndpointsProtocol=https;AccountName=".getenv('account_name').";AccountKey=".getenv('account_key');

    // Create blob client.
    $blobClient = BlobRestProxy::createBlobService($connectionString);

    # Create the BlobService that represents the Blob service for the storage account
    $createContainerOptions = new CreateContainerOptions();

    $createContainerOptions->setPublicAccess(PublicAccessType::CONTAINER_AND_BLOBS);

    // Set container metadata.
    $createContainerOptions->addMetaData("key1", "value1");
    $createContainerOptions->addMetaData("key2", "value2");

    $containerName = "blockblobs".generateRandomString();

    try    {
        // Create container.
        $blobClient->createContainer($containerName, $createContainerOptions);
Upload blobs to the container
Blob storage supports block blobs, append blobs, and page blobs. Block blobs are the most commonly used, and that is what is used in this quickstart.
To upload a file to a blob, get the full path of the file by joining the directory name and the file name on your local drive. You can then upload the file to the specified path using the createBlockBlob() method.
The sample code takes a local file and uploads it to Azure. The file is stored as myfile and the name of the blob as fileToUpload in the code. The following example uploads the file to your container called quickstartblobs.
    $myfile = fopen("HelloWorld.txt", "w") or die("Unable to open file!");
    fclose($myfile);

    # Upload file as a block blob
    echo "Uploading BlockBlob: ".PHP_EOL;
    echo $fileToUpload;
    echo "<br />";

    $content = fopen($fileToUpload, "r");

    //Upload blob
    $blobClient->createBlockBlob($containerName, $fileToUpload, $content);
To perform a partial update of the content of a block blob, use the createblocklist() method. Block blobs can be as large as 4.7 TB, and can be anything from Excel spreadsheets to large video files. Page blobs are primarily used for the VHD files used to back IaaS VMs. Append blobs are used for logging, such as when you want to write to a file and then keep adding more information. Append blob should be used in a single writer model. Most objects stored in Blob storage are block blobs.
List the blobs in a container
You can get a list of files in the container using the listBlobs() method. The following code retrieves the list of blobs, then loops through them, showing the names of the blobs found in a container.
    $listBlobsOptions = new ListBlobsOptions();
    $listBlobsOptions->setPrefix("HelloWorld");

    echo "These are the blobs present in the container: ";

    do{
        $result = $blobClient->listBlobs($containerName, $listBlobsOptions);
        foreach ($result->getBlobs() as $blob)
        {
            echo $blob->getName().": ".$blob->getUrl()."<br />";
        }

        $listBlobsOptions->setContinuationToken($result->getContinuationToken());
    } while($result->getContinuationToken());
Get the content of your blobs
Get the contents of your blobs using the getBlob() method. The following code displays the contents of the blob uploaded in a previous section.
    $blob = $blobClient->getBlob($containerName, $fileToUpload);
    fpassthru($blob->getContentStream());
Clean up resources
If you no longer need the blobs uploaded in this quickstart, you can delete the entire container using the deleteContainer() method. If the files created are no longer needed, you use the deleteBlob() method to delete the files.
    // Delete blob.
    echo "Deleting Blob".PHP_EOL;
    echo $fileToUpload;
    echo "<br />";
    $blobClient->deleteBlob($_GET["containerName"], $fileToUpload);

    // Delete container.
    echo "Deleting Container".PHP_EOL;
    echo $_GET["containerName"].PHP_EOL;
    echo "<br />";
    $blobClient->deleteContainer($_GET["containerName"]);

    //Deleting local file
    echo "Deleting file".PHP_EOL;
    echo "<br />";
    unlink($fileToUpload);
Resources for developing PHP applications with blobs
See these additional resources for PHP development with Blob storage:
- View, download, and install the PHP client library source code for Azure Storage on GitHub.
- Explore Blob storage samples written using the PHP client library.
Next steps
In this quickstart, you learned how to transfer files between a local disk and Azure blob storage using PHP. To learn more about working with PHP, continue to our PHP Developer center.
For more information about the Storage Explorer and Blobs, see Manage Azure Blob storage resources with Storage Explorer.