Upgrade Azure Blob Storage with Azure Data Lake Storage capabilities
This article helps you to enable a hierarchical namespace and unlock capabilities such as file and directory-level security and faster operations. These capabilities are widely used by big data analytics workloads and are referred to collectively as Azure Data Lake Storage.
To learn more about these capabilities and evaluate the impact of this upgrade on workloads, applications, costs, service integrations, tools, features, and documentation, see Upgrading Azure Blob Storage with Azure Data Lake Storage capabilities.
Important
An upgrade is one-way. There's no way to revert your account once you've performed the upgrade. We recommend that you validate your upgrade in a nonproduction environment.
Prepare to upgrade
To prepare to upgrade your storage account to Data Lake Storage:
Review feature support
Your storage account might be configured to use features that aren't yet supported in Data Lake Storage enabled accounts. If your account is using such features, the upgrade will not pass the validation step. Review the Blob Storage feature support in Azure Storage accounts article to identify unsupported features. If you're using any such features in your account, disable them before you begin the upgrade.
The following features are supported for Data Lake Storage accounts, but are not supported by the upgrade process:
- Blob snapshots
- Encryption scopes
- Immutable storage
- Last access time tracking for lifecycle management
- Soft delete for blobs
- Soft delete for containers
If your storage account has such features enabled, you must disable them before performing the upgrade. If you want to resume using the features after the upgrade is complete, re-enable them.
In some cases, you will have to allow time for clean-up operations after a feature is disabled before upgrading. One example is the blob soft delete feature. You must disable blob soft delete and then allow all soft-delete blobs to expire before you can upgrade the account.
Important
You cannot upgrade a storage account to Data Lake Storage that has ever had the change feed feature enabled. Simply disabling change feed will not allow you to perform an upgrade. Instead, you must create an account with the hierarchical namespace feature enabled on it, and move then transfer your data into that account.
Remove page blobs from the storage account
You cannot upgrade a storage account that contains page blobs. Make sure to remove page blobs from the storage account before you perform the upgrade.
Ensure the segments of each blob path are named
The migration process creates a directory for each path segment of a blob. Data Lake Storage directories must have a name so for migration to succeed, each path segment in a virtual directory must have a name. The same requirement is true for segments that are named only with a space character. If any path segments are either unnamed (//) or named only with a space character (_), then before you proceed with the migration, you must copy those blobs to a new path that is compatible with these naming requirements.
Prevent write activity to the storage account
The upgrade might fail if an application writes to the storage account during the upgrade. To prevent such write activity:
Quiesce any applications or services that might perform write operations.
Release or break existing leases on containers and blobs in the storage account.
After the upgrade has completed, break the leases you created to resume allowing write access to the containers and blobs.
Warning
Breaking an active lease without gracefully disabling applications or virtual machines that are currently accessing those resources could have unexpected results. Be sure to quiesce any current write activities before breaking any current leases.
Perform the upgrade
Sign in to the Azure portal to get started.
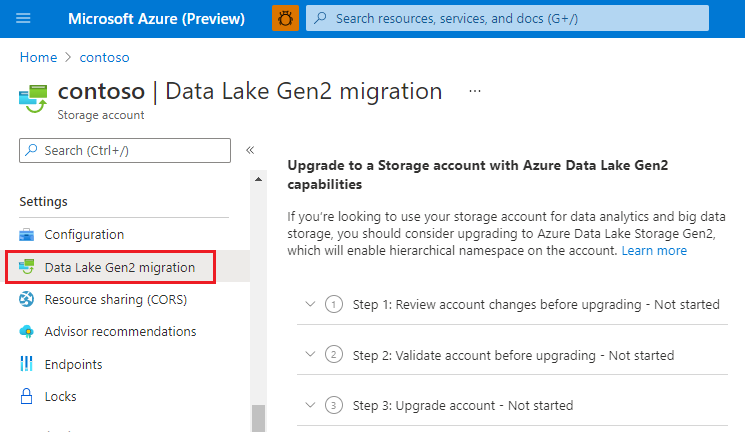
Locate your storage account and display the account overview.
Select Data Lake Gen2 migration.
The Upgrade to a Storage account with Azure Data Lake Gen2 capabilities configuration page appears.
Expand the Step 1: Review account changes before upgrading section and click Review and agree to changes.
In the Review account changes page, select the checkbox and then click Agree to changes.
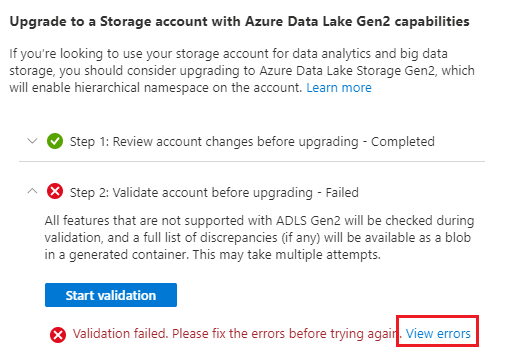
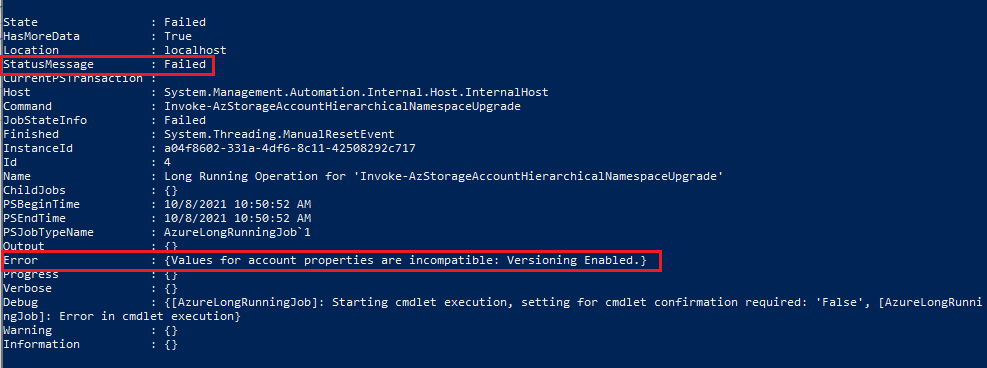
Expand the Step 2: Validate account before upgrading section and then click Start validation.
If validation fails, an error appears in the page. In some cases, a View errors link appears. If that link appears, select it.
Then, from the context menu of the error.json file, select Download.
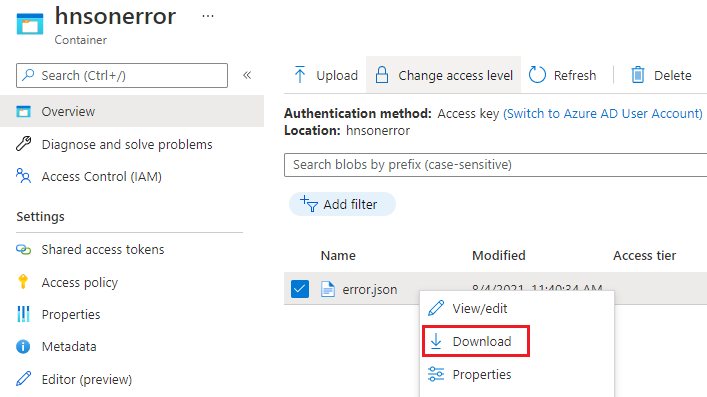
Open the downloaded file to determine why the account did not pass the validation step. The following JSON indicates that an incompatible feature is enabled on the account. In this case, you would disable the feature and then start the validation process again.
{
 "startTime": "2021-08-04T18:40:31.8465320Z",
 "id": "45c84a6d-6746-4142-8130-5ae9cfe013a0",
 "incompatibleFeatures": [
     "Blob Delete Retention Enabled"
 ],
 "blobValidationErrors": [],
 "scannedBlobCount": 0,
 "invalidBlobCount": 0,
 "endTime": "2021-08-04T18:40:34.9371480Z"
}
After your account has been successfully validated, expand the Step 3: Upgrade account section, and then click Start upgrade.
Important
Write operations are disabled while your account is being upgraded. Read operations aren't disabled, but we strongly recommend that you suspend read operations as they might destabilize the upgrade process.
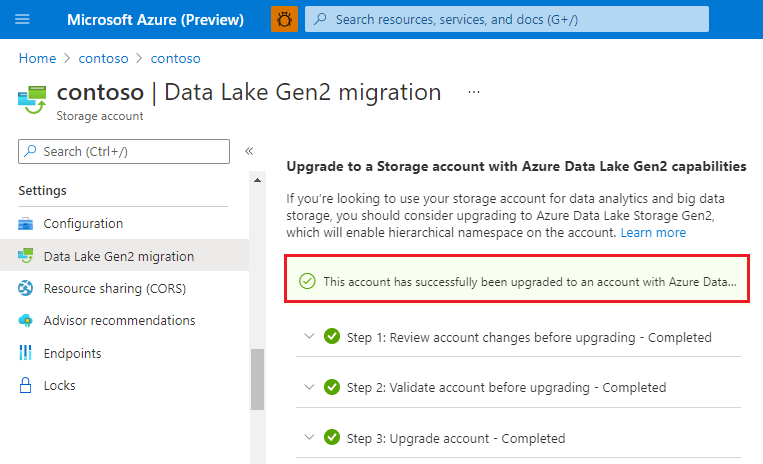
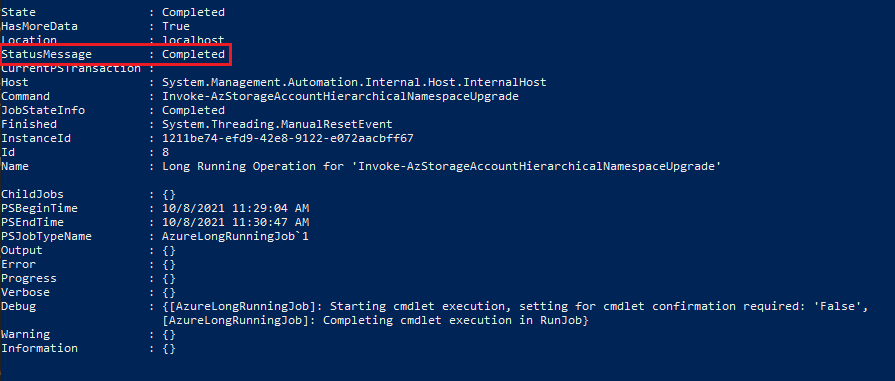
When the migration has completed successfully, a message similar to the following appears.
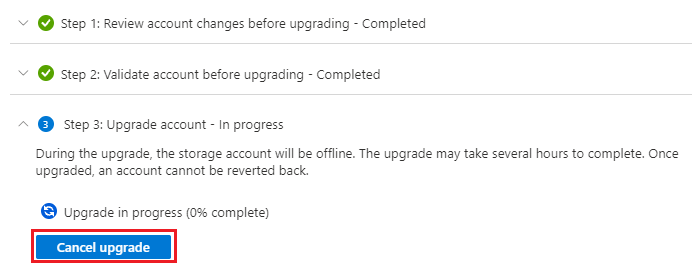
Stop the upgrade
You can stop the migration before it completes.
To stop the upgrade before it completes, select Cancel upgrade while the upgrade is in progress.
Migrate data, workloads, and applications
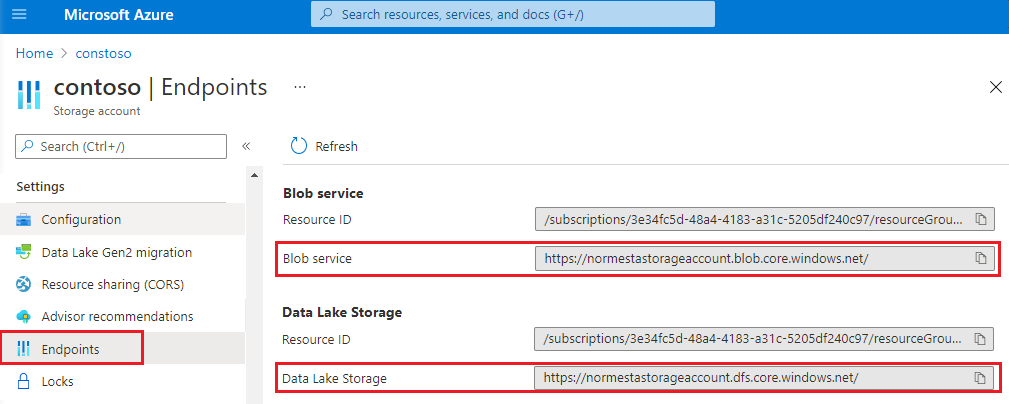
Configure services in your workloads to point to either the Blob service endpoint or the Data Lake storage endpoint.
For Hadoop workloads that use Windows Azure Storage Blob driver or WASB driver, make sure to modify them to use the Azure Blob File System (ABFS) driver. Unlike the WASB driver that makes requests to the Blob service endpoint, the ABFS driver will make requests to the Data Lake Storage endpoint of your account.
Test custom applications to ensure that they work as expected with your upgraded account.
Multi-protocol access on Data Lake Storage enables most applications to continue using Blob APIs without modification. If you encounter issues or you want to use APIs to work with directory operations and ACLs, consider moving some of your code to use Data Lake Storage APIs. See guides for .NET, Java, Python, Node.js, and REST.
Test any custom scripts to ensure that they work as expected with your upgraded account.
As is the case with Blob APIs, many of your scripts will likely work without requiring you to modify them. However, if needed, you can upgrade script files to use Data Lake Storage PowerShell cmdlets, and Azure CLI commands.