Note
Access to this page requires authorization. You can try signing in or changing directories.
Access to this page requires authorization. You can try changing directories.
This article provides some general guidance on getting optimal performance with an environment that uses an Azure Elastic SAN.
Client-side optimizations
General recommendations
Windows & Linux Virtual Machines
For best performance, deploy your virtual machines (VM) and Elastic SAN in the same zone and the same region.
VM storage I/O to Elastic SAN volumes uses VM network bandwidth, so traditional disk throughput limits on a VM don't apply to Elastic SAN volumes. Choose a VM that can provide sufficient bandwidth for production/VM-to-VM I/O and iSCSI I/O to attached Elastic SAN volumes. Generally, you should use Gen 5 (D / E / M series) VMs for the best performance.
Enable Accelerated Networking on the VM during creation. To do it via Azure PowerShell or Azure CLI or to enable Accelerated Networking on existing VMs, see Use Azure PowerShell to create a VM with Accelerated Networking

- You must use 32 sessions per target volume for each volume to achieve its maximum IOPS and/or throughput limits. Use Multipath I/O (MPIO) on the client to manage these multiple sessions to each volume for load balancing. Scripts are available for Windows, Linux, or on the Connect to volume page for your volumes in the Azure portal, which uses 32 sessions by default. Windows software iSCSI initiator has a limit of maximum 256 sessions. If you need to connect more than eight volumes to a Windows VM, reduce the number of sessions to each volume as needed.
Azure VMware Solution
Deploy your Elastic SAN in the same region and availability zone as your Azure VMware Solution cluster
Configure Private Endpoints before mounting your Elastic SAN volume as an external datastore
If you plan for your environment to ever have 16 nodes in an Azure VMware Solution cluster, use one of the following configurations, depending on which hosts you have.
- AV36, AV36P, AV52 - Six iSCSI sessions over three Private Endpoints
- AV64 - Seven iSCSI sessions over seven Private Endpoints
If your environment won't have 16 nodes, use one of the following configurations.
- AV36, AV36P, AV52 - Eight iSCSI sessions over four Private Endpoints
- AV64 - Eight iSCSI sessions over eight Private Endpoints
Note
When an Elastic SAN volume is attached to a cluster, it automatically attaches to all nodes. If you have 16 nodes and each node is configured to use eight iSCSI sessions that uses the maximum number of connections (128). Configuring your nodes to use seven iSCSI sessions ensures that if you need to attach an extra node (for maintenance) then you have available iSCSI sessions.
Use eager zeroed thick provisioning when creating virtual disks
Size ExpressRoute Gateway so that it can meet your throughput requirements
Configure your Elastic SAN to have at least 16 TiB in its base size, so you can get up to the maximum performance on your Elastic SAN datastores
MPIO
Windows
Use the following commands to update your settings:
# Enable multipath support for iSCSI devices
Enable-MSDSMAutomaticClaim -BusType iSCSI

# Set the default load balancing policy based on your requirements. In this example, we set it to round robin which should be optimal for most workloads.
mpclaim -L -M 2

# Set disk time out to 30 seconds
Set-MPIOSetting -NewDiskTimeout 30
For more information regarding MPIO cmdlets, see MPIO reference.
Linux
Update /etc/multipath.conf file with the following commands:
defaults {
    user_friendly_names yes		# To create ‘mpathn’ names for multipath devices
    path_grouping_policy multibus	# To place all the paths in one priority group
    path_selector "round-robin 0"	# To use round robin algorithm to determine path for next I/O operation
    failback immediate			# For immediate failback to highest priority path group with active paths
    no_path_retry 3			# To disable I/O queueing after retrying once when all paths are down
    polling_interval 5         # Set path check polling interval to 5 seconds
    find multipaths yes        # To allow multipath to take control of only those devices that have multiple paths
}
devices {
  device {
    vendor "MSFT"
    product "Virtual HD"
  }
}
Azure VMware Solution
Microsoft manages MPIO settings for Azure VMware Solution. Optimal values are set when you create a datastore.
iSCSI
Windows
Update the registry settings for iSCSI initiator on Windows.
- Open Registry Editor:
- Select Start, type regedit in the search box and press enter.
- Navigate to the following location: [\HKEY_LOCAL_MACHINE\SYSTEM\CurrentControlSet\Control\Class\{4d36e97b-e325-11ce-bfc1-08002be10318}\0004 (Microsoft iSCSI Initiator)\Parameters]
- Update the following settings. Right-click on each setting and select Modify. Change Base to Decimal, update the value and select OK.
| Description | Parameter and value |
|---|---|
| Sets maximum data the initiator sends in an iSCSI PDU to the target to 256 KB | MaxTransferLength=262144 |
| Sets maximum SCSI payload that the initiator negotiates with the target to 256 KB | MaxBurstLength=262144 |
| Sets maximum unsolicited data the initiator can send in an iSCSI PDU to a target to 256 KB | FirstBurstLength=262144 |
| Sets maximum data the initiator can receive in an iSCSI PDU from the target to 256 KB | MaxRecvDataSegmentLength=262144 |
| Disables R2T flow control | InitialR2T=0 |
| Enables immediate data | ImmediateData=1 |
| Sets timeout value for WMI requests to 30 seconds | WMIRequestTimeout = 30 seconds |
| Sets timeout value for link down time to 30 seconds | LinkDownTime = 30 seconds |
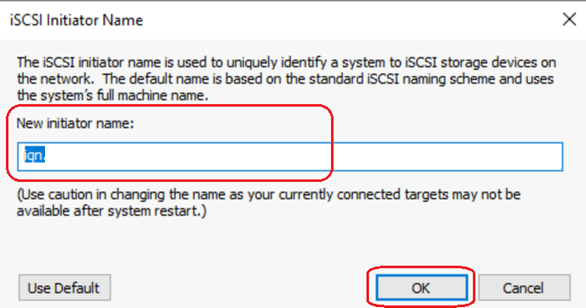
In cluster configurations, ensure iSCSI initiator names unique across all nodes that are sharing volumes. In Windows, you can update them via iSCSI Initiator app.
Select Start, search for iSCSI Initiator in the search box. This opens the iSCSI Initiator.
Select Configuration to see current initiator name.
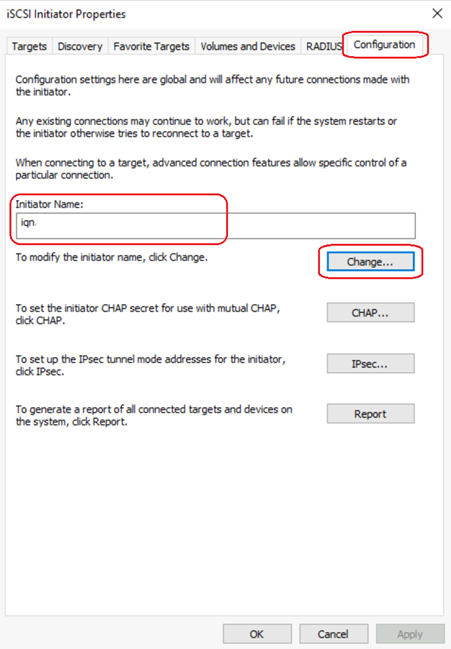
To modify it, select Change, enter new initiator name, and select OK.


Linux
Update the following settings with recommended values in global iSCSI configuration file (iscsid.conf, generally found in /etc/iscsi directory) on the client before connecting any volumes to it. When a volume is connected, a node is created along with a configuration file specific to that node (for example on Ubuntu VMs, it can be found in the /etc/iscsi/nodes/$volume_iqn/portal_hostname,$port directory) inheriting the settings from global configuration file. If you already connected one or more volumes to the client before updating global configuration file, update the node specific configuration file for each volume directly or using the following command:
# Variable declaration
volume_iqn=<Elastic SAN volume IQN>
portal_hostname=<Elastic SAN volume portal hostname>
port=3260

# Set maximum data the initiator sends in an iSCSI PDU to the target to 256 KB
sudo iscsiadm -m node -T $volume_iqn -p $portal_hostname:$port -o update -n node.conn[0].iscsi.MaxXmitDataSegmentLength -v 262144

# Set maximum SCSI payload that the initiator negotiates with the target to 256 KB
sudo iscsiadm -m node -T $volume_iqn -p $portal_hostname:$port -o update -n node.session.iscsi.MaxBurstLength -v 262144

# Set maximum unsolicited data the initiator can send in an iSCSI PDU to a target to 256 KB
sudo iscsiadm -m node -T $volume_iqn -p $portal_hostname:$port -o update -n node.session.iscsi.FirstBurstLength -v 262144

# Set maximum data the initiator can receive in an iSCSI PDU from the target to 256 KB
sudo iscsiadm -m node -T $volume_iqn -p $portal_hostname:$port -o update -n node.conn[0].iscsi.MaxRecvDataSegmentLength -v 262144

# Disable R2T flow control
sudo iscsiadm -m node -T $volume_iqn -p $portal_hostname:$port -o update -n node.session.iscsi.InitialR2T -v No

# Enable immediate data
sudo iscsiadm -m node -T $volume_iqn -p $portal_hostname:$port -o update -n node.session.iscsi.ImmediateData -v Yes

# Set timeout value for WMI requests
sudo iscsiadm -m node -T $volume_iqn -p $portal_hostname:$port -o update -n node.conn[0].timeo.login_timeout -v 30
sudo iscsiadm -m node -T $volume_iqn -p $portal_hostname:$port -o update -n node.conn[0].timeo.logout_timeout -v 15

# Enable CRC digest checking for header and data
sudo iscsiadm -m node -T $volume_iqn -p $portal_hostname:$port -o update -n node.conn[0].iscsi.HeaderDigest -v CRC32C
sudo iscsiadm -m node -T $volume_iqn -p $portal_hostname:$port -o update -n node.conn[0].iscsi.DataDigest -v CRC32C
In cluster configurations, ensure iSCSI initiator names are unique across all nodes that are sharing volumes. In Linux, modify /etc/iscsi/initiatorname.iscsi to update the initiator name.

Azure VMware Solution
Microsoft manages iSCSI settings. Optimal values are set when you create a datastore.
Elastic SAN optimizations
Before deploying an Elastic SAN, determining the optimal size of the Elastic SAN you deploy is necessary to achieving the right balance of performance for your workloads and cost. Use the following steps to determine the best sizing for you:
With your existing storage solution, select a time interval (day/week/quarter) to track performance. The best time interval is one that is a good snapshot of your applications/workloads. Over that time period, record the combined maximum IOPS and throughput for all workloads. If you use an interval higher than a minute, or if any of your workloads have bottlenecks with your current configuration, consider adding more base capacity to your Elastic SAN deployment. You should leave some headroom when determining your base capacity, to account for growth. The rest of your Elastic SAN's storage should use additional-capacity, to save on cost.
For more information on performance, see Elastic SAN and virtual machine performance.