Note
Access to this page requires authorization. You can try signing in or changing directories.
Access to this page requires authorization. You can try changing directories.
This article provides guidance for users who have questions related to managing tiered files. For conceptual questions regarding cloud tiering, see Azure Files FAQ.
How to check if your files are being tiered
Whether or not files need to be tiered per set policies is evaluated once an hour. You can come across two situations when a new server endpoint is created:
When you first add a new server endpoint, often files exist in that server location. They need to be uploaded before cloud tiering can begin. The volume free space policy won't begin its work until initial upload of all files has finished. However, the optional date policy will begin to work on an individual file basis, as soon as a file has been uploaded. The one-hour interval applies here as well.
When you add a new server endpoint, it's possible you connected an empty server location to an Azure file share with your data in it. If you choose to download the namespace and recall content during initial download to your server, then after the namespace comes down, files will be recalled based on the last modified timestamp until the volume free space policy and the optional date policy limits are reached.
There are several ways to check whether a file has been tiered to your Azure file share:
Check the file attributes on the file. Right-click on a file, go to Details, and then scroll down to the Attributes property. A tiered file has the following attributes set:
Attribute letter Attribute Definition A Archive Indicates that the file should be backed up by backup software. This attribute is always set, regardless of whether the file is tiered or stored fully on disk. P Sparse file Indicates that the file is a sparse file. A sparse file is a specialized type of file that NTFS offers for efficient use when the file on the disk stream is mostly empty. Azure File Sync uses sparse files because a file is either fully tiered or partially recalled. In a fully tiered file, the file stream is stored in the cloud. In a partially recalled file, that part of the file is already on disk. This might occur when files are partially read by applications like multimedia players or zip utilities. If a file is fully recalled to disk, Azure File Sync converts it from a sparse file to a regular file. This attribute is only set on Windows Server 2016 and older. M Recall on data access Indicates that the file's data isn't fully present on local storage. Reading the file will cause at least some of the file content to be fetched from an Azure file share to which the server endpoint is connected. This attribute is only set on Windows Server 2019 and newer. L Reparse point Indicates that the file has a reparse point. A reparse point is a special pointer for use by a file system filter. Azure File Sync uses reparse points to define to the Azure File Sync file system filter (StorageSync.sys) the cloud location where the file is stored. This supports seamless access. Users won't need to know that Azure File Sync is being used or how to get access to the file in your Azure file share. When a file is fully recalled, Azure File Sync removes the reparse point from the file. O Offline Indicates that some or all of the file's content isn't stored on disk. When a file is fully recalled, Azure File Sync removes this attribute. 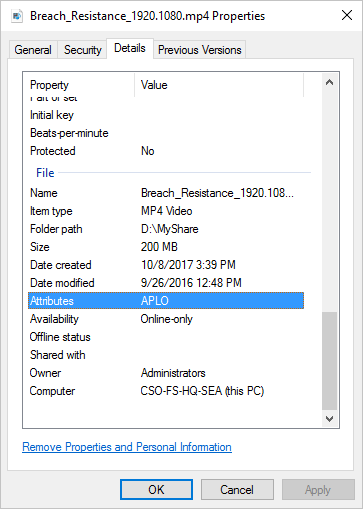
Note
You can see the attributes for all the files in a folder by adding the Attributes field to the table display of File Explorer. To do this, right-click on an existing column (for example, Size), select More, and then select Attributes from the drop-down list.
Note
All of these attributes will be visible for partially recalled files as well.
Use
fsutilto check for reparse points on a file. As described in the preceding option, a tiered file always has a reparse point set. A reparse point allows the Azure File Sync file system filter driver (StorageSync.sys) to retrieve content from Azure file shares that isn't stored locally on the server.To check whether a file has a reparse point, in an elevated Command Prompt or PowerShell window, run the
fsutilutility:fsutil reparsepoint query <your-file-name>If the file has a reparse point, you can expect to see Reparse Tag Value: 0x8000001e. This hexadecimal value is the reparse point value that is owned by Azure File Sync. The output also contains the reparse data that represents the path to your file on your Azure file share.
Warning
The
fsutil reparsepointutility command also has the ability to delete a reparse point. Don't execute this command unless the Azure File Sync engineering team asks you to. Running this command might result in data loss.
How to exclude files or folders from being tiered
If you want to exclude files or folders from being tiered and remain local on the Windows Server, you can configure the GhostingExclusionList registry setting under HKEY_LOCAL_MACHINE\SOFTWARE\Microsoft\Azure\StorageSync. You can exclude files by file name, file extension or path.
To exclude files or folders from cloud tiering, perform the following steps:
Open an elevated command prompt.
Run one of the following commands to configure exclusions:
To exclude certain file extensions from tiering (for example, .one, .lnk, .log), run the following command:
reg ADD "HKEY_LOCAL_MACHINE\SOFTWARE\Microsoft\Azure\StorageSync" /v GhostingExclusionList /t REG_SZ /d .one|.lnk|.log /fTo exclude a specific file name from tiering (for example, FileName.vhd), run the following command:
reg ADD "HKEY_LOCAL_MACHINE\SOFTWARE\Microsoft\Azure\StorageSync" /v GhostingExclusionList /t REG_SZ /d FileName.vhd /fTo exclude all files under a folder from tiering (for example, D:\ShareRoot\Folder\SubFolder), run the following command: reg ADD "HKEY_LOCAL_MACHINE\SOFTWARE\Microsoft\Azure\StorageSync" /v GhostingExclusionList /t REG_SZ /d D:\\ShareRoot\\Folder\\SubFolder /f
To exclude a combination of file names, file extensions and folders from tiering (for example, D:\ShareRoot\Folder1\SubFolder1,FileName.log,.txt), run the following command:
reg ADD "HKEY_LOCAL_MACHINE\SOFTWARE\Microsoft\Azure\StorageSync" /v GhostingExclusionList /t REG_SZ /d D:\\ShareRoot\\Folder1\\SubFolder1|FileName.log|.txt /fFor the cloud tiering exclusions to take effect, you must restart the Storage Sync Agent service (FileSyncSvc) by running the following commands:
net stop filesyncsvc
net start filesyncsvc
Tiered downloads
When you exclude a file type or pattern, it won't be tiered from that server anymore. However, all files changed or created in a different endpoint will continue to be downloaded as tiered files and will stay tiered. These files will be recalled gradually based on exclusion policy.
For example, if you exclude PDF files, the PDF files that you create directly on the server won't be tiered. However, any PDF files that you create on a different endpoint, such as another server endpoint or the Azure file share, will still download as tiered files. These excluded tiered files will be fully recalled within the next 3-4 days.
If you don't want any files to be in a tiered state, enable proactive recalling. This feature will prevent tiered download of all files and stop background tiering.
More information
- If the Azure File Sync agent is installed on a Failover Cluster, you must create the GhostingExclusionList registry setting under
HKEY_LOCAL_MACHINE\Cluster\StorageSync\SOFTWARE\Microsoft\Azure\StorageSync.- Example: reg ADD "HKEY_LOCAL_MACHINE\Cluster\StorageSync\SOFTWARE\Microsoft\Azure\StorageSync" /v GhostingExclusionList /t REG_SZ /d .one|.lnk|.log /f
- Each exclusion in the registry should be separated by a pipe (|) character.
- Use double backslash (\\) when specifying a path to exclude.
- Example: reg ADD "HKEY_LOCAL_MACHINE\SOFTWARE\Microsoft\Azure\StorageSync" /v GhostingExclusionList /t REG_SZ /d D:\\ShareRoot\\Folder\\SubFolder /f
- File name or file type exclusions apply to all server endpoints on the server.
- You can't exclude file types from a particular folder only.
- Exclusions don't apply to files already tiered. Use the Invoke-StorageSyncFileRecall cmdlet to recall files already tiered.
- Use Event ID 9001 in the Telemetry event log on the server to check the cloud tiering exclusions that are configured. The Telemetry event log is located in Event Viewer under
Applications and Services\Microsoft\FileSync\Agent.
How to exclude applications from cloud tiering last access time tracking
When an application accesses a file, the last access time for the file is updated in the cloud tiering database. Applications that scan the file system like anti-virus cause all files to have the same last access time, which impacts when files are tiered.
To exclude applications from last access time tracking, add the process exclusions to the HeatTrackingProcessNamesExclusionList registry setting under HKEY_LOCAL_MACHINE\SOFTWARE\Microsoft\Azure\StorageSync.
Example: reg ADD "HKEY_LOCAL_MACHINE\SOFTWARE\Microsoft\Azure\StorageSync" /v HeatTrackingProcessNamesExclusionList /t REG_SZ /d "SampleApp.exe|AnotherApp.exe" /f
If the Azure File Sync agent is installed on a Failover Cluster, the HeatTrackingProcessNamesExclusionList registry setting must be created under HKEY_LOCAL_MACHINE\Cluster\StorageSync\SOFTWARE\Microsoft\Azure\StorageSync.
Example: reg ADD "HKEY_LOCAL_MACHINE\Cluster\StorageSync\SOFTWARE\Microsoft\Azure\StorageSync" /v HeatTrackingProcessNamesExclusionList /t REG_SZ /d "SampleApp.exe|AnotherApp.exe" /f
Note
Data Deduplication and File Server Resource Manager (FSRM) processes are excluded by default. Changes to the process exclusion list are honored by the system every five minutes.
How to access the heat store
Cloud tiering uses the last access time and the access frequency of a file to determine which files should be tiered. The cloud tiering filter driver (storagesync.sys) tracks last access time and logs the information in the cloud tiering heat store. You can retrieve the heat store and save it into a CSV file by using a server-local PowerShell cmdlet.
There is a single heat store for all files on the same volume. The heat store can get very large. If you only need to retrieve the "coolest" number of items, use -Limit and a number and also consider filtering by a sub path versus the volume root.
Import the PowerShell module:
Import-Module '<SyncAgentInstallPath>\StorageSync.Management.ServerCmdlets.dll'VOLUME FREE SPACE: To get the order in which files will be tiered using the volume free space policy:
Get-StorageSyncHeatStoreInformation -VolumePath '<DriveLetter>:\' -ReportDirectoryPath '<FolderPathToStoreResultCSV>' -IndexName FilesToBeTieredBySpacePolicyDATE POLICY: To get the order in which files will be tiered using the date policy:
Get-StorageSyncHeatStoreInformation -VolumePath '<DriveLetter>:\' -ReportDirectoryPath '<FolderPathToStoreResultCSV>' -IndexName FilesToBeTieredByDatePolicyFind the heat store information for a particular file:
Get-StorageSyncHeatStoreInformation -FilePath '<PathToSpecificFile>'See all files in descending order by last access time:
Get-StorageSyncHeatStoreInformation -VolumePath '<DriveLetter>:\' -ReportDirectoryPath '<FolderPathToStoreResultCSV>' -IndexName DescendingLastAccessTimeSee the order by which tiered files will be recalled by background recall or on-demand recall through PowerShell:
Get-StorageSyncHeatStoreInformation -VolumePath '<DriveLetter>:\' -ReportDirectoryPath '<FolderPathToStoreResultCSV>' -IndexName OrderTieredFilesWillBeRecalled
How to force a file or directory to be tiered
Note
When you select a directory to be tiered, only the files currently in the directory are tiered. Any files created after that time aren't automatically tiered.
When the cloud tiering feature is enabled, cloud tiering automatically tiers files based on last access and modify times to achieve the volume free space percentage specified on the cloud endpoint. Sometimes you might want to manually force a file to tier. This might be useful if you save a large file that you don't intend to use again for a long time, and you want the free space on your volume now to use for other files and folders. You can force tiering by using the following PowerShell commands:
Import-Module "C:\Program Files\Azure\StorageSyncAgent\StorageSync.Management.ServerCmdlets.dll"
Invoke-StorageSyncCloudTiering -Path "file-or-directory-to-be-tiered"
How to recall a tiered file to disk
The easiest way to recall a file to disk is to open the file. The Azure File Sync file system filter (StorageSync.sys) seamlessly downloads the file from your Azure file share. For file types that can be partially read or streamed, such as multimedia or .zip files, simply opening a file doesn't ensure the entire file is downloaded.
Note
If a shortcut file is brought down to the server as a tiered file, there might be an issue when accessing the file over SMB. To mitigate this, there is a task that runs every three days that will recall any shortcut files. However, if you want shortcut files that are tiered to be recalled more frequently, create a scheduled task that runs this at the desired frequency:
Import-Module "C:\Program Files\Azure\StorageSyncAgent\StorageSync.Management.ServerCmdlets.dll"
Invoke-StorageSyncFileRecall -Path "D:\path-to-your-server-endpoint" -Pattern *.lnk
Parameters:
-PathThe -Path parameter in theInvoke-StorageSyncFileRecallcommand specifies where the recalled files should be restored on the local server. This path must be the server endpoint configured for Azure File Sync.- If you're unsure of the server endpoint path, navigate to your Azure File Sync agent → Select your Storage Sync Service → Open your Sync Group.
- You can also run the following command via PowerShell:
Get-StorageSyncServerEndpoint
-PatternThe -Pattern parameter inInvoke-StorageSyncFileRecallis used to filter which files should be recalled from Azure File Sync. It allows you to specify file types or names using wildcards.
To ensure that a file is fully downloaded to local disk, you must use PowerShell to force a file to be fully recalled. This option might also be useful if you want to recall multiple files at once, such as all the files in a folder. Open a PowerShell session to the server node where Azure File Sync is installed, and then run the following PowerShell commands:
Import-Module "C:\Program Files\Azure\StorageSyncAgent\StorageSync.Management.ServerCmdlets.dll"
Invoke-StorageSyncFileRecall -Path "D:\path-to-your-server-endpoint"
Optional parameters:
-Order CloudTieringPolicywill recall the most recently modified or accessed files first, and is allowed by the current tiering policy.- If volume free space policy is configured, files will be recalled until the volume free space policy setting is reached. For example, if the volume free policy setting is 20%, recall will stop once the volume free space reaches 20%.
- If volume free space and date policy is configured, files will be recalled until the volume free space or date policy setting is reached. For example, if the volume free policy setting is 20% and the date policy is 7 days, recall will stop once the volume free space reaches 20% or all files accessed or modified within 7 days are local.
-ThreadCountdetermines how many files can be recalled in parallel (thread count limit is 32).-PerFileRetryCountdetermines how often a recall will be attempted of a file that is currently blocked.-PerFileRetryDelaySecondsdetermines the time in seconds between retry to recall attempts and should always be used in combination with the previous parameter.
Example:
Import-Module "C:\Program Files\Azure\StorageSyncAgent\StorageSync.Management.ServerCmdlets.dll"
Invoke-StorageSyncFileRecall -Path "D:\path-to-your-server-endpoint" -ThreadCount 8 -Order CloudTieringPolicy -PerFileRetryCount 3 -PerFileRetryDelaySeconds 10
Note
- If the local volume hosting the server doesn't have enough free space to recall all the tiered data, the
Invoke-StorageSyncFileRecallcmdlet fails.
Note
To recall files that have been tiered, the network bandwidth should be at least 1 Mbps. If network bandwidth is less than 1 Mbps, files might fail to recall with a timeout error.