Note
Access to this page requires authorization. You can try signing in or changing directories.
Access to this page requires authorization. You can try changing directories.
✔️ Applies to: Classic SMB and NFS file shares created with the Microsoft.Storage resource provider
✖️ Doesn't apply to: File shares created with the Microsoft.FileShares resource provider (preview)
Before you create an Azure classic file share, consider the following requirements:
Performance: Azure classic file shares offer two media tiers: SSD (premium), with single-digit millisecond latency, and HDD (standard), for cost-effective general purpose storage.
Redundancy:
Azure Files offers locally redundant storage (LRS), zone-redundant storage (ZRS), geo-redundant storage (GRS), and geo-zone-redundant storage (GZRS) options for HDD SMB file shares. SSD file shares are only available for the LRS and ZRS redundancy types. See Azure Files redundancy for more information.
For more information, see Plan for an Azure Files deployment.
Prerequisites
- This article assumes that you have an Azure subscription. If you don't have an Azure subscription, create a free account.
- If you intend to use Azure PowerShell, install the latest version.
- If you intend to use Azure CLI, install the latest version.
Create a storage account
Azure classic file shares are deployed into storage accounts, which are top-level objects that represent a shared pool of storage. You can use this pool of storage to deploy multiple file shares. If you already have an Azure storage account that you want to use, you can skip this section and proceed to Create a classic file share.
Storage accounts have two properties, kind and SKU, which dictate the billing model, media tier, and redundancy of the file shares that you can deploy in the storage account. For Azure Files, consider three main combinations of kind and SKU:
| Media tier | Billing model | Storage account kind | Storage account SKUs |
|---|---|---|---|
| SSD and HDD | Provisioned v2 | FileStorage |
|
| SSD | Provisioned v1 | FileStorage |
|
| HDD | Pay-as-you-go | StorageV2 |
|
We recommend using the provisioned v2 billing model for all new file share deployments. The provisioned v1 and pay-as-you-go billing models remain fully supported for new and existing deployments. Provisioned v2 file shares are currently available in most regions. See provisioned v2 availability for more information.
To create a storage account by using the Azure portal, use the search box at the top of the Azure portal to search for storage accounts and select the matching result.
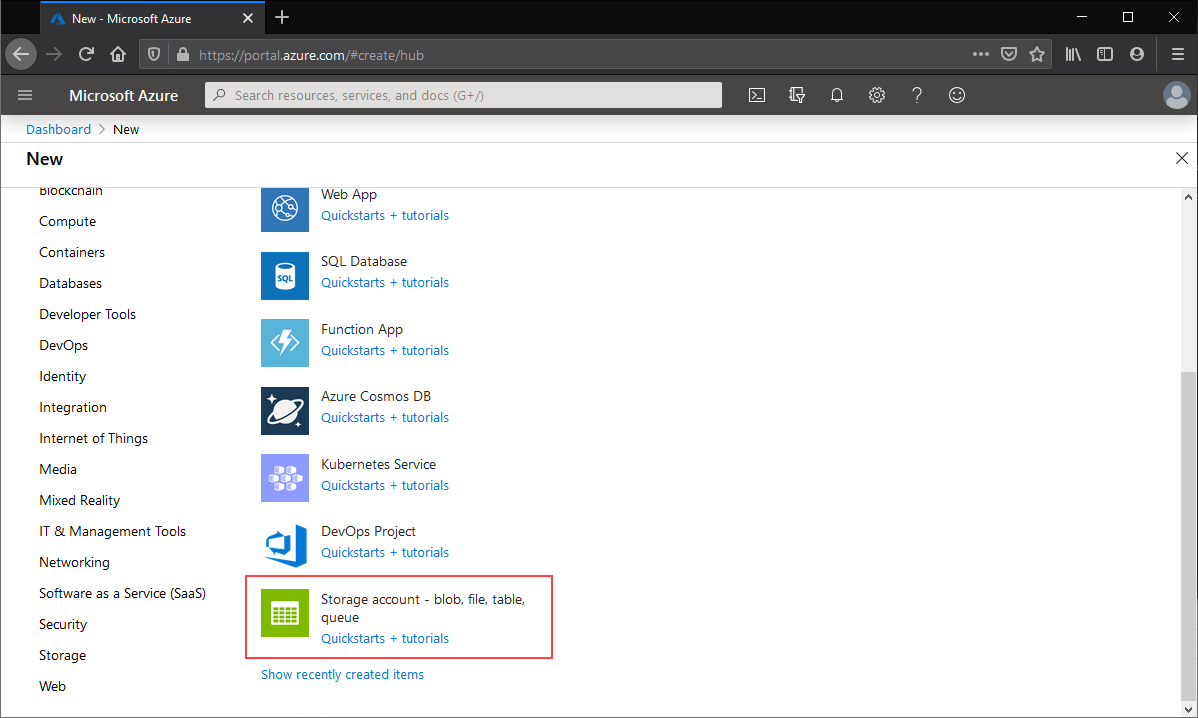
This shows a list of all existing storage accounts available in your visible subscriptions. Select + Create to create a new storage account.
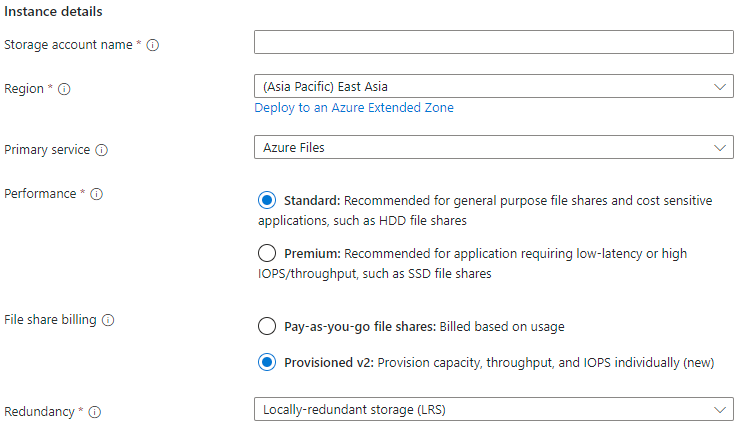
Basics
The first tab to complete when creating a storage account is labeled Basics. It contains the required fields to create a storage account.
| Field name | Input type | Values | Applicable to Azure Files | Meaning |
|---|---|---|---|---|
| Subscription | Drop-down list | Available Azure subscriptions | Yes | The subscription for the storage account. See storage account scale targets for subscription limits. |
| Resource group | Drop-down list | Available resource groups in selected subscription | Yes | The resource group for the storage account. |
| Storage account name | Text box | -- | Yes | A globally unique name for the storage account, used as the server name when mounting via SMB. Must be 3-24 characters, containing only numbers and lowercase letters. |
| Region | Drop-down list | Available Azure regions | Yes | The region for the storage account. Can be the region associated with the resource group or any other available region. |
| Primary service | Drop-down list |
|
Only unpopulated and Azure Files | Select Azure Files. This field is optional, but you can't select provisioned v2 billing without it. |
| Performance | Radio button group |
|
Yes | Select Standard for HDD or Premium for SSD. |
| File share billing | Radio button group |
|
Yes | We recommend provisioned v2 for all new deployments. Provisioned v1 and pay-as-you-go are still supported. |
| Redundancy | Drop-down list |
|
Yes | See Azure Files redundancy for more information. |
| Make read access to data available in the event of region unavailability | Checkbox | Checked/unchecked | No | Only appears with pay-as-you-go GRS or GZRS. Azure Files doesn't support read access to the secondary region without a failover. |
Advanced
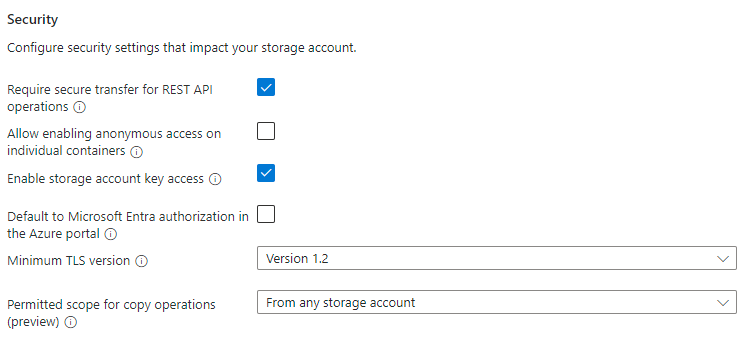
The Advanced tab is optional, but it provides more granular settings for the storage account. The first section relates to Security settings.
| Field name | Input type | Values | Applicable to Azure Files | Meaning |
|---|---|---|---|---|
| Require secure transfer for REST API operations | Checkbox | Checked/unchecked | Yes | If neither Require Encryption in Transit for SMB nor Require Encryption in Transit for NFS are selected in the Azure Files section of the Advanced tab, the Secure transfer required setting applies to SMB and NFS for Azure Files as well as REST/HTTPS traffic. If you have clients that need access to unencrypted SMB (such as SMB 2.1), uncheck this checkbox. |
| Allow enabling anonymous access on individual containers | Checkbox | Checked/unchecked | No | This setting controls whether Azure Blob storage containers are allowed to be accessed with anonymous access. This setting doesn't apply to Azure Files. This setting is available for FileStorage storage accounts containing provisioned v1 or provisioned v2 file shares even though it isn't possible to create Azure Blob storage containers in FileStorage storage accounts. |
| Enable storage account key access | Checkbox | Checked/unchecked | Yes | This setting controls whether the storage account keys (also referred to as shared keys) are enabled. When enabled, storage account keys can be used to mount the file share using SMB or to access the share using the FileREST API. |
| Default to Microsoft Entra authorization in the Azure portal | Checkbox | Checked/unchecked | Yes | This setting controls whether the user's Microsoft Entra (formerly Azure AD) identity is used when browsing the file share in the Azure portal. |
| Minimum TLS version | Drop-down list | Supported TLS versions | Yes | This setting controls the minimum allowed TLS version that's used for protocols which use TLS. For Azure Files, only the FileREST protocol uses TLS (as part of HTTPS). |
| Permitted scope for copy operations | Drop-down list | Scopes for copy operations | Yes | This setting controls the scope of storage account to storage account copy operations using the FileREST API, usually facilitated through tools like AzCopy. |
The Hierarchical Namespace section applies only to Azure Blob storage, even in FileStorage storage accounts using the provisioned v1 or provisioned v2 billing models which can only contain Azure file shares. Azure file shares support a hierarchical namespace regardless of the value of these settings.
| Field name | Input type | Values | Applicable to Azure Files | Meaning |
|---|---|---|---|---|
| Enable hierarchical namespace | Checkbox | Checked/unchecked | No | This is an Azure Blob storage only setting. This setting is disabled for FileStorage storage accounts, but is active for storage accounts using the pay-as-you-go model, even if Azure Files is selected as the primary service. |
The Access protocols section applies only to Azure Blob storage, even in FileStorage storage accounts using the provisioned v1 or provisioned v2 billing models which can only contain Azure file shares.
| Field name | Input type | Values | Applicable to Azure Files | Meaning |
|---|---|---|---|---|
| Enable SFTP | Checkbox | Checked/unchecked | No | This is an Azure Blob storage only setting. This setting is disabled for FileStorage storage accounts, but is active for storage accounts using the pay-as-you-go model, even if Azure Files is selected as the primary service. |
| Enable network file system v3 | Checkbox | Checked/unchecked | No | This is an Azure Blob storage only setting. This setting is disabled for FileStorage storage accounts, but is active for storage accounts using the pay-as-you-go model. SSD storage accounts can create NFSv4.1 file shares even though this setting is unchecked; in Azure Files, the file share's protocol is selected on the file share, not the storage account. |
The Blob storage section applies only to Azure Blob storage use, even in FileStorage storage accounts using the provisioned v1 or provisioned v2 models which can only contain Azure file shares.
| Field name | Input type | Values | Applicable to Azure Files | Meaning |
|---|---|---|---|---|
| Allow cross-tenant replication | Checkbox | Checked/unchecked | No | This is an Azure Blob storage only setting. This setting is always available, even for FileStorage storage accounts which can't contain Azure Blob storage. Checking this checkbox has no impact on Azure Files. |
| Access tier | Radio button group | Blob storage access tiers | No | This is an Azure Blob storage only setting. This setting is always available, even for FileStorage storage accounts which can't contain Azure Blob storage. Selecting an option has no impact on Azure Files. |
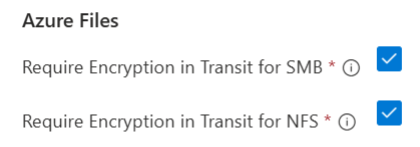
The Azure Files section allows you to choose whether to require encryption in transit for SMB and NFS file shares in the storage account, respectively. This per-protocol setting gives more granular control than the storage account-level Secure transfer required setting. When Require Encryption in Transit is enabled on a storage account, the Secure transfer required setting applies only to REST/HTTPS traffic.
| Field name | Input type | Values | Applicable to Azure Files | Meaning |
|---|---|---|---|---|
| Require Encryption in Transit for SMB | Checkbox | Checked/unchecked | Yes | This setting lets you independently control whether encryption is required for SMB access to Azure file shares. |
| Require Encryption in Transit for NFS | Checkbox | Checked/unchecked | Yes | This setting lets you independently control whether encryption is required for NFS access to Azure file shares. The NFS setting only appears if you selected Premium performance on the Basics tab. |
Networking
The networking section enables you to configure networking options. These settings are optional for creating the storage account and you can configure them later if desired. For more information about these options, see Azure Files networking considerations.
Data protection
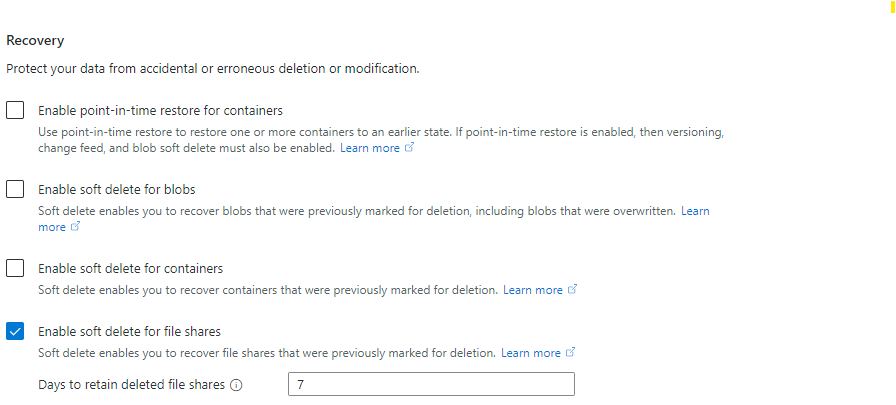
The Data protection tab allows you to enable or disable soft-delete. The soft-delete option for Azure Files is under the Recovery section.
| Field name | Input type | Values | Applicable to Azure Files | Meaning |
|---|---|---|---|---|
| Enable point-in-time restore for containers | Checkbox | Checked/unchecked | No | This setting applies only to Azure Blob storage. It's always available, even for FileStorage storage accounts that can't contain Azure Blob storage. However, selecting this option for FileStorage storage accounts results in a validation error message. For pay-as-you-go storage accounts, this setting doesn't apply to Azure Files. |
| Maximum restore point (days ago) | Textbox | Days (number) | No | When you select Enable point-in-time restore for containers, this textbox becomes available. The value chosen doesn't apply to Azure Files. |
| Enable soft delete for blobs | Checkbox | Checked/unchecked | No | This setting applies only to Azure Blob storage. It's always available, even for FileStorage storage accounts that can't contain Azure Blob storage. However, selecting this option for FileStorage storage accounts results in a validation error message. For pay-as-you-go storage accounts, this setting doesn't apply to Azure Files. |
| Days to retain deleted blobs | Textbox | Days (number) | No | When you select Enable soft delete for blobs, this textbox becomes available. The value chosen doesn't apply to Azure Files. |
| Enable soft delete for containers | Checkbox | Checked/unchecked | No | This setting applies only to Azure Blob storage. It's always available, even for FileStorage storage account results in a validation error message. For pay-as-you-go storage accounts, this setting doesn't apply to Azure Files. |
| Days to retain deleted containers | Textbox | Days (number) | No | When you select Enable soft delete for containers, this textbox becomes available. The value chosen doesn't apply to Azure Files. |
| Enable soft delete for file shares | Checkbox | Checked/unchecked | Yes | Enable the soft delete feature to protect against the accidental deletion of file shares. Soft delete is enabled by default, but you can choose to disable this setting if shares are frequently created and deleted as part of a business workflow. Soft-deleted file shares are billed for their used capacity, even in provisioned models. |
| Days to retain deleted file shares | Textbox | Days (number) | Yes | When you select Enable soft delete for file shares, this textbox becomes available. By default, file shares are retained for 7 days before being purged, but you can choose to increase or decrease this number depending on your requirements. Soft-deleted file shares are billed for their used capacity, even in provisioned file shares, so retaining for a longer period of time can result in greater expenses due to soft-delete. |
The Tracking section applies only to Azure Blob storage use, even in FileStorage storage accounts that use the provisioned v1 or provisioned v2 billing models and can only contain Azure file shares.
| Field name | Input type | Values | Applicable to Azure Files | Meaning |
|---|---|---|---|---|
| Enable versioning for blobs | Checkbox | Checked/unchecked | No | This setting applies only to Azure Blob storage. It's always available, even for FileStorage storage accounts that can't contain Azure Blob storage. However, selecting this option for FileStorage storage accounts results in a validation error message. For pay-as-you-go storage accounts, this setting doesn't apply to Azure Files. |
| Enable blob change feed | Checkbox | Checked/unchecked | No | This setting applies only to Azure Blob storage. It's always available, even for FileStorage storage accounts that can't contain Azure Blob storage. However, selecting this option for FileStorage storage accounts results in a validation error message. For pay-as-you-go storage accounts, this setting doesn't apply to Azure Files. |
The Access control section applies only to Azure Blob storage use, even in FileStorage storage accounts that use the provisioned v1 or provisioned v2 billing models and can only contain Azure file shares.
| Field name | Input type | Values | Applicable to Azure Files | Meaning |
|---|---|---|---|---|
| Enable version-level immutability support | Checkbox | Checked/unchecked | No | This setting applies only to Azure Blob storage. It's always available, even for FileStorage storage accounts that can't contain Azure Blob storage. However, selecting this option for FileStorage storage accounts results in a validation error message. For pay-as-you-go storage accounts, this setting doesn't apply to Azure Files. |
Encryption
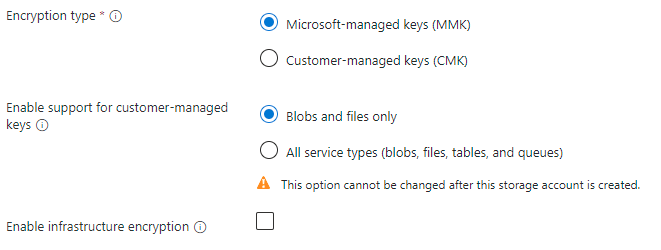
The Encryption tab controls settings related to encryption at rest.
| Field name | Input type | Values | Applicable to Azure Files | Meaning |
|---|---|---|---|---|
| Encryption type | Radio button group |
|
Yes | This setting controls who holds the encryption key for the data placed in this storage account. See Encryption for data at rest for more information. |
| Enable support for customer-managed keys | Radio button group |
|
No | All kind/SKU combinations for Azure classic file shares support customer-managed keys regardless of this setting. |
| Enable infrastructure encryption | Checkbox | Checked/unchecked | Yes | Storage accounts can optionally use a secondary layer of encryption for data stored in the system to guard against one of the keys being compromised. See Enable infrastructure encryption. |
Tags
Tags are name/value pairs that you use to categorize resources and view consolidated billing by applying the same tag to multiple resources and resource groups. They're optional and you can apply them after storage account creation.
Review + create
The final step to create the storage account is to select the Create button on the Review + create tab. This button isn't available until you complete all the required fields for a storage account.
Create a classic file share
After you create a storage account, you can create a classic file share. This process is different depending on whether you created a provisioned v2, provisioned v1, or pay-as-you-go storage account. Provisioned file shares require a FileStorage storage account kind, and pay-as-you-go file shares (HDD only) require a StorageV2 (general purpose v2) storage account kind.
Create a provisioned v2 classic file share
When you create a classic file share by using the provisioned v2 billing model, you specify how much storage, IOPS, and throughput your file share needs. The amount of each quantity that you provision determines your total bill. The service provides a recommendation for how many IOPS and how much throughput you need based on the amount of provisioned storage you specify. Depending on your requirements, you might find that you require more or less IOPS or throughput than the recommendations. You can optionally override these recommendations with your own values. To learn more, see Understanding the provisioned v2 billing model.
Important
Before you create a provisioned v2 classic file share, make sure the storage account you intend to use is of the FileStorage storage account kind. To check the account kind, go to the storage account and look under Essentials. If you created your storage account by using the Azure portal, you must select Provisioned v2 for File share billing.
Follow these instructions to create a provisioned v2 classic file share by using the Azure portal.
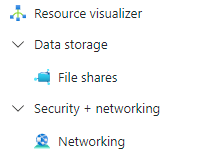
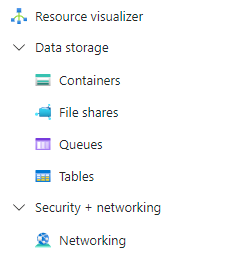
Go to your storage account. From the service menu, under Data storage, select File shares.
In the file share listing, you should see any previously created file shares in this storage account or an empty table if no file shares exist. Select + File share to create a new file share.
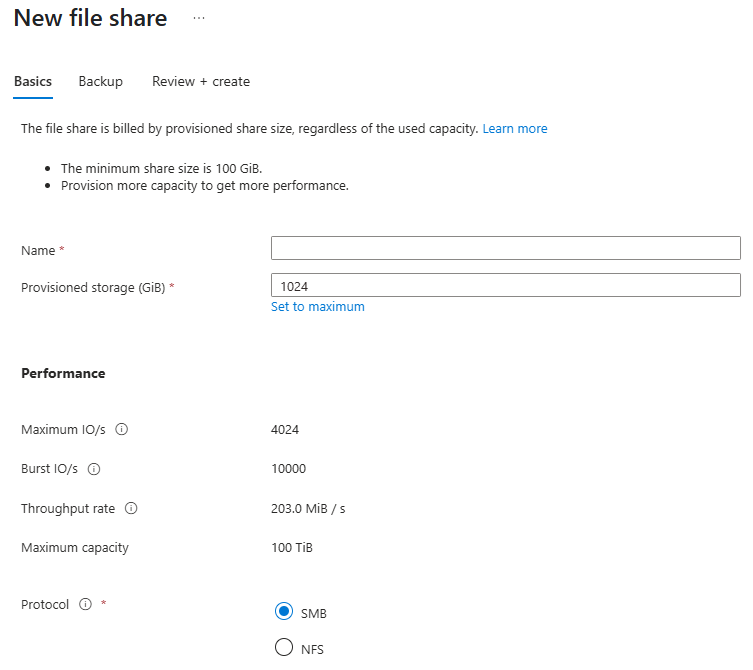
Complete the field in the Basics tab of the new file share blade:

Name: The name of the file share to create. The name of your file share must be all lowercase letters, numbers, and single hyphens, and must begin and end with a lowercase letter or number. The name can't contain two consecutive hyphens. For details about naming file shares and files, see Naming and referencing shares, directories, files, and metadata.
Provisioned storage (GiB): The amount of storage to provision on the share. The actual provisioned storage capacity is the amount that you're billed for regardless of actual usage.
Provisioned IOPS and throughput: A set of radio buttons that you use to select between Recommended provisioning and Manually specify IOPS and throughput. The IOPS and throughput recommendations are based on typical customer usage for that amount of provisioned storage for that media tier. If you don't know specifically what your IOPS and throughput requirements are, stick with the recommendations and adjust later as needed.
IOPS: If you select Manually specify IOPS and throughput, enter the amount of IOPS you want to provision on this file share.
Throughput (MiB/sec): If you select Manually specify IOPS and throughput, enter the amount of throughput you want to provision on this file share.
Protocol: The file sharing protocol to use on the share. By default, new shares use the SMB protocol. Select the NFS protocol to create an NFSv4.1 share.
Select the Backup tab. By default, backup is enabled when you create a classic file share using the Azure portal. If you want to disable backup for the file share, uncheck the Enable backup checkbox. If you want backup enabled, you can either leave the defaults or create a new Recovery Services Vault in the same region and subscription as the storage account. To create a new backup policy, select Create a new policy.
Select Review + create and then Create to create the file share.
Create an SSD provisioned v1 classic file share
When you create a classic file share by using the provisioned v1 billing model, which only supports SSD file shares, you specify how much storage your share needs. IOPS and throughput capacity are then computed for you based on how much storage you provisioned. Depending on your individual file share requirements, you might find that you require more IOPS or throughput than the recommendations. In this case, you need to provision more storage to get the required IOPS or throughput. To learn more, see Understanding the provisioned v1 billing model.
Important
Before you create a provisioned v1 classic file share, make sure the storage account you intend to use is of the FileStorage storage account kind. To check the account kind, go to the storage account and look under Essentials. If you created your storage account by using the Azure portal, you must select Provisioned v1 for File share billing.
Follow these instructions to create an SSD provisioned v1 classic file share by using the Azure portal.
Go to your storage account. From the service menu, under Data storage, select File shares.
In the file share listing, you should see any previously created file shares in this storage account or an empty table if no file shares exist. Select + File share to create a new file share.
Complete the fields in the Basics tab of new file share blade:
Name: The name of the file share to create. The name of your file share must be all lowercase letters, numbers, and single hyphens, and must begin and end with a lowercase letter or number. The name can't contain two consecutive hyphens. For details about naming file shares and files, see Naming and referencing shares, directories, files, and metadata.
Provisioned storage (GiB): The amount of storage to provision on the share. The provisioned storage capacity is the amount that you're billed for regardless of actual usage.
Protocol: The file sharing protocol to use on the share. By default, new shares use the SMB protocol. Select the NFS protocol to create an NFSv4.1 share.
Select the Backup tab. By default, backup is enabled when you create an Azure file share using the Azure portal. If you want to disable backup for the file share, uncheck the Enable backup checkbox. If you want backup enabled, you can either leave the defaults or create a new Recovery Services Vault in the same region and subscription as the storage account. To create a new backup policy, select Create a new policy. NFS shares don't support Azure Backup.
Select Review + create and then Create to create the Azure file share.
Create an HDD pay-as-you-go classic file share
Pay-as-you-go file shares (SMB only) have a property called access tier. All three access tiers are stored on the exact same HDD storage hardware. The main difference for these three access tiers is their data at-rest storage prices, which are lower in cooler tiers, and the transaction prices, which are higher in the cooler tiers. To learn more about the differences between tiers, see differences in access tiers.
Important
Before you create a pay-as-you-go classic file share, make sure the storage account you intend to use is of the StorageV2 (general purpose v2) storage account kind. To check the account kind, go to the storage account and look under Essentials. If you created your storage account by using the Azure portal, you must select Pay-as-you-go file shares for File share billing.
Follow these instructions to create a new HDD pay-as-you-go classic file share by using the Azure portal.
Go to your storage account. From the service menu, under Data storage, select File shares.
In the file share listing, you should see any previously created file shares in this storage account or an empty table if no file shares exist. Select + File share to create a new file share.
Complete the fields in the Basics tab of new file share blade:

Name: The name of the file share to create. The name of your file share must be all lowercase letters, numbers, and single hyphens, and must begin and end with a lowercase letter or number. The name can't contain two consecutive hyphens. For details about naming file shares and files, see Naming and referencing shares, directories, files, and metadata.
Access tier: The selected access tier for a pay-as-you-go file share. Pick the transaction optimized access tier during a migration to minimize transaction expenses, and then switch to a lower tier if desired after the migration is complete.
Select the Backup tab. By default, backup is enabled when you create an Azure file share using the Azure portal. If you want to disable backup for the file share, uncheck the Enable backup checkbox. If you want backup enabled, you can either leave the defaults or create a new Recovery Services Vault in the same region and subscription as the storage account. To create a new backup policy, select Create a new policy.
Select Review + create and then Create to create the Azure file share.
Set up networking
If you're using an SMB file share, networking configuration isn't required. However, we still recommend you take it into consideration. If you're using an NFS file share, networking configuration is required.
Important
The NFSv4.1 protocol runs on port 2049. If you're connecting from an on-premises network, make sure that your client allows outgoing communication through port 2049. If you grant access to specific virtual networks, make sure that any network security groups associated with those virtual networks don't contain security rules that block incoming communication through port 2049.
Set up a private endpoint or service endpoint
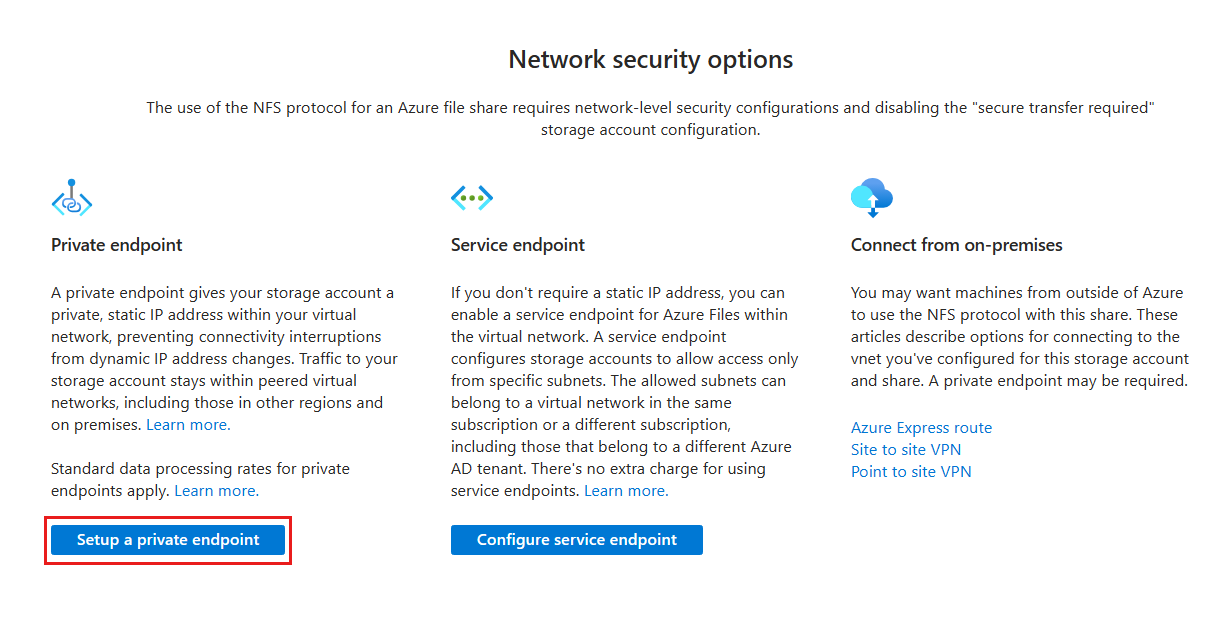
NFS file shares require network-level security configurations. Currently, two options exist for establishing networking-level security configurations: private endpoint and service endpoint. A private endpoint gives your file share a private, static IP address within your virtual network, preventing connectivity interruptions from dynamic IP address changes. Traffic to your file share stays within peered virtual networks, including those in other regions and on-premises. Standard data processing rates for private endpoints apply. See What is a private endpoint to learn more.
If you don't require a static IP address, you can enable a service endpoint for Azure Files within the virtual network. A service endpoint configures the file share to allow access only from specific subnets. The allowed subnets can belong to a virtual network in the same subscription or a different subscription, including those that belong to a different Microsoft Entra tenant. There's no extra charge for using service endpoints. See Azure virtual network service endpoints to learn more.
Steps 1 to 3 show an NFS file share scenario. You can also modify the networking settings at the storage account level for SMB file shares. Go to the storage account, choose Security + networking, and configure the required endpoints.
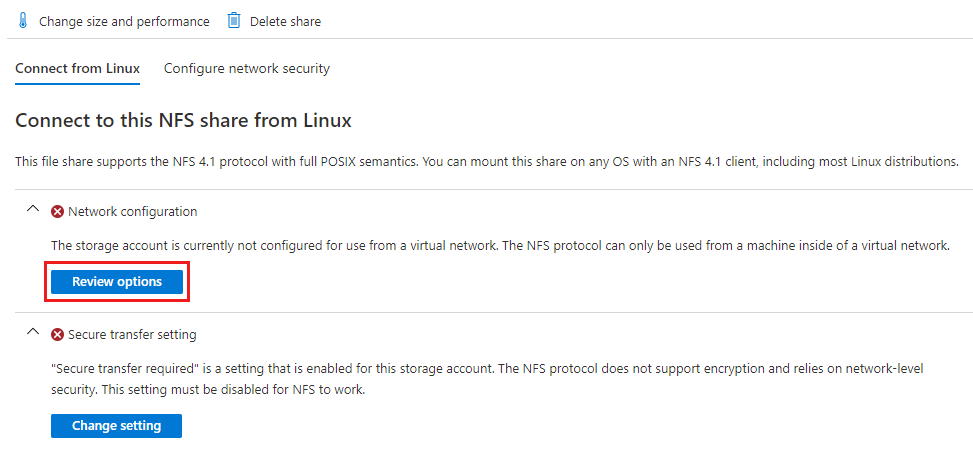
Select the NFS file share you created. You see a dialog that says Connect to this NFS share from Linux. Under Network configuration, select Review options.
Next, select Setup a private endpoint.
Select + Private endpoint.

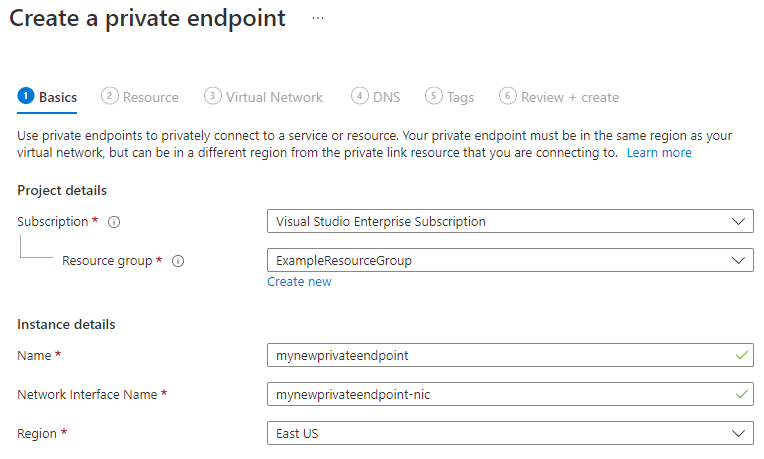
Leave Subscription and Resource group the same. Under Instance, provide a name and select a region for the new private endpoint. Your private endpoint must be in the same region as your virtual network, so use the same region as you specified when creating the VM. When all the fields are complete, select Next: Resource.
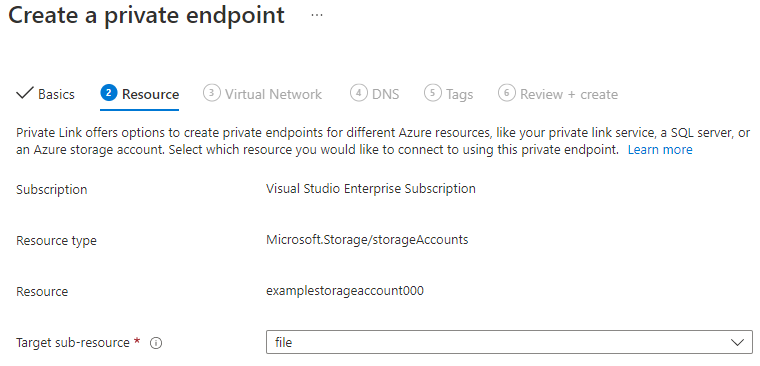
Confirm that the Subscription, Resource type, and Resource are correct. Select File from the Target sub-resource drop-down. Then select Next: Virtual Network.
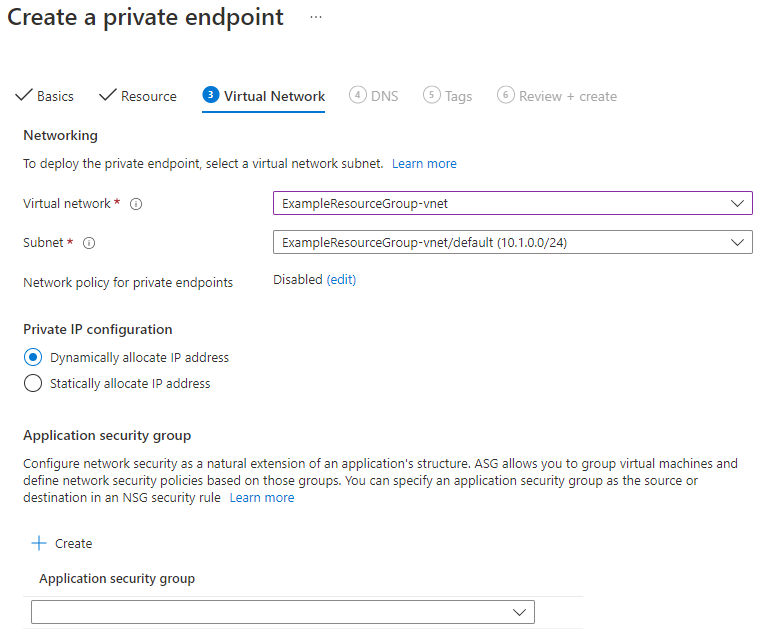
Under Networking, select the virtual network associated with your VM and leave the default subnet. Under Private IP configuration, leave Dynamically allocate IP address selected. Select Next: DNS.
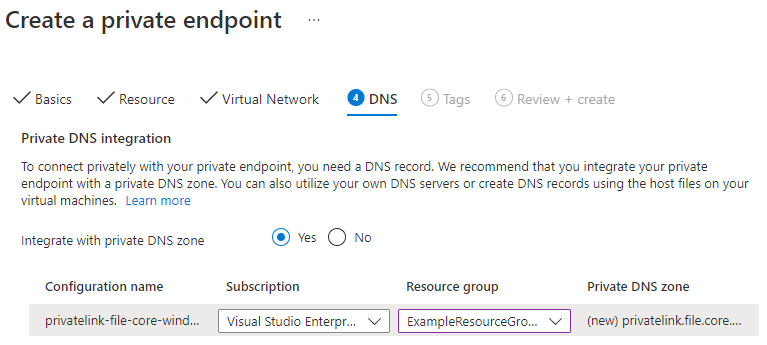
Select Yes for Integrate with private DNS zone. Make sure the correct subscription and resource group are selected, and then select Next: Tags.
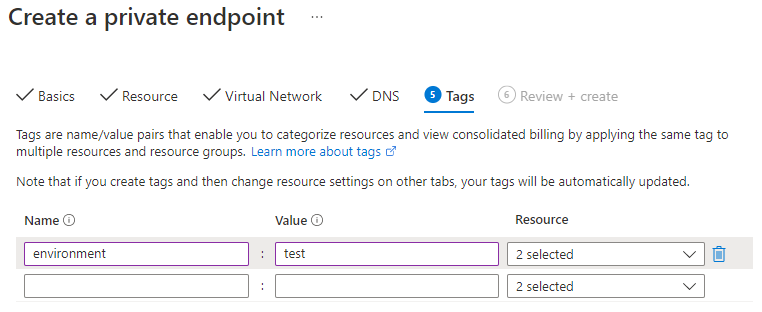
You can optionally apply tags to categorize your resources, such as applying the name Environment and the value Test to all testing resources. Enter name/value pairs if desired, and then select Next: Review + create.
Azure attempts to validate the private endpoint. When validation is complete, select Create. You see a notification that deployment is in progress. After a few minutes, you see a notification that deployment is complete.


Enable hybrid access through VPN or Azure ExpressRoute (optional)
To enable hybrid access to an NFS Azure file share, use one of the following networking solutions: