Nasuni Configuration Guide for Microsoft Azure
Nasuni uses cost-effective Azure Blob object and an intelligent caching architecture to deliver high performance SMB and NFS file shares across multiple Azure regions and on-premises locations. With effortless scalability, up-to-the-minute recovery points, instant recoveries, real-time ransomware detection, zero-latency edge performance, remote/hybrid worker support, and more, Nasuni with Azure Blob is the enterprise-class solution for moving traditional file server and NAS workloads into the cloud.
How Nasuni works:
- Stores all files and metadata in Azure Blob Cool or Cold object storage using Nasuni’s cloud-native UniFS® global file system.
- Caches copies the actively used file data from Azure Blob on lightweight Nasuni Edge Appliance virtual machines that can be deployed in any on-premises location or Azure region for high performance read/write access. Caching also minimizes Azure egress fees, since any cached files can be accessed repeatedly without having to be retrieved from Azure Blob.
- Protects file data with snapshots taken as often as every minute and stored as an infinite, immutable versioned timeline in Azure Blob.
- Synchronizes all Nasuni Edge caches from the gold copies of file data in Azure Blob to present a global file system and unified namespace across multiple locations.
- Provides Global File Lock so that multiple authors can edit the same files in different locations without version conflict.
- Detects ransomware in real time at each edge location, stops attacks with automated mitigation policies, and restores only infected files from the most recent healthy snapshot.
- Provides VPN-less access to file shares for remote/hybrid workers and enables secure external file sharing with authorized third parties.
Azure Blob storage is Microsoft's object storage solution for the cloud. Blob storage is optimized for storing massive amounts of unstructured data and offers superior durability and scalability at the lowest cost of any Azure storage account. With the capabilities listed above, Nasuni makes Azure Blob the best target for enterprises that want to move traditional NAS and Windows file server workloads to the cloud using standard SMB (CIFS) and NFS protocols, without having to rewrite applications for object storage.
Tip
For Microsoft Azure configuration suggestions to prevent accidental or malicious deletion of data, see Deletion Security
Creating an Azure storage account (using Azure portal)
Note
You must have at least one subscription for this purpose.
Note
Selecting the “Secure transfer required” feature for an Azure Storage account does not affect the operation of the Nasuni Edge Appliance
Tip
In the Nasuni model, customers provide their own cloud accounts for the storage of their data. Customers should leverage Azure's role-based access and identity access management features as part of their overall security strategy. Such features can be used to limit or prohibit administrative access to the cloud account, based on customer policies
Introduction
This document describes how to deploy a Nasuni environment in Microsoft Azure, using Azure Blob storage to store your file data.
Creating a storage account using the Azure portal.
If you don't already have a storage account in Microsoft Azure, create a storage account in Microsoft Azure by following these steps:
- Sign in to the Azure portal. The Microsoft Azure dashboard page appears.
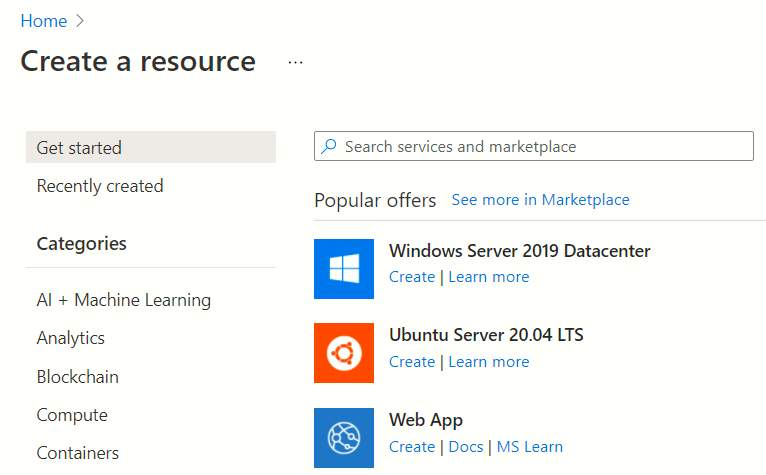
- On the top left of the page, select “Create a resource." The “Create a resource” dialog appears.
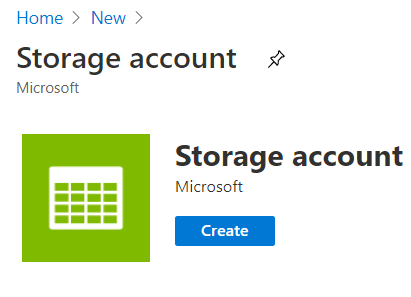
- In the Search box, enter “storage account" then select Storage account from the list of results. The Storage account pane appears.
- Select Create. The “Create a storage account” pane appears.
- If there is more than one subscription, from the Subscription drop-down list, select the subscription to use for this storage account.
- To select an existing Resource Group, select an existing Resource Group from the Resource Group drop-down list. Alternatively, create a new Resource Group by clicking “Create new” and then entering a name for the new Resource Group and clicking OK.
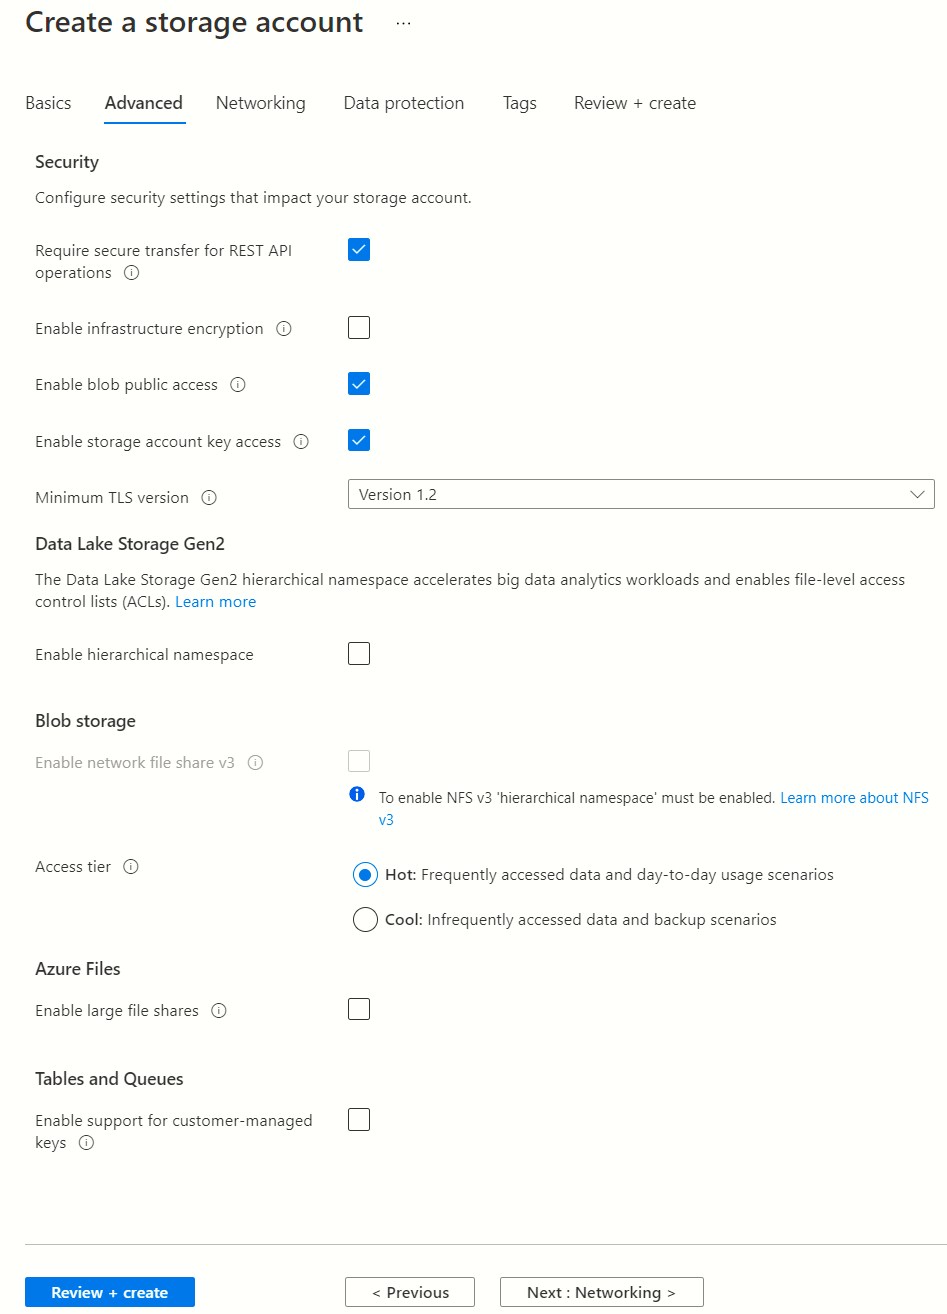
- Select Next: Advanced. The Advanced pane appears.
- If your security policy requires it, enable “Require secure transfer for REST API operations."
- For “Access tier,” select Cool for production data.
Note
Nasuni also supports Azure Cold Storage. To use Azure Cold Storage, configure Lifecycle Management rules that are based on access tracking. When enabled, access tracking checks when a blob was last accessed. A rule can be defined to move objects that have not been accessed for 90 days or longer. Enabling this feature may incur additional cost.
- Set “Azure Files” to disabled.
- Configure other features according to your needs.
- Select “Next: Networking >.” The Networking pane appears.
- Select the “Connectivity method” to match your security requirements.
Note
Consider where Edge Appliances will be deployed and how they will access the storage account, for example, via the Internet, Azure ExpressRoute, or a VPN connection to Azure. Most customers select the default “Public endpoint (all networks)”.
Configure other features according to your needs
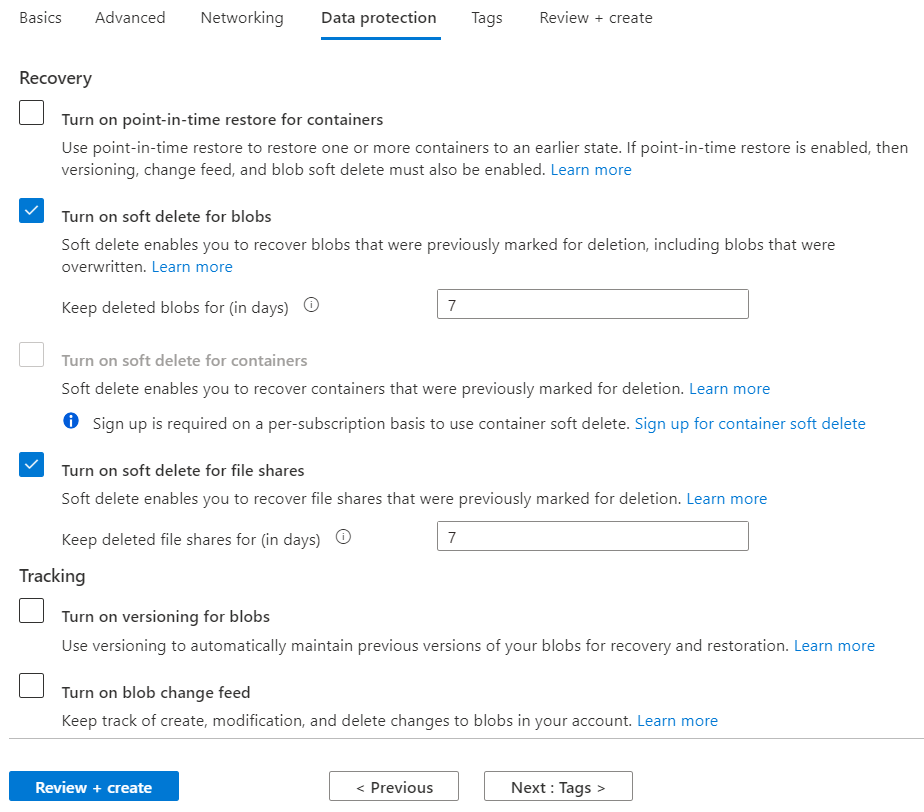
Select “Next: Data protection.” The Data protection pane appears.
Nasuni recommends enabling Soft Delete for all storage accounts being used for Nasuni volumes. If data is deleted, instead of the data being permanently lost, the data changes to a “soft deleted” state and remains available for a configurable number of days.
Select “Enable soft delete for blobs."
Specify “Days to retain deleted blobs” by entering or selecting the number of days to retain data. (You can retain soft-deleted data for between 1 and 365 days.)
- Nasuni recommends specifying at least 30 days.
Nasuni recommends enabling Soft Delete for containers. Containers marked for deletion remain available for a configurable number of days.
After configuring your storage account, select “Enable soft delete for containers.”
Specify “Days to retain deleted containers” by entering or selecting the number of days to retain data. (You can retain soft-deleted data for between 1 and 365 days.)
- Nasuni recommends specifying at least 30 days.
- For details see soft delete for containers
- Configure other features according to your needs
- Select “Next: Tags >." The Tags pane appears.
- Define any Tags based on your internal policies.
- Select “Next: Review + create >”
- Select Create.
- The storage account starts being created. When the storage account is created, select Storage Accounts in the left-hand list. The new storage account appears in the list of storage accounts.
- Select the name of your storage account. The pane for your storage account settings appears.
Tip
It is possible to recover a deleted storage account. For details, see Recovering a deleted storage account.
Configuring storage account firewalls
Storage account firewalls must be configured to allow connections from the internal customer network or any other networks that Nasuni Edge Appliances either exist on or are using.
To configure storage account firewalls, follow these steps:
- Select the storage account.
- In the left-hand column, select Networking, then select the “Firewalls and virtual networks” tab. The “Firewalls and virtual networks” pane appears.
- Select “Selected networks.” Alternatively, if allowing access from all networks, select “All networks” and skip to step 7.
- To add an existing virtual network, in the Virtual Networks area, select “Add existing virtual network.” Select Virtual networks and Subnets options, and then select Add.
- To create a new virtual network and grant it access, in the Virtual Networks area, select “Add new virtual network.” Provide the information necessary to create the new virtual network, and then select Create.
- To grant access to an IP range, in the Firewall area, enter the IP address or address range (in CIDR format) in Address Range. Include the internal customer network and other networks that Edge Appliances exist on or are using. Take network routing into account. For example, if connecting to the storage account over a private connection, use internal subnets; if connecting to the storage account over the public Internet, use public IPs.
- Select Save to apply your changes.
Finding Microsoft Azure User Credentials
Note
You must have at least one subscription for this purpose
Note
Confirm with Nasuni Sales or Support that your Nasuni account is configured for supplying your own Microsoft Azure credentials.
To locate Microsoft Azure credentials, follow these steps:
- Sign in to the Azure portal. The Microsoft Azure dashboard page appears.
- Select Storage Accounts in the left-hand list.
- Select your storage account. The pane for your storage account settings appears.
- Select Access keys. Your account access key information appears.
- Record the Microsoft Azure Storage Account Name for later use
- Select “Show keys” to view key values. Key values appear.
- Under key1, find the Key value. Select the copy button to copy the Microsoft Azure Primary Access Key. Save this value for creating Microsoft Azure cloud credentials
- Under key1, find the “Connection string” value. Select the copy button to copy the Connection string. Save this value for possible later use.
Configuration
Nasuni provides a Nasuni Connector for Microsoft Azure.
Tip
If you have a requirement to change Cloud Credentials on a regular basis, use the following procedure, preferably outside office hours:
- Obtain new credentials. Credentials typically consist of a pair of values, such as Access Key ID and Secret Access Key, Account Name and Primary Access Key, or User and Secret.
- On the Cloud Credentials page, edit the cloud credentials to use the new credentials.
- The change in cloud credentials is registered on the next snapshot that contains unprotected data.
- Manually performing a snapshot also causes the change in cloud credentials to be registered, even if there is no unprotected data for the volume.
- After each Edge Appliance has performed such a snapshot, the original credentials can be retired with the cloud provider
Warning
Do not retire the original credentials with the cloud provider until you are certain that they are no longer necessary. Otherwise, data might become unavailable
To configure Nasuni for Microsoft Azure, follow these steps:
- Ensure that port 443 (HTTPS) is open between the Nasuni Edge Appliance and the object storage solution.
- Select Configuration. On NMC, select Account.
- Select Cloud Credentials.
- Select Add New Credentials, then select "Windows Azure Platform" from the drop-down menu
- Enter credentials information:
- For Microsoft Azure, enter the following information:
- Name: A name for this set of credentials, which is used for display purposes, such as ObjectStorageCluster1.
- Account Name: The Microsoft Azure Storage Account Name for this set of credentials, obtained in step 5 on page 9 above.
- Primary Access Key: The Microsoft Azure Primary Access Key for this set of credentials, obtained in step 7 on page 9 above.
- Hostname: The hostname for the location of the object storage solution. Use the default setting: blob.core.windows.net.
- Verify SSL Certificates: Use the default On setting.
- Filers (on NMC only): The target Nasuni Edge Appliance(s).
- For Microsoft Azure Gov Cloud, enter the following information:
- Name: A name for this set of credentials, which is used for display purposes, such as ObjectStorageCluster1.
- Account Name: The Microsoft Azure Storage Account Name for this set of credentials, obtained in step 5 on page 9 above.
- Primary Access Key: The Microsoft Azure Primary Access Key for this set of credentials, obtained in step 7 on page 9 above.
- Hostname: The hostname for the location of the object storage solution. Use: blob.core.usgovcloudapi.net.
- Verify SSL Certificates: Use the default On setting.
- Filers (on NMC only): The target Nasuni Edge Appliance(s).
- For Microsoft Azure, enter the following information:
Warning
Be careful changing existing credentials. The connection between the Nasuni Edge Appliance and the container could become invalid, causing loss of data access. Credential editing is to update access after changes to the account name or the access key on the Microsoft Azure system. 6. Select Save Credentials.
You're now ready to add volumes to the Nasuni Edge Appliance.
Adding volumes
To add volumes to your Nasuni system, follow these steps:
- Select Volumes, then select Add New Volume. The Add New Volume page appears.
- Enter the following information for the new volume:
- Name: Enter a human-readable name for the volume.
- Cloud Provider: Select Windows Azure Platform.
- Credentials: Select the Cloud Credentials that you defined in step 5 for this volume, such as ObjectStorageCluster1
- For the remaining options, select what is appropriate for this volume.
- Select Save.
You have successfully created a new volume on your Nasuni Filer.
Recovering a deleted storage account
It's possible to recover a deleted storage account, if the following conditions are true:
- It has been less than 14 days since the storage account was deleted.
- You created the storage account with the Azure Resource Manager deployment model. Storage accounts created using the Azure portal satisfy this requirement. The older “classic” storage accounts don't.
- A new storage account with the same name hasn't been created since the original storage account was deleted.
For details, review Recover a Deleted Storage Account
Azure Private Endpoints
Nasuni supports Azure Private Endpoints relying on the DNS layer to resolve the private endpoint IP.
It's important to correctly configure your DNS settings to resolve the private endpoint IP address to the fully qualified domain name (FQDN) of the connection string.
Existing Microsoft Azure services might already have a DNS configuration for a public endpoint. This configuration must be overridden to connect using your private endpoint.
The network interface associated with the private endpoint contains the information to configure your DNS. The network interface information includes FQDN and private IP addresses for your private link resource.
You can use the following options to configure your DNS settings for private endpoints:
- Use a private DNS zone. You can use private DNS zones to override the DNS resolution for a private endpoint. A private DNS zone can be linked to your virtual network to resolve specific domains.
- Use your DNS forwarder (optional). You can use your DNS forwarder to override the DNS resolution for a private link resource. Create a DNS forwarding rule to use a private DNS zone on your DNS server hosted in a virtual network.
Note
Using the Host file on the Nasuni Edge Appliance is not supported.
Note
Nasuni’s default Host URL endpoint for Nasuni’s Azure Cloud Credentials should not be changed.
Azure services DNS zone configuration
Azure creates a canonical name DNS record (CNAME) on the public DNS. The CNAME record redirects the resolution to the private domain name. You can override the resolution with the private IP address of your private endpoints. Your applications don't need to change the connection URL. When resolving names via a public DNS service, the DNS server resolves to your private endpoints. The process doesn't affect Nasuni Edge Appliances.
For Azure services, use the recommended zone names as described here
DNS configuration scenarios
The FQDN of the services resolves automatically to a public IP address. To resolve to the private IP address of the private endpoint, change your DNS configuration.
DNS is a critical component to make the application work correctly by successfully resolving the private endpoint IP address.
Based on your configuration requirements, the following scenarios are available with DNS resolution integrated:


