Note
Access to this page requires authorization. You can try signing in or changing directories.
Access to this page requires authorization. You can try changing directories.
In this article, you'll learn how to create an empty lake database in Azure Synapse Analytics using the database designer. The database designer allows you to easily create and deploy a database without writing any code.
Prerequisites
- At least Synapse User role permissions are required for exploring a lake database template from Gallery.
- Synapse Administrator, Synapse Contributor, or Synapse Artifact Publisher permissions are required on the Synapse workspace for creating a lake database.
- Storage Blob Data Contributor permissions are required on data lake when using the create table From data lake option.
Create lake database from database template
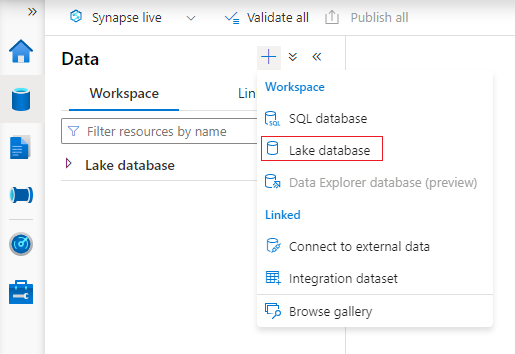
From your Azure Synapse Analytics workspace Home hub, select the Data tab on the left. The Data tab will open and you will see the list of databases that already exist in your workspace.
Hover over the + button and select, then choose Lake database.
The database designer tab will open with an empty database.
The database designer has Properties on the right that need to be configured.
- Name - Give your database a name. Names cannot be edited after the database is published, so make sure the name you choose is correct.
- Description - Giving your database a description is optional, but it allows users to understand the purpose of the database.
- Storage settings for database - This section contains the default storage information for tables in the database. This default is applied to each table in the database unless it's overridden on the table itself.
- Linked service - It's the default linked service used to store your data in Azure Data Lake Storage. The default linked service associated with the Synapse workspace will be shown, but you can change the Linked Service to any ADLS storage account you like.
- Input folder - Used to set the default container and folder path within that linked service using the file browser.
- Data format - Lake databases in Azure Synapse support parquet and delimited text as the storage formats for data.
Note
You can always override the default storage settings on a table by table basis, and the default remains customizable. If you are not sure what to choose, you can revisit this later.
To add a table to the database, select the + Table button.
- Custom will add a new table to the canvas.
- From template will open the gallery and let you select a database template to use when adding a new table. For more information, see Create lake database from database template.
- From data lake lets you import a table schema using data already in your lake.
Select Custom. A new table will appear on the canvas called Table_1.
You can then customize Table_1, including the table name, description, storage settings, columns, and relationships. For more information, see Modify a lake database.
Add a new table from the data lake by selecting + Table and then From data lake.
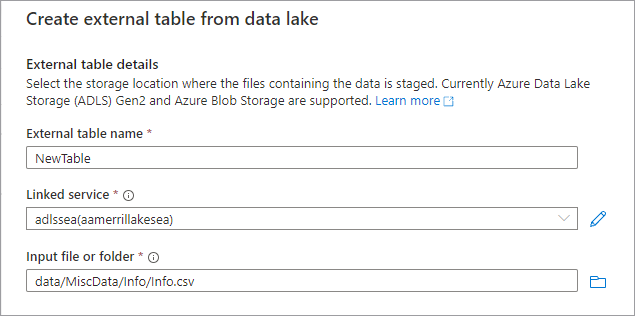
The Create external table from data lake pane will appear. Fill out the pane with the below details and select Continue.
- External table name the name you want to give the table you're creating.
- Linked service the linked service containing the Azure Data Lake Storage location where your data file lives.
- Input file or folder use the file browser to navigate to and select a file on your lake you want to create a table using.
- On the next screen, Azure Synapse will preview the file and detect the schema.
- You'll land on the New external table page where you can update any settings related to the data format, and Preview Data to check if Synapse identified the file correctly.
- When you're happy with the settings, select Create.
- A new table with the name you selected will be added to the canvas, and the Storage settings for table section will show the file that you specified.
With the database customized, it's now time to publish it. If you're using Git integration with your Synapse workspace, you must commit your changes and merge them into the collaboration branch. Learn more about source control in Azure Synapse. If you're using Synapse Live mode, you can select "publish".
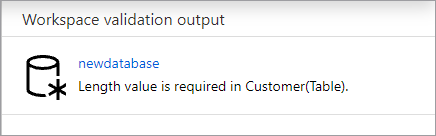
Your database will be validated for errors before it's published. Any errors found will be showing in the notifications tab with instructions on how to remedy the error.
Publishing will create your database schema in the Azure Synapse Metastore. After publishing, the database and table objects will be visible to other Azure services and allow the metadata from your database to flow into apps like Power BI or Microsoft Purview.
You've now created an empty lake database in Azure Synapse, and added tables to it using the Custom and From data lake options.
Next steps
Continue to explore the capabilities of the database designer using the links below.