Note
Access to this page requires authorization. You can try signing in or changing directories.
Access to this page requires authorization. You can try changing directories.
This article is a step-by-step guide that shows you how to move an Azure Synapse Analytics workspace from one Azure region to another.
Note
The steps in this article don't actually move the workspace. The steps show you how to create a new workspace in a new region by using Azure Synapse Analytics-dedicated SQL pool backups and artifacts from the source region.
Prerequisites
- Integrate the source region Azure Synapse workspace with Azure DevOps or GitHub. For more information, see Source control in Synapse Studio.
- Have Azure PowerShell and Azure CLI modules installed on the server where scripts are executed.
- Make sure all dependent services, for example, Azure Machine Learning, Azure Storage, and Azure Private Link hubs, are re-created in the target region or moved to the target region if the service supports a region move.
- Move Azure Storage to a different region. For more information, see Move an Azure Storage account to another region.
- Ensure the dedicated SQL pool name and the Apache Spark pool name are the same in the source region and the target region workspace.
Scenarios for a region move
- New compliance requirements: Organizations require data and services to be placed in the same region as part of new compliance requirements.
- Availability of a new Azure region: Scenarios where a new Azure region is available and there are project or business requirements to move the workspace and other Azure resources to the newly available Azure region.
- Wrong region selected: The wrong region was selected when the Azure resources were created.
Steps to move an Azure Synapse workspace to another region
Moving an Azure Synapse workspace from one region to another region is a multistep process. Here are the high-level steps:
- Create a new Azure Synapse workspace in the target region along with a Spark pool with the same configurations as used in the source region workspace.
- Restore the dedicated SQL pool to the target region by using restore points or geo-backups.
- Re-create all the required logins on the new logical SQL Server.
- Create serverless SQL pool and Spark pool databases and objects.
- Add an Azure DevOps Service Principal to the Azure Synapse role-based access control (RBAC) Synapse Artifact Publisher role if you're using an Azure DevOps release pipeline to deploy the artifacts.
- Deploy code artifact (SQL Scripts, Notebooks), linked services, pipelines, datasets, Spark Job definitions triggers, and credentials from Azure DevOps release pipelines to the target region Azure Synapse workspace.
- Add Microsoft Entra users or groups to Azure Synapse RBAC roles. Granting Storage Blob Contributor access to system-assigned managed identity (SA-MI) on Azure Storage and Azure Key Vault if you're authenticating by using managed identity.
- Grant Storage Blob Reader or Storage Blob Contributor roles to required Microsoft Entra users on default attached storage or on the Storage account that has data to be queried by using a serverless SQL pool.
- Re-create self-hosted integration runtime (SHIR).
- Manually upload all required libraries and jars in the target Azure Synapse workspace.
- Create all managed private endpoints if the workspace is deployed in a managed virtual network.
- Test the new workspace on the target region and update any DNS entries, which are pointing to the source region workspace.
- If there's a private endpoint connection created on the source workspace, create one on the target region workspace.
- You can delete the workspace in the source region after you test it thoroughly and route all the connections to the target region workspace.
Prepare
Step 1: Create an Azure Synapse workspace in a target region
In this section, you'll create the Azure Synapse workspace by using Azure PowerShell, the Azure CLI, and the Azure portal. You'll create a resource group along with an Azure Data Lake Storage Gen2 account that will be used as the default storage for the workspace as part of the PowerShell script and the CLI script. If you want to automate the process of deployment, invoke these PowerShell or CLI scripts from the DevOps release pipeline.
Azure portal
To create a workspace from the Azure portal, follow the steps in Quickstart: Create a Synapse workspace.
Azure PowerShell
The following script creates the resource group and Azure Synapse workspace by using the New-AzResourceGroup and New-AzSynapseWorkspace cmdlets.
Create a resource group
$storageAccountName= "<YourDefaultStorageAccountName>"
$resourceGroupName="<YourResourceGroupName>"
$regionName="<YourTargetRegionName>"
$containerName="<YourFileSystemName>" # This is the file system name
$workspaceName="<YourTargetRegionWorkspaceName>"

$sourceRegionWSName="<Your source region workspace name>"
$sourceRegionRGName="<YourSourceRegionResourceGroupName>"
$sqlUserName="<SQLUserName>"
$sqlPassword="<SQLStrongPassword>"

$sqlPoolName ="<YourTargetSQLPoolName>" #Both Source and target workspace SQL pool name will be same
$sparkPoolName ="<YourTargetWorkspaceSparkPoolName>"
$sparkVersion="2.4"

New-AzResourceGroup -Name $resourceGroupName -Location $regionName
Create a Data Lake Storage Gen2 account
#If the Storage account is already created, then you can skip this step.
New-AzStorageAccount -ResourceGroupName $resourceGroupName `
  -Name $storageAccountName `
  -Location  $regionName `
  -SkuName Standard_LRS `
  -Kind StorageV2 `
  -EnableHierarchicalNamespace $true
Create an Azure Synapse workspace
$password = ConvertTo-SecureString $sqlPassword -AsPlainText -Force
$creds = New-Object System.Management.Automation.PSCredential ($sqlUserName, $password)

New-AzSynapseWorkspace -ResourceGroupName $resourceGroupName `
                        -Name $workspaceName -Location $regionName `
                        -DefaultDataLakeStorageAccountName $storageAccountName `
                        -DefaultDataLakeStorageFilesystem $containerName `
                        -SqlAdministratorLoginCredential $creds
If you want to create the workspace with a Managed Virtual Network, add the extra parameter "ManagedVirtualNetwork" to the script. To learn more about the options available, see Managed Virtual Network Config.
#Creating a managed virtual network configuration
$config = New-AzSynapseManagedVirtualNetworkConfig -PreventDataExfiltration -AllowedAadTenantIdsForLinking ContosoTenantId

#Creating an Azure Synapse workspace
New-AzSynapseWorkspace -ResourceGroupName $resourceGroupName `
                        -Name $workspaceName -Location $regionName `
                        -DefaultDataLakeStorageAccountName $storageAccountName `
                        -DefaultDataLakeStorageFilesystem $containerName `
                        -SqlAdministratorLoginCredential $creds `
                              -ManagedVirtualNetwork $config
Azure CLI
This Azure CLI script creates a resource group, a Data Lake Storage Gen2 account, and a file system. Then it creates the Azure Synapse workspace.
Create a resource group
az group create --name $resourceGroupName --location $regionName
Create a Data Lake Storage Gen2 account
The following script creates a storage account and container.
# Checking if name is not used only then creates it.
$StorageAccountNameAvailable=(az storage account check-name --name $storageAccountName --subscription $subscriptionId | ConvertFrom-Json).nameAvailable

if($StorageAccountNameAvailable)
{
Write-Host "Storage account Name is available to be used...creating storage account"

#Creating a Data Lake Storage Gen2 account
$storageAccountProvisionStatus=az storage account create `
  --name $storageAccountName `
  --resource-group $resourceGroupName `
  --location $regionName `
  --sku Standard_GRS `
  --kind StorageV2 `
  --enable-hierarchical-namespace $true

($storageAccountProvisionStatus| ConvertFrom-Json).provisioningState
}
else
{
    Write-Host "Storage account Name is NOT available to be used...use another name --    exiting the script..."
    EXIT
}

#Creating a container in a Data Lake Storage Gen2 account

$key=(az storage account keys list -g $resourceGroupName -n $storageAccountName|ConvertFrom-Json)[0].value

$fileShareStatus=(az storage share create --account-name $storageAccountName --name $containerName --account-key $key)

if(($fileShareStatus|ConvertFrom-Json).created -eq "True")
{
      Write-Host f"Successfully created the fileshare - '$containerName'"
}
Create an Azure Synapse workspace
az synapse workspace create `
  --name $workspaceName `
  --resource-group $resourceGroupName `
  --storage-account $storageAccountName `
  --file-system $containerName `
  --sql-admin-login-user $sqlUserName `
  --sql-admin-login-password $sqlPassword `
  --location $regionName
To enable a managed virtual network, include the parameter --enable-managed-virtual-network in the preceding script. For more options, see workspace managed virtual network.
az synapse workspace create `
  --name $workspaceName `
  --resource-group $resourceGroupName `
  --storage-account $storageAccountName `
  --file-system $FileShareName `
  --sql-admin-login-user $sqlUserName `
  --sql-admin-login-password $sqlPassword `
  --location $regionName `
  --enable-managed-virtual-network true `
  --allowed-tenant-ids "Contoso"
Step 2: Create an Azure Synapse workspace firewall rule
After the workspace is created, add the firewall rules for the workspace. Restrict the IPs to a certain range. You can add a firewall from the Azure portal or by using PowerShell or the CLI.
Azure portal
Select the firewall options and add the range of IP addresses as shown in the following screenshot.

Azure PowerShell
Run the following PowerShell commands to add firewall rules by specifying the start and end IP addresses. Update the IP address range as per your requirements.
$WorkspaceWeb = (Get-AzSynapseWorkspace -Name $workspaceName -ResourceGroupName $resourceGroup).ConnectivityEndpoints.Web
$WorkspaceDev = (Get-AzSynapseWorkspace -Name $workspaceName -ResourceGroupName $resourceGroup).ConnectivityEndpoints.Dev

# Adding firewall rules
$FirewallParams = @{
  WorkspaceName = $workspaceName
  Name = 'Allow Client IP'
  ResourceGroupName = $resourceGroup
  StartIpAddress = "0.0.0.0"
  EndIpAddress = "255.255.255.255"
}
New-AzSynapseFirewallRule @FirewallParams
Run the following script to update the managed identity SQL control settings of the workspace:
Set-AzSynapseManagedIdentitySqlControlSetting -WorkspaceName $workspaceName -Enabled $true
Azure CLI
az synapse workspace firewall-rule create --name allowAll --workspace-name $workspaceName  `
--resource-group $resourceGroupName --start-ip-address 0.0.0.0 --end-ip-address 255.255.255.255
Run the following script to update the managed identity SQL control settings of the workspace:
az synapse workspace managed-identity grant-sql-access `
--workspace-name $workspaceName --resource-group $resourceGroupName
Step 3: Create an Apache Spark pool
Create the Spark pool with the same configuration that's used in the source region workspace.
Azure portal
To create a Spark pool from the Azure portal, see Quickstart: Create a new serverless Apache Spark pool using the Azure portal.
You can also create the Spark pool from Synapse Studio by following the steps in Quickstart: Create a serverless Apache Spark pool by using Synapse Studio.
Azure PowerShell
The following script creates a Spark pool with two workers and one driver node, and a small cluster size with 4 cores and 32-GB RAM. Update the values to match your source region workspace Spark pool.
#Creating a Spark pool with 3 nodes (2 worker + 1 driver) and a small cluster size with 4 cores and 32 GB RAM.
New-AzSynapseSparkPool `
    -WorkspaceName  $workspaceName `
    -Name $sparkPoolName `
    -NodeCount 3 `
    -SparkVersion $sparkVersion `
    -NodeSize Small
Azure CLI
az synapse spark pool create --name $sparkPoolName --workspace-name $workspaceName --resource-group $resourceGroupName `
--spark-version $sparkVersion --node-count 3 --node-size small
Move
Step 4: Restore a dedicated SQL pool
Restore from geo-redundant backups
To restore the dedicated SQL pools from geo-backup by using the Azure portal and PowerShell, see Geo-restore a dedicated SQL pool in Azure Synapse Analytics.
Restore by using restore points from the source region workspace dedicated SQL pool
Restore the dedicated SQL pool to the target region workspace by using the restore point of the source region workspace dedicated SQL pool. You can use the Azure portal, Synapse Studio, or PowerShell to restore from restore points. If the source region isn't accessible, you can't restore by using this option.
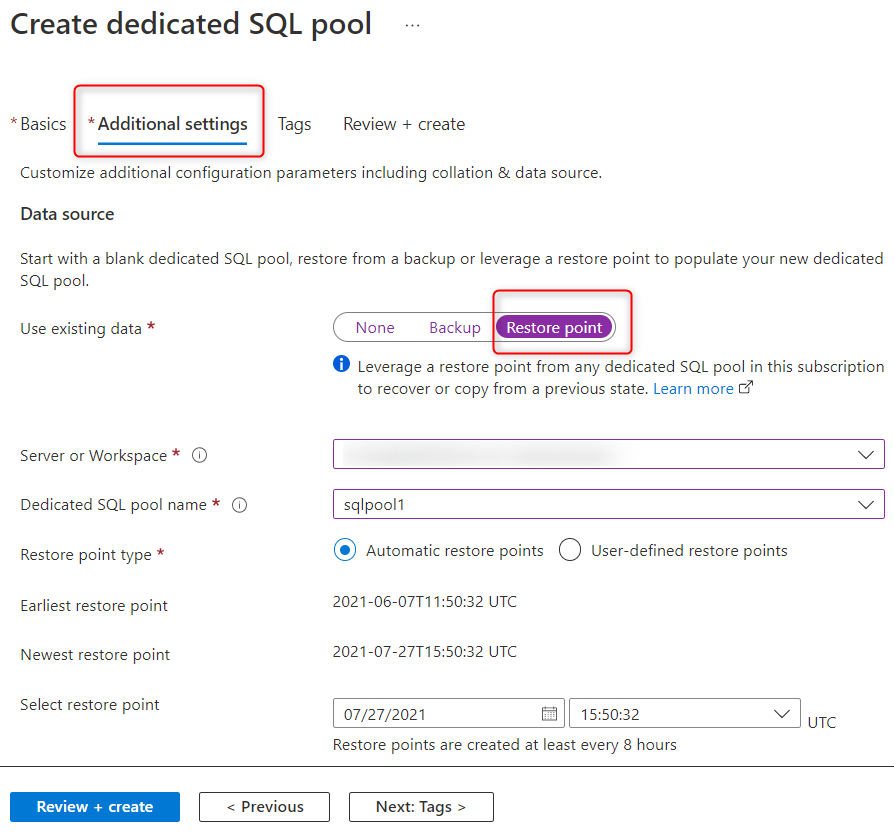
Synapse Studio
From Synapse Studio, you can restore the dedicated SQL pool from any workspace in the subscription by using restore points. While you create the dedicated SQL pool, under Additional settings, select Restore point and select the workspace as shown in the following screenshot. If you created a user-defined restore point, use it to restore the SQL pool. Otherwise, you can select the latest automatic restore point.
Azure PowerShell
Run the following PowerShell script to restore the workspace. This script uses the latest restore point from the source workspace dedicated SQL pool to restore the SQL pool on the target workspace. Before you run the script, update the performance level from DW100c to the required value.
Important
The dedicated SQL pool name should be the same on both the workspaces.
Get the restore points:
$restorePoint=Get-AzSynapseSqlPoolRestorePoint -WorkspaceName $sourceRegionWSName -Name $sqlPoolName|Sort-Object  -Property RestorePointCreationDate -Descending `
                                                                                         | SELECT RestorePointCreationDate -ExpandProperty  RestorePointCreationDate -First 1
Transform the Azure Synapse SQL pool resource ID to SQL database ID because currently the command only accepts the SQL database ID.
For example: /subscriptions/<SubscriptionId>/resourceGroups/<ResourceGroupName>/providers/Microsoft.Sql/servers/<WorkspaceName>/databases/<DatabaseName>
$pool = Get-AzSynapseSqlPool -ResourceGroupName $sourceRegionRGName -WorkspaceName $sourceRegionWSName -Name $sqlPoolName
$databaseId = $pool.Id `
    -replace "Microsoft.Synapse", "Microsoft.Sql" `
    -replace "workspaces", "servers" `
    -replace "sqlPools", "databases"


$restoredPool = Restore-AzSynapseSqlPool -FromRestorePoint `
                                         -RestorePoint $restorePoint `
                                         -TargetSqlPoolName $sqlPoolName `
                                         -ResourceGroupName $resourceGroupName `
                                         -WorkspaceName $workspaceName `
                                         -ResourceId $databaseId `
                                         -PerformanceLevel DW100c -AsJob
The following tracks the status of the restore operation:
Get-Job | Where-Object Command -In ("Restore-AzSynapseSqlPool") | `
Select-Object Id,Command,JobStateInfo,PSBeginTime,PSEndTime,PSJobTypeName,Error |Format-Table
After the dedicated SQL pool is restored, create all the SQL logins in Azure Synapse. To create all the logins, follow the steps in Create login.
Step 5: Create a serverless SQL pool, Spark pool database, and objects
You can't back up and restore serverless SQL pool databases and Spark pools. As a possible workaround, you could:
- Create notebooks and SQL scripts, which have the code to re-create all the required Spark pool, serverless SQL pool databases, tables, roles, and users with all the role assignments. Check in these artifacts to Azure DevOps or GitHub.
- If the Storage account name is changed, make sure the code artifacts are pointing to the correct storage account name.
- Create pipelines, which invoke these code artifacts in a specific sequence. When these pipelines are executed on the target region workspace, the Spark SQL databases, serverless SQL pool databases, external data sources, views, roles, and users and permissions will be created on the target region workspace.
- When you integrate the source region workspace with Azure DevOps, these code artifacts will be part of the repo. Later, you can deploy these code artifacts to the target region workspace by using the DevOps Release pipeline as mentioned in step 6.
- On the target region workspace, trigger these pipelines manually.
Step 6: Deploy artifacts and pipelines by using CI/CD
To learn how to integrate an Azure Synapse workspace with Azure DevOps or GitHub and how to deploy the artifacts to a target region workspace, follow the steps in Continuous integration and continuous delivery (CI/CD) for an Azure Synapse workspace.
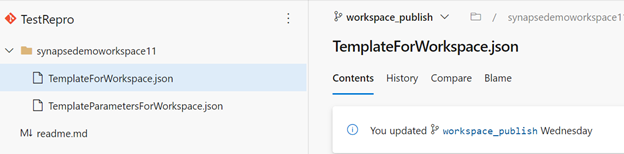
After the workspace is integrated with Azure DevOps, you'll find a branch with the name workspace_publish. This branch contains the workspace template that includes definitions for the artifacts like Notebooks, SQL Scripts, Datasets, Linked Services, Pipelines, Triggers, and Spark job definition.
This screenshot from the Azure DevOps repo shows the workspace template files for the artifacts and other components.
You can use the workspace template to deploy artifacts and pipelines to a workspace by using the Azure DevOps release pipeline.
If the workspace isn't integrated with GitHub or Azure DevOps, you'll have to manually re-create or write custom PowerShell or Azure CLI scripts to deploy all the artifacts, pipelines, linked services, credentials, triggers, and Spark definitions on the target region workspace.
Note
This process requires you to keep updating the pipelines and code artifacts to include any changes made to Spark and serverless SQL pools, objects, and roles in the source region workspaces.
Step 7: Create a shared integration runtime
To create a SHIR, follow the steps in Create and configure a self-hosted integration runtime.
Step 8: Assign an Azure role to managed identity
Assign Storage Blob Contributor access to the managed identity of the new workspace on the default attached Data Lake Storage Gen2 account. Also assign access on other storage accounts where SA-MI is used for authentication. Assign Storage Blob Contributor or Storage Blob Reader access to Microsoft Entra users and groups for all the required storage accounts.
Azure portal
Follow the steps in Grant permissions to workspace managed identity to assign a Storage Blob Data Contributor role to the managed identity of the workspace.
Azure PowerShell
Assign a Storage Blob Data Contributor role to the managed identity of the workspace.
Adding Storage Blob Data Contributor to the workspace managed identity on the storage account. The execution of New-AzRoleAssignment errors out with the message Exception of type 'Microsoft.Rest.Azure.CloudException' was thrown. however it creates the required permissions on the storage account.
$workSpaceIdentityObjectID= (Get-AzSynapseWorkspace -ResourceGroupName $resourceGroupName -Name $workspaceName).Identity.PrincipalId
$scope = "/subscriptions/$($subscriptionId)/resourceGroups/$($resourceGroupName)/providers/Microsoft.Storage/storageAccounts/$($storageAccountName)"

$roleAssignedforManagedIdentity=New-AzRoleAssignment -ObjectId $workSpaceIdentityObjectID `
    -RoleDefinitionName "Storage Blob Data Contributor" `
    -Scope $scope -ErrorAction SilentlyContinue
Azure CLI
Get the role name, resource ID, and principal ID for the workspace managed identity, then add the Storage Blob Data Contributor Azure role to the SA-MI.
# Getting Role name
$roleName =az role definition list --query "[?contains(roleName, 'Storage Blob Data Contributor')].{roleName:roleName}" --output tsv

#Getting resource id for storage account
$scope= (az storage account show --name $storageAccountName|ConvertFrom-Json).id

#Getting principal ID for workspace managed identity
$workSpaceIdentityObjectID=(az synapse workspace show --name $workspaceName --resource-group $resourceGroupName|ConvertFrom-Json).Identity.PrincipalId

# Adding Storage Blob Data Contributor Azure role to SA-MI
az role assignment create --assignee $workSpaceIdentityObjectID `
--role $roleName `
--scope $scope
Step 9: Assign Azure Synapse RBAC roles
Add all the users who need access to the target workspace with separate roles and permissions. The following PowerShell and CLI script adds a Microsoft Entra user to the Synapse Administrator role in the target region workspace.
To get all the Azure Synapse RBAC role names, see Azure Synapse RBAC roles.
Synapse Studio
To add or delete Azure Synapse RBAC assignments from Synapse Studio, follow the steps in How to manage Azure Synapse RBAC role assignments in Synapse Studio.
Azure PowerShell
The following PowerShell script adds the Synapse Administrator role assignment to a Microsoft Entra user or group. You can use -RoleDefinitionId instead of -RoleDefinitionName with the following command to add the users to the workspace:
New-AzSynapseRoleAssignment `
   -WorkspaceName $workspaceName  `
   -RoleDefinitionName "Synapse Administrator" `
   -ObjectId aaaaaaaa-0000-1111-2222-bbbbbbbbbbbb

Get-AzSynapseRoleAssignment -WorkspaceName $workspaceName
To get the ObjectIds and RoleIds in the source region workspace, run the Get-AzSynapseRoleAssignment command. Assign the same Azure Synapse RBAC roles to the Microsoft Entra users or groups in the target region workspace.
Instead of using -ObjectId as the parameter, you can also use -SignInName, where you provide the email address or the user principal name of the user. To find out more about the available options, see Azure Synapse RBAC - PowerShell cmdlet.
Azure CLI
Get the Object ID of the user and assign the required Azure Synapse RBAC permissions to the Microsoft Entra user. You can provide the email address of the user (username@contoso.com) for the --assignee parameter.
az synapse role assignment create `
--workspace-name $workspaceName `
--role "Synapse Administrator" --assignee adasdasdd42-0000-000-xxx-xxxxxxx

az synapse role assignment create `
--workspace-name $workspaceName `
--role "Synapse Contributor" --assignee "user1@contoso.com"
To learn more about available options, see Azure Synapse RBAC - CLI.
Step 10: Upload workspace packages
Upload all required workspace packages to the new workspace. To automate the process of uploading the workspace packages, see the Microsoft Azure Synapse Analytics Artifacts client library.
Step 11: Permissions
To set up the access control for the target region Azure Synapse workspace, follow the steps in How to set up access control for your Azure Synapse workspace.
Step 12: Create managed private endpoints
To re-create the managed private endpoints from the source region workspace in your target region workspace, see Create a managed private endpoint to your data source.
Discard
If you wish to discard the target region workspace, delete the target region workspace. To do so, go to the resource group from your dashboard in the portal and select the workspace and select Delete at the top of the Resource group page.
Clean up
To commit the changes and complete the move of the workspace, delete the source region workspace after testing the workspace in the target region. To do so, go to the resource group that has the source region workspace from your dashboard in the portal and select the workspace and select Delete at the top of the Resource group page.
Next steps
- Learn more about Azure Synapse managed virtual networks.
- Learn more about Azure Synapse managed private endpoints.
- Learn more about how to connect to workspace resources from a restricted network.