Note
Access to this page requires authorization. You can try signing in or changing directories.
Access to this page requires authorization. You can try changing directories.
Tip
Microsoft Fabric Data Warehouse is an enterprise scale relational warehouse on a data lake foundation, with a future-ready architecture, built-in AI, and new features. If you're new to data warehousing, start with Fabric Data Warehouse. Existing dedicated SQL pool workloads can upgrade to Fabric to access new capabilities across data science, real-time analytics, and reporting.
In this article, you learn how to restore an existing dedicated SQL pool (formerly SQL Data Warehouse) using Azure portal and PowerShell.
Note
This guidance is for standalone dedicated SQL pools (formerly SQL DW) only. For dedicated SQL pools in an Azure Synapse Analytics workspace, see Restore an existing dedicated SQL pool.
Before you begin
Verify your DTU capacity. Each pool is hosted by a logical SQL server (for example,
myserver.database.windows.net) which has a default DTU quota. Verify the server has enough remaining DTU quota for the database being restored. To learn how to calculate DTU needed or to request more DTU, see Request a DTU quota change.Make sure to install Azure PowerShell.
Note
We recommend that you use the Azure Az PowerShell module to interact with Azure. To get started, see Install Azure PowerShell. To learn how to migrate to the Az PowerShell module, see Migrate Azure PowerShell from AzureRM to Az.
Have an existing restore point that you want to restore from. If you want to create a new restore, see the tutorial to create a new user-defined restore point.
Permissions: Make sure the user performing the restore must have proper permissions in both the source and target subscriptions.
Task Required role (minimum) Additional requirements Backup Source SQL Pool SQL Server Contributor (source server) Requires access to storage account with Storage Blob Data Contributor Access Backup File Storage Blob Data Reader (on storage account) Restore to Target Server SQL Server Contributor (target server) Requires Storage Blob Data Reader for the backup
Restore an existing dedicated SQL pool (formerly SQL DW) through PowerShell
To restore an existing dedicated SQL pool (formerly SQL DW) from a restore point use the Restore-AzSqlDatabase PowerShell cmdlet.
Open PowerShell.
Connect to your Azure account and list all the subscriptions associated with your account.
Select the subscription that contains the database to be restored.
List the restore points for the dedicated SQL pool (formerly SQL DW).
Pick the desired restore point using the RestorePointCreationDate.
Restore the dedicated SQL pool (formerly SQL DW) to the desired restore point using Restore-AzSqlDatabase PowerShell cmdlet.
- To restore the dedicated SQL pool (formerly SQL DW) to a different server, make sure to specify the other server name. This server can also be in a different resource group and region.
- To restore to a different subscription, see the Restore an existing dedicated SQL pool to a different subscription through PowerShell.
Verify that the restored dedicated SQL pool (formerly SQL DW) is online.
After the restore has completed, you can configure your recovered dedicated SQL pool (formerly SQL DW) by following configure your database after recovery.
$SubscriptionName="<YourSubscriptionName>"
$ResourceGroupName="<YourResourceGroupName>"
$ServerName="<YourServerNameWithoutURLSuffixSeeNote>"  # Without database.windows.net
#$TargetResourceGroupName="<YourTargetResourceGroupName>" # uncomment to restore to a different server.
#$TargetServerName="<YourtargetServerNameWithoutURLSuffixSeeNote>"
$DatabaseName="<YourDatabaseName>"
$NewDatabaseName="<YourDatabaseName>"

Connect-AzAccount
Get-AzSubscription
Select-AzSubscription -SubscriptionName $SubscriptionName

# Or list all restore points
Get-AzSqlDatabaseRestorePoint -ResourceGroupName $ResourceGroupName -ServerName $ServerName -DatabaseName $DatabaseName

# Get the specific database to restore
$Database = Get-AzSqlDatabase -ResourceGroupName $ResourceGroupName -ServerName $ServerName -DatabaseName $DatabaseName

# Pick desired restore point using RestorePointCreationDate "xx/xx/xxxx xx:xx:xx xx"
$PointInTime="<RestorePointCreationDate>"

# Restore database from a restore point
$RestoredDatabase = Restore-AzSqlDatabase –FromPointInTimeBackup –PointInTime $PointInTime -ResourceGroupName $Database.ResourceGroupName -ServerName $Database.ServerName -TargetDatabaseName $NewDatabaseName –ResourceId $Database.ResourceID

# Use the following command to restore to a different server
#$TargetResourceGroupName = $Database.ResourceGroupName # for restoring to different server in same resourcegroup
#$RestoredDatabase = Restore-AzSqlDatabase –FromPointInTimeBackup –PointInTime $PointInTime -ResourceGroupName $TargetResourceGroupName -ServerName $TargetServerName -TargetDatabaseName $NewDatabaseName –ResourceId $Database.ResourceID

# Verify the status of restored database
$RestoredDatabase.status
Restore an existing dedicated SQL pool (formerly SQL DW) through the Azure portal
Sign in to the Azure portal.
Navigate to the dedicated SQL pool that you want to restore from.
At the top of the Overview page, select Restore.

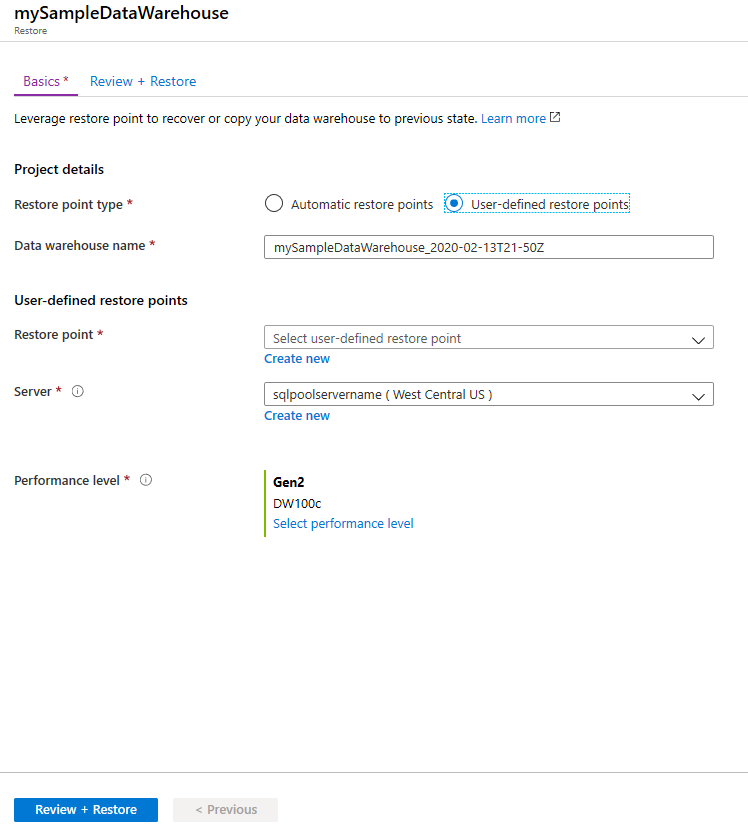
Select either Automatic Restore Points or User-Defined Restore Points. If the dedicated SQL pool (formerly SQL DW) doesn't have any automatic restore points, wait a few hours or create a user defined restore point before restoring. For User-Defined Restore Points, select an existing one or create a new one. For Server, you can pick a server in a different resource group and region or create a new one. After providing all the parameters, select Review + Restore.
Restore an existing dedicated SQL pool (formerly SQL DW) to a different subscription through PowerShell
This is similar guidance to restoring an existing dedicated SQL pool. However, the following instructions show that Get-AzSqlDatabase PowerShell cmdlet should be performed in the originating subscription while the Restore-AzSqlDatabase PowerShell cmdlet should be performed in the destination subscription. The user performing the restore must have proper permissions in both the source and target subscriptions.
Open PowerShell.
Update Az.Sql Module to 3.8.0 (or greater) if on an older version using
Update-Module. Otherwise it will cause failures. To validate the version with PowerShell:foreach ($i in (get-module -ListAvailable | ?{$_.name -eq 'az.sql'}).Version) { $version = [string]$i.Major + "." + [string]$i.Minor; if ($version -gt 3.7) {write-host "Az.Sql version $version installed. Prerequisite met."} else {update-module az.sql} }Connect to your Azure account and list all the subscriptions associated with your account.
Select the subscription that contains the database to be restored.
List the restore points for the dedicated SQL pool (formerly SQL DW).
Pick the desired restore point using the RestorePointCreationDate.
Select the destination subscription in which the database should be restored.
Restore the dedicated SQL pool (formerly SQL DW) to the desired restore point using Restore-AzSqlDatabase PowerShell cmdlet.
Verify that the restored dedicated SQL pool (formerly SQL DW) is online.
$SourceSubscriptionName="<YourSubscriptionName>"
$SourceResourceGroupName="<YourResourceGroupName>"
$SourceServerName="<YourServerNameWithoutURLSuffixSeeNote>"  # Without database.windows.net
$SourceDatabaseName="<YourDatabaseName>"
$TargetSubscriptionName="<YourTargetSubscriptionName>"
$TargetResourceGroupName="<YourTargetResourceGroupName>"
$TargetServerName="<YourTargetServerNameWithoutURLSuffixSeeNote>"  # Without database.windows.net
$TargetDatabaseName="<YourDatabaseName>"

# Update Az.Sql module to the latest version (3.8.0 or above)
# Update-Module -Name Az.Sql -RequiredVersion 3.8.0

Connect-AzAccount
Get-AzSubscription
Select-AzSubscription -SubscriptionName $SourceSubscriptionName

# Pick desired restore point using RestorePointCreationDate "xx/xx/xxxx xx:xx:xx xx"
$PointInTime="<RestorePointCreationDate>"
# Or list all restore points
Get-AzSqlDatabaseRestorePoint -ResourceGroupName $SourceResourceGroupName -ServerName $SourceServerName -DatabaseName $SourceDatabaseName

# Get the specific database to restore
$Database = Get-AzSqlDatabase -ResourceGroupName $SourceResourceGroupName -ServerName $SourceServerName -DatabaseName $SourceDatabaseName

# Switch context to the destination subscription
Select-AzSubscription -SubscriptionName $TargetSubscriptionName

# Restore database from a desired restore point of the source database to the target server in the desired subscription
$RestoredDatabase = Restore-AzSqlDatabase –FromPointInTimeBackup –PointInTime $PointInTime -ResourceGroupName $TargetResourceGroupName -ServerName $TargetServerName -TargetDatabaseName $TargetDatabaseName –ResourceId $Database.ResourceID

# Verify the status of restored database
$RestoredDatabase.status