Note
Access to this page requires authorization. You can try signing in or changing directories.
Access to this page requires authorization. You can try changing directories.
Note
The Time Series Insights service will be retired on 7 July 2024. Consider migrating existing environments to alternative solutions as soon as possible. For more information on the deprecation and migration, visit our documentation.
Depending on your business needs, your solution might include one or more client applications that you use to interact with your Azure Time Series Insights environment's APIs. Azure Time Series Insights performs authentication using Microsoft Entra Security Tokens based on OAUTH 2.0. To authenticate your client(s), you'll need to get a bearer token with the right permissions, and pass it along with your API calls. This document describes several methods for getting credentials that you can use to get a bearer token and authenticate, including using managed identity and Microsoft Entra app registration.
Managed identities
The following sections describe how to use a managed identity from Microsoft Entra ID to access the Azure Time Series Insights API. On Azure, managed identities eliminate the need for developers having to manage credentials by providing an identity for the Azure resource in Microsoft Entra ID and using it to obtain Microsoft Entra tokens. Here are some of the benefits of using Managed identities:
- You don't need to manage credentials. Credentials are not even accessible to you.
- You can use managed identities to authenticate to any Azure service that supports Microsoft Entra authentication including Azure Key Vault.
- Managed identities can be used without any additional cost.
For more information on the two types of managed identities read What are managed identities for Azure resources?
You can use managed identities from your:
- Azure VMs
- Azure App Services
- Azure Functions
- Azure Container instances
- and more ...
See Azure services that support managed identities for Azure resources for the complete list.
Microsoft Entra app registration
We recommend using managed identities whenever possible so that you don't need to manage credentials. If your client application is not hosted on an Azure service that supports managed identities you can register your application with a Microsoft Entra tenant. When you register your application with Microsoft Entra ID, you are creating an identity configuration for your application that allows it to integrate with Microsoft Entra ID. When you register an app in the Azure portal, you choose whether it's a single tenant (only accessible in your tenant) or multi-tenant (accessible in other tenants) and can optionally set a redirect URI (where the access token is sent to).
When you've completed the app registration, you have a globally unique instance of the app (the application object) which lives within your home tenant or directory. You also have a globally unique ID for your app (the app or client ID). In the portal, you can then add secrets or certificates and scopes to make your app work, customize the branding of your app in the sign-in dialog, and more.
If you register an application in the portal, an application object as well as a service principal object are automatically created in your home tenant. If you register/create an application using the Microsoft Graph APIs, creating the service principal object is a separate step. A service principal object is required to request tokens.
Be sure to review the Security checklist for your application. As a best practice, you should use certificate credentials, not password credentials (client secrets).
See Application and service principal objects in Microsoft Entra ID for more details.
Step 1: Create your managed identity or app registration
Once you've identified whether you'll be using a managed identity or app registration, your next step is to provision one.
Managed identity
The steps you'll use to create a managed identity will vary depending on where your code is located and whether or not you're creating a system assigned or user assigned identity. Read Managed identity types to understand the difference. Once you've selected your identity type, locate and follow the correct tutorial in the Microsoft Entra managed identities documentation. There you will find instructions for how to configure managed identities for:
Application registration
Follow the steps listed in Register an application.
After selecting the appropriate platform in step 4 of Configure platform settings, configure your Redirect URIs and Access Tokens in the side panel to the right of the user interface.
Redirect URIs must match the address supplied by the authentication request:
- For apps hosted in a local development environment, select Public client (mobile & desktop). Make sure to set public client to Yes.
- For Single-Page Apps hosted on Azure App Service, select Web.
Determine whether a Logout URL is appropriate.
Enable the implicit grant flow by checking Access tokens or ID tokens.
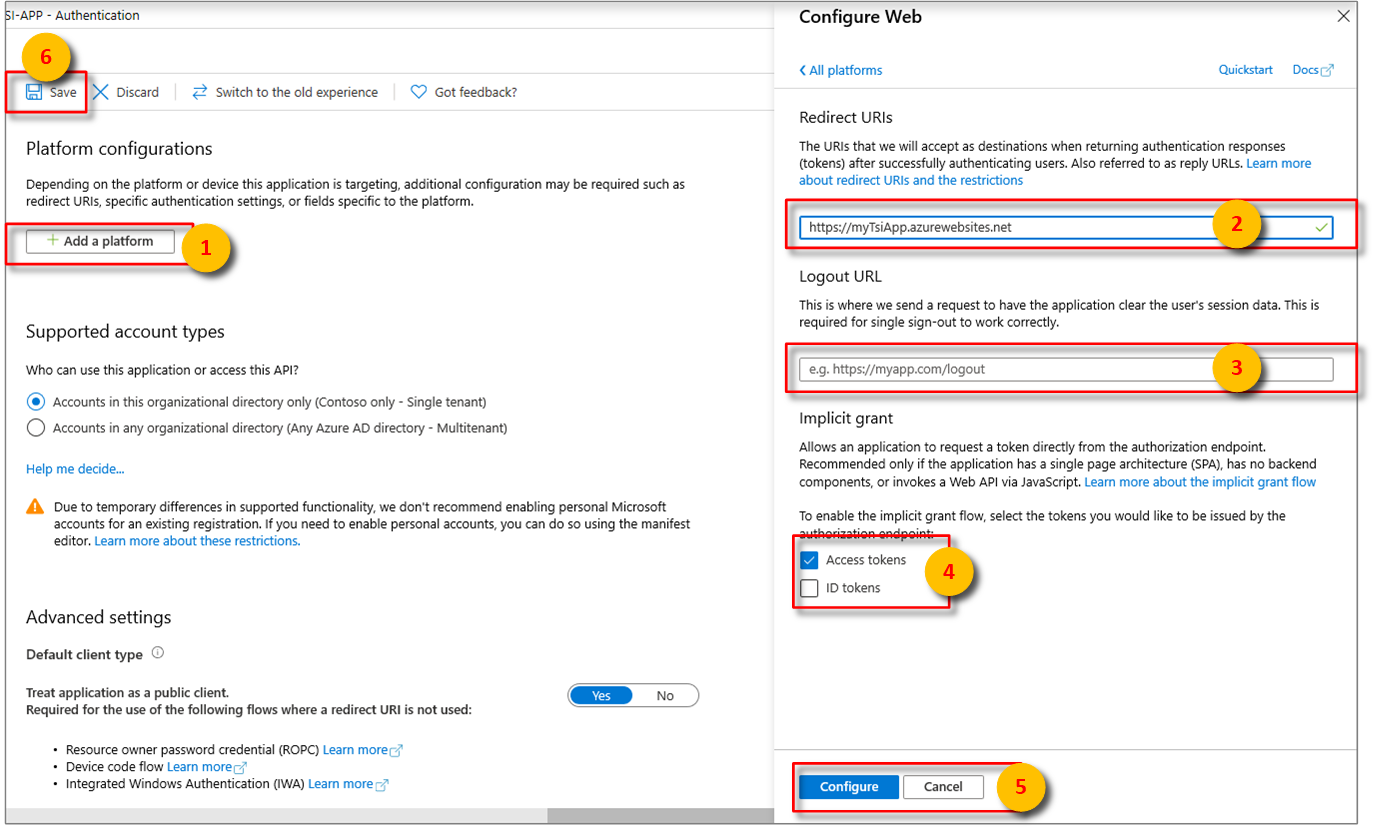
Click Configure, then Save.
Associate your Microsoft Entra app Azure Time Series Insights. Select API permissions > Add a permission > APIs my organization uses.
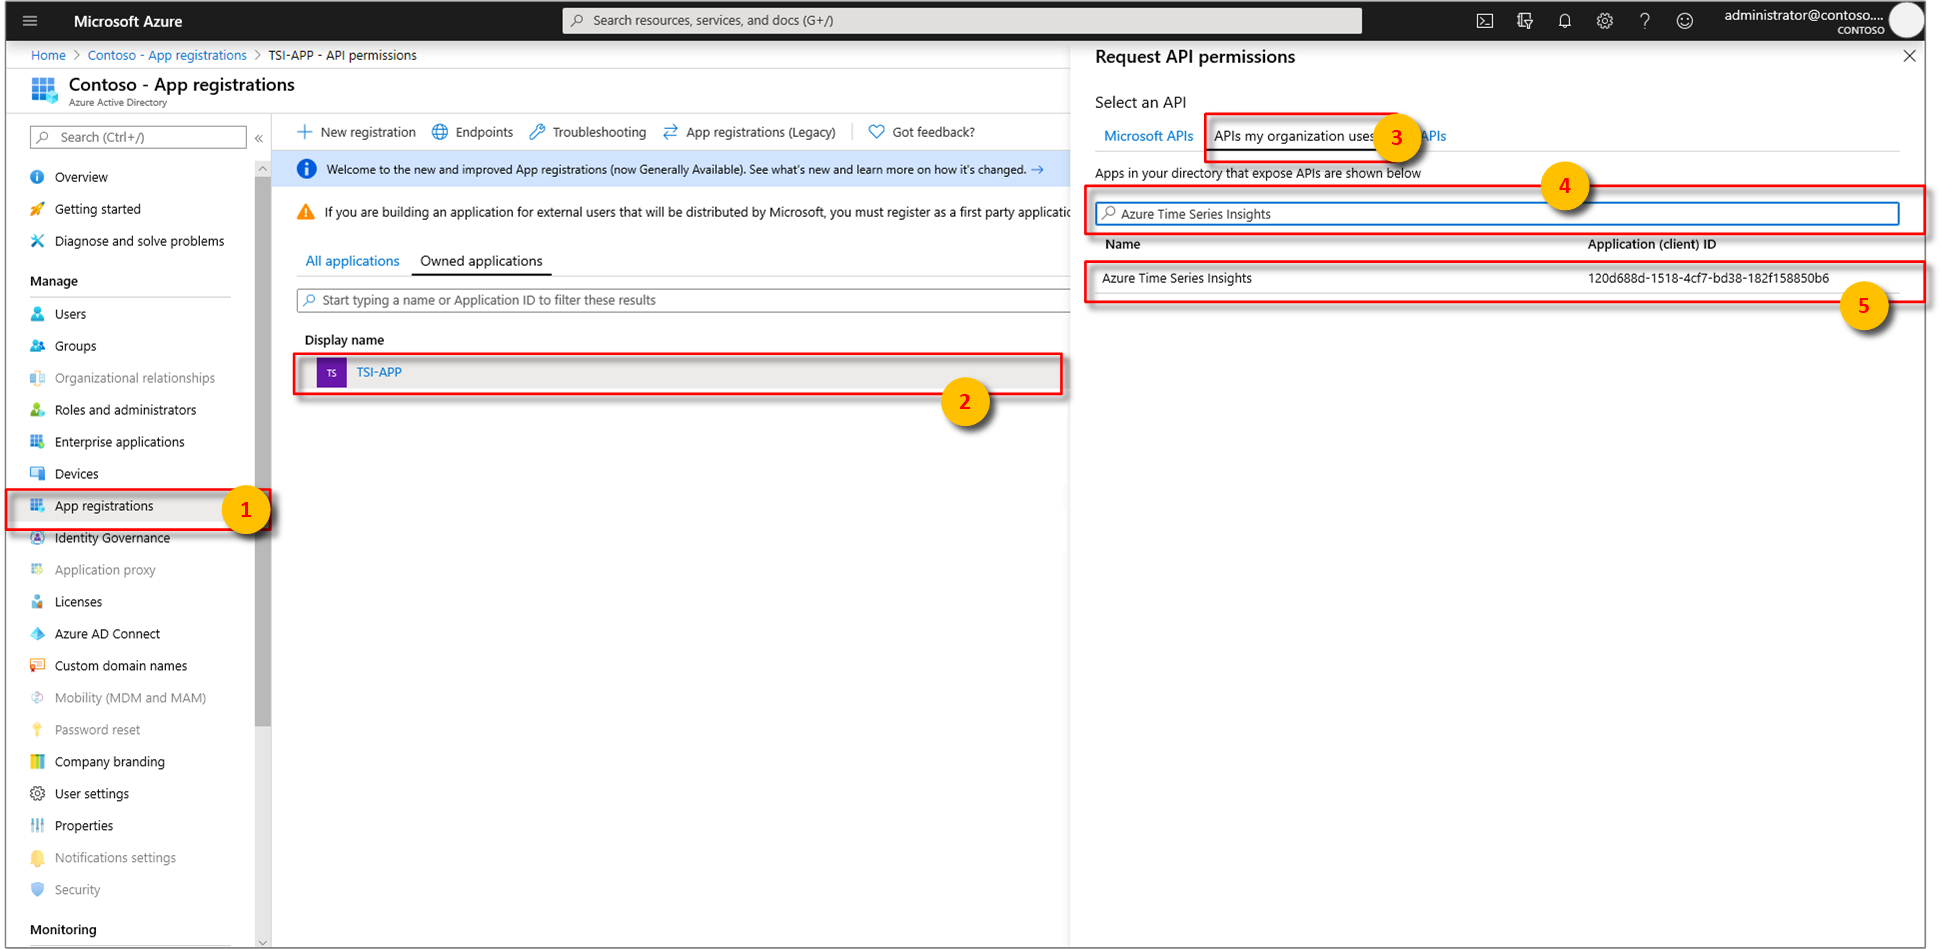
Type
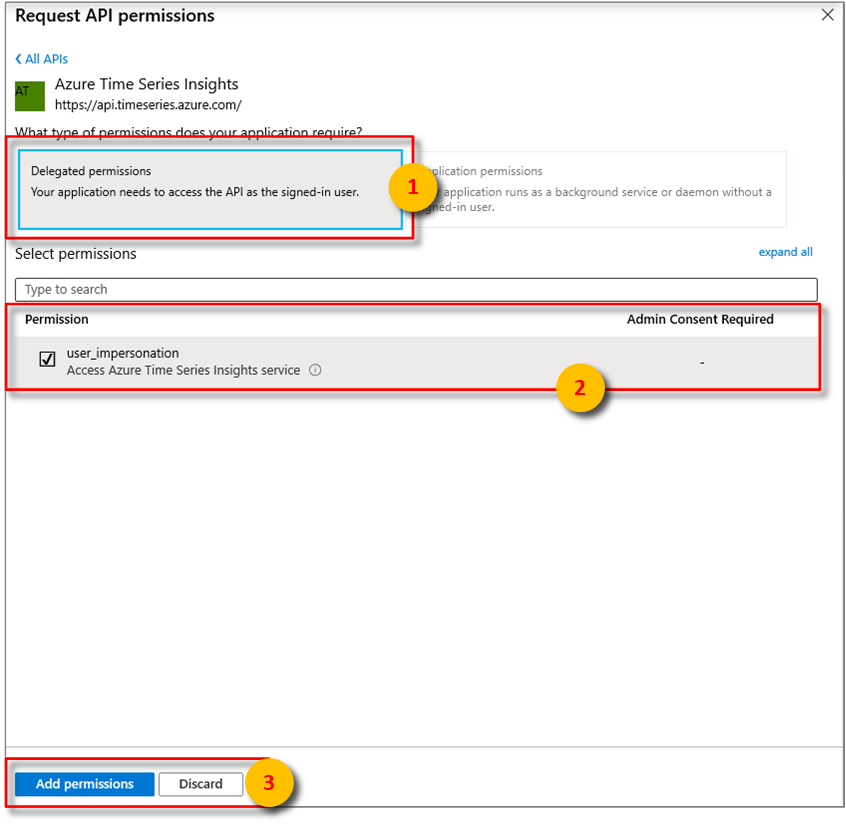
Azure Time Series Insightsinto the search bar then selectAzure Time Series Insights.Next, specify the kind API permission your app requires. By default, Delegated permissions will be highlighted. Choose a permission type then, select Add permissions.
Add Credentials if the application will be calling your environment's APIs as itself. Credentials allow your application to authenticate as itself, requiring no interaction from a user at runtime.


Step 2: Grant Access
When your Azure Time Series Insights environment receives a request, first the caller's bearer token is validated. If validation passes, the caller has been authenticated, and then another check is made to ensure the caller is authorized to perform the requested action. To authorize any user or service principal, you must first grant them access to the environment by assigning them either the Reader or Contributor role.
To grant access via the Azure portal UI, follow the instructions listed in the Grant data access to an environment article. When selecting the user, you can search for the managed identity or app registration by its name or by ID.
To grant access using the Azure CLI, run the following command. Review the documentation here for the full list of commands available to manage access.
az tsi access-policy create --name "ap1" --environment-name "env1" --description "some description" --principal-object-id "aGuid" --roles Reader Contributor --resource-group "rg1"
Note
The timeseriesinsights extension for Azure CLI requires version 2.11.0 or higher. The extension will automatically install the first time you run an az tsi access-policy command. Learn more about extensions.
Step 3: Requesting Tokens
Once your managed identity or app registration has been provisioned and assigned a role, you're ready to begin using it to request OAuth 2.0 bearer tokens. The method you use to obtain a token will differ depending on where your code is hosted and your language of choice. When specifying the resource (also known as the "audience" of the token), you can identify Azure Time Series Insights by its URL or GUID:
https://api.timeseries.azure.com/120d688d-1518-4cf7-bd38-182f158850b6
Important
If you use the URL as the resource ID, the token must be issued exactly to https://api.timeseries.azure.com/. The trailing slash is required.
- If using Postman your AuthURL will therefore be:
https://login.microsoftonline.com/microsoft.onmicrosoft.com/oauth2/authorize?scope=https://api.timeseries.azure.com//.defaulthttps://api.timeseries.azure.com/is valid buthttps://api.timeseries.azure.comis not.
Managed identities
When accessing from Azure App Service or Functions follow the guidance in the Obtain tokens for Azure resources.
For .NET applications and functions, the simplest way to work with a managed identity is through the Azure Identity client library for .NET. This client library is popular due to its simplicity and security benefits. Developers can write code once and let the client library determine how to authenticate based on the application environment - whether on a developer workstation using a developer's account or deployed in Azure using a managed service identity. For migration guidance from the predecessor AppAuthentication library read AppAuthentication to Azure.Identity Migration Guidance.
Request a token for Azure Time Series Insights using C# and the Azure Identity client library for .NET:
using Azure.Identity;
// ...
var credential = new DefaultAzureCredential();
var token = credential.GetToken(
new Azure.Core.TokenRequestContext(
    new[] { "https://api.timeseries.azure.com/" }));
var accessToken = token.Token;
App registration
- Use the Microsoft Authentication Library (MSAL) to obtain tokens for app registrations.
MSAL can be used in many application scenarios, including, but not limited to:
- Single page applications (JavaScript)
- Web application signing in a user and calling a web API on behalf of the user
- Web API calling another downstream web API on behalf of the signed-in user
- Desktop application calling a web API on behalf of the signed-in user
- Mobile application calling a web API on behalf of the user who's signed-in interactively.
- Desktop/service daemon application calling web API on behalf of itself
For sample C# code showing how to acquire a token as an app registration and query data from a Gen2 environment, view the sample app on GitHub
Important
If you are using Azure Active Directory Authentication Library (ADAL), migrate to MSAL.
Common headers and parameters
This section describes common HTTP request headers and parameters used to make queries against the Azure Time Series Insights Gen1 and Gen2 APIs. API-specific requirements are covered in greater detail in the Azure Time Series Insights REST API reference documentation.
Tip
Read the Azure REST API Reference to learn more about how to consume REST APIs, make HTTP requests, and handle HTTP responses.
HTTP headers
Required request headers are described below.
| Required request header | Description |
|---|---|
| Authorization | To authenticate with Azure Time Series Insights, a valid OAuth 2.0 Bearer token must be passed in the Authorization header. |
Tip
Read the hosted Azure Time Series Insights client SDK sample visualization to learn how to authenticate with the Azure Time Series Insights APIs programmatically using the JavaScript Client SDK along with charts and graphs.
Optional request headers are described below.
| Optional request header | Description |
|---|---|
| Content-type | only application/json is supported. |
| x-ms-client-request-id | A client request ID. The service records this value. Allows the service to trace operation across services. |
| x-ms-client-session-id | A client session ID. The service records this value. Allows the service to trace a group of related operations across services. |
| x-ms-client-application-name | Name of the application that generated this request. The service records this value. |
Optional but recommended response headers are described below.
| Response header | Description |
|---|---|
| Content-type | Only application/json is supported. |
| x-ms-request-id | Server-generated request ID. Can be used to contact Microsoft to investigate a request. |
| x-ms-property-not-found-behavior | GA API optional response header. Possible values are ThrowError (default) or UseNull. |
HTTP parameters
Tip
Find more information about required and optional query information in the reference documentation.
Required URL query string parameters depend on API version.
| Release | API version values |
|---|---|
| Gen1 | api-version=2016-12-12 |
| Gen2 | api-version=2020-07-31 |
Optional URL query string parameters include setting a timeout for HTTP request execution times.
| Optional query parameter | Description | Version |
|---|---|---|
timeout=<timeout> |
Server-side timeout for HTTP request execution. Applicable only to the Get Environment Events and Get Environment Aggregates APIs. Timeout value should be in ISO 8601 duration format, for example "PT20S" and should be in the range 1-30 s. Default value is 30 s. |
Gen1 |
storeType=<storeType> |
For Gen2 environments with warm store enabled, the query can be executed either on the WarmStore or ColdStore. This parameter in the query defines which store the query should be executed on. If not defined, the query will be executed on the cold store. To query the warm store, storeType needs to be set to WarmStore. If not defined, the query will be executed against the cold store. |
Gen2 |
Next steps
For sample code that calls the Gen1 Azure Time Series Insights API, read Query Gen1 data using C#.
For sample code that calls the Gen2 Azure Time Series Insights API code samples, read Query Gen2 data using C#.
For API reference information, read the Query API reference documentation.