Note
Access to this page requires authorization. You can try signing in or changing directories.
Access to this page requires authorization. You can try changing directories.
This quickstart describes how to create a Traffic Manager profile that delivers high availability for your web application.
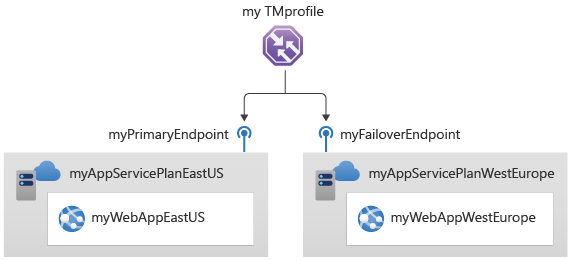
In this quickstart, you'll create two instances of a web application. Each of them is running in a different Azure region. You'll create a Traffic Manager profile based on endpoint priority. The profile directs user traffic to the primary site running the web application. Traffic Manager continuously monitors the web application. If the primary site is unavailable, it provides automatic failover to the backup site.
Prerequisites
If you don't have an Azure subscription, create a free account now.
Azure Cloud Shell
Azure hosts Azure Cloud Shell, an interactive shell environment that you can use through your browser. You can use either Bash or PowerShell with Cloud Shell to work with Azure services. You can use the Cloud Shell preinstalled commands to run the code in this article, without having to install anything on your local environment.
To start Azure Cloud Shell:
| Option | Example/Link |
|---|---|
| Select Try It in the upper-right corner of a code or command block. Selecting Try It doesn't automatically copy the code or command to Cloud Shell. |  |
| Go to https://shell.azure.com, or select the Launch Cloud Shell button to open Cloud Shell in your browser. |  |
| Select the Cloud Shell button on the menu bar at the upper right in the Azure portal. |  |
To use Azure Cloud Shell:
Start Cloud Shell.
Select the Copy button on a code block (or command block) to copy the code or command.
Paste the code or command into the Cloud Shell session by selecting Ctrl+Shift+V on Windows and Linux, or by selecting Cmd+Shift+V on macOS.
Select Enter to run the code or command.
If you choose to install and use PowerShell locally, this article requires the Azure PowerShell module version 5.4.1 or later. Run Get-Module -ListAvailable Az to find the installed version. If you need to upgrade, see Install Azure PowerShell module. If you're running PowerShell locally, you also need to run Connect-AzAccount to create a connection with Azure.
Create a Resource Group
Create a resource group using New-AzResourceGroup.
# Variables
$Location1="EastUS"

# Create a Resource Group
New-AzResourceGroup -Name MyResourceGroup -Location $Location1
Create a Traffic Manager profile
Create a Traffic Manager profile using New-AzTrafficManagerProfile that directs user traffic based on endpoint priority.
# Generates a random value
$Random=(New-Guid).ToString().Substring(0,8)
$mytrafficmanagerprofile="mytrafficmanagerprofile$Random"

New-AzTrafficManagerProfile `
-Name $mytrafficmanagerprofile `
-ResourceGroupName MyResourceGroup `
-TrafficRoutingMethod Priority `
-MonitorPath '/' `
-MonitorProtocol "HTTP" `
-RelativeDnsName $mytrafficmanagerprofile `
-Ttl 30 `
-MonitorPort 80
Create Web Apps
For this quickstart, you'll need two instances of a web application deployed in two different Azure regions (West US and East US). Each will serve as primary and failover endpoints for Traffic Manager.
Create Web App Service plans
Create Web App service plans using New-AzAppServicePlan for the two instances of the web application that you'll deploy in two different Azure regions.
# Variables
$Location1="EastUS"
$Location2="WestEurope"

# Create an App service plan
New-AzAppservicePlan -Name "myAppServicePlanEastUS$Random" -ResourceGroupName MyResourceGroup -Location $Location1 -Tier Standard
New-AzAppservicePlan -Name "myAppServicePlanWestEurope$Random" -ResourceGroupName MyResourceGroup -Location $Location2 -Tier Standard
Create a Web App in the App Service Plan
Create two instances the web application using New-AzWebApp in the App Service plans in the East US and West Europe Azure regions.
$App1ResourceId=(New-AzWebApp -Name myWebAppEastUS -ResourceGroupName MyResourceGroup -Location $Location1 -AppServicePlan "myAppServicePlanEastUS").Id
$App2ResourceId=(New-AzWebApp -Name myWebAppWestEurope -ResourceGroupName MyResourceGroup -Location $Location2 -AppServicePlan "myAppServicePlanWestEurope").Id
Add Traffic Manager endpoints
Add the two Web Apps as Traffic Manager endpoints using New-AzTrafficManagerEndpoint to the Traffic Manager profile as follows:
- Add the Web App located in the East US Azure region as the primary endpoint to route all the user traffic.
- Add the Web App located in the West Europe Azure region as the failover endpoint. When the primary endpoint is unavailable, traffic automatically routes to the failover endpoint.
New-AzTrafficManagerEndpoint -Name "myPrimaryEndpoint" `
-ResourceGroupName MyResourceGroup `
-ProfileName "$mytrafficmanagerprofile" `
-Type AzureEndpoints `
-TargetResourceId $App1ResourceId `
-EndpointStatus "Enabled"

New-AzTrafficManagerEndpoint -Name "myFailoverEndpoint" `
-ResourceGroupName MyResourceGroup `
-ProfileName "$mytrafficmanagerprofile" `
-Type AzureEndpoints `
-TargetResourceId $App2ResourceId `
-EndpointStatus "Enabled"
Test Traffic Manager profile
In this section, you'll check the domain name of your Traffic Manager profile. You'll also configure the primary endpoint to be unavailable. Finally, you get to see that the web app is still available. It's because Traffic Manager sends the traffic to the failover endpoint.
Determine the DNS name
Determine the DNS name of the Traffic Manager profile using Get-AzTrafficManagerProfile.
Get-AzTrafficManagerProfile -Name $mytrafficmanagerprofile `
-ResourceGroupName MyResourceGroup
Copy the RelativeDnsName value. The DNS name of your Traffic Manager profile is http://<relativednsname>.trafficmanager.net.
View Traffic Manager in action
In a web browser, enter the DNS name of your Traffic Manager profile (http://<relativednsname>.trafficmanager.net) to view your Web App's default website.
Note
In this quickstart scenario, all requests route to the primary endpoint. It is set to Priority 1.
To view Traffic Manager failover in action, disable your primary site using Disable-AzTrafficManagerEndpoint.
 Disable-AzTrafficManagerEndpoint -Name "myPrimaryEndpoint" `
 -Type AzureEndpoints `
 -ProfileName $mytrafficmanagerprofile `
 -ResourceGroupName MyResourceGroup `
 -Force
Copy the DNS name of your Traffic Manager profile (http://<relativednsname>.trafficmanager.net) to view the website in a new web browser session.
Verify that the web app is still available.
Clean up resources
When you're done, delete the resource groups, web applications, and all related resources using Remove-AzResourceGroup.
Remove-AzResourceGroup -Name MyResourceGroup
Next steps
In this quickstart, you created a Traffic Manager profile that provides high availability for your web application. To learn more about routing traffic, continue to the Traffic Manager tutorials.
