Schedule recurring updates for machines by using the Azure portal and Azure Policy
Applies to: ✔️ Windows VMs ✔️ Linux VMs ✔️ On-premises environment ✔️ Azure Arc-enabled servers.
Important
- For a seamless scheduled patching experience, we recommend that for all Azure virtual machines (VMs), you update the patch orchestration to Customer Managed Schedules by June 30, 2023. If you fail to update the patch orchestration by June 30, 2023, you can experience a disruption in business continuity because the schedules will fail to patch the VMs. Learn more.
- Schedule recurring updates via Azure Policy isn't available in Azure US Government and Azure China operated by 21 Vianet.
You can use Azure Update Manager to create and save recurring deployment schedules. You can create a schedule on a daily, weekly, or hourly cadence. You can specify the machines that must be updated as part of the schedule and the updates to be installed.
This schedule then automatically installs the updates according to the created schedule for a single VM and at scale.
Update Manager uses a maintenance control schedule instead of creating its own schedules. Maintenance control enables customers to manage platform updates. For more information, see Maintenance control documentation.
Prerequisites for scheduled patching
Patch orchestration of the Azure machines should be set to Customer Managed Schedules. For more information, see Enable schedule patching on existing VMs. For Azure Arc-enabled machines, it isn't a requirement.
Note
If you set the patch mode to Azure orchestrated (
AutomaticByPlatform) but do not enable the BypassPlatformSafetyChecksOnUserSchedule flag and do not attach a maintenance configuration to an Azure machine, it's treated as an automatic guest patching-enabled machine. The Azure platform automatically installs updates according to its own schedule. Learn more.
Schedule patching in an availability set
All VMs in a common availability set aren't updated concurrently.
VMs in a common availability set are updated within Update Domain boundaries. VMs across multiple Update Domains aren't updated concurrently.
In scenarios where machines from the same availability set are being patched at the same time in different schedules, it is likely that they might not get patched or could potentially fail if the maintenance window exceeds. To avoid this, we recommend that you either increase the maintenance window or split the machines belonging to the same availability set across multiple schedules at different times.
Configure reboot settings
The registry keys listed in Configure Automatic Updates by editing the registry and Registry keys used to manage restart can cause your machines to reboot. A reboot can occur even if you specify Never Reboot in the Schedule settings. Configure these registry keys to best suit your environment.
Service limits
We recommend the following limits for the indicators.
| Indicator | Limit |
|---|---|
| Number of schedules per subscription per region | 250 |
| Total number of resource associations to a schedule | 3,000 |
| Resource associations on each dynamic scope | 1,000 |
| Number of dynamic scopes per resource group or subscription per region | 250 |
| Number of dynamic scopes per schedule | 30 |
| Total number of subscriptions attached to all dynamic scopes per schedule | 30 |
For more information, see the service limits for Dynamic scope.
Schedule recurring updates on a single VM
You can schedule updates from the Overview or Machines pane on the Update Manager page or from the selected VM.
To schedule recurring updates on a single VM:
Sign in to the Azure portal.
On the Azure Update Manager | Overview page, select your subscription, and then select Schedule updates.
On the Create new maintenance configuration page, you can create a schedule for a single VM.
Currently, VMs and maintenance configuration in the same subscription are supported.
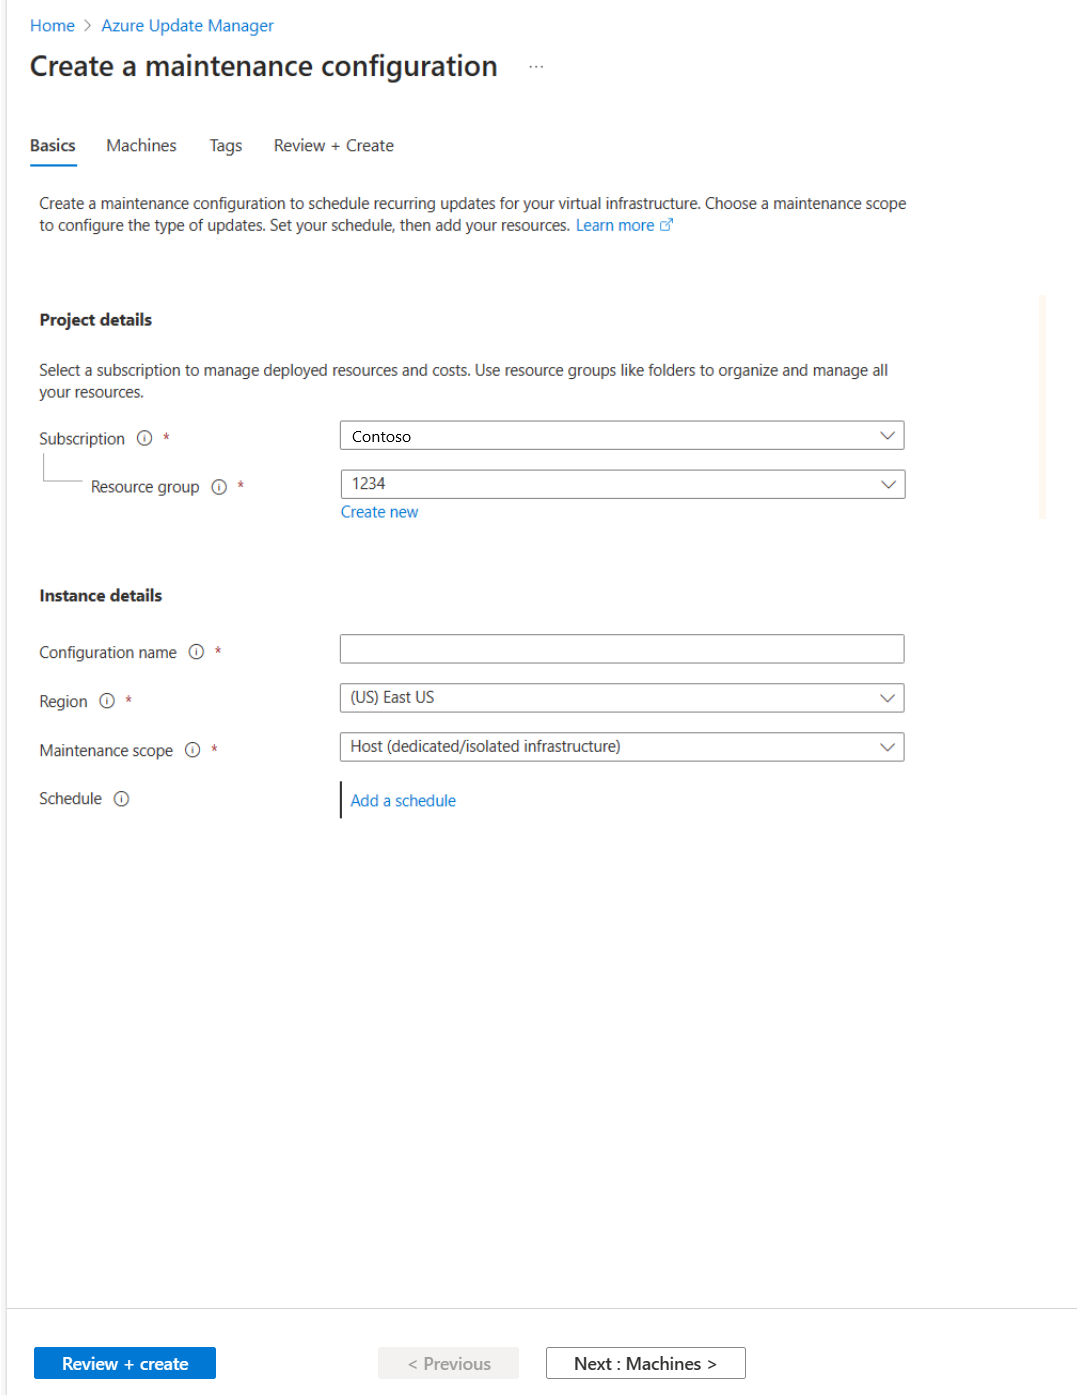
On the Basics page, select Subscription, Resource Group, and all options in Instance details.
Select Maintenance scope as Guest (Azure VM, Azure Arc-enabled VMs/servers).
Select Add a schedule. In Add/Modify schedule, specify the schedule details, such as:
- Start on
- Maintenance window (in hours). The upper maintenance window is 3 hours 55 minutes.
- Repeats (monthly, daily, or weekly)
- Add end date
- Schedule summary
The hourly option isn't supported in the portal but can be used through the API.
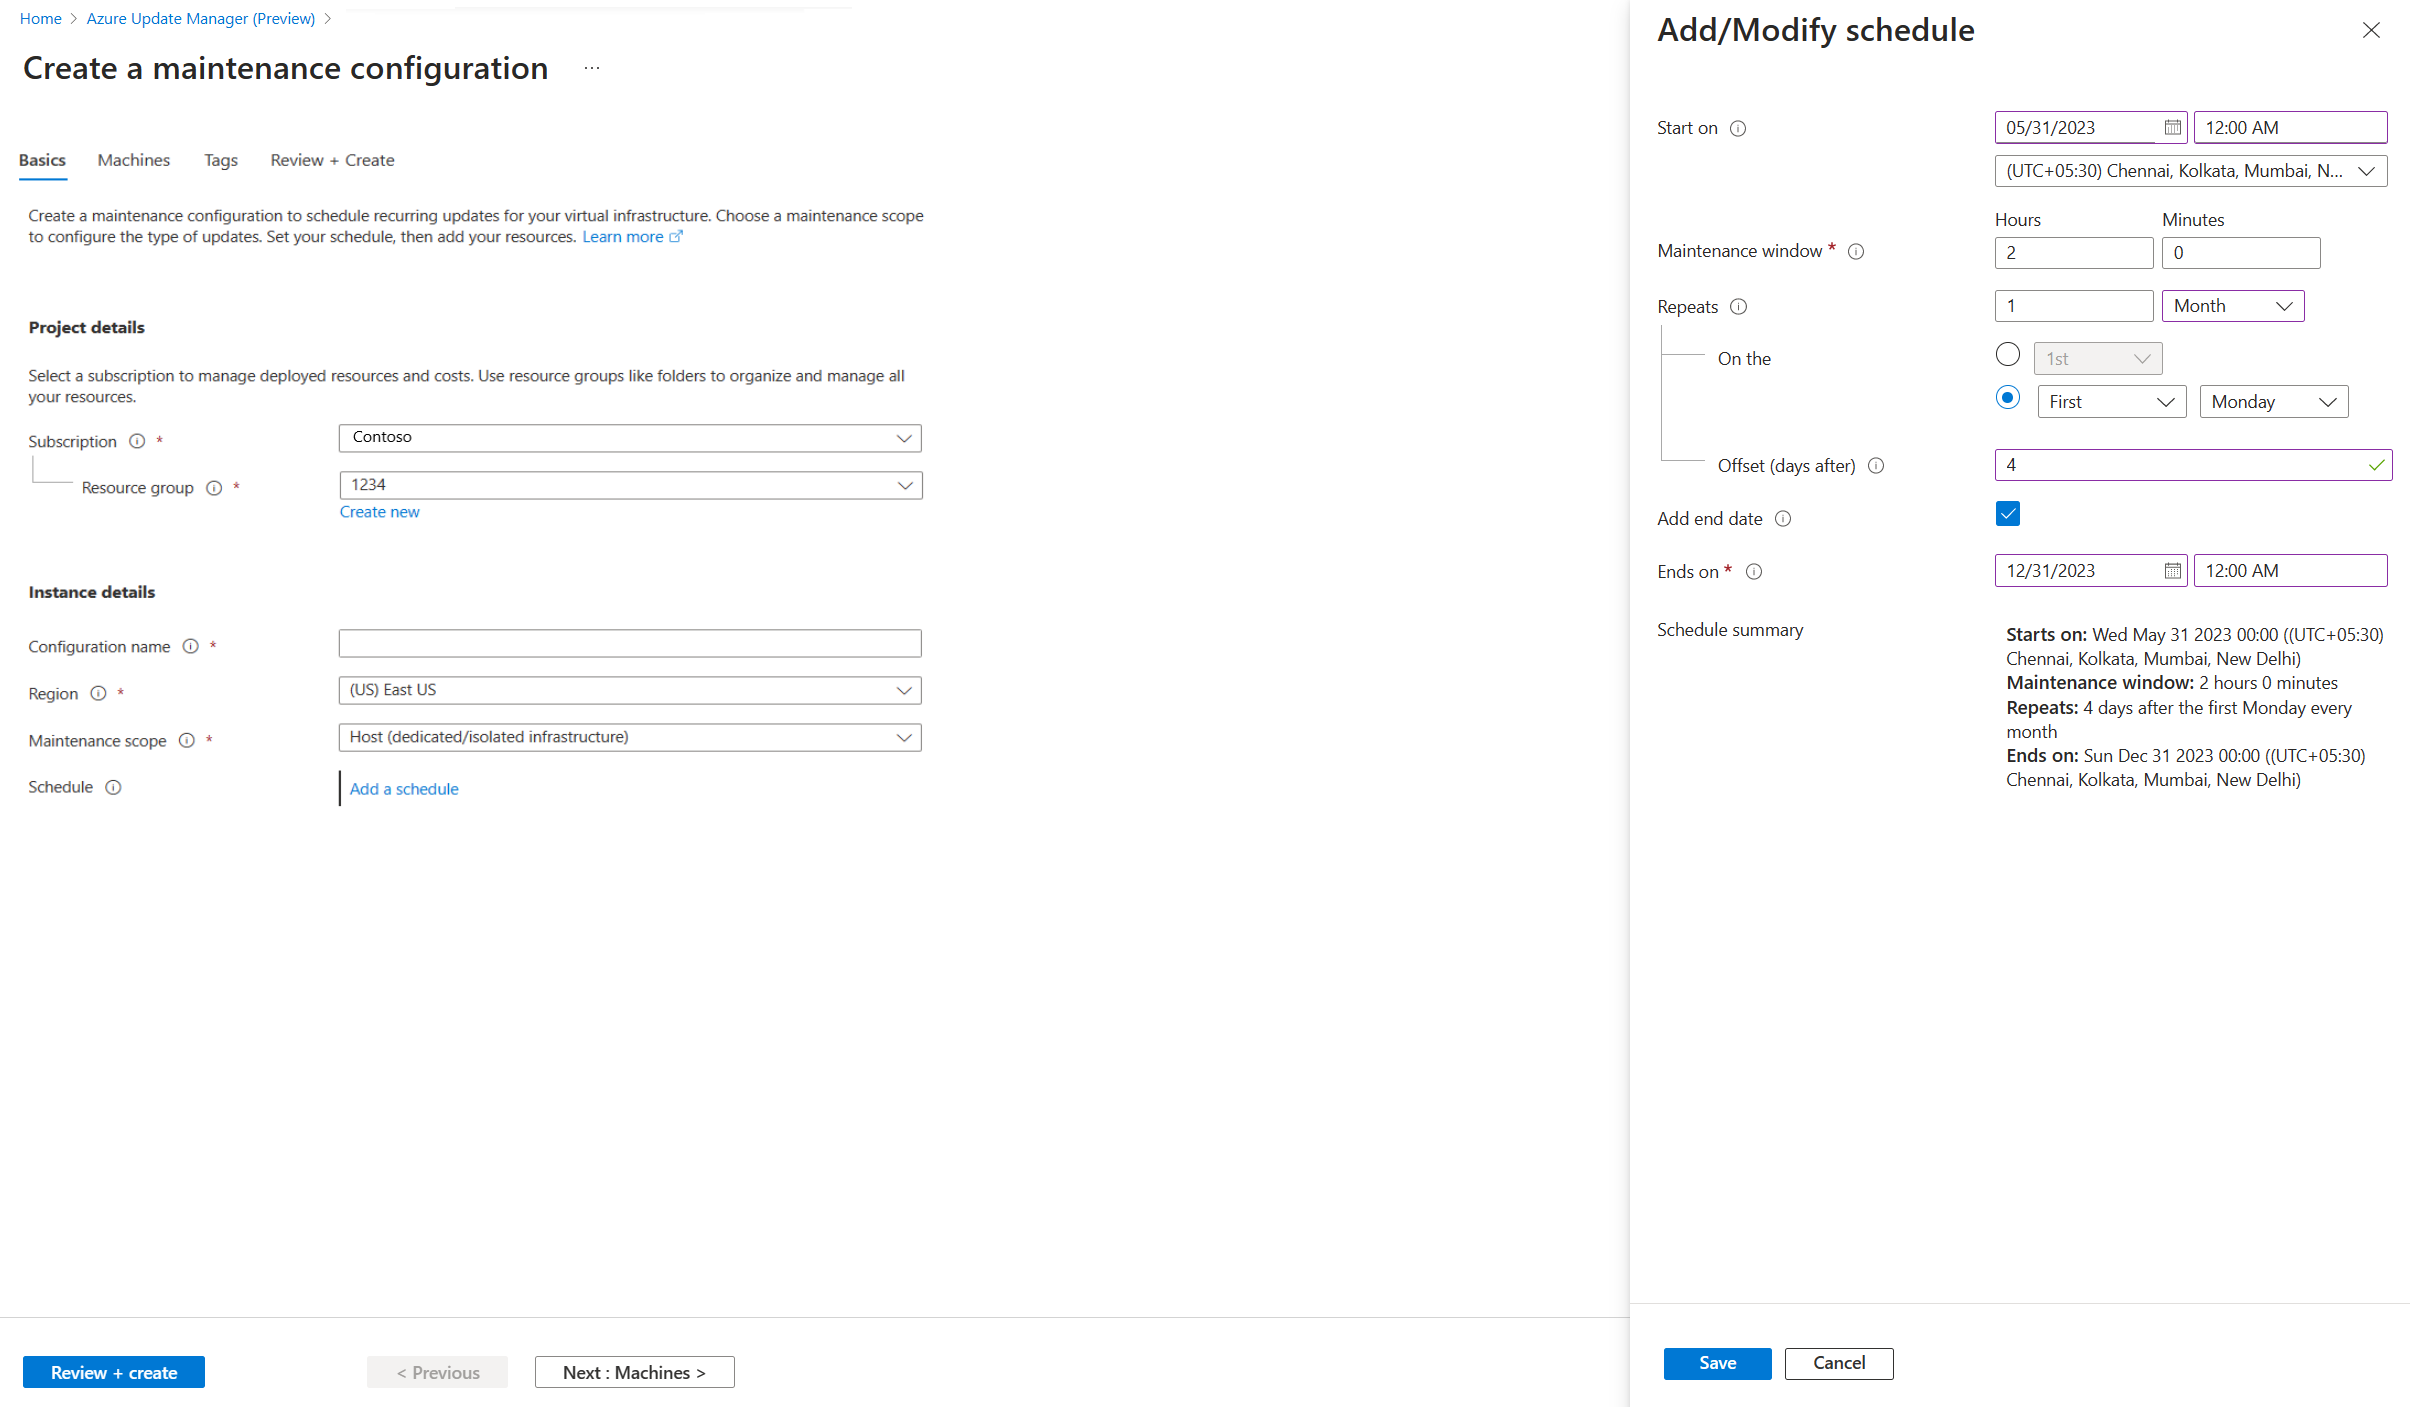
For Repeats monthly, there are two options:
- Repeat on a calendar date (optionally run on the last date of the month).
- Repeat on nth (first, second, etc.) x day (for example, Monday, Tuesday) of the month. You can also specify an offset from the day set. It could be +6/-6. For example, if you want to patch on the first Saturday after a patch on Tuesday, set the recurrence as the second Tuesday of the month with a +4 day offset. Optionally, you can also specify an end date when you want the schedule to expire.
On the Machines tab, select your machine, and then select Next.
Update Manager doesn't support driver updates.
On the Tags tab, assign tags to maintenance configurations.
On the Review + create tab, verify your update deployment options, and then select Create.
Sign in to the Azure portal.
On the Azure Update Manager | Machines page, select your subscription, select your machine, and then select Schedule updates.
In Create new maintenance configuration, you can create a schedule for a single VM and assign a machine and tags. Follow the procedure from step 3 listed in From the Overview pane of Schedule recurring updates on a single VM to create a maintenance configuration and assign a schedule.
A notification confirms that the deployment was created.
Schedule recurring updates at scale
To schedule recurring updates at scale, follow these steps.
You can schedule updates from the Overview or Machines pane.
Sign in to the Azure portal.
On the Azure Update Manager | Overview page, select your subscription, and then select Schedule updates.
On the Create new maintenance configuration page, you can create a schedule for multiple machines.
Currently, VMs and maintenance configuration in the same subscription are supported.
On the Basics tab, select Subscription, Resource Group, and all options in Instance details.
Select Add a schedule. In Add/Modify schedule, specify the schedule details, such as:
- Start on
- Maintenance window (in hours)
- Repeats (monthly, daily, or weekly)
- Add end date
- Schedule summary
The hourly option isn't supported in the portal but can be used through the API.
On the Machines tab, verify if the selected machines are listed. You can add or remove machines from the list. Select Next.
On the Updates tab, specify the updates to include in the deployment, such as update classifications or KB ID/packages that must be installed when you trigger your schedule.
Update Manager doesn't support driver updates.
On the Tags tab, assign tags to maintenance configurations.
On the Review + create tab, verify your update deployment options, and then select Create.
A notification confirms that the deployment was created.
Attach a maintenance configuration
A maintenance configuration can be attached to multiple machines. It can be attached to machines at the time of creating a new maintenance configuration or even after you create one.
On the Azure Update Manager page, select Machines, and then select your subscription.
Select your machine, and on the Updates pane, select Scheduled updates to create a maintenance configuration or attach an existing maintenance configuration to the scheduled recurring updates.
On the Scheduling tab, select Attach maintenance configuration.
Select the maintenance configuration that you want to attach, and then select Attach.
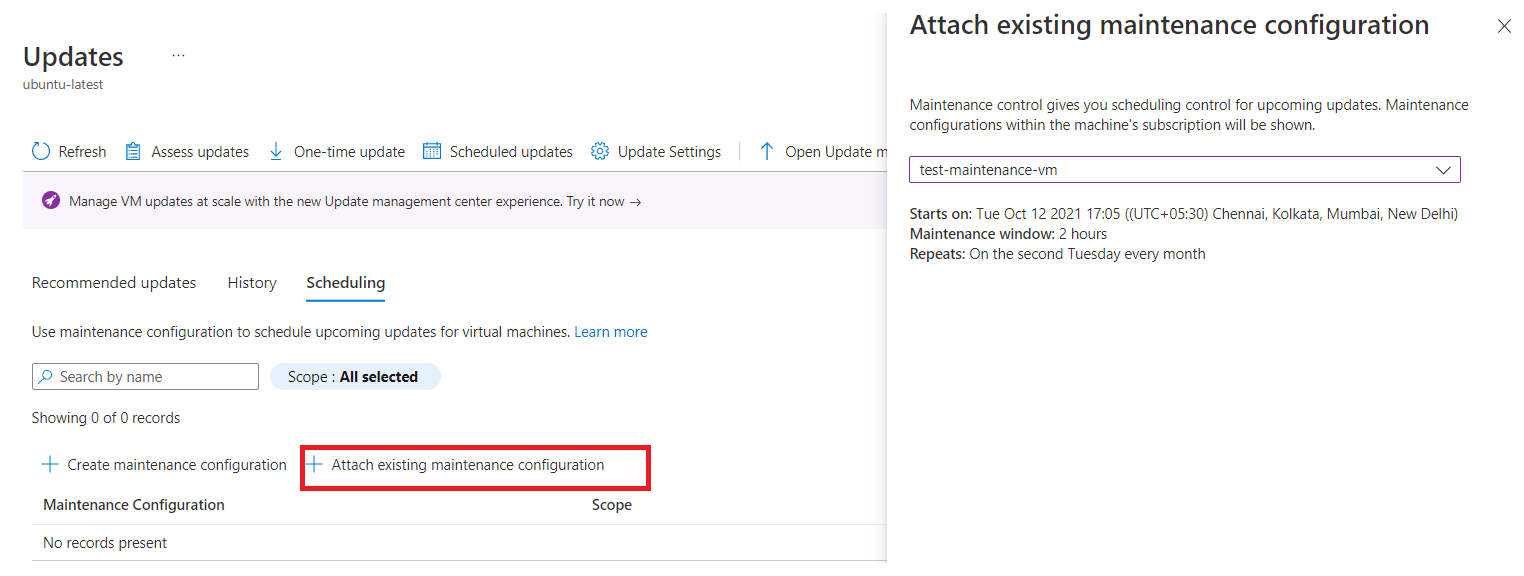
On the Updates pane, select Scheduling > Attach maintenance configuration.
On the Attach existing maintenance configuration page, select the maintenance configuration that you want to attach, and then select Attach.

Schedule recurring updates from maintenance configuration
You can browse and manage all your maintenance configurations from a single place.
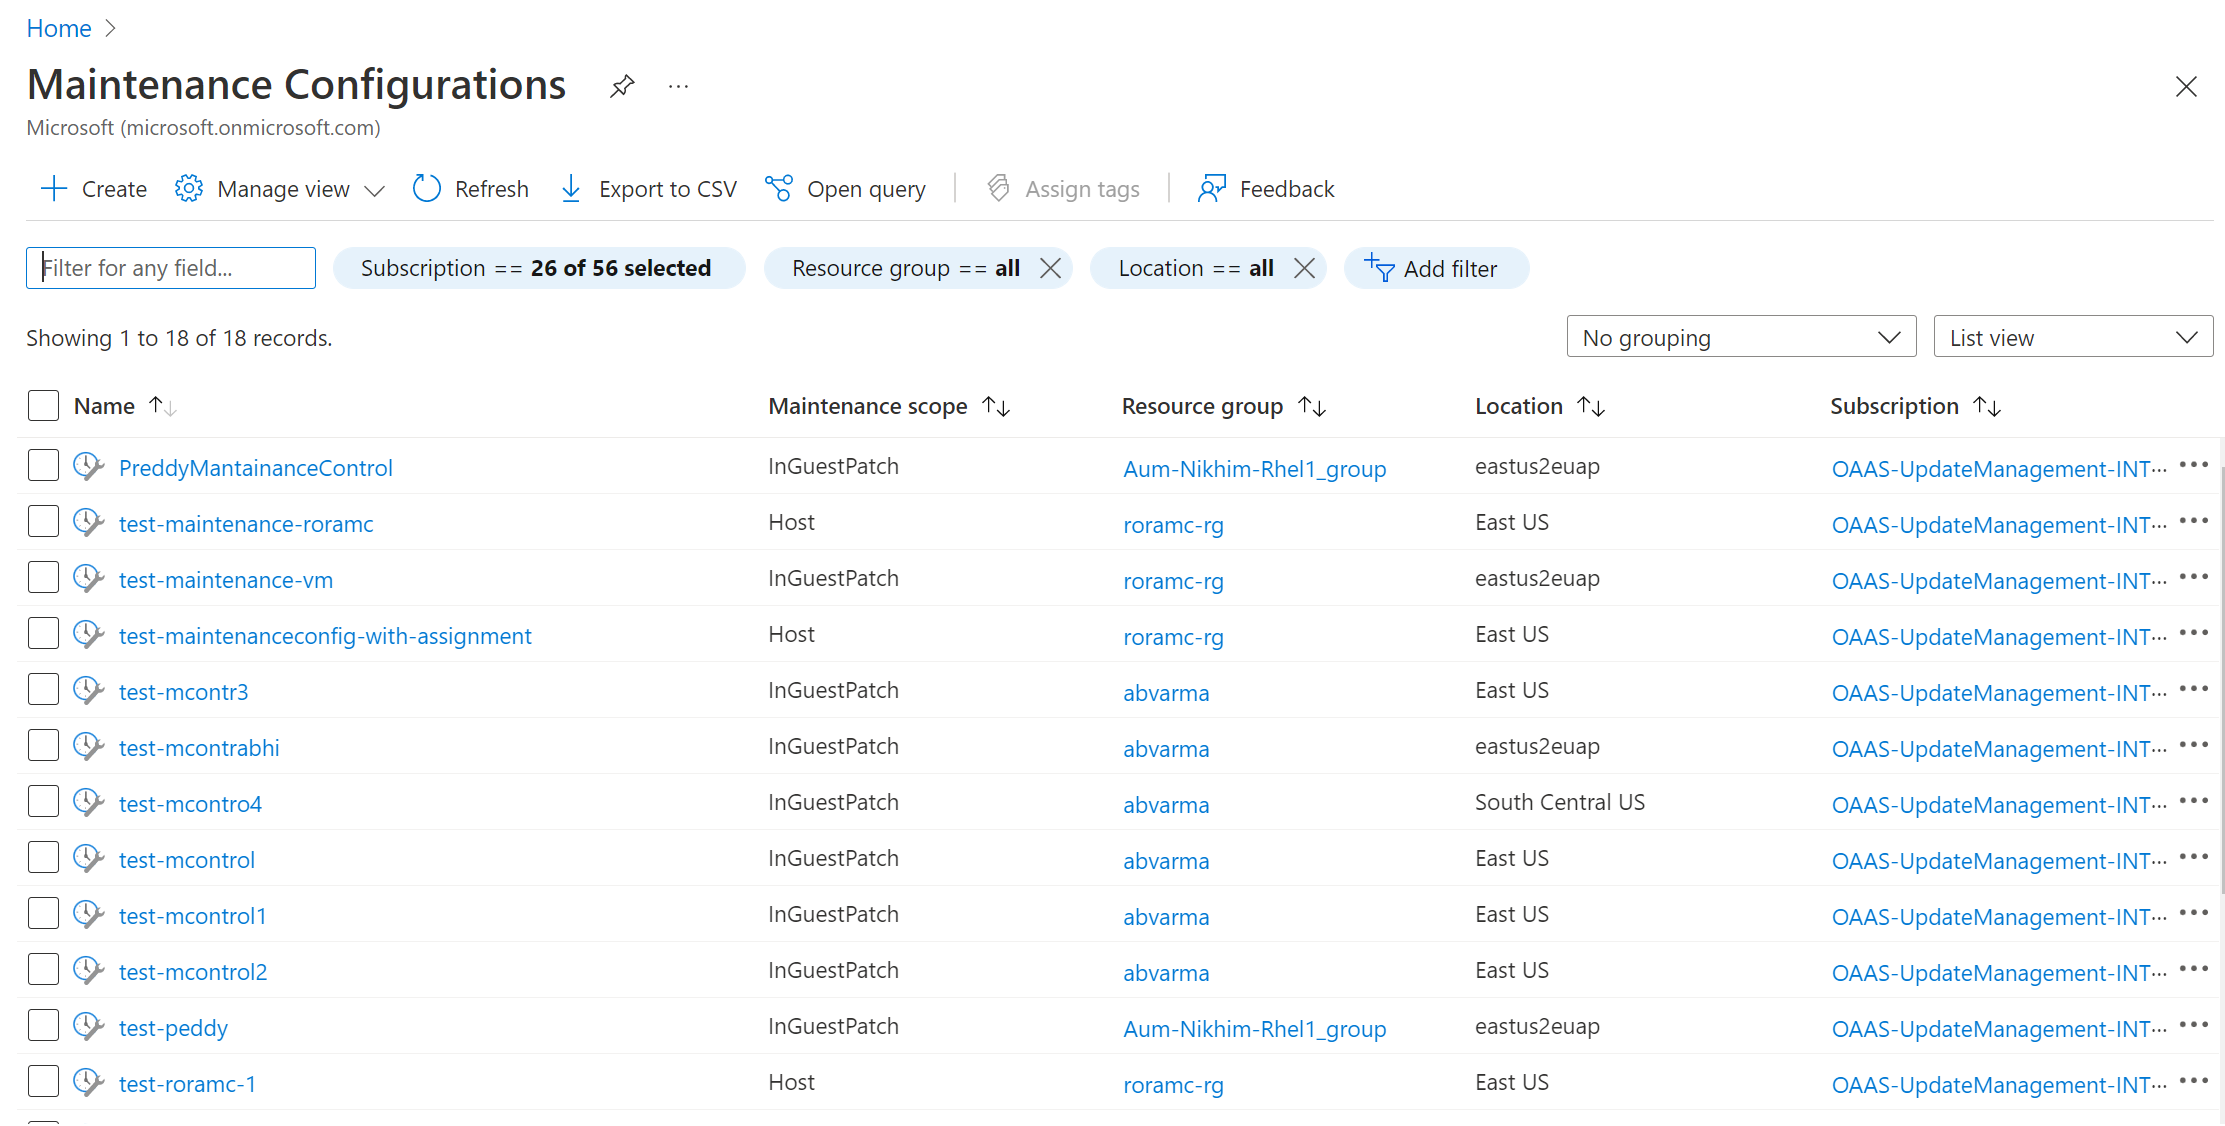
Search Maintenance configurations in the Azure portal. It shows a list of all maintenance configurations along with the maintenance scope, resource group, location, and the subscription to which it belongs.
You can filter maintenance configurations by using filters at the top. Maintenance configurations related to guest OS updates are the ones that have maintenance scope as InGuestPatch.
You can create a new guest OS update maintenance configuration or modify an existing configuration.
Create a new maintenance configuration
Go to Machines and select machines from the list.
On the Updates pane, select Scheduled updates.
On the Create a maintenance configuration pane, follow step 3 in this procedure to create a maintenance configuration.
On the Basics tab, select the Maintenance scope as Guest (Azure VM, Arc-enabled VMs/servers).
Add or remove machines from maintenance configuration
Go to Machines and select the machines from the list.
On the Updates page, select One-time updates.
On the Install one-time updates pane, select Machines > Add machine.


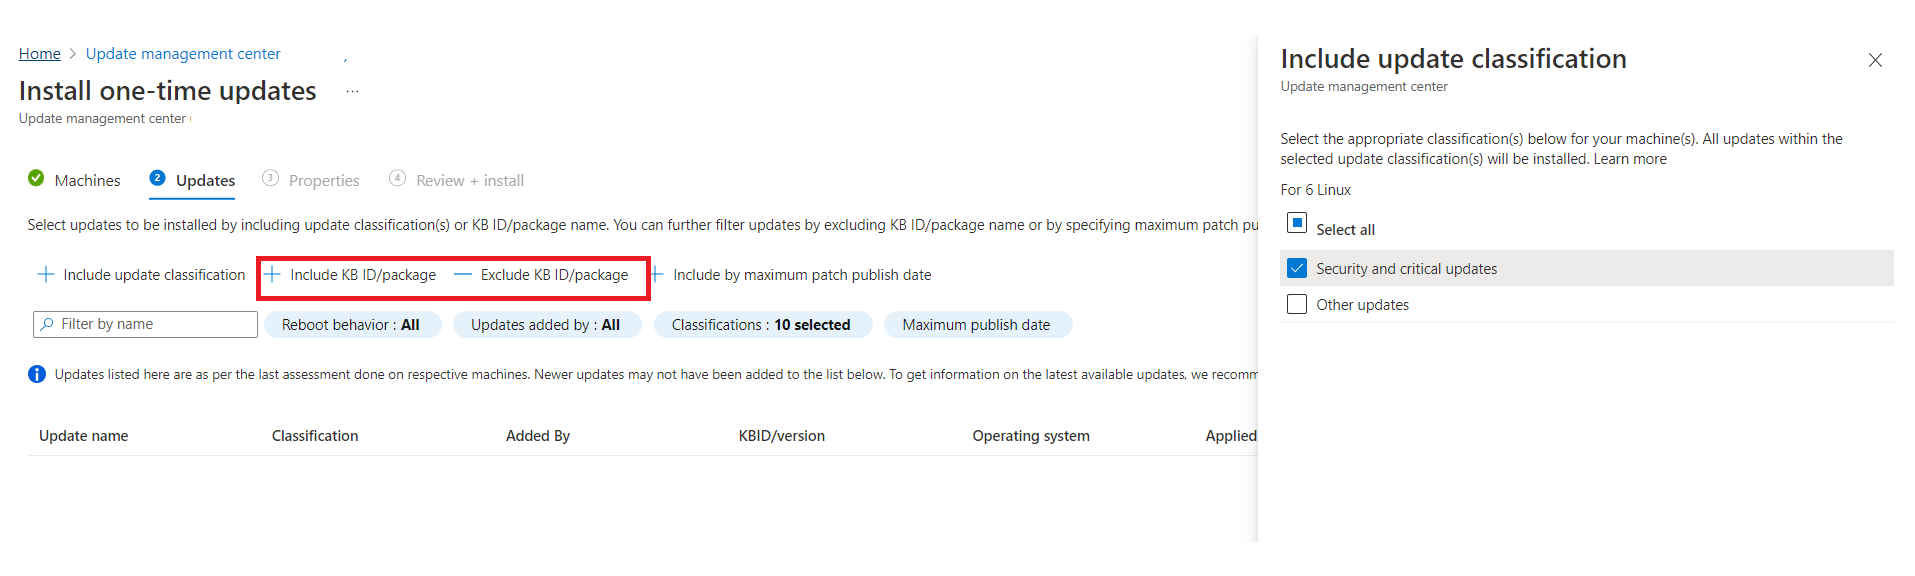
Change update selection criteria
On the Install one-time updates pane, select the resources and machines to install the updates.
On the Machines tab, select Add machine to add machines that weren't previously selected, and then select Add.
On the Updates tab, specify the updates to include in the deployment.
Select Include KB ID/package and Exclude KB ID/package, respectively, to select updates like Critical, Security, and Feature updates.

Onboard to schedule by using Azure Policy
Update Manager allows you to target a group of Azure or non-Azure VMs for update deployment via Azure Policy. The grouping using a policy keeps you from having to edit your deployment to update machines. You can use subscription, resource group, tags, or regions to define the scope. You can use this feature for the built-in policies, which you can customize according to your use case.
Note
This policy also ensures that the patch orchestration property for Azure machines is set to Customer Managed Schedules because it's a prerequisite for scheduled patching.
Assign a policy
Azure Policy allows you to assign standards and assess compliance at scale. For more information, see Overview of Azure Policy. To assign a policy to scope:
Sign in to the Azure portal and select Policy.
Under Assignments, select Assign policy.
On the Assign policy page, on the Basics tab:
For Scope, choose your subscription and resource group and choose Select.
Select Policy definition to view a list of policies.
On the Available Definitions pane, select Built in for Type. In Search, enter Schedule recurring updates using Azure Update Manager and click Select.
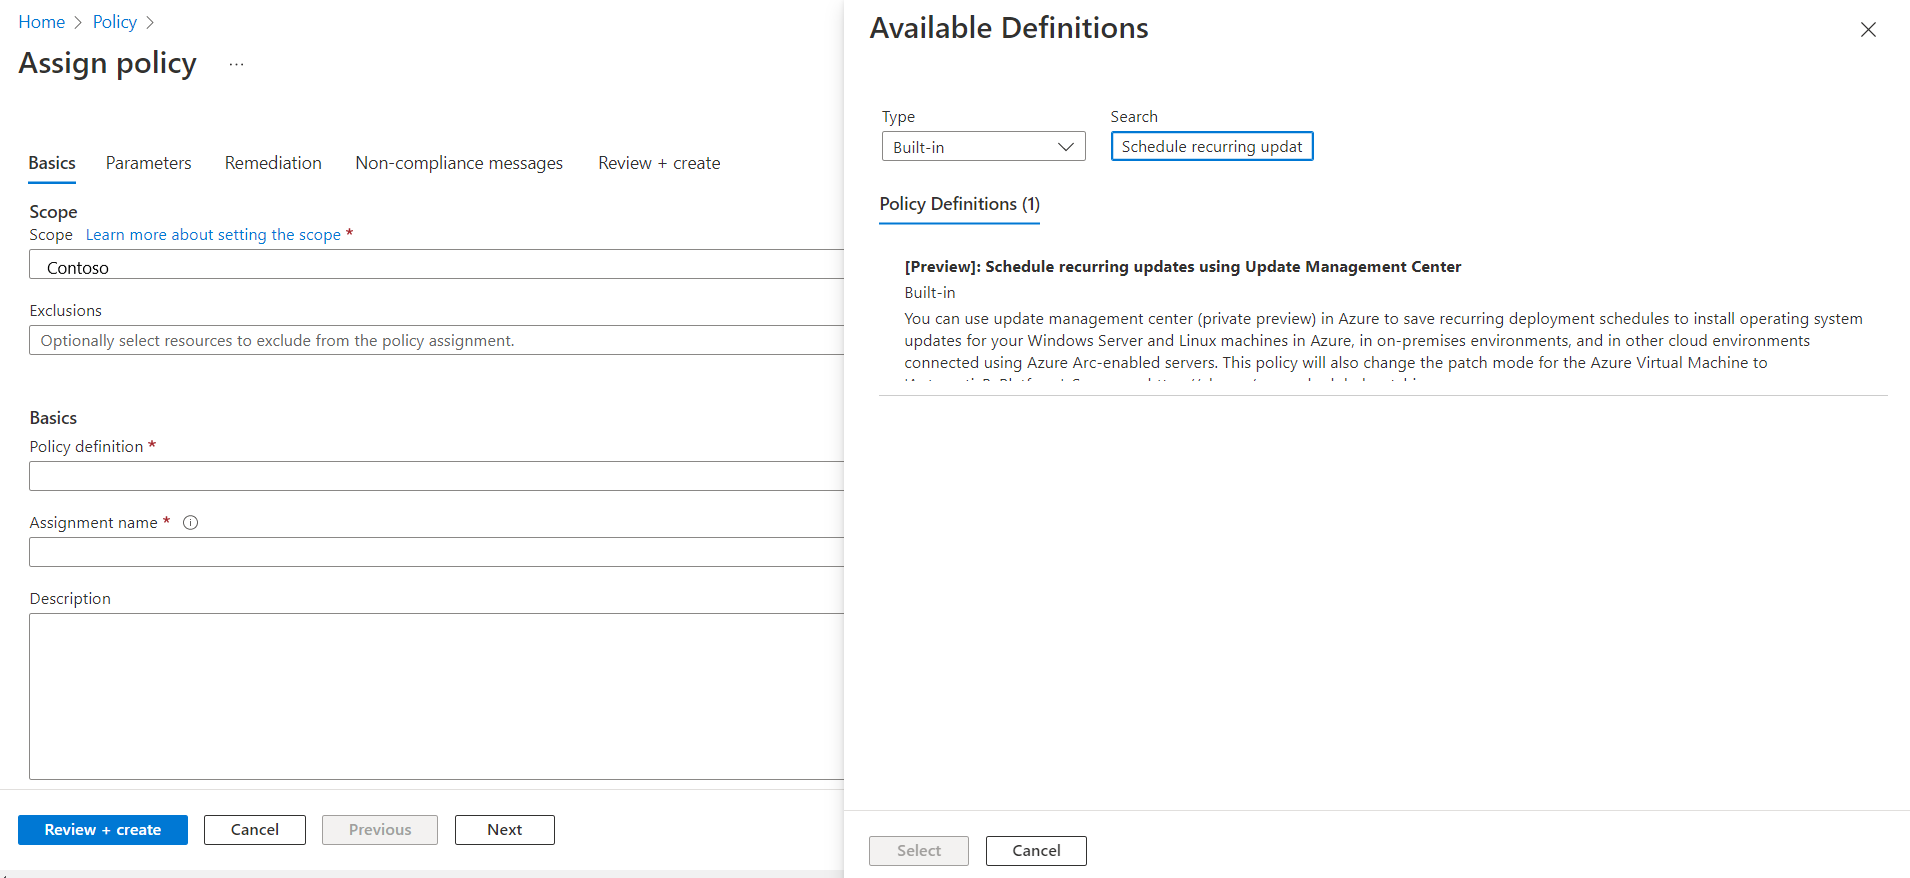
Ensure that Policy enforcement is set to Enabled, and then select Next.
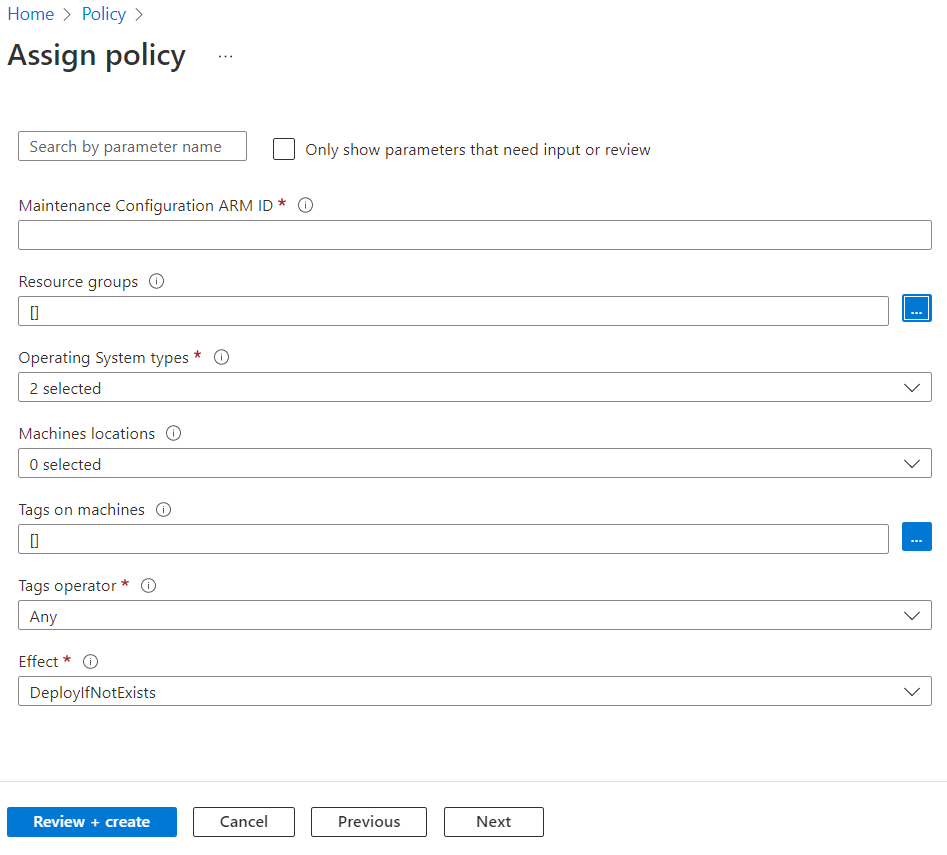
On the Parameters tab, by default, only the Maintenance configuration ARM ID is visible.
If you don't specify any other parameters, all machines in the subscription and resource group that you selected on the Basics tab are covered under scope. If you want to scope further based on resource group, location, OS, tags, and so on, clear Only show parameters that need input or review to view all parameters:
- Maintenance Configuration ARM ID: A mandatory parameter to be provided. It denotes the Azure Resource Manager (ARM) ID of the schedule that you want to assign to the machines.
- Resource groups: You can optionally specify a resource group if you want to scope it down to a resource group. By default, all resource groups within the subscription are selected.
- Operating System types: You can select Windows or Linux. By default, both are preselected.
- Machine locations: You can optionally specify the regions that you want to select. By default, all are selected.
- Tags on machines: You can use tags to scope down further. By default, all are selected.
- Tags operator: If you select multiple tags, you can specify if you want the scope to be machines that have all the tags or machines that have any of those tags.
On the Remediation tab, in Managed Identity > Type of Managed Identity, select System assigned managed identity. Permissions is already set as Contributor according to the policy definition.
If you select Remediation, the policy is in effect on all the existing machines in the scope or else it's assigned to any new machine that's added to the scope.
On the Review + create tab, verify your selections, and then select Create to identify the noncompliant resources to understand the compliance state of your environment.
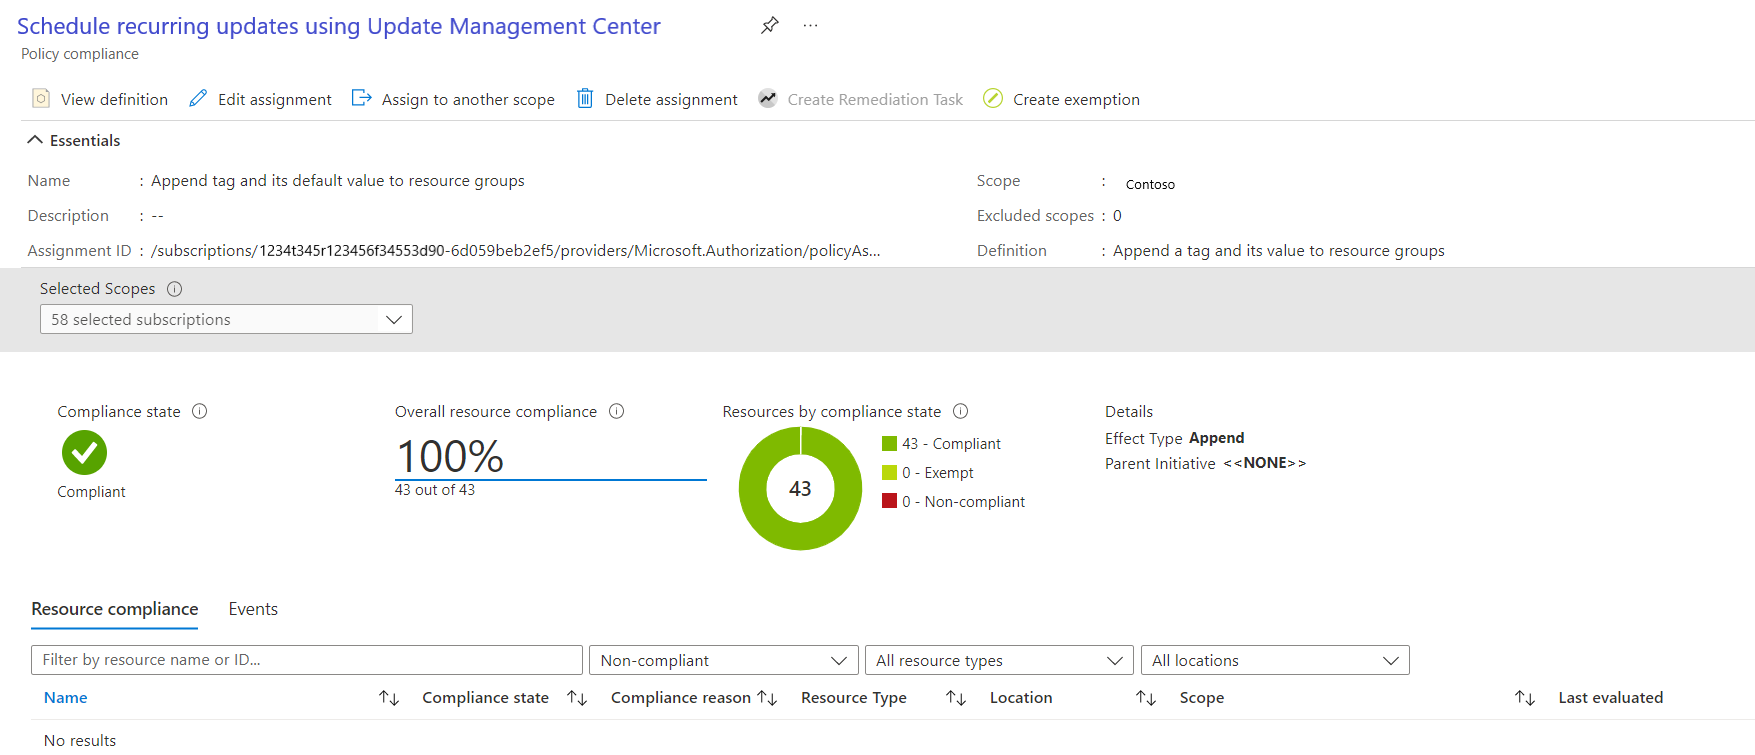
View compliance
To view the current compliance state of your existing resources:
In Policy Assignments, select Scope to select your subscription and resource group.
In Definition type, select the policy. In the list, select the assignment name.
Select View compliance. Resource compliance lists the machines and reasons for failure.
Check your scheduled patching run
You can check the deployment status and history of your maintenance configuration runs from the Update Manager portal. For more information, see Update deployment history by maintenance run ID.
Timeline of Maintenance Window
The maintenance window controls the number of updates that can be installed on your virtual machine and Arc-enabled servers. We recommend that you go through the following table to understand the timeline for a maintenance window while installing an update:
For example, if a maintenance window is of 3 hours and starts at 3:00 PM, the following are the details on how the updates are installed:
| Update Type | Details |
|---|---|
| Service Pack | If you are installing a Service Pack, you need 20 mins left in the maintenance window for the updates to be successfully installed, else the update is skipped. In this example, you must finish installing the service pack by 5:40 PM. |
| Other updates | If you are installing any other update besides Service Pack, you need to have 15 mins left in the maintenance window, else it is skipped. In this example, you must finish installing the other updates by 5:45 PM. |
| Reboot | If the machine(s) needs a reboot, you need to have 10 minutes left in the maintenance window, else the reboot is skipped. In this example, you must start the reboot by 5:50 PM. Note: For Azure virtual machines and Arc-enabled servers, Azure Update Manager waits for a maximum of 15 minutes for Azure VMs and 25 minutes for Arc servers after a reboot to complete the reboot operation before marking it as failed. |
Note
- Azure Update Manager doesn't stop installing the new updates if it's approaching the end of the maintenance window.
- Azure Update Manger doesn't terminate in-progress updates if the maintenance window is exceeded and only the remaining updates that must be installed aren't attempted. We recommend that you re-evaluate the duration of your maintenance window to ensure all the updates are installed .
- If the maintenance window is exceeded on Windows, it's often because a service pack update is taking a long time to install.
Next steps
- Learn more about Dynamic scope, an advanced capability of schedule patching.
- Learn more about how to Configure schedule patching on Azure VMs for business continuity.
- Follow the instructions on how to manage various operations of Dynamic scope
- Learn about pre and post events to automatically perform tasks before and after a scheduled maintenance configuration.
Feedback
Coming soon: Throughout 2024 we will be phasing out GitHub Issues as the feedback mechanism for content and replacing it with a new feedback system. For more information see: https://aka.ms/ContentUserFeedback.
Submit and view feedback for