Note
Access to this page requires authorization. You can try signing in or changing directories.
Access to this page requires authorization. You can try changing directories.
This article will walk you through the process of configuring Active Directory Federation Service (AD FS) single sign-on (SSO) for Azure Virtual Desktop.
Prerequisites
Before configuring AD FS single sign-on, you must have the following setup running in your environment:
Session hosts running a supported version of Windows 10 or Windows 11.
You must deploy the Active Directory Certificate Services (CA) role. All servers running the role must be domain-joined, have the latest Windows updates installed, and be configured as enterprise certificate authorities.
You must deploy the Active Directory Federation Services (AD FS) role. All servers running this role must be domain-joined, have the latest Windows updates installed, and be running Windows Server 2016 or later.
We recommend setting up the Web Application Proxy role to secure your environment's connection to the AD FS servers. All servers running this role must have the latest Windows updates installed, and be running Windows Server 2016 or later. See this Web Application Proxy guide to get started setting up this role.
You must deploy Microsoft Entra Connect to sync users to Microsoft Entra ID. Microsoft Entra Connect must be configured in federation mode.
Set up your PowerShell environment for Azure Virtual Desktop on the AD FS server.
Note
This solution is not supported with Microsoft Entra Domain Services. You must use an Active Directory Domain Services domain controller.
Supported clients
The following Azure Virtual Desktop clients support this feature:
Configure the certificate authority to issue certificates
You must properly create the following certificate templates so that AD FS can use SSO:
- First, you'll need to create the Exchange Enrollment Agent (Offline Request) certificate template. AD FS uses the Exchange Enrollment Agent certificate template to request certificates on the user's behalf.
- You'll also need to create the Smartcard Logon certificate template, which AD FS will use to create the sign in certificate.
After you create these certificate templates, you'll need to enable the templates on the certificate authority so AD FS can request them.
Note
This solution generates new short-term certificates every time a user signs in, which can fill up the Certificate Authority database if you have many users. You can avoid overloading your database by setting up a CA for non-persistent certificate processing. If you do this, on the duplicated smartcard logon certificate template, make sure you enable only Do not store certificates and requests in the CA database. Don't enable Do not include revocation information in issued certificates or the configuration won't work.
Create the enrollment agent certificate template
Depending on your environment, you may already have configured an enrollment agent certificate template for other purposes like Windows Hello for Business, Logon certificates or VPN certificates. If so, you will need to modify it to support SSO. If not, you can create a new template.
To determine if you are already using an enrollment agent certificate template, run the following PowerShell command on the AD FS server and see if a value is returned. If it's empty, create a new enrollment agent certificate template. Otherwise, remember the name and update the existing enrollment agent certificate template.
Import-Module adfs
(Get-AdfsCertificateAuthority).EnrollmentAgentCertificateTemplateName
To create a new enrollment agent certificate template:
On the certificate authority, run mmc.exe from the Start menu to launch the Microsoft Management Console.
Select File... > Add/Remote Snap-in... > Certificate Templates > Add > > OK to view the list of certificate templates.
Expand the Certificate Templates, right-click Exchange Enrollment Agent (Offline Request) and select Duplicate Template.
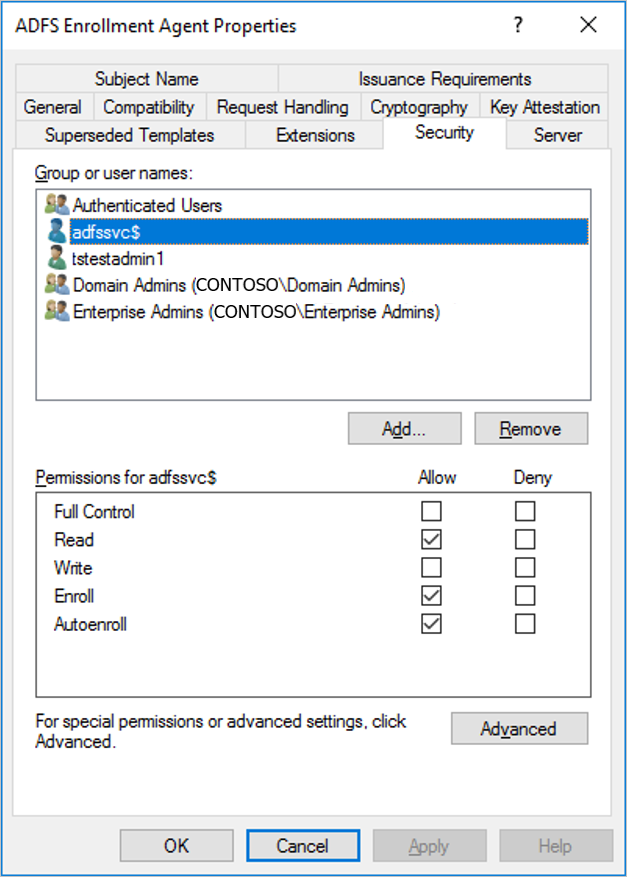
Select the General tab, then enter "ADFS Enrollment Agent" into the Template display name field. This will automatically set the template name to "ADFSEnrollmentAgent".
Select the Security tab, then select Add....
Next, select Object Types..., then Service Accounts, and then OK.
Enter the service account name for AD FS and select OK.
- In an isolated AD FS setup, the service account will be named "adfssvc$"
- If you set up AD FS using Microsoft Entra Connect, the service account will be named "aadcsvc$"
After the service account is added and is visible in the Security tab, select it in the Group or user names pane, select Allow for both "Enroll" and "Autoenroll" in the Permissions for the AD FS service account pane, then select OK to save.
To update an existing enrollment agent certificate template:
- On the certificate authority, run mmc.exe from the Start menu to launch the Microsoft Management Console.
- Select File... > Add/Remote Snap-in... > Certificate Templates > Add > > OK to view the list of certificate templates.
- Expand the Certificate Templates, double-click the template that corresponds to the one configured on the AD FS server. On the General tab, the template name should match the name you found above.
- Select the Security tab, then select Add....
- Next, select Object Types..., then Service Accounts, and then OK.
- Enter the service account name for AD FS and select OK.
- In an isolated AD FS setup, the service account will be named "adfssvc$"
- If you set up AD FS using Microsoft Entra Connect, the service account will be named "aadcsvc$"
- After the service account is added and is visible in the Security tab, select it in the Group or user names pane, select Allow for both "Enroll" and "Autoenroll" in the Permissions for the AD FS service account pane, then select OK to save.
Create the Smartcard Logon certificate template
To create the Smartcard Logon certificate template:
On the certificate authority, run mmc.exe from the Start menu to launch the Microsoft Management Console.
Select File... > Add/Remote Snap-in... > Certificate Templates > Add > OK to view the list of certificate templates.
Expand the Certificate Templates, right-click Smartcard Logon and select Duplicate Template.
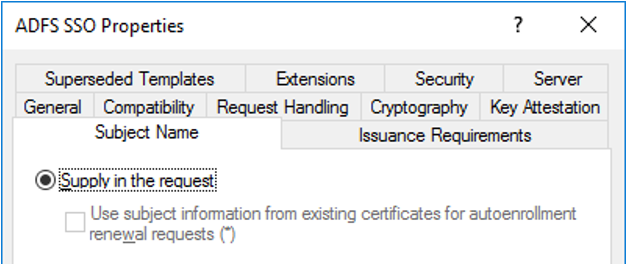
Select the General tab, then enter "ADFS SSO" into the Template display name field. This will automatically set the template name to "ADFSSSO".
Note
Since this certificate is requested on-demand, we recommend shortening the validity period to 8 hours and the renewal period to 1 hour.
Select the Subject name tab and then select Supply in the request. When you see a warning message, select OK.
Select the Issuance Requirements tab.
Select This number of authorized signatures and enter the value of 1.
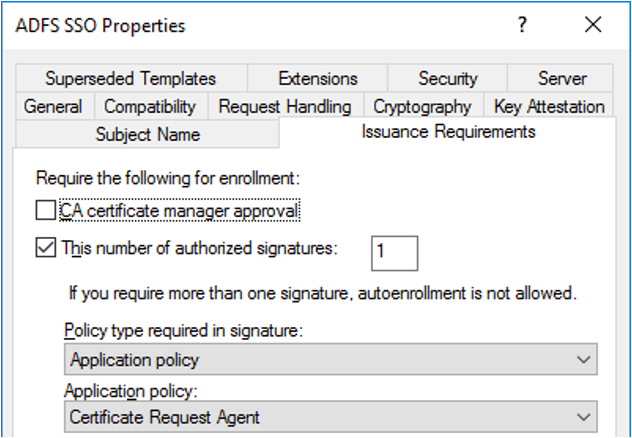
For Application policy, select Certificate Request Agent.
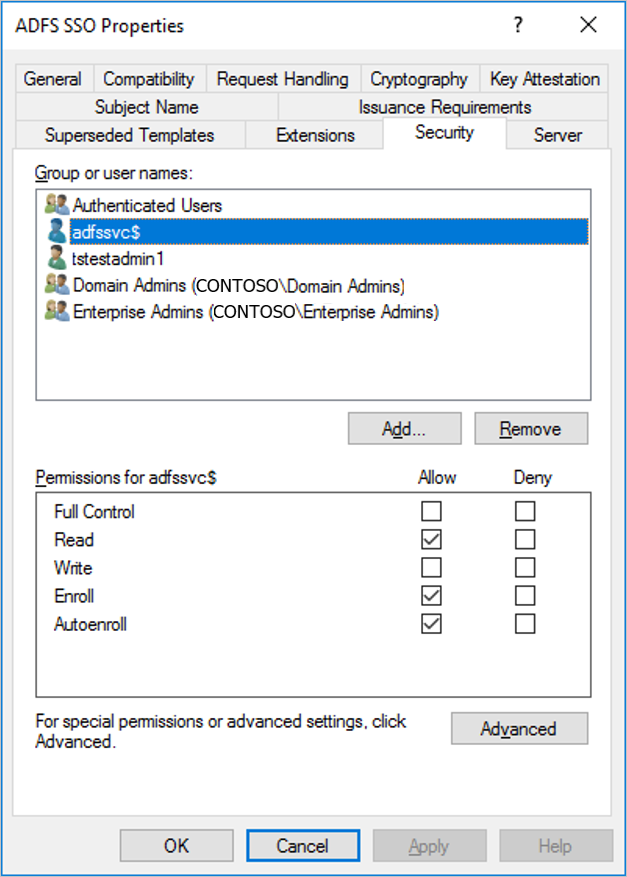
Select the Security tab, then select Add....
Select Object Types..., Service Accounts, and OK.
Enter the service account name for AD FS just like you did in the Create the enrollment agent certificate template section.
- In an isolated AD FS setup, the service account will be named "adfssvc$"
- If you set up AD FS using Microsoft Entra Connect, the service account will be named "aadcsvc$"
After the service account is added and is visible in the Security tab, select it in the Group or user names pane, select Allow for both "Enroll" and "Autoenroll", then select OK to save.


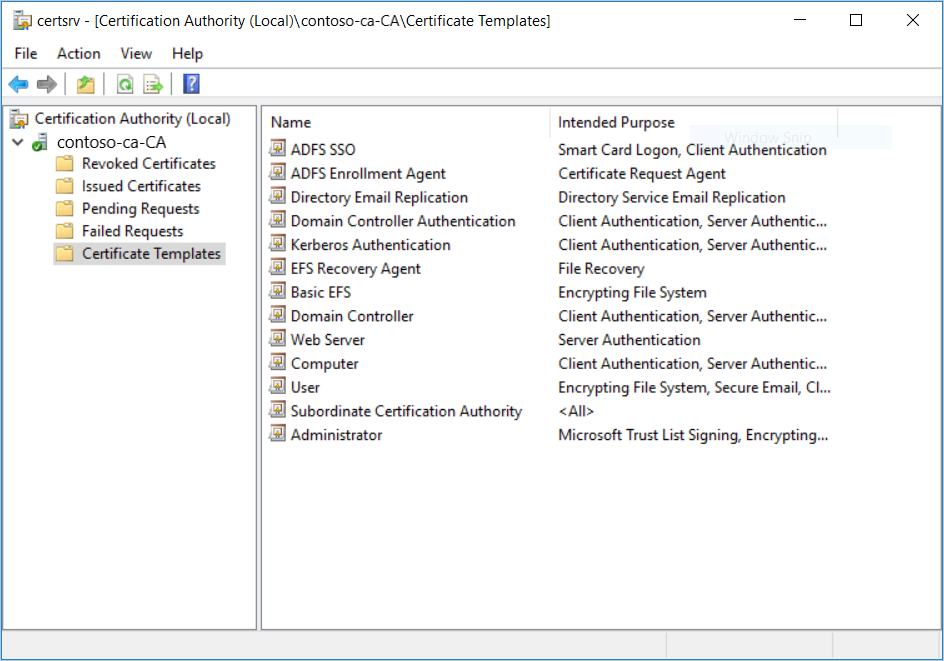
Enable the new certificate templates:
To enable the new certificate templates:
On the certificate authority, run mmc.exe from the Start menu to launch the Microsoft Management Console.
Select File... > Add/Remove Snap-in... > Certification Authority > Add > > Finish > and OK to view the Certification Authority.
Expand the Certification Authority on the left-hand pane and open Certificate Templates.
Right-click in the middle pane that shows the list of certificate templates, select New, then select Certificate Template to Issue.
Select both ADFS Enrollment Agent and ADFS SSO, then select OK. You should see both templates in the middle pane.
Note
If you already have an enrollment agent certificate template configured, you only need to add the ADFS SSO template.
Configure the AD FS Servers
You must configure the Active Directory Federation Services (AD FS) servers to use the new certificate templates and set the relying-party trust to support SSO.
The relying-party trust between your AD FS server and the Azure Virtual Desktop service allows single sign-on certificate requests to be forwarded correctly to your domain environment.
When configuring AD FS single sign-on you must choose shared key or certificate:
- If you have a single AD FS server, you can choose shared key or certificate.
- If you have multiple AD FS servers, it's required to choose certificate.
The shared key or certificate used to generate the token to sign in to Windows must be stored securely in Azure Key Vault. You can store the secret in an existing Key Vault or deploy a new one. In either case, you must ensure to set the right access policy so the Azure Virtual Desktop service can access it.
When using a certificate, you can use any general purpose certificate and there is no requirement on the subject name or Subject Alternative Name (SAN). While not required, it's recommended to create a certificate issued by a valid Certificate Authority. This certificate can be created directly in Azure Key Vault and needs to have an exportable private key. The public key can be exported and used to configure the AD FS server using the script below. Note that this certificate is different from the AD FS SSL certificate that must have a proper subject name and valid Certificate Authority.
The PowerShell script ConfigureWVDSSO.ps1 available in the PowerShell Gallery will configure your AD FS server for the relying-party trust and install the certificate if needed.
This script only has one required parameter, ADFSAuthority, which is the URL that resolves to your AD FS and uses "/adfs" as its suffix. For example, https://adfs.contoso.com/adfs.
On the AD FS VMs, run the following PowerShell cmdlet to configure AD FS to use the certificate templates from the previous section:
Set-AdfsCertificateAuthority -EnrollmentAgentCertificateTemplate "ADFSEnrollmentAgent" -LogonCertificateTemplate "ADFSSSO" -EnrollmentAgentNote
If you already have an EnrollmentAgentCertificateTemplate configured, ensure you use the existing template name instead of ADFSEnrollmentAgent.
Run the ConfigureWVDSSO.ps1 script.
Note
You need the
$configvariable values to complete the next part of the instructions, so don't close the PowerShell window you used to complete the previous instructions. You can either keep using the same PowerShell window or leave it open while launching a new PowerShell session.If you're using a shared key in the Key Vault, run the following PowerShell cmdlet on the AD FS server with ADFSServiceUrl replaced with the full URL to reach your AD FS service:
Install-Script ConfigureWVDSSO
$config = ConfigureWVDSSO.ps1 -ADFSAuthority "<ADFSServiceUrl>" [-WvdWebAppAppIDUri "<WVD Web App URI>"] [-RdWebURL "<RDWeb URL>"]
Note
You need the WvdWebAppAppIDUri and RdWebURL properties to configure an environment in a sovereign cloud like Azure Government. In the Azure Commercial Cloud, these properties are automatically set to
https://www.wvd.microsoft.comandhttps://rdweb.wvd.microsoft.comrespectively.If you're using a certificate in the Key Vault, run the following PowerShell cmdlet on the AD FS server with ADFSServiceUrl replaced with the full URL to reach your AD FS service:
Install-Script ConfigureWVDSSO
$config = ConfigureWVDSSO.ps1 -ADFSAuthority "<ADFSServiceUrl>" -UseCert -CertPath "<Path to the pfx file>" -CertPassword <Password to the pfx file> [-WvdWebAppAppIDUri "<WVD Web App URI>"] [-RdWebURL "<RDWeb URL>"]
Note
You need the WvdWebAppAppIDUri and RdWebURL properties to configure an environment in a sovereign cloud like Azure Government. In the Azure Commercial Cloud, these properties are automatically set to
https://www.wvd.microsoft.comandhttps://rdweb.wvd.microsoft.comrespectively.
Set the access policy on the Azure Key Vault by running the following PowerShell cmdlet:
Set-AzKeyVaultAccessPolicy -VaultName "<Key Vault Name>" -ServicePrincipalName 9cdead84-a844-4324-93f2-b2e6bb768d07 -PermissionsToSecrets get -PermissionsToKeys signStore the shared key or certificate in Azure Key Vault with a Tag containing a coma separated list of subscription IDs allowed to use the secret.
If you're using a shared key in the Key Vault, run the following PowerShell cmdlet to store the shared key and set the tag:
$hp = Get-AzWvdHostPool -Name "<Host Pool Name>" -ResourceGroupName "<Host Pool Resource Group Name>"
$secret = Set-AzKeyVaultSecret -VaultName "<Key Vault Name>" -Name "adfsssosecret" -SecretValue (ConvertTo-SecureString -String $config.SSOClientSecret  -AsPlainText -Force) -Tag @{ 'AllowedWVDSubscriptions' = $hp.Id.Split('/')[2]}
If your certificate is already in the Key Vault, run the following PowerShell cmdlet to set the tag:
$hp = Get-AzWvdHostPool -Name "<Host Pool Name>" -ResourceGroupName "<Host Pool Resource Group Name>"
$secret = Update-AzKeyVaultCertificate -VaultName "<Key Vault Name>" -Name "<Certificate Name>" -Tag @{ 'AllowedWVDSubscriptions' = $hp.Id.Split('/')[2]} -PassThru
If you have a local certificate, run the following PowerShell cmdlet to import the certificate in the Key Vault and set the tag:
$hp = Get-AzWvdHostPool -Name "<Host Pool Name>" -ResourceGroupName "<Host Pool Resource Group Name>"
$secret = Import-AzKeyVaultCertificate -VaultName "<Key Vault Name>" -Name "adfsssosecret" -Tag @{ 'AllowedWVDSubscriptions' = $hp.Id.Split('/')[2]} -FilePath "<Path to pfx>" -Password (ConvertTo-SecureString -String "<pfx password>"  -AsPlainText -Force)
Note
You can optionally configure how often users are prompted for credentials by changing the AD FS single sign-on settings. By default, users will be prompted every 8 hours on unregistered devices.
Configure your Azure Virtual Desktop host pool
It's time to configure the AD FS SSO parameters on your Azure Virtual Desktop host pool. To do this, set up your PowerShell environment for Azure Virtual Desktop if you haven't already and connect to your account.
After that, update the SSO information for your host pool by running one of the following two cmdlets in the same PowerShell window on the AD FS VM:
If you're using a shared key in the Key Vault, run the following PowerShell cmdlet:
Update-AzWvdHostPool -Name "<Host Pool Name>" -ResourceGroupName "<Host Pool Resource Group Name>" -SsoadfsAuthority "<ADFSServiceUrl>" -SsoClientId "<WVD Web App URI>" -SsoSecretType SharedKeyInKeyVault -SsoClientSecretKeyVaultPath $secret.IdNote
You need to set the SsoClientId property to match the Azure cloud you're deploying SSO in. In the Azure Commercial Cloud, this property should be set to
https://www.wvd.microsoft.com. However, the required setting for this property will be different for other clouds, like the Azure Government cloud.If you're using a certificate in the Key Vault, run the following PowerShell cmdlet:
Update-AzWvdHostPool -Name "<Host Pool Name>" -ResourceGroupName "<Host Pool Resource Group Name>" -SsoadfsAuthority "<ADFSServiceUrl>" -SsoClientId "<WVD Web App URI>" -SsoSecretType CertificateInKeyVault -SsoClientSecretKeyVaultPath $secret.IdNote
You need to set the SsoClientId property to match the Azure cloud you're deploying SSO in. In the Azure Commercial Cloud, this property should be set to
https://www.wvd.microsoft.com. However, the required setting for this property will be different for other clouds, like the Azure Government cloud.
Configure additional host pools
When you need to configure additional host pools, you can retrieve the settings you used to configure an existing host pool to setup the new one.
To retrieve the settings from your existing host pool, open a PowerShell window and run this cmdlet:
Get-AzWvdHostPool -Name "<Host Pool Name>" -ResourceGroupName "<Host Pool Resource Group Name>" | fl *
You can follow the steps to Configure your Azure Virtual Desktop host pool using the same SsoClientId, SsoClientSecretKeyVaultPath, SsoSecretType, and SsoadfsAuthority values.
Removing SSO
To disable SSO on the host pool, run the following cmdlet:
Update-AzWvdHostPool -Name "<Host Pool Name>" -ResourceGroupName "<Host Pool Resource Group Name>" -SsoadfsAuthority ''
If you also want to disable SSO on your AD FS server, run this cmdlet:
Install-Script UnConfigureWVDSSO
UnConfigureWVDSSO.ps1 -WvdWebAppAppIDUri "<WVD Web App URI>" -WvdClientAppApplicationID "a85cf173-4192-42f8-81fa-777a763e6e2c"
Note
The WvdWebAppAppIDUri property needs to match the Azure cloud you are deploying in. In the Azure Commercial Cloud, this property is https://www.wvd.microsoft.com. It will be different for other clouds like the Azure Government cloud.
Next steps
Now that you've configured single sign-on, you can sign in to a supported Azure Virtual Desktop client to test it as part of a user session. If you want to learn how to connect to a session using your new credentials, check out these articles: