Depending on how you delete a VM, it may only delete the VM resource, not the networking and disk resources. You can change the default settings for what other resources are deleted when you delete a VM.
Set delete options when creating a VM
Open the portal.
Select + Create a resource.
On the Create a resource page, under Virtual machines, select Create.
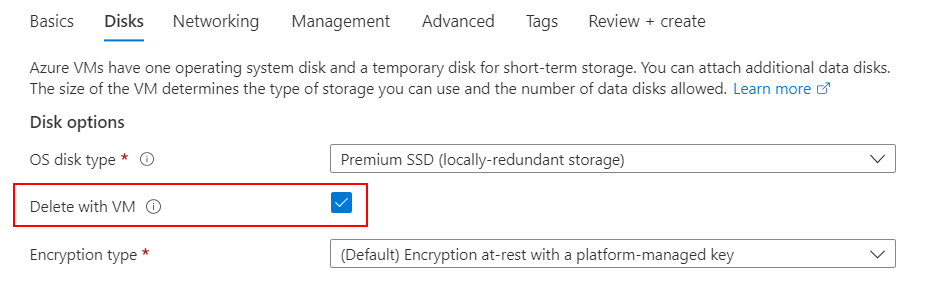
Make your choices on the Basics, then select Next : Disks > to open the Disks tab.
Under Disk options, by default the OS disk is set to Delete with VM. If you don't want to delete the OS disk, clear the checkbox. If you're using an existing OS disk, the default is to detach the OS disk when the VM is deleted.
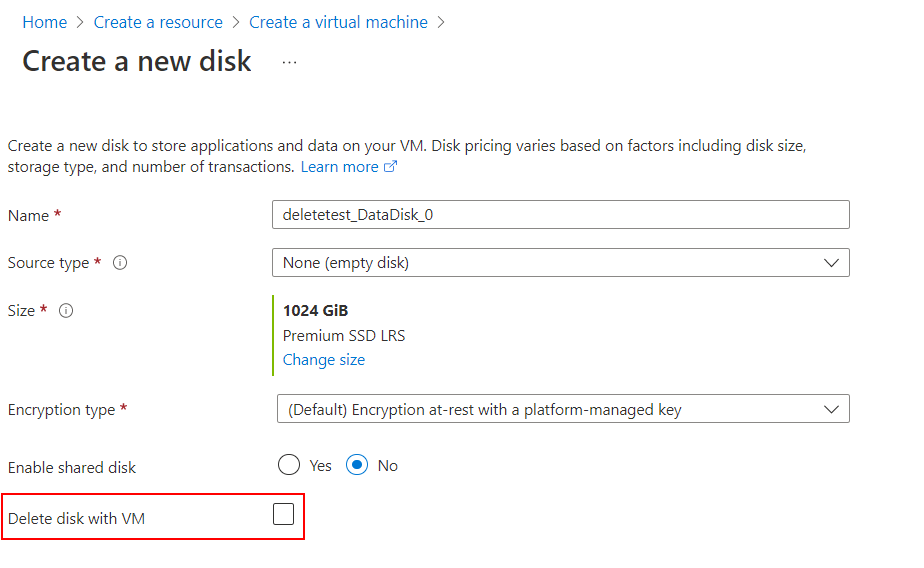
Under Data disks, you can either attach an existing data disk or create a new disk and attach it to the VM.
If you choose Create and attach a new disk, the Create a new disk page opens and you can select whether to delete the disk when you delete the VM.
If you choose to Attach an existing disk, can choose the disk, LUN, and whether you want to delete the data disk when you delete the VM.

When you're done adding your disk information, select Next : Networking > to open the Networking tab.
Towards the bottom of the page, select Delete public IP and NIC when VM is deleted.

When you're done making selections, select Review + create.
You can verify which resources you have chosen to delete when you delete the VM.
When you're satisfied with your selections, and validation passes, select Create to deploy the VM.
To specify what happens to the attached resources when you delete a VM, use the delete-option parameters. Each can be set to either Delete, which permanently deletes the resource when you delete the VM, or Detach which only detaches the resource and leaves it in Azure so it can be reused later. The default for VMs created using the CLI is to detach the OS disk. Resources that you Detach, like disks, will continue to incur charges as applicable.
--os-disk-delete-option - OS disk.--data-disk-delete-option - data disk.--nic-delete-option - NIC.
In this example, we create a VM named myVM in the resource group named myResourceGroup using an image named myImage, and set the OS disk and NIC to be deleted when we delete the VM.
az vm create \
    --resource-group myResourceGroup \
    --name myVM \
    --image myImage \
    --public-ip-sku Standard \
    --nic-delete-option delete \
    --os-disk-delete-option delete \
    --admin-username azureuser \
    --generate-ssh-keys
To specify what happens to the attached resources when you delete a VM, use the DeleteOption parameters. Each can be set to either Delete, which permanently deletes the resource when you delete the VM, or Detach which only detaches the resource and leaves it in Azure so it can be reused later. The default for VMs created using PowerShell is for the OS disk to be detached when you delete the VM. Resources that you Detach, like disks, will continue to incur charges as applicable.
The DeleteOption parameters are:
-OSDiskDeleteOption - OS disk.-DataDiskDeleteOption - data disk.-NetworkInterfaceDeleteOption - NIC.
In this example, we create a VM and set the OS disk and NIC to be deleted when we delete the VM.
New-AzVm `
    -ResourceGroupName "myResourceGroup" `
    -Name "myVM" `
    -OSDiskDeleteOption Delete `
    -NetworkInterfaceDeleteOption Delete `
    -Location "East US" `
    -VirtualNetworkName "myVnet" `
    -SubnetName "mySubnet" `
    -SecurityGroupName "myNetworkSecurityGroup" `
    -PublicIpAddressName "myPublicIpAddress"
This example shows how to set the data disk and NIC to be deleted when the VM is deleted. Note, the API version specified in the api-version parameter must be '2021-03-01' or newer to configure the delete option.
PUT
https://management.azure.com/subscriptions/subid/resourceGroups/rg1/providers/Microsoft.Compute/virtualMachines/myVM?api-version=xx
{
  "storageProfile": {
    "dataDisks": [
        {
          "diskSizeGB": 1023,
          "name": "myVMdatadisk",
          "createOption": "Empty",
          "lun": 0,
          "deleteOption": "Delete"
       }
    ]
  },
  "networkProfile": {
      "networkInterfaces": [
        {
          "id": "/subscriptions/.../Microsoft.Network/networkInterfaces/myNIC",
          "properties": {
            "primary": true,
  	        "deleteOption": "Delete"
          }
        }
      ]
  }
}
You can also set this property for a Public IP associated with a NIC, so that the Public IP is automatically deleted when the NIC gets deleted.
PUT https://management.azure.com/subscriptions/subid/resourceGroups/rg1/providers/Microsoft.Network/networkInterfaces/test-nic?api-version=xx
{

  "properties": {

    "enableAcceleratedNetworking": true,

    "ipConfigurations": [

      {

        "name": "ipconfig1",

        "properties": {

          "publicIPAddress": {

            "id": "/subscriptions/../publicIPAddresses/test-ip",

            "properties": {
              "deleteOption": "Delete"
            }
          },

          "subnet": {

            "id": "/subscriptions/../virtualNetworks/rg1-vnet/subnets/default"

          }

        }

      }

    ]

  },

  "location": "eastus"

}
Update the delete behavior on an existing VM
You can change the behavior when you delete a VM.
The following example uses the Azure CLI to set the delete option to detach so you can reuse the disk.
Make sure to login to correct subscription using az account set --subscription "SubscriptionIDName"
az resource update --resource-group myResourceGroup --name myVM --resource-type virtualMachines --namespace Microsoft.Compute --set properties.storageProfile.osDisk.deleteOption=detach
The following Azure PowerShell example updates the VM to delete the OS disk, all data disks, and all NICs when the VM is deleted.
Make sure to login to correct subscription using Set-AzContext -Subscription "Subid".
$vmConfig = Get-AzVM -ResourceGroupName myResourceGroup -Name myVM
$vmConfig.StorageProfile.OsDisk.DeleteOption = 'Delete'
$vmConfig.StorageProfile.DataDisks | ForEach-Object { $_.DeleteOption = 'Delete' }
$vmConfig.NetworkProfile.NetworkInterfaces | ForEach-Object { $_.DeleteOption = 'Delete' }
$vmConfig | Update-AzVM
The following example updates the VM to delete the NIC, OS disk, and data disk when the VM is deleted. Note, the API version specified in the api-version parameter must be '2021-03-01' or newer to configure the delete option.
PATCH https://management.azure.com/subscriptions/subID/resourceGroups/resourcegroup/providers/Microsoft.Compute/virtualMachines/testvm?api-version=2021-07-01


{
    "properties": {
        "hardwareProfile": {
            "vmSize": "Standard_D2s_v3"
        },
        "storageProfile": {
            "imageReference": {
                "publisher": "MicrosoftWindowsServer",
                "offer": "WindowsServer",
                "sku": "2019-Datacenter",
                "version": "latest",
                "exactVersion": "17763.3124.2111130129"
            },
            "osDisk": {
                "osType": "Windows",
                "name": "OsDisk_1",
                "createOption": "FromImage",
                "caching": "ReadWrite",
                "managedDisk": {
                    "storageAccountType": "Premium_LRS",
                    "id": "/subscriptions/subID/resourceGroups/resourcegroup/providers/Microsoft.Compute/disks/OsDisk_1"
                },
                "deleteOption": "Delete",
                "diskSizeGB": 127
            },
            "dataDisks": [
                {
                    "lun": 0,
                    "name": "DataDisk_0",
                    "createOption": "Attach",
                    "caching": "None",
                    "writeAcceleratorEnabled": false,
                    "managedDisk": {
                        "storageAccountType": "Premium_LRS",
                        "id": "/subscriptions/subID/resourceGroups/resourcegroup/providers/Microsoft.Compute/disks/DataDisk_0"
                    },
                    "deleteOption": "Delete",
                    "diskSizeGB": 1024,
                    "toBeDetached": false
                },
                {
                    "lun": 1,
                    "name": "DataDisk_1",
                    "createOption": "Attach",
                    "caching": "None",
                    "writeAcceleratorEnabled": false,
                    "managedDisk": {
                        "storageAccountType": "Premium_LRS",
                        "id": "/subscriptions/subID/resourceGroups/resourcegroup/providers/Microsoft.Compute/disks/DataDisk_1"
                    },
                    "deleteOption": "Delete",
                    "diskSizeGB": 1024,
                    "toBeDetached": false
                }
            ]
        },
        "osProfile": {
            "computerName": "testvm",
            "adminUsername": "azureuser",
            "windowsConfiguration": {
                "provisionVMAgent": true,
                "enableAutomaticUpdates": true,
                "patchSettings": {
                    "patchMode": "AutomaticByOS",
                    "assessmentMode": "ImageDefault",
                    "enableHotpatching": false
                }
            },
            "secrets": [],
            "allowExtensionOperations": true,
            "requireGuestProvisionSignal": true
        },
        "networkProfile": {
            "networkInterfaces": [
                {
                   "id": "/subscriptions/subID/resourceGroups/resourcegroup/providers/Microsoft.Network/networkInterfaces/nic336",
                   "properties": {
                     "deleteOption": "Delete"
                    }
                }
            ]
        }
    }
}
Force Delete for VMs
Force delete allows you to forcefully delete your virtual machine, reducing delete latency and immediately freeing up attached resources. For VMs that don't require graceful shutdown, Force Delete will delete the VM as fast as possible while relieving the logical resources from the VM, bypassing the graceful shutdown and some of the cleanup operations. Force Delete won't immediately free the MAC address associated with a VM, as this is a physical resource that may take up to 10 min to free. If you need to immediately reuse the MAC address on a new VM, Force Delete isn't recommended. Force delete should only be used when you aren't intending to reuse virtual hard disks. You can use force delete through Portal, CLI, PowerShell, and REST API.
When you go to delete an existing VM, you'll find an option to apply force delete in the delete pane.
- Open the portal.
- Navigate to your virtual machine.
- On the Overview page, select Delete.
- In the Delete virtual machine pane, select the checkbox for Apply force delete.
- Select Ok.
Use the --force-deletion parameter for az vm delete.
az vm delete \
    --resource-group myResourceGroup \
    --name myVM \
    --force-deletion true
Use the -ForceDeletion parameter for Remove-AzVm.
Remove-AzVm `
    -ResourceGroupName "myResourceGroup" `
    -Name "myVM" `
    -ForceDeletion $true
You can use the Azure REST API to apply force delete to your virtual machines. Use the forceDeletion parameter for Virtual Machines - Delete.
Force Delete for scale sets
Force delete allows you to forcefully delete your Virtual Machine Scale Set, reducing delete latency and immediately freeing up attached resources. Force Delete won't immediately free the MAC address associated with a VM, as this is a physical resource that may take up to 10 min to free. If you need to immediately reuse the MAC address on a new VM, Force Delete is not recommended. Force delete should only be used when you are not intending to reuse virtual hard disks. You can use force delete through Portal, CLI, PowerShell, and REST API.
When you go to delete an existing scale set, you'll find an option to apply force delete in the delete pane.
- Open the portal.
- Navigate to your Virtual Machine Scale Set.
- On the Overview page, select Delete.
- In the Delete Virtual Machine Scale Set pane, select the checkbox for Apply force delete.
- Select Ok.
Use the --force-deletion parameter for az vmss delete.
az vmss delete \
    --resource-group myResourceGroup \
    --name myVMSS \
    --force-deletion true
Use the -ForceDeletion parameter for Remove-AzVmss.
Remove-AzVmss `
    -ResourceGroupName "myResourceGroup" `
    -Name "myVMSS" `
    -ForceDeletion $true
FAQ
Q: Does this feature work with shared disks?
A: For shared disks, you can't set the ‘deleteOption’ property to ‘Delete’. You can leave it blank or set it to ‘Detach’
Q: Which Azure resources support this feature?
A: This feature is supported on all managed disk types used as OS disks and Data disks, NICs, and Public IPs
Q: What happens to the data on the disks when a VM is deleted?
A: When a VM is deleted, the data on the disks is not automatically deleted. The OS disk and any attached data disks remain in your resource group and continue to incur charges. You need to manually delete these disks if you no longer need them.
Q: What happens to VM backups when I delete the VM?
A: Azure Backup retains VM backups according to the backup policy, even after the VM is deleted. Retained backups continue to incur storage charges until they are deleted. To avoid unnecessary costs, review your backup retention and delete backups you no longer need.
To manage or delete VM backups, go to the Azure portal, navigate to your Recovery Services vault, select Backup items, then select Azure Virtual Machine, and choose the VM whose backups you want to manage. From there, you can stop backup and delete backup data as needed.
Q: Can I use this feature on disks and NICs that aren't associated with a VM?
A: No, this feature is only available on disks and NICs associated with a VM.
Q: How does this feature work with Flexible Virtual Machine Scale Set?
A: For Flexible Virtual Machine Scale Set the disks, NICs, and PublicIPs have deleteOption set to Delete by default so these resources are automatically cleaned up when the VMs are deleted.
For data disks that were explicitly created and attached to the VMs, you can modify this property to ‘Detach’ instead of ‘Delete’ if you want the disks to persist after the VM is deleted.
Q: Do Spot VMs support this feature?
A: Yes, you can use this feature for Spot VMs just the way you would for on-demand VMs.
Q: How do I persist the disks, NIC, and Public IPs associated with a VM?
A: By default, disks, NICs, and Public IPs associated with a VM are persisted when the VM is deleted. If you configure these resources to be automatically deleted, you can update the settings so that the resources remain after the VM is deleted. To keep these resources, set the deleteOption property to Detach.
Next steps
To learn more about basic VM management, see Tutorial: Create and Manage Linux VMs with the Azure CLI.