Note
Access to this page requires authorization. You can try signing in or changing directories.
Access to this page requires authorization. You can try changing directories.
Applies to: ✔️ Linux VMs ✔️ Windows VMs ✔️ Flexible scale sets ✔️ Uniform scale sets
This article covers how to enable the shared disks feature for Azure managed disks. Azure shared disks is a new feature for Azure managed disks that enables you to attach a managed disk to multiple virtual machines (VMs) simultaneously. Attaching a managed disk to multiple VMs allows you to either deploy new or migrate existing clustered applications to Azure.
If you are looking for conceptual information on managed disks that have shared disks enabled, see Azure shared disks.
Prerequisites
The scripts and commands in this article require either:
- Version 6.0.0 or newer of the Azure PowerShell module.
Or
- The latest version of the Azure CLI.
Limitations
General limitations
Shared disks have general limitations that apply to all shared disks, regardless of disk type. They also have more limitations that only apply to specific types of shared disks. The following list is the list of general limitations:
- Currently, only Ultra Disks, Premium SSD v2, Premium SSD, and Standard SSDs can be used as a shared disk
- Shared disks can be attached to individual Virtual Machine Scale Sets but can't be defined in the Virtual Machine Scale Set models or automatically deployed
- A shared disk can't be expanded without either deallocating all VMs the disk is attached to, or detaching the disk from all of these VMs
- Write accelerator isn't supported for shared disks
- Host caching isn't supported for shared disks
Each managed disk that has shared disks enabled are also subject to the following limitations, organized by disk type:
Ultra disks
Ultra disks have their own separate list of limitations, unrelated to shared disks. For ultra disk limitations, refer to Using Azure ultra disks.
When sharing ultra disks, they have the following additional limitations:
- Only basic disks can be used with some versions of Windows Server Failover Cluster, for details see Failover clustering hardware requirements and storage options.
- Can't be shared across availability zones.
Premium SSD v2
Premium SSD v2 managed disks have their own separate list of limitations, unrelated to shared disks. For these limitations, see Premium SSD v2 limitations.
When sharing Premium SSD v2 disks, they have the following additional limitation:
- Only basic disks can be used with some versions of Windows Server Failover Cluster, for details see Failover clustering hardware requirements and storage options.
- Can't be shared across availability zones.
Premium SSD
- Can only be enabled on data disks, not OS disks.
- Host caching isn't available for premium SSD disks with
maxShares>1. - Disk bursting isn't available for premium SSD disks with
maxShares>1. - When using Availability sets or Virtual Machine Scale Sets with Azure shared disks, storage fault domain alignment with virtual machine fault domain isn't enforced for the shared data disk.
- When using proximity placement groups (PPG), all virtual machines sharing a disk must be part of the same PPG.
- Only basic disks can be used with some versions of Windows Server Failover Cluster, for details see Failover clustering hardware requirements and storage options.
- Azure Site Recovery support isn't yet available.
- Azure Backup is available through Azure Disk Backup.
- Only server-side encryption is supported, Azure Disk Encryption isn't currently supported.
- Can only be shared across availability zones if using Zone-redundant storage for managed disks.
Standard SSDs
- Can only be enabled on data disks, not OS disks.
- Host caching isn't available for standard SSDs with
maxShares>1. - When using Availability sets and Virtual Machine Scale Sets with Azure shared disks, storage fault domain alignment with virtual machine fault domain isn't enforced for the shared data disk.
- When using proximity placement groups (PPG), all virtual machines sharing a disk must be part of the same PPG.
- Only basic disks can be used with some versions of Windows Server Failover Cluster, for details see Failover clustering hardware requirements and storage options.
- Azure Site Recovery support isn't yet available.
- Azure Backup is available through Azure Disk Backup.
- Only server-side encryption is supported, Azure Disk Encryption isn't currently supported.
- Can only be shared across availability zones if using Zone-redundant storage for managed disks.
Supported operating systems
Shared disks support several operating systems. See the Windows and Linux sections of the conceptual article for the supported operating systems.
Disk sizes
For now, only ultra disks, premium SSD v2, premium SSD, and standard SSDs can enable shared disks. Different disk sizes may have a different maxShares limit, which you can't exceed when setting the maxShares value.
For each disk, you can define a maxShares value that represents the maximum number of nodes that can simultaneously share the disk. For example, if you plan to set up a 2-node failover cluster, you would set maxShares=2. The maximum value is an upper bound. Nodes can join or leave the cluster (mount or unmount the disk) as long as the number of nodes is lower than the specified maxShares value.
Note
The maxShares value can only be set or edited when the disk is detached from all nodes.
Premium SSD ranges
The following table illustrates the allowed maximum values for maxShares by premium SSD sizes:
| Disk sizes | maxShares limit |
|---|---|
| P1,P2,P3,P4,P6,P10,P15,P20 | 3 |
| P30, P40, P50 | 5 |
| P60, P70, P80 | 10 |
The IOPS and bandwidth limits for a disk aren't affected by the maxShares value. For example, the max IOPS of a P15 disk is 1100 whether maxShares = 1 or maxShares > 1.
Standard SSD ranges
The following table illustrates the allowed maximum values for maxShares by standard SSD sizes:
| Disk sizes | maxShares limit |
|---|---|
| E1,E2,E3,E4,E6,E10,E15,E20 | 3 |
| E30, E40, E50 | 5 |
| E60, E70, E80 | 10 |
The IOPS and bandwidth limits for a disk aren't affected by the maxShares value. For example, the max IOPS of a E15 disk is 500 whether maxShares = 1 or maxShares > 1.
Ultra disk ranges
The minimum maxShares value is 1, while the maximum maxShares value is 15. There are no size restrictions on ultra disks, any size ultra disk can use any value for maxShares, up to and including the maximum value.
Premium SSD v2 ranges
The minimum maxShares value is 1, while the maximum maxShares value is 15. There are no size restrictions on Premium SSD v2, any size Premium SSD v2 disk can use any value for maxShares, up to and including the maximum value.
Deploy shared disks
Deploy a premium SSD as a shared disk
To deploy a managed disk with the shared disk feature enabled, use the new property maxShares and define a value greater than 1. This makes the disk shareable across multiple VMs.
Important
Host caching isn't supported for shared disks.
The value of maxShares can only be set or changed when a disk is unmounted from all VMs. See the Disk sizes for the allowed values for maxShares.
Sign in to the Azure portal.
Search for and Select Disks.
Select + Create to create a new managed disk.
Fill in the details and select an appropriate region, then select Change size.
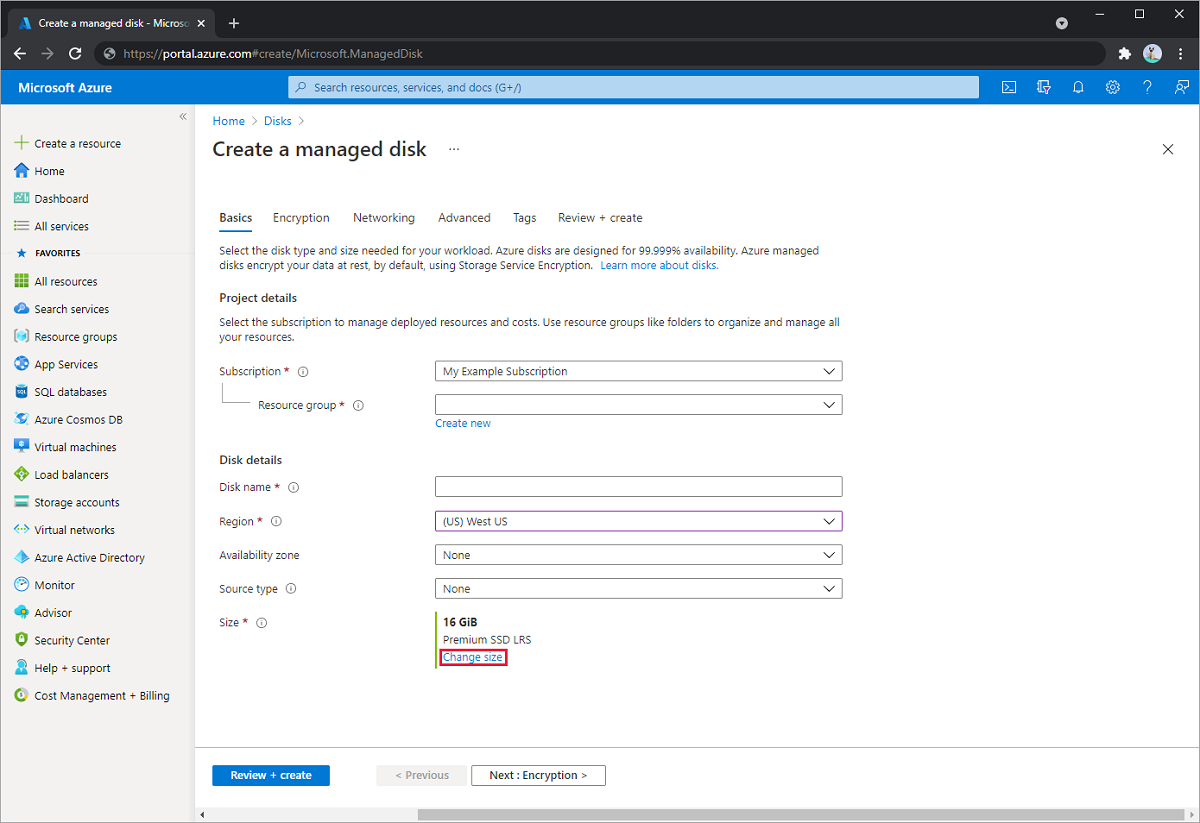
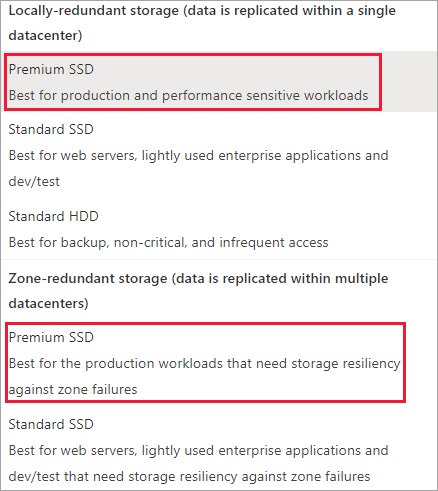
Select the premium SSD size and SKU that you want and select OK.
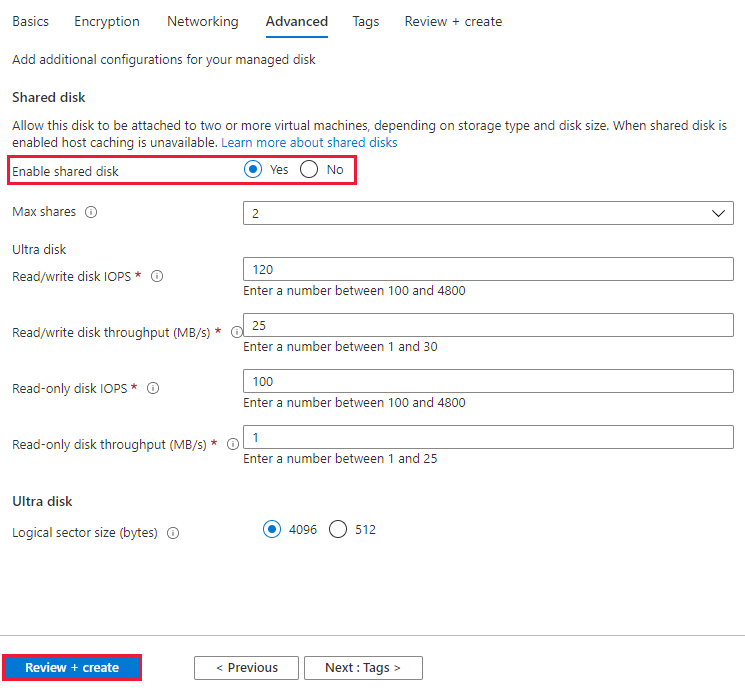
Proceed through the deployment until you get to the Advanced pane.
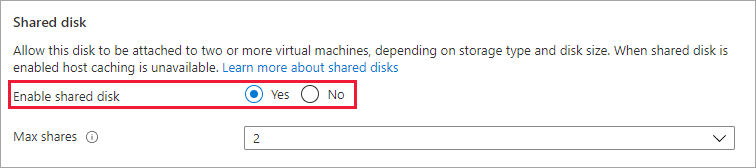
Select Yes for Enable shared disk and select the amount of Max shares you want.
Select Review + Create.


Deploy a standard SSD as a shared disk
To deploy a managed disk with the shared disk feature enabled, use the new property maxShares and define a value greater than 1. This makes the disk shareable across multiple VMs.
Important
Host caching isn't supported for shared disks.
The value of maxShares can only be set or changed when a disk is unmounted from all VMs. See the Disk sizes for the allowed values for maxShares.
Sign in to the Azure portal.
Search for and Select Disks.
Select + Create to create a new managed disk.
Fill in the details and select an appropriate region, then select Change size.
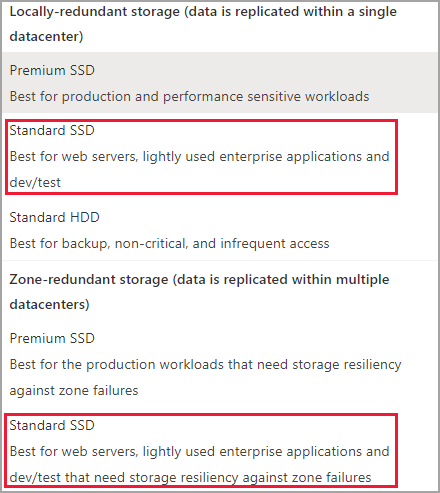
Select the standard SSD size and SKU that you want and select OK.
Proceed through the deployment until you get to the Advanced pane.
Select Yes for Enable shared disk and select the amount of Max shares you want.
Select Review + Create.
Deploy an ultra disk as a shared disk
To deploy a managed disk with the shared disk feature enabled, change the maxShares parameter to a value greater than 1. This makes the disk shareable across multiple VMs.
Important
The value of maxShares can only be set or changed when a disk is unmounted from all VMs. See the Disk sizes for the allowed values for maxShares.
Sign in to the Azure portal.
Search for and Select Disks.
Select + Create to create a new managed disk.
Fill in the details, then select Change size.
Select ultra disk for the Disk SKU.
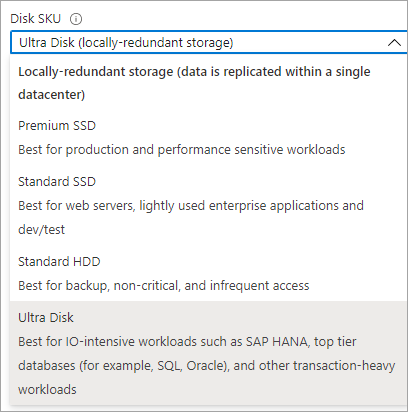
Select the disk size that you want and select OK.
Proceed through the deployment until you get to the Advanced pane.
Select Yes for Enable shared disk and select the amount of Max shares you want.
Select Review + Create.


Share an existing disk
To share an existing disk, or update how many VMs it can mount to, set the maxShares parameter with either the Azure PowerShell module or Azure CLI. You can also set maxShares to 1, if you want to disable sharing.
Important
Host caching isn't supported for shared disks.
The value of maxShares can only be set or changed when a disk is unmounted from all VMs. See the Disk sizes for the allowed values for maxShares.
Before detaching a disk, record the LUN ID for when you re-attach it.
PowerShell
$datadiskconfig = Get-AzDisk -DiskName "mySharedDisk"
$datadiskconfig.maxShares = 3

Update-AzDisk -ResourceGroupName 'myResourceGroup' -DiskName 'mySharedDisk' -Disk $datadiskconfig
CLI
#Modifying a disk to enable or modify sharing configuration

az disk update --name mySharedDisk --max-shares 5 --resource-group myResourceGroup
Using Azure shared disks with your VMs
Once you've deployed a shared disk with maxShares>1, you can mount the disk to one or more of your VMs.
Note
Host caching isn't supported for shared disks.
If you are deploying an ultra disk, make sure it matches the necessary requirements. See Using Azure ultra disks for details.
$resourceGroup = "myResourceGroup"
$location = "WestCentralUS"

$vm = New-AzVm -ResourceGroupName $resourceGroup -Name "myVM" -Location $location -VirtualNetworkName "myVnet" -SubnetName "mySubnet" -SecurityGroupName "myNetworkSecurityGroup" -PublicIpAddressName "myPublicIpAddress"

$dataDisk = Get-AzDisk -ResourceGroupName $resourceGroup -DiskName "mySharedDisk"

$vm = Add-AzVMDataDisk -VM $vm -Name "mySharedDisk" -CreateOption Attach -ManagedDiskId $dataDisk.Id -Lun 0

update-AzVm -VM $vm -ResourceGroupName $resourceGroup
Supported SCSI PR commands
Once you've mounted the shared disk to your VMs in your cluster, you can establish quorum and read/write to the disk using SCSI PR. The following PR commands are available when using Azure shared disks:
To interact with the disk, start with the persistent-reservation-action list:
PR_REGISTER_KEY

PR_REGISTER_AND_IGNORE

PR_GET_CONFIGURATION

PR_RESERVE

PR_PREEMPT_RESERVATION

PR_CLEAR_RESERVATION

PR_RELEASE_RESERVATION
When using PR_RESERVE, PR_PREEMPT_RESERVATION, or PR_RELEASE_RESERVATION, provide one of the following persistent-reservation-type:
PR_NONE

PR_WRITE_EXCLUSIVE

PR_EXCLUSIVE_ACCESS

PR_WRITE_EXCLUSIVE_REGISTRANTS_ONLY

PR_EXCLUSIVE_ACCESS_REGISTRANTS_ONLY

PR_WRITE_EXCLUSIVE_ALL_REGISTRANTS

PR_EXCLUSIVE_ACCESS_ALL_REGISTRANTS
You also need to provide a persistent-reservation-key when using PR_RESERVE, PR_REGISTER_AND_IGNORE, PR_REGISTER_KEY, PR_PREEMPT_RESERVATION, PR_CLEAR_RESERVATION, or PR_RELEASE-RESERVATION.
Next steps
If you prefer to use Azure Resource Manager templates to deploy your disk, the following sample templates are available:
If you've additional questions, see the shared disks section of the FAQ.