Note
Access to this page requires authorization. You can try signing in or changing directories.
Access to this page requires authorization. You can try changing directories.
Applies to: ✔️ Linux VMs ✔️ Flexible scale sets
In this article, you'll learn how to resize data disks that use Azure Disk Encryption. To resize the disks, you'll use logical volume management (LVM) on Linux. The steps apply to multiple scenarios.
You can use this resizing process in the following environments:
- Linux distributions:
- Red Hat Enterprise Linux (RHEL) 7 or later
- Ubuntu 18.04 or later
- SUSE 12 or later
- Azure Disk Encryption versions:
- Single-pass extension
- Dual-pass extension
Prerequisites
This article assumes that you have:
An existing LVM configuration. For more information, see Configure LVM on a Linux VM.
Disks that are already encrypted by Azure Disk Encryption. For more information, see Configure LVM and RAID on encrypted devices.
Experience using Linux and LVM.
Experience using /dev/disk/scsi1/ paths for data disks on Azure. For more information, see Troubleshoot Linux VM device name problems.
Scenarios
The procedures in this article apply to the following scenarios:
- Traditional LVM and LVM-on-crypt configurations
- Traditional LVM encryption
- LVM-on-crypt
- Data disks only. OS disk resizing is not supported.
Traditional LVM and LVM-on-crypt configurations
Traditional LVM and LVM-on-crypt configurations extend a logical volume (LV) when the volume group (VG) has available space.
Traditional LVM encryption
In traditional LVM encryption, LVs are encrypted. The whole disk isn't encrypted.
By using traditional LVM encryption, you can:
- Extend the LV when you add a new physical volume (PV).
- Extend the LV when you resize an existing PV.
LVM-on-crypt
The recommended method for disk encryption is LVM-on-encrypt. This method encrypts the entire disk, not just the LV.
By using LVM-on-crypt, you can:
- Extend the LV when you add a new PV.
- Extend the LV when you resize an existing PV.
Note
We don't recommend mixing traditional LVM encryption and LVM-on-crypt on the same VM.
The following sections provide examples of how to use LVM and LVM-on-crypt. The examples use preexisting values for disks, PVs, VGs, LVs, file systems, universally unique identifiers (UUIDs), and mount points. Replace these values with your own values to fit your environment.
Extend an LV when the VG has available space
The traditional way to resize LVs is to extend an LV when the VG has space available. You can use this method for nonencrypted disks, traditional LVM-encrypted volumes, and LVM-on-crypt configurations.
Verify the current size of the file system that you want to increase:
df -h /mountpoint
Verify that the VG has enough space to increase the LV:
sudo vgs
You can also use
vgdisplay:sudo vgdisplay vgname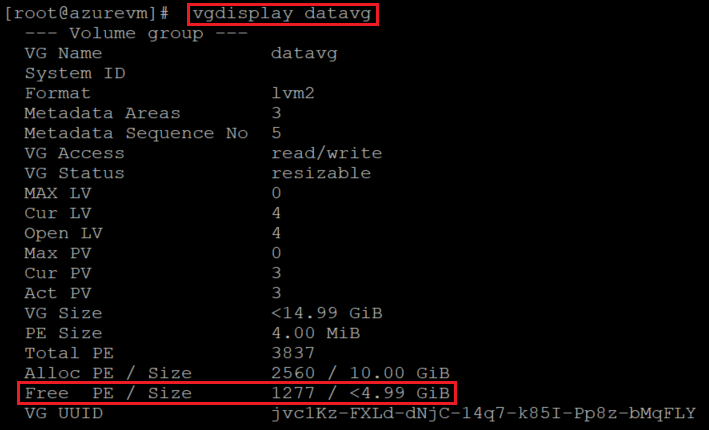
Identify which LV needs to be resized:
sudo lsblk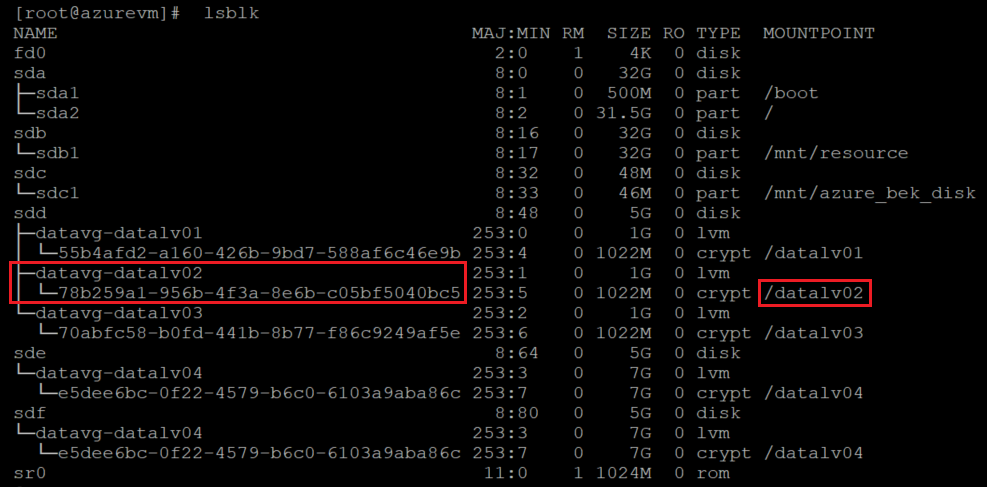
For LVM-on-crypt, the difference is that this output shows that the encrypted layer is at the disk level.
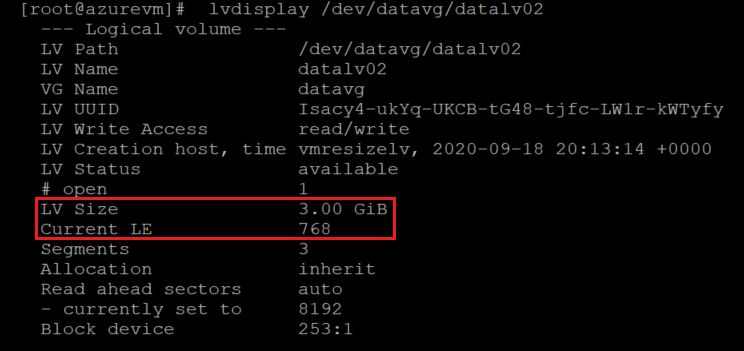
Check the LV size:
sudo lvdisplay lvname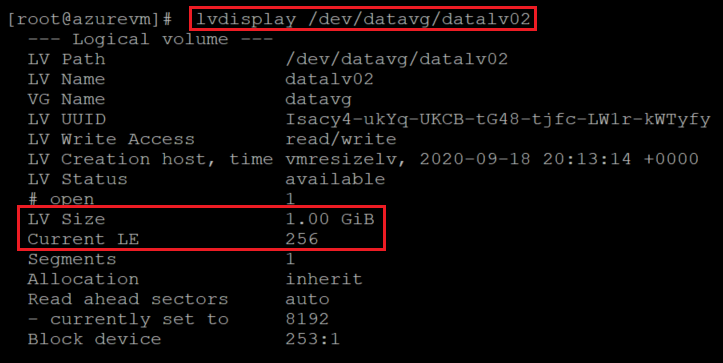
Increase the LV size by using
-rto resize the file system online:sudo lvextend -r -L +2G /dev/vgname/lvname
Verify the new sizes for the LV and the file system:
df -h /mountpoint
The size output indicates that the LV and file system were successfully resized.
You can check the LV information again to confirm the changes at the level of the LV:
sudo lvdisplay lvname
Extend a traditional LVM volume by adding a new PV
When you need to add a new disk to increase the VG size, extend your traditional LVM volume by adding a new PV.
Verify the current size of the file system that you want to increase:
df -h /mountpoint
Verify the current PV configuration:
sudo pvs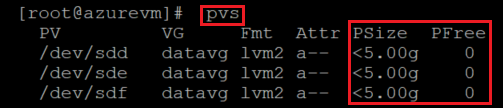
Check the current VG information:
sudo vgs
Check the current disk list. Identify data disks by checking the devices in /dev/disk/azure/scsi1/.
sudo ls -l /dev/disk/azure/scsi1/
Check the output of
lsblk:sudo lsbk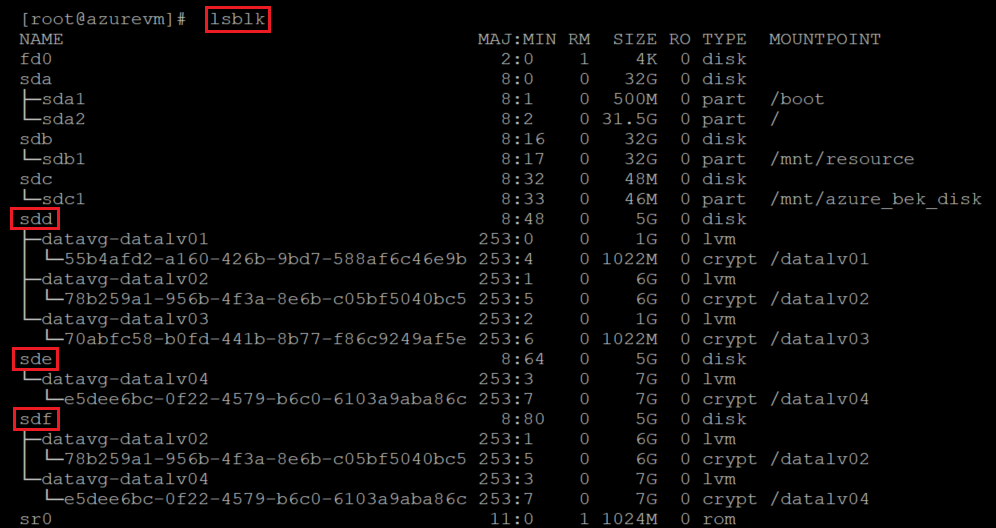
Attach the new disk to the VM by following the instructions in Attach a data disk to a Linux VM.
Check the disk list, and notice the new disk.
sudo ls -l /dev/disk/azure/scsi1/
sudo lsblk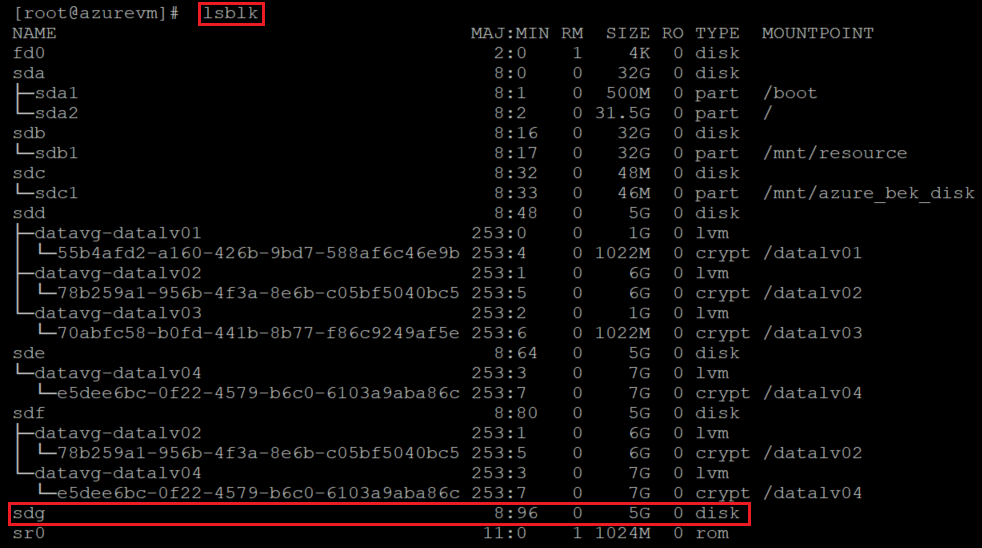
Create a new PV on top of the new data disk:
sudo pvcreate /dev/newdisk
This method uses the whole disk as a PV without a partition. Alternatively, you can use
fdiskto create a partition and then use that partition forpvcreate.Verify that the PV was added to the PV list:
sudo pvs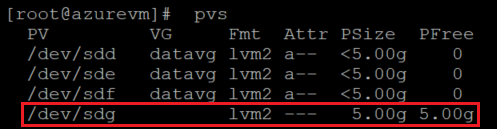
Extend the VG by adding the new PV to it:
sudo vgextend vgname /dev/newdisk
Check the new VG size:
sudo vgs

Use
lsblkto identify the LV that needs to be resized:sudo lsblk
Extend the LV size by using
-rto increase the file system online:sudo lvextend -r -L +2G /dev/vgname/lvname
Verify the new sizes of the LV and file system:
df -h /mountpoint
Important
When Azure Data Encryption is used on traditional LVM configurations, the encrypted layer is created at the LV level, not at the disk level.
At this point, the encrypted layer is expanded to the new disk. The actual data disk has no encryption settings at the platform level, so its encryption status isn't updated.
These are some of the reasons why LVM-on-crypt is the recommended approach.
Check the encryption information from the portal:

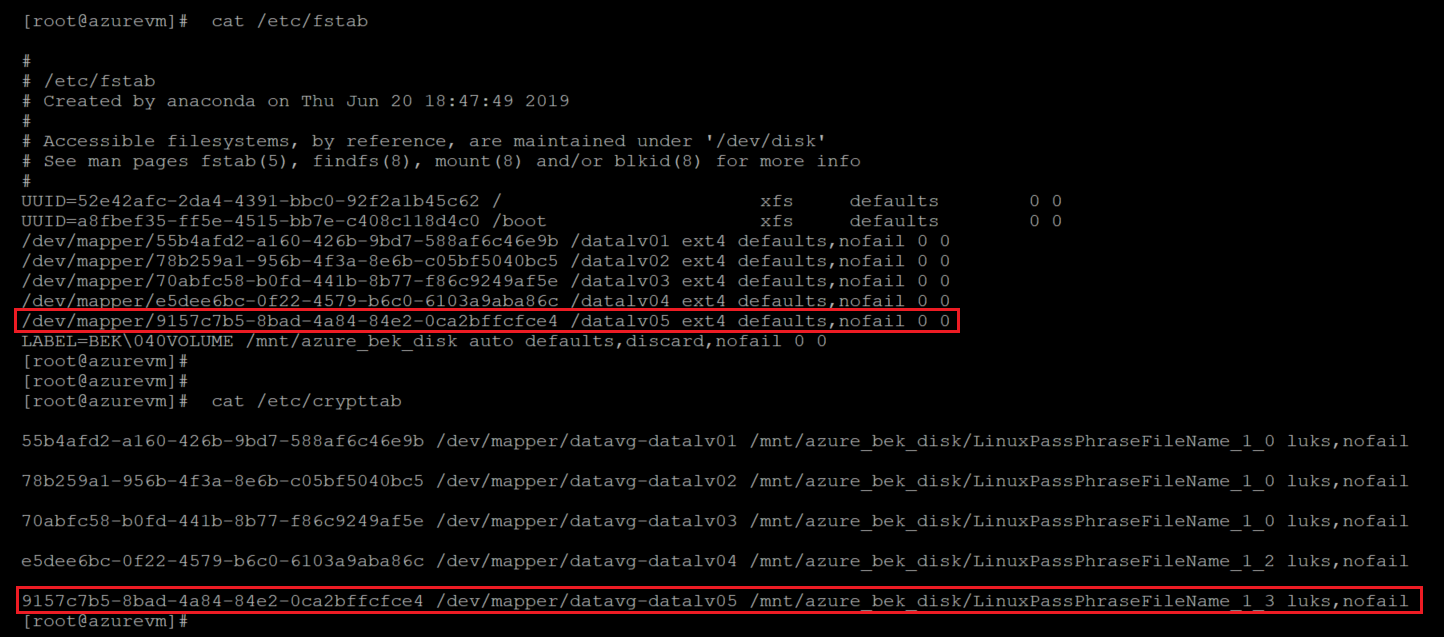
To update the encryption settings on the disk, add a new LV and enable the extension on the VM.
Add a new LV, create a file system on it, and add it to
/etc/fstab.Set the encryption extension again. This time you'll stamp the encryption settings on the new data disk at the platform level. Here's a CLI example:
az vm encryption enable -g ${RGNAME} --name ${VMNAME} --disk-encryption-keyvault "<your-unique-keyvault-name>"Check the encryption information from the portal:

After the encryption settings are updated, you can delete the new LV. Also delete the entry from the /etc/fstab and /etc/crypttab that you created.
Follow these steps to finish cleaning up:
Unmount the LV:
sudo umount /mountpointClose the encrypted layer of the volume:
sudo cryptsetup luksClose /dev/vgname/lvnameDelete the LV:
sudo lvremove /dev/vgname/lvname
Extend a traditional LVM volume by resizing an existing PV
Im some scenarios, your limitations might require you to resize an existing disk. Here's how:
Identify your encrypted disks:
sudo ls -l /dev/disk/azure/scsi1/
sudo lsblk -fs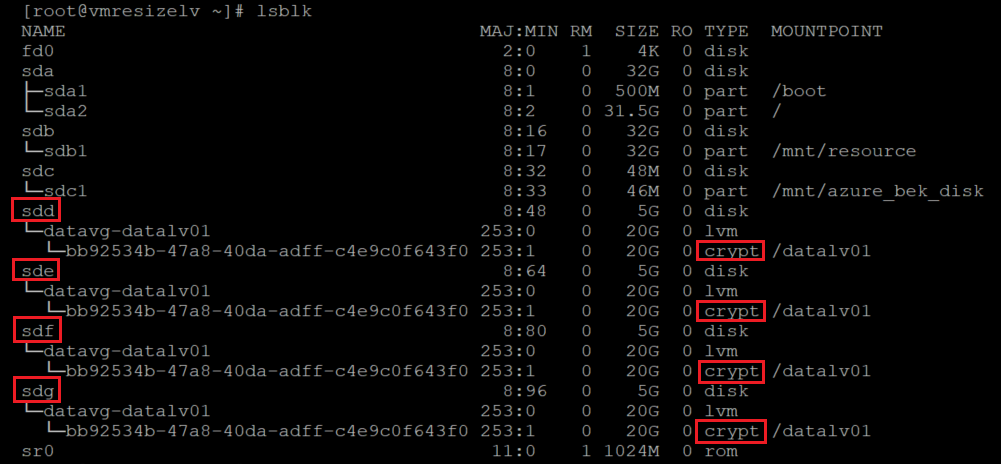
Check the PV information:
sudo pvs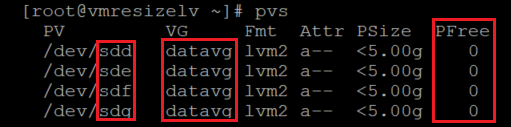
The results in the image show that all of the space on all of the PVs is currently used.
Check the VG information:
sudo vgs
sudo vgdisplay -v vgname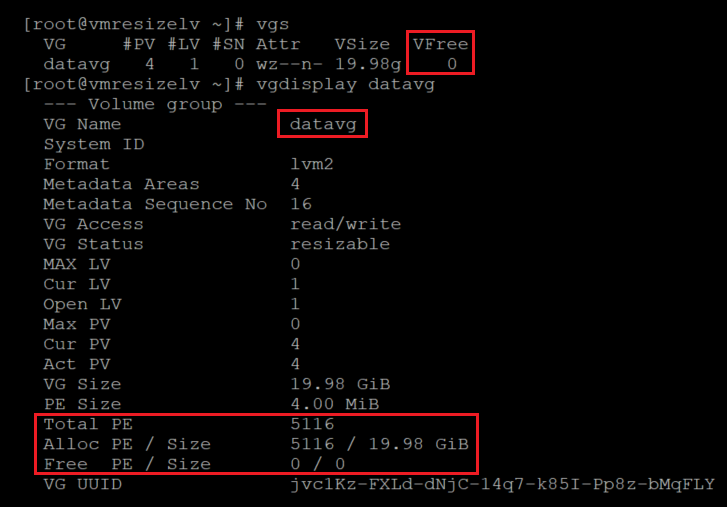
Check the disk sizes. You can use
fdiskorlsblkto list the drive sizes.for disk in `sudo ls -l /dev/disk/azure/scsi1/* | awk -F/ '{print $NF}'` ; do echo "sudo fdisk -l /dev/${disk} | grep ^Disk "; done | bash sudo lsblk -o "NAME,SIZE"
Here we identified which PVs are associated with which LVs by using
lsblk -fs. You can identify the associations by runninglvdisplay.sudo lvdisplay --maps VG/LV sudo lvdisplay --maps datavg/datalv1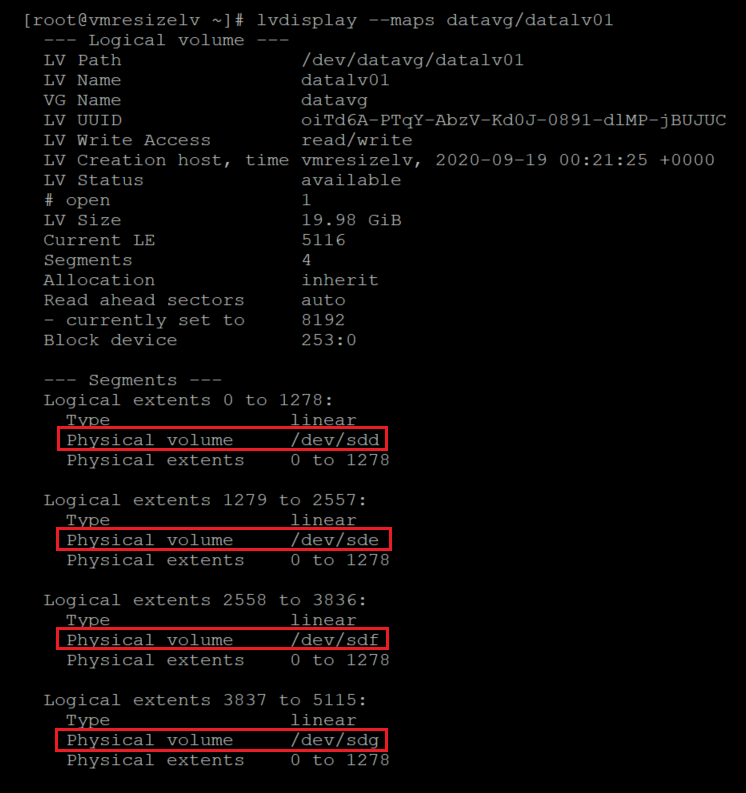
In this case, all four data drives are part of the same VG and a single LV. Your configuration might differ.
Check the current file system utilization:
df -h /datalvm*
Resize the data disks by following the instructions in Expand an Azure managed disk. You can use the portal, the CLI, or PowerShell.
Important
Some data disks on Linux VMs can be resized without Deallocating the VM, please check [Expand virtual hard disks on a Linux VM](/azure/virtual-machines/linux/expand-disks? tabs=ubuntu#expand-an-azure-managed-disk) in order to verify your disks meet the requirements.
Start the VM and check the new sizes by using
fdisk.for disk in `sudo ls -l /dev/disk/azure/scsi1/* | awk -F/ '{print $NF}'` ; do echo "sudo fdisk -l /dev/${disk} | grep ^Disk "; done | bash sudo lsblk -o "NAME,SIZE"
In this case,
/dev/sddwas resized from 5 G to 20 G.Check the current PV size:
sudo pvdisplay /dev/resizeddisk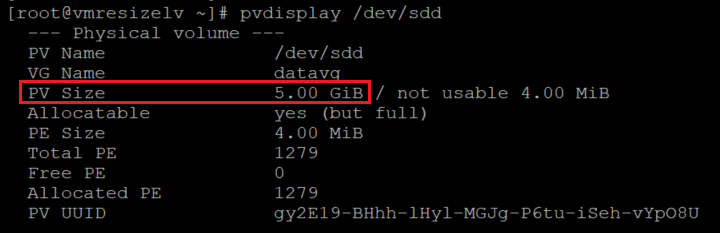
Even though the disk was resized, the PV still has the previous size.
Resize the PV:
sudo pvresize /dev/resizeddisk
Check the PV size:
sudo pvdisplay /dev/resizeddisk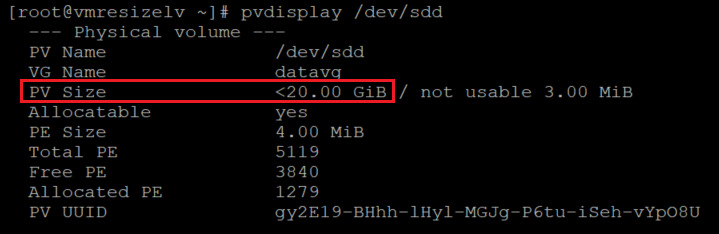
Apply the same procedure for all of the disks that you want to resize.
Check the VG information.
sudo vgdisplay vgname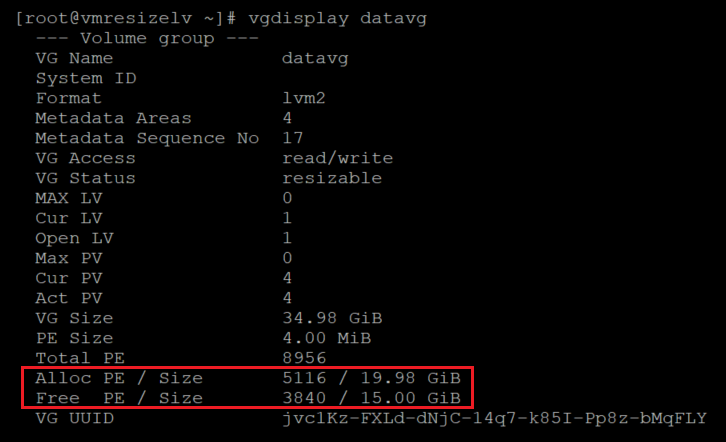
The VG now has enough space to be allocated to the LVs.
Resize the LV:
sudo lvresize -r -L +5G vgname/lvname
sudo lvresize -r -l +100%FREE /dev/datavg/datalv01
Check the size of the file system:
df -h /datalvm2
Extend an LVM-on-crypt volume by adding a new PV
You can also extend an LVM-on-crypt volume by adding a new PV. This method closely follows the steps in Configure LVM and RAID on encrypted devices. See the sections that explain how to add a new disk and set it up in an LVM-on-crypt configuration.
You can use this method to add space to an existing LV. Or you can create new VGs or LVs.
Verify the current size of your VG:
sudo vgdisplay vgname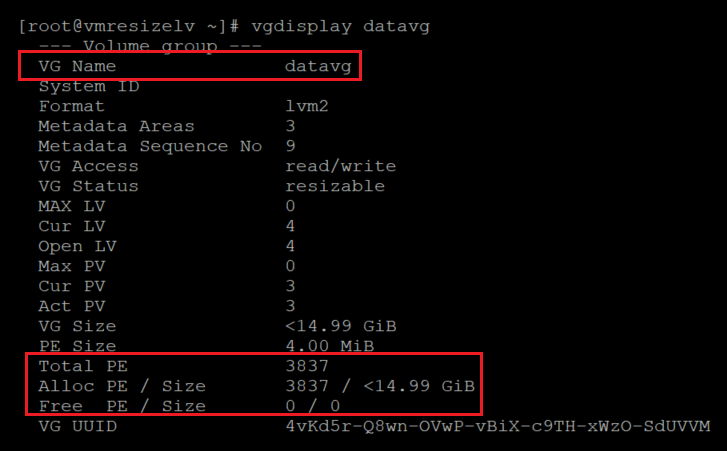
Verify the size of the file system and LV that you want to expand:
sudo lvdisplay /dev/vgname/lvname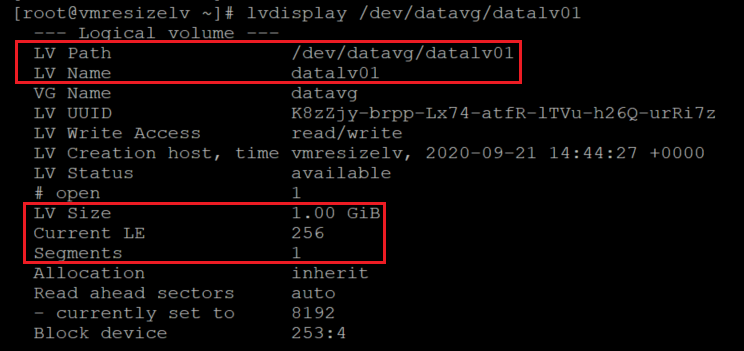
df -h mountpoint
Add a new data disk to the VM and identify it.
Before you add the new disk, check the disks:
sudo fdisk -l | egrep ^"Disk /"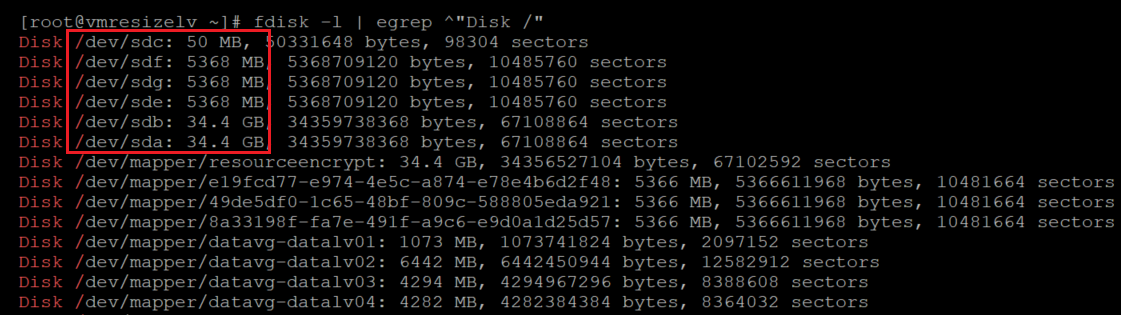
Here's another way to check the disks before you add the new disk:
sudo lsblk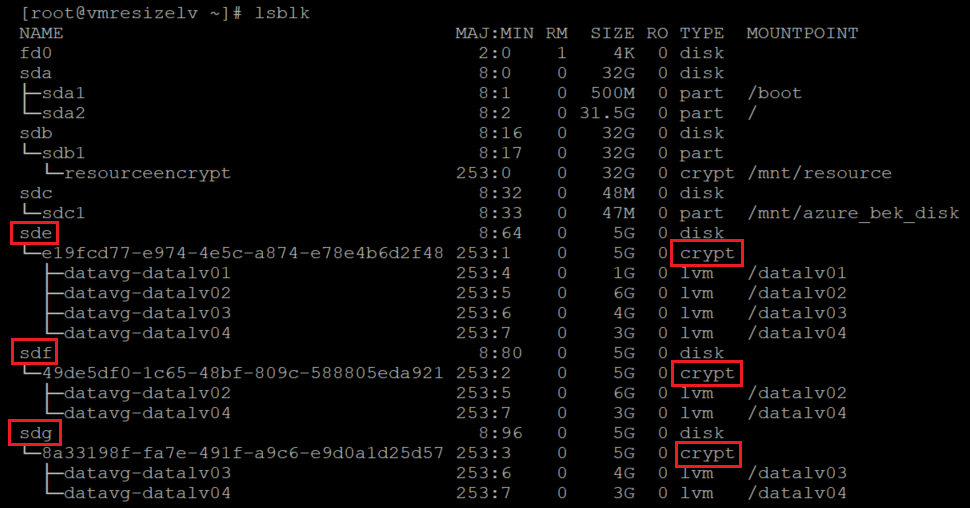
To add the new disk, you can use PowerShell, the Azure CLI, or the Azure portal. For more information, see Attach a data disk to a Linux VM.
The kernel name scheme applies to the newly added device. A new drive is normally assigned the next available letter. In this case, the added disk is
sdd.Check the disks to make sure the new disk has been added:
sudo fdisk -l | egrep ^"Disk /"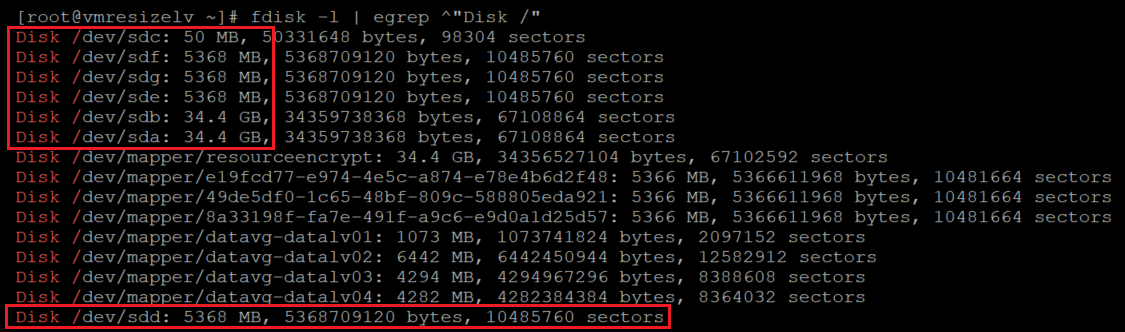
sudo lsblk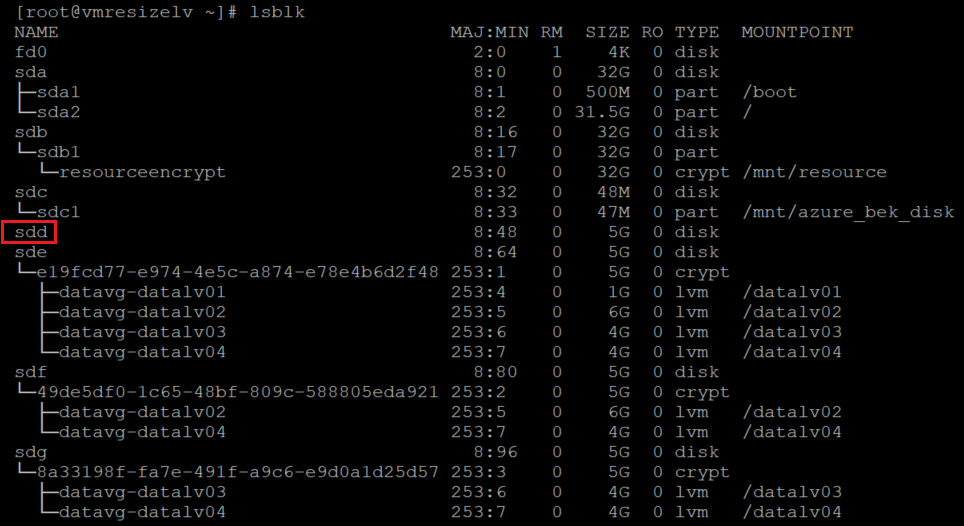
Create a file system on top of the recently added disk. Match the disk to the linked devices on
/dev/disk/azure/scsi1/.sudo ls -la /dev/disk/azure/scsi1/
sudo mkfs.ext4 /dev/disk/azure/scsi1/${disk}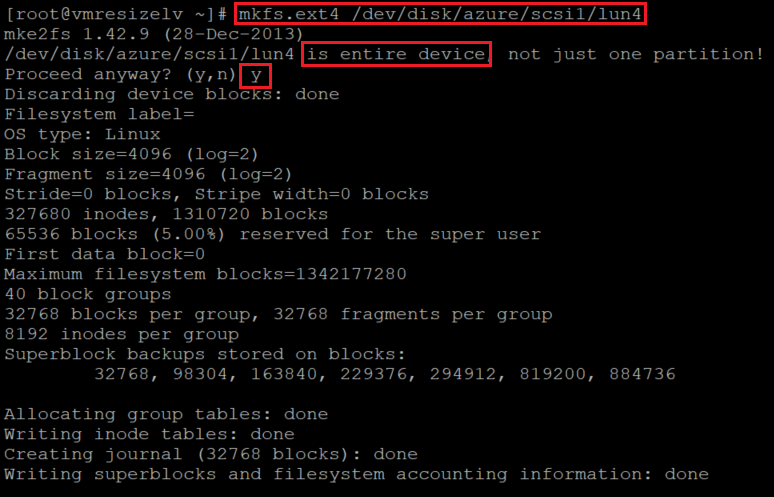
Create a temporary mount point for the new added disk:
newmount=/data4
sudo mkdir ${newmount}
Add the recently created file system to
/etc/fstab.sudo blkid /dev/disk/azure/scsi1/lun4| awk -F\" '{print "UUID="$2" '${newmount}' "$4" defaults,nofail 0 0"}' >> /etc/fstabMount the newly created file system:
sudo mount -aVerify that the new file system is mounted:
df -h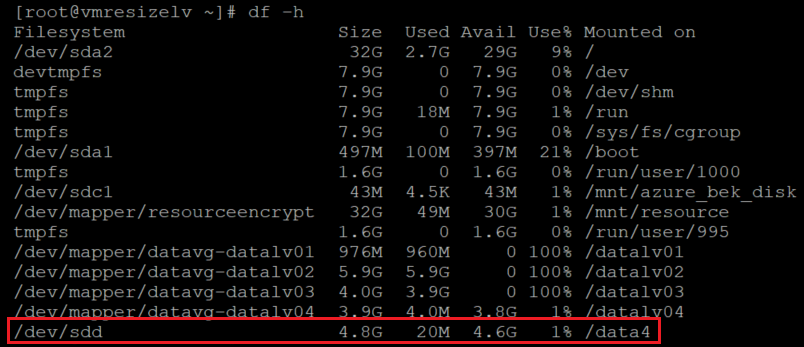
sudo lsblk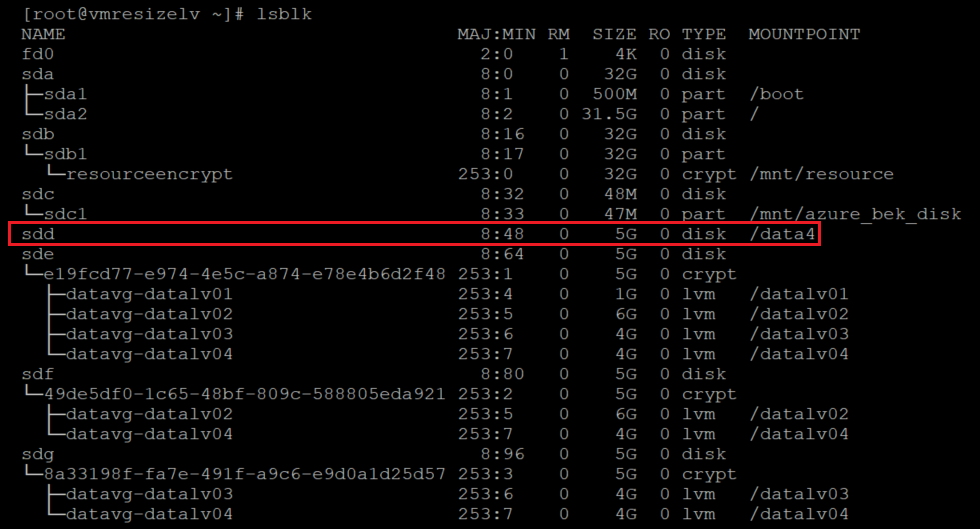
Restart the encryption that you previously started for data drives.
Tip
For LVM-on-crypt, we recommend that you use
EncryptFormatAll. Otherwise, you might see a double encryption while you set additional disks.For more information, see Configure LVM and RAID on encrypted devices.
Here's an example:
az vm encryption enable \
--resource-group ${RGNAME} \
--name ${VMNAME} \
--disk-encryption-keyvault ${KEYVAULTNAME} \
--key-encryption-key ${KEYNAME} \
--key-encryption-keyvault ${KEYVAULTNAME} \
--volume-type "DATA" \
--encrypt-format-all \
-o table
When the encryption finishes, you see a crypt layer on the newly added disk:
sudo lsblk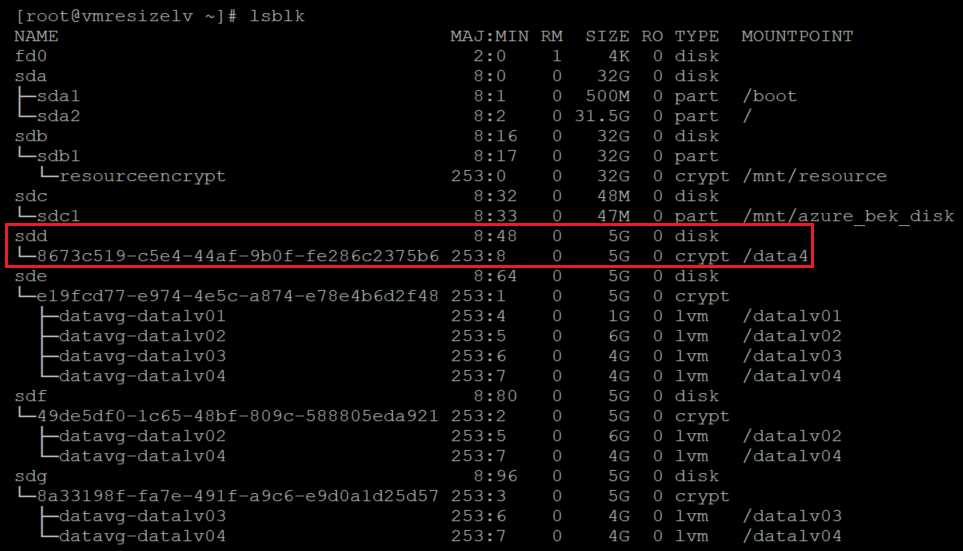
Unmount the encrypted layer of the new disk:
sudo umount ${newmount}Check the current PV information:
sudo pvs
Create a PV on top of the encrypted layer of the disk. Take the device name from the previous
lsblkcommand. Add a/dev/mapper in front of the device name to create the PV:sudo pvcreate /dev/mapper/mapperdevicename
You see a warning about wiping the current
ext4 fssignature. This warning is expected. Answer this question withy.Verify that the new PV was added to the LVM configuration:
sudo pvs
Add the new PV to the VG that you need to increase.
sudo vgextend vgname /dev/mapper/nameofhenewpv
Verify the new size and free space of the VG:
sudo vgdisplay vgname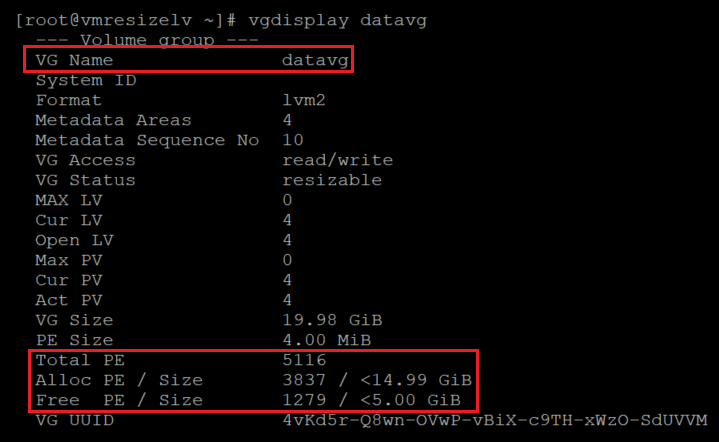
Note the increase of the
Total PEcount and theFree PE / Size.Increase the size of the LV and the file system. Use the
-roption onlvextend. In this example, we're adding the total available space in the VG to the given LV.sudo lvextend -r -l +100%FREE /dev/vgname/lvname
Follow the next steps to verify your changes.
Verify the size of the LV:
sudo lvdisplay /dev/vgname/lvname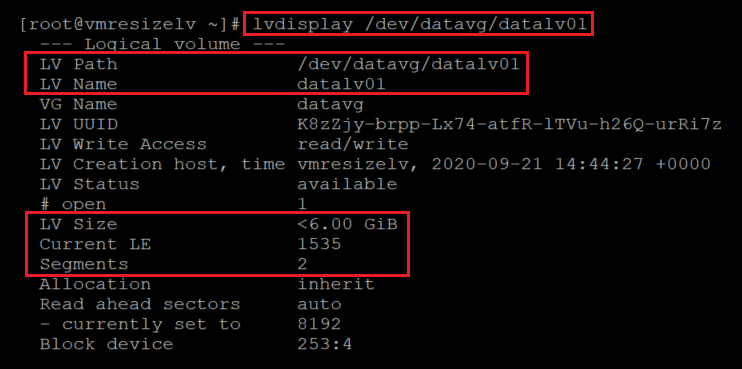
Verify the new size of the file system:
df -h /mountpoint
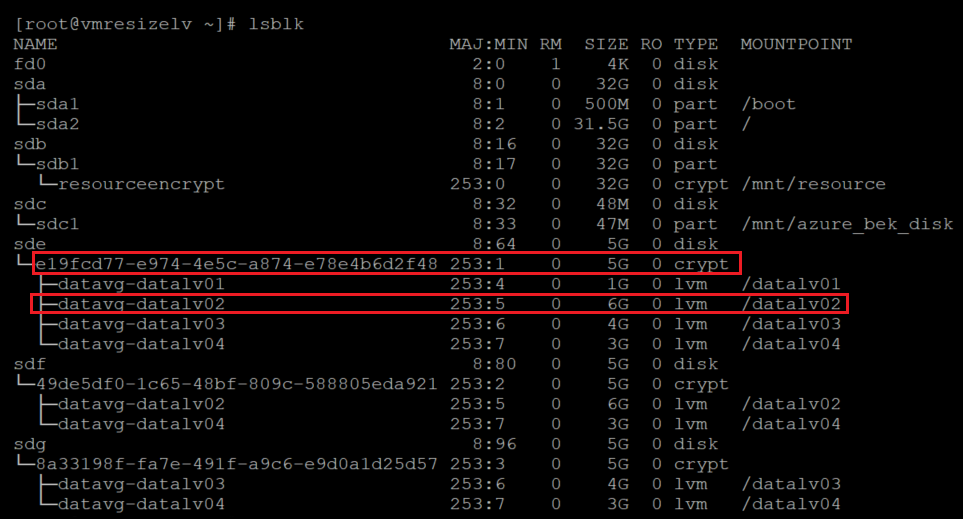
Verify that the LVM layer is on top of the encrypted layer:
sudo lsblk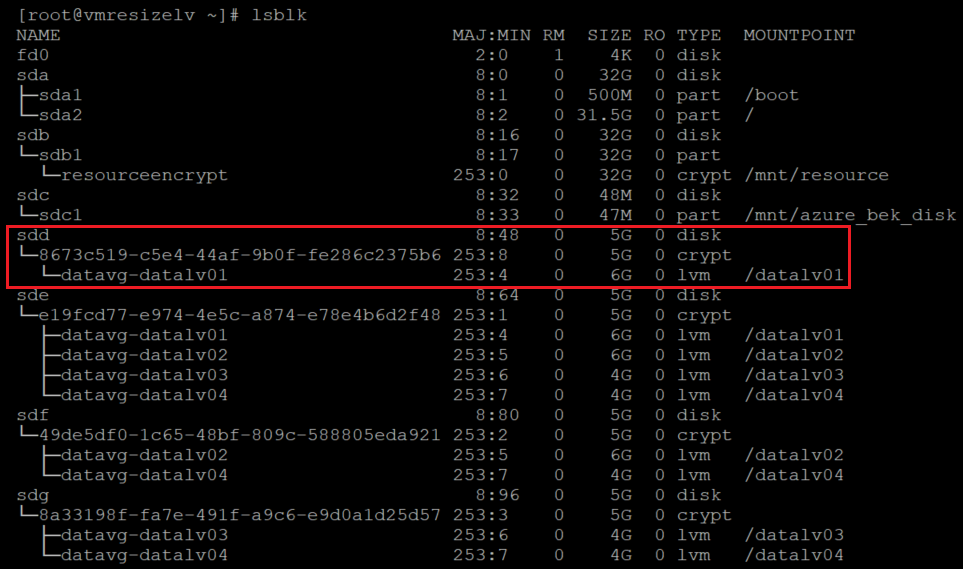
If you use
lsblkwithout options, then you see the mount points multiple times. The command sorts by device and LVs.You might want to use
lsblk -fs. In this command,-fsreverses the sort order so that the mount points are shown once. The disks are shown multiple times.sudo lsblk -fs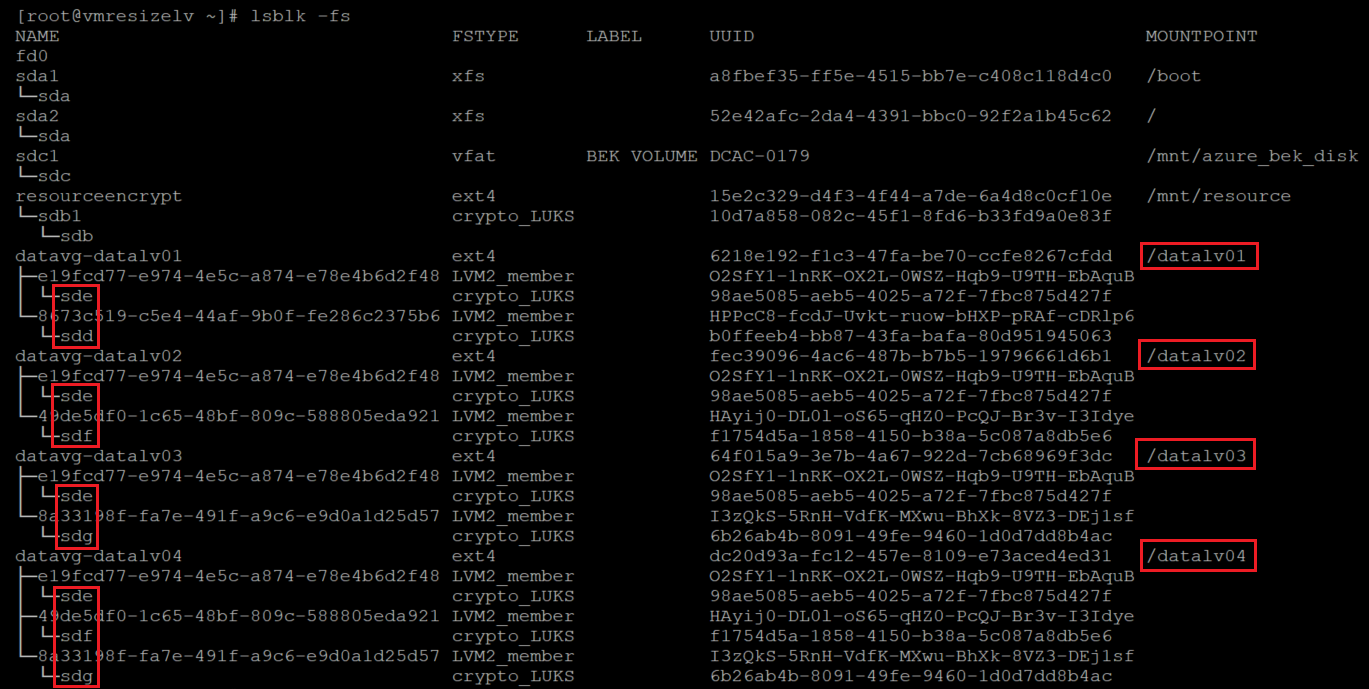
Extend an LVM on a crypt volume by resizing an existing PV
Identify your encrypted disks:
sudo lsblk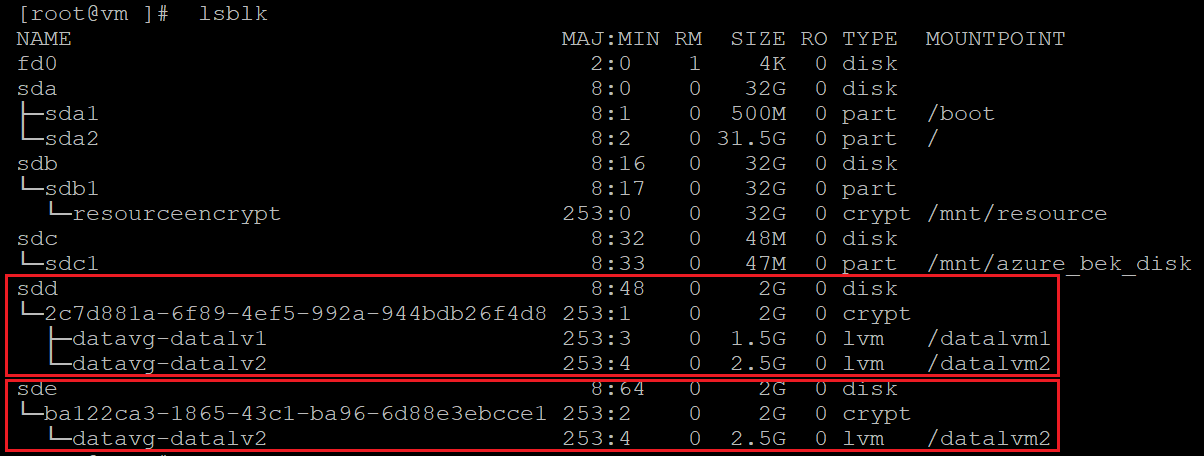
sudo lsblk -s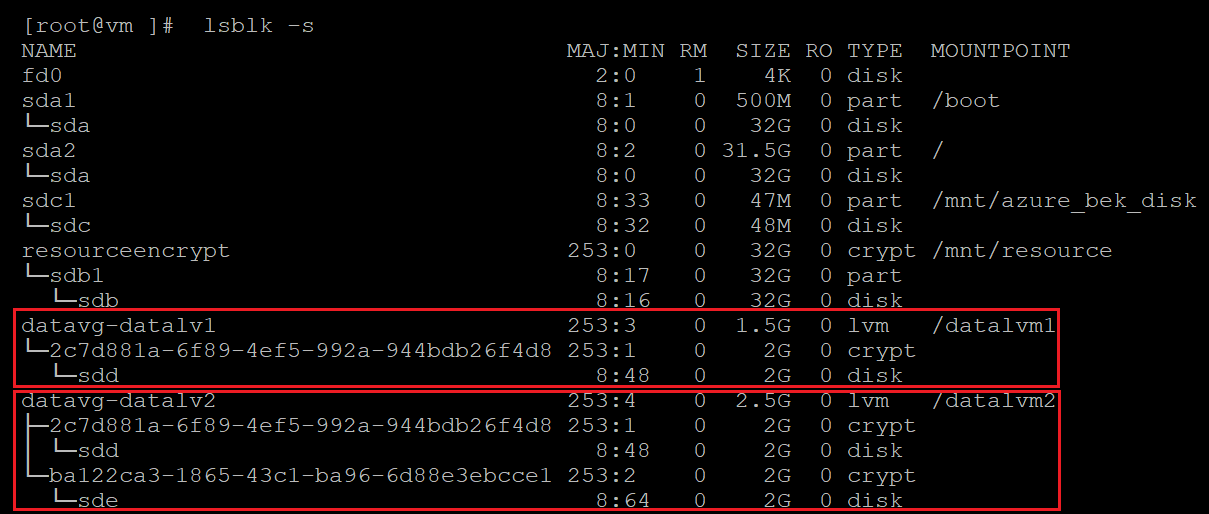
Check your PV information:
sudo pvs
Check your VG information:
sudo vgs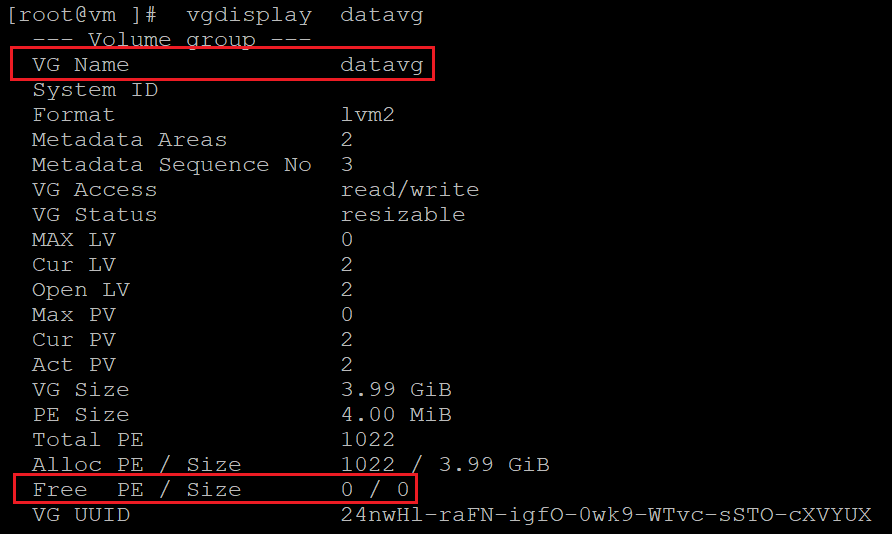
Check your LV information:
sudo lvs
Check the file system utilization:
df -h /mountpoint(s)
Check the sizes of your disks:
sudo fdisk
sudo fdisk -l | egrep ^"Disk /"
sudo lsblk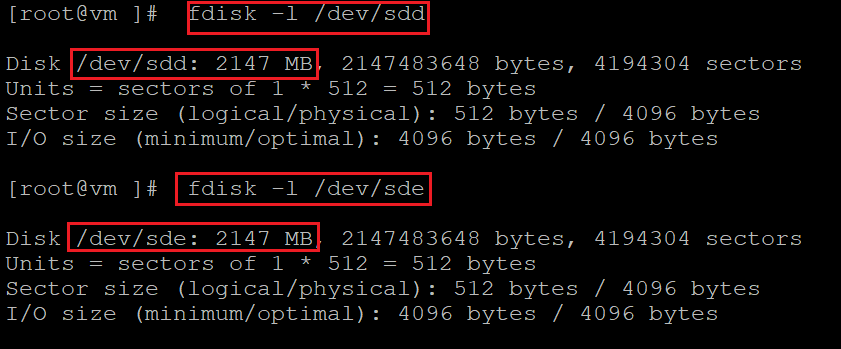
Resize the data disk. You can use the portal, CLI, or PowerShell. For more information, see the disk-resize section in Expand virtual hard disks on a Linux VM.
Important
You can't resize virtual disks while the VM is running. Deallocate your VM for this step.
Check your disks sizes:
sudo fdisk
sudo fdisk -l | egrep ^"Disk /"
sudo lsblk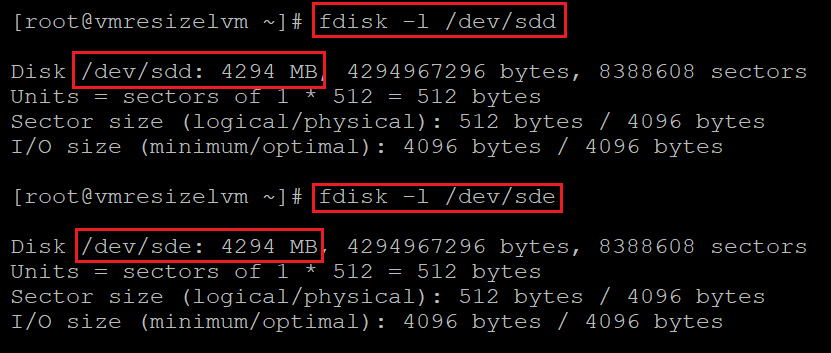
In this case, both disks were resized from 2 GB to 4 GB. But the size of the file system, LV, and PV remain the same.
Check the current PV size. Remember that on LVM-on-crypt, the PV is the
/dev/mapper/device, not the/dev/sd*device.sudo pvdisplay /dev/mapper/devicemappername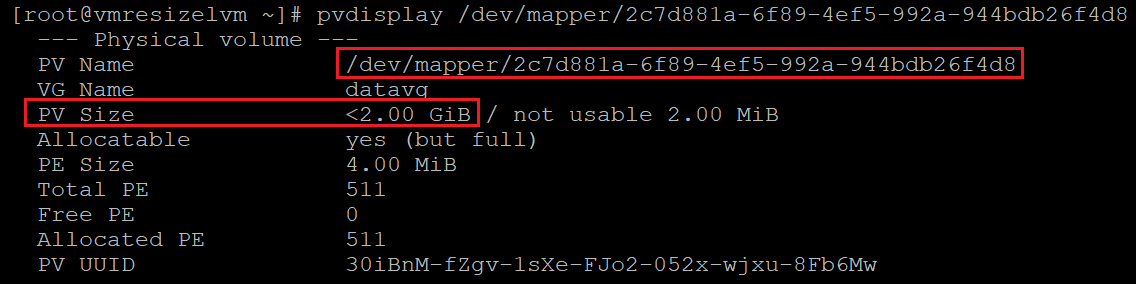
Resize the PV:
sudo pvresize /dev/mapper/devicemappername
Check the new PV size:
sudo pvdisplay /dev/mapper/devicemappername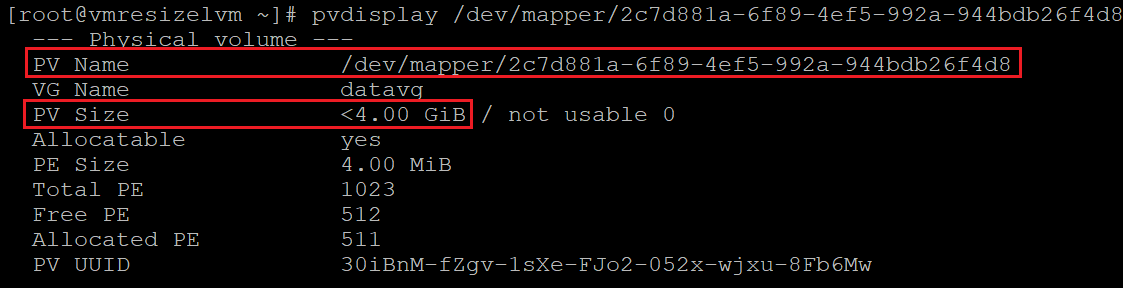
Resize the encrypted layer on the PV:
sudo cryptsetup resize /dev/mapper/devicemappernameApply the same procedure for all of the disks that you want to resize.
Check your VG information:
sudo vgdisplay vgname
The VG now has enough space to be allocated to the LVs.
Check the LV information:
sudo lvdisplay vgname/lvname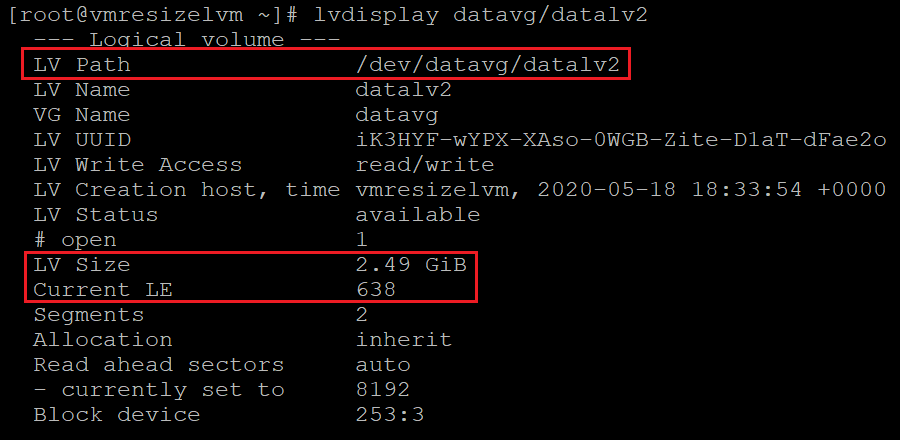
Check the file system utilization:
df -h /mountpoint
Resize the LV:
sudo lvresize -r -L +2G /dev/vgname/lvname
Here we use the
-roption to also resize the file system.Check the LV information:
sudo lvdisplay vgname/lvname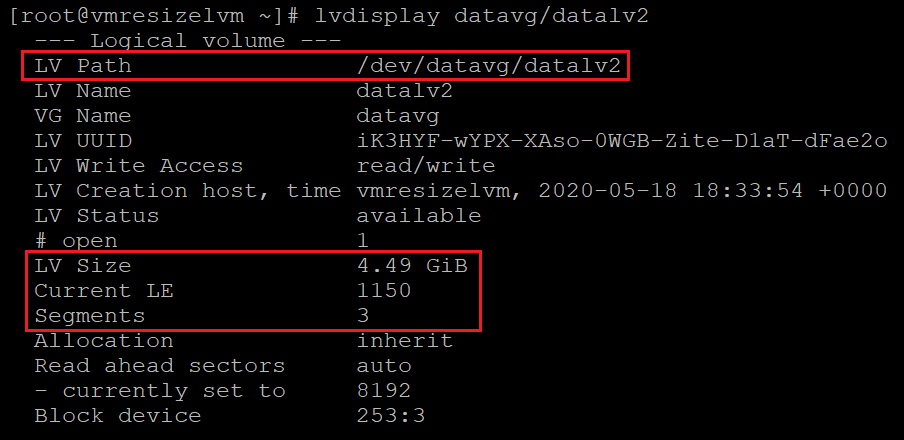
Check the file system utilization:
df -h /mountpoint
Apply the same resizing procedure to any other LV that requires it.