Note
Access to this page requires authorization. You can try signing in or changing directories.
Access to this page requires authorization. You can try changing directories.
Applies to: ✔️ Linux VMs ✔️ Windows VMs ✔️ Flexible scale sets ✔️ Uniform scale sets
If you frequently use the portal to deploy Linux VMs, you can simplify using SSH keys by integrating them into Azure. There are several ways to create SSH keys for use with Azure.
You can create SSH keys when you first create a VM. Your keys aren't tied to a specific VM and you can use them in future applications.
You can create SSH keys in the Azure portal separate from a VM. You can use them with both new and old VMs.
You can create SSH keys externally and upload them for use in Azure.
You can reuse your stored keys in various of applications to fit your organization's needs.
For more detailed information about creating and using SSH keys with Linux VMs, see Use SSH keys to connect to Linux VMs.
Generate new keys
Open the Azure portal.
At the top of the page, type SSH to search. Under Marketplace, select SSH keys.
On the SSH Key page, select Create.

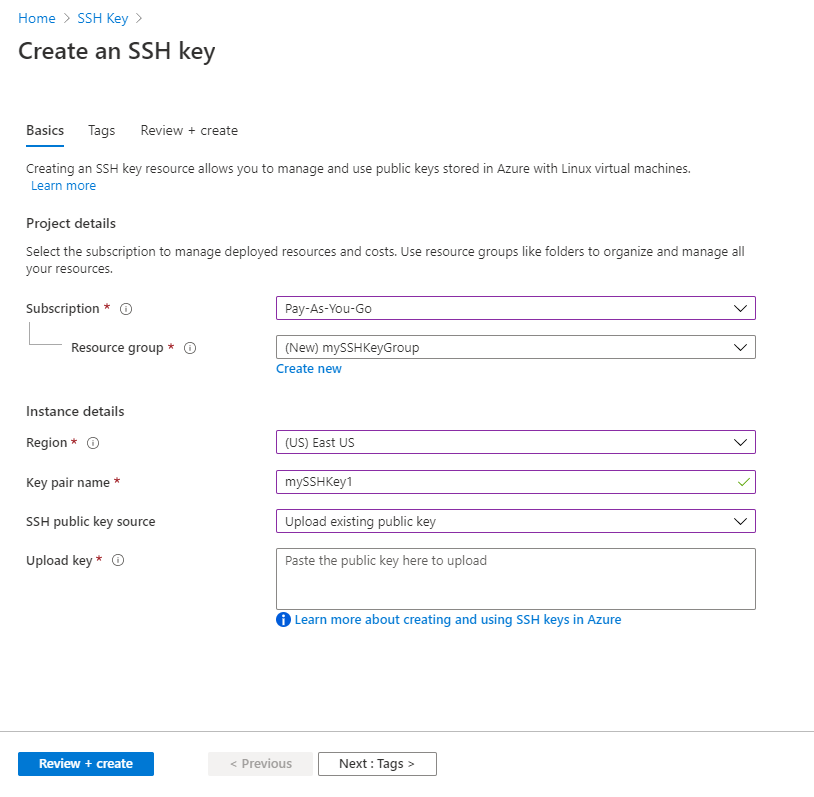
In Resource group select Create new to create a new resource group to store your keys. Type a name for your resource group and select OK.
In Region select a region to store your keys. You can use the keys in any region, this option is just the region where you store them.
Type a name for your key in Key pair name.
In SSH public key source, select Generate public key source.
In SSH Key Type, select either RSA SSH Format or Ed25519 SSH Format
When you're done, select Review + create.
After it passes validation, select Create.
You'll get a pop-up window to, select Download private key and create resource that downloads the SSH key as a .pem file.
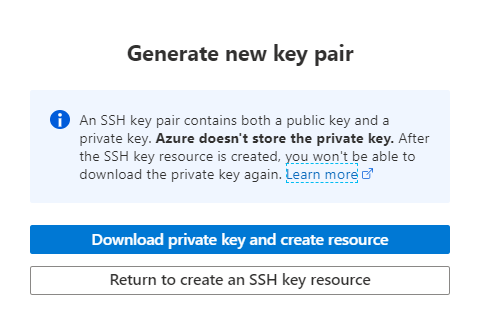
Once you've downloaded the .pem file, you might want to move it somewhere on your computer where it's easy to point to from your SSH client.
Connect to the VM
On your local computer, open a PowerShell prompt and type:
ssh -i <path to the .pem file> username@<ipaddress of the VM>
For example, type: ssh -i /Downloads/mySSHKey.pem azureuser@123.45.67.890 and replace the example IP address at the end of the command with your VM's public IP address.
Upload an SSH key
You can also upload a public SSH key to store in Azure. For information about how to create an SSH key pair, see Use SSH keys to connect to Linux VMs.
Open the Azure portal.
At the top of the page, type SSH to search. Under *Marketplace, select SSH keys.
On the SSH Key page, select Create.
In Resource group select Create new to create a new resource group to store your keys. Type a name for your resource group and select OK.
In Region select a region to store your keys. You can use the keys in any region, this option is just the region where they're stored.
Type a name for your key in Key pair name.
In SSH public key source, select Upload existing public key.
Paste the full contents of the public key into Upload key and then select Review + create.
After validation completes, select Create.
Once you upload the key, you can choose to use it when you create a VM.
List keys
Azure stores your SSH keys created in the portal as resources, so you can filter your resources view to see all of them.
In the portal, select All resource.
In the filters, select Type, unselect the Select all option to clear the list.
Type SSH in the filter and select SSH key.

Get the public key
If you need your public key, you can easily copy it from the portal page for the key. Just list your keys (using the process in the last section) then select a key from the list. The page for your key opens and you can click the Copy to clipboard icon next to the key to copy it.
Next steps
To learn more about using SSH keys with Azure VMs, see Use SSH keys to connect to Linux VMs.