Note
Access to this page requires authorization. You can try signing in or changing directories.
Access to this page requires authorization. You can try changing directories.
Important
Azure Disk Encryption is scheduled for retirement on September 15, 2028. Until that date, you can continue to use Azure Disk Encryption without disruption. On September 15, 2028, ADE-enabled workloads will continue to run, but encrypted disks will fail to unlock after VM reboots, resulting in service disruption.
Use encryption at host for new VMs, or consider Confidential VM sizes with OS disk encryption for confidential computing workloads. All ADE-enabled VMs (including backups) must migrate to encryption at host before the retirement date to avoid service disruption. See Migrate from Azure Disk Encryption to encryption at host for details.
Applies to: ✔️ Windows VMs
This article provides sample scripts for preparing pre-encrypted VHDs and other tasks.
Note
All scripts refer to the latest, non-AAD version of ADE, except where noted.
Sample PowerShell scripts for Azure Disk Encryption
- List all encrypted VMs in your subscription
You can find all ADE-encrypted VMs and the extension version, in all resource groups present in a subscription, by using the Find_1passAdeVersion_VM.ps1 PowerShell script.
Alternatively, these cmdlets show all ADE-encrypted VMs (but not the extension version):
$osVolEncrypted = {(Get-AzVMDiskEncryptionStatus -ResourceGroupName $_.ResourceGroupName -VMName $_.Name).OsVolumeEncrypted}
$dataVolEncrypted= {(Get-AzVMDiskEncryptionStatus -ResourceGroupName $_.ResourceGroupName -VMName $_.Name).DataVolumesEncrypted}
Get-AzVm | Format-Table @{Label="MachineName"; Expression={$_.Name}}, @{Label="OsVolumeEncrypted"; Expression=$osVolEncrypted}, @{Label="DataVolumesEncrypted"; Expression=$dataVolEncrypted}
List all encrypted VMSS instances in your subscription
You can find all ADE-encrypted virtual machine scale sets instances and the extension version, in all resource groups present in a subscription, by using the Find_1passAdeVersion_VMSS.ps1 PowerShell script.
List all disk encryption secrets used for encrypting VMs in a key vault
Get-AzKeyVaultSecret -VaultName $KeyVaultName | where {$_.Tags.ContainsKey('DiskEncryptionKeyFileName')} | format-table @{Label="MachineName"; Expression={$_.Tags['MachineName']}}, @{Label="VolumeLetter"; Expression={$_.Tags['VolumeLetter']}}, @{Label="EncryptionKeyURL"; Expression={$_.Id}}
Using the Azure Disk Encryption prerequisites PowerShell script
If you're already familiar with the prerequisites for Azure Disk Encryption, you can use the Azure Disk Encryption prerequisites PowerShell script. For an example of using this PowerShell script, see the Encrypt a VM Quickstart. You can remove the comments from a section of the script, starting at line 211, to encrypt all disks for existing VMs in an existing resource group.
The following table shows which parameters you can use in the PowerShell script:
| Parameter | Description | Mandatory? |
|---|---|---|
| $resourceGroupName | Name of the resource group to which the key vault belongs. The script creates a new resource group with this name if one doesn't exist. | True |
| $keyVaultName | Name of the key vault in which to place encryption keys. The script creates a new vault with this name if one doesn't exist. | True |
| $location | Location of the key vault. Ensure that the key vault and VMs to be encrypted are in the same location. Get a location list with Get-AzLocation. |
True |
| $subscriptionId | Identifier of the Azure subscription to use. Get your Subscription ID with Get-AzSubscription. |
True |
| $aadAppName | Name of the Microsoft Entra application that writes secrets to Key Vault. The script creates a new application with this name if one doesn't exist. If this app already exists, pass the aadClientSecret parameter to the script. | False |
| $aadClientSecret | Client secret of the Microsoft Entra application that is created earlier. | False |
| $keyEncryptionKeyName | Name of optional key encryption key in Key Vault. The script creates a new key with this name if one doesn't exist. | False |
Resource Manager templates
Encrypt or decrypt VMs without a Microsoft Entra app
- Enable disk encryption on an existing or running Windows VM
- Disable encryption on a running Windows VM
Encrypt or decrypt VMs by using a Microsoft Entra app
- Enable disk encryption on an existing or running Windows VM
- Disable encryption on a running Windows VM
- Create a new encrypted managed disk from a pre-encrypted VHD/storage blob - Creates a new encrypted managed disk from a pre-encrypted VHD and its corresponding encryption settings.
Prepare a pre-encrypted Windows VHD
The following sections explain how to prepare a pre-encrypted Windows VHD for deployment as an encrypted VHD in Azure IaaS. Use this information to prepare and boot a fresh Windows VM (VHD) on Azure Site Recovery or Azure. For more information about how to prepare and upload a VHD, see Upload a generalized VHD and use it to create new VMs in Azure.
Update group policy to allow non-TPM for OS protection
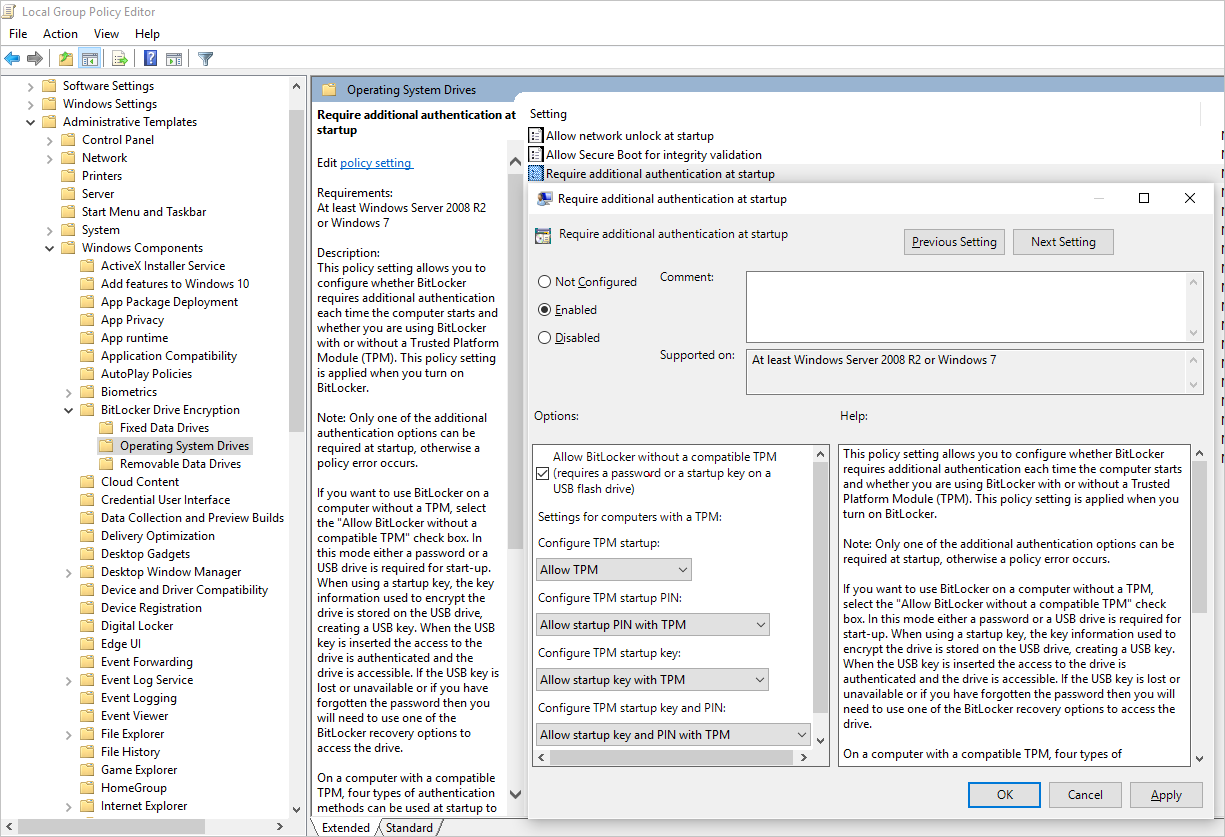
Configure the BitLocker Group Policy setting BitLocker Drive Encryption, which you'll find under Local Computer Policy > Computer Configuration > Administrative Templates > Windows Components. Change this setting to Operating System Drives > Require additional authentication at startup > Allow BitLocker without a compatible TPM, as shown in the following figure:
Install BitLocker feature components
For Windows Server 2012 and later, use the following command:
dism /online /Enable-Feature /all /FeatureName:BitLocker /quiet /norestart
For Windows Server 2008 R2, use the following command:
ServerManagerCmd -install BitLockers
Prepare the OS volume for BitLocker by using bdehdcfg
To compress the OS partition and prepare the machine for BitLocker, execute the bdehdcfg if needed:
bdehdcfg -target c: shrink -quiet
Protect the OS volume by using BitLocker
Use the manage-bde command to enable encryption on the boot volume by using an external key protector. Also place the external key (.bek file) on the external drive or volume. Encryption is enabled on the system/boot volume after the next reboot.
manage-bde -on %systemdrive% -sk [ExternalDriveOrVolume]
reboot
Note
Prepare the VM with a separate data/resource VHD for getting the external key by using BitLocker.
Upload encrypted VHD to an Azure storage account
After BitLocker encryption is enabled, the local encrypted VHD needs to be uploaded to your storage account.
Add-AzVhd [-Destination] <Uri> [-LocalFilePath] <FileInfo> [[-NumberOfUploaderThreads] <Int32> ] [[-BaseImageUriToPatch] <Uri> ] [[-OverWrite]] [ <CommonParameters>]
Upload the secret for the pre-encrypted VM to your key vault
Upload the disk encryption secret that you got previously as a secret in your key vault. To do so, grant the set secret permission and the wrapkey permission to the account that uploads the secrets.
# Typically, account Id is the user principal name (in user@domain.com format)
$upn = (Get-AzureRmContext).Account.Id
Set-AzKeyVaultAccessPolicy -VaultName $kvname -UserPrincipalName $acctid -PermissionsToKeys wrapKey -PermissionsToSecrets set

# In cloud shell, the account ID is a managed service identity, so specify the username directly
# $upn = "user@domain.com"
# Set-AzKeyVaultAccessPolicy -VaultName $kvname -UserPrincipalName $acctid -PermissionsToKeys wrapKey -PermissionsToSecrets set

# When running as a service principal, retrieve the service principal ID from the account ID, and set access policy to that
# $acctid = (Get-AzureRmContext).Account.Id
# $spoid = (Get-AzureRmADServicePrincipal -ServicePrincipalName $acctid).Id
# Set-AzKeyVaultAccessPolicy -VaultName $kvname -ObjectId $spoid -BypassObjectIdValidation -PermissionsToKeys wrapKey -PermissionsToSecrets set
Disk encryption secret not encrypted with a KEK
To set up the secret in your key vault, use Set-AzKeyVaultSecret. The passphrase is encoded as a base64 string and then uploaded to the key vault. In addition, make sure that the following tags are set when you create the secret in the key vault.
 # This is the passphrase that was provided for encryption during the distribution installation
 $passphrase = "contoso-password"

 $tags = @{"DiskEncryptionKeyEncryptionAlgorithm" = "RSA-OAEP"; "DiskEncryptionKeyFileName" = "LinuxPassPhraseFileName"}
 $secretName = [guid]::NewGuid().ToString()
 $secretValue = [Convert]::ToBase64String([System.Text.Encoding]::ASCII.GetBytes($passphrase))
 $secureSecretValue = ConvertTo-SecureString $secretValue -AsPlainText -Force

 $secret = Set-AzKeyVaultSecret -VaultName $KeyVaultName -Name $secretName -SecretValue $secureSecretValue -tags $tags
 $secretUrl = $secret.Id
Use the $secretUrl in the next step for attaching the OS disk without using a KEK.
Disk encryption secret encrypted with a KEK
Before you upload the secret to the key vault, you can optionally encrypt it by using a key encryption key. Use the wrap API to first encrypt the secret by using the key encryption key. The output of this wrap operation is a base64 URL encoded string, which you can then upload as a secret by using the Set-AzKeyVaultSecret cmdlet.
    # This is the passphrase that was provided for encryption during the distribution installation
    $passphrase = "contoso-password"

    Add-AzKeyVaultKey -VaultName $KeyVaultName -Name "keyencryptionkey" -Destination Software
    $KeyEncryptionKey = Get-AzKeyVaultKey -VaultName $KeyVault.OriginalVault.Name -Name "keyencryptionkey"

    $apiversion = "2015-06-01"

    ##############################
    # Get Auth URI
    ##############################

    $uri = $KeyVault.VaultUri + "/keys"
    $headers = @{}

    $response = try { Invoke-RestMethod -Method GET -Uri $uri -Headers $headers } catch { $_.Exception.Response }

    $authHeader = $response.Headers["www-authenticate"]
    $authUri = [regex]::match($authHeader, 'authorization="(.*?)"').Groups[1].Value

    Write-Host "Got Auth URI successfully"

    ##############################
    # Get Auth Token
    ##############################

    $uri = $authUri + "/oauth2/token"
    $body = "grant_type=client_credentials"
    $body += "&client_id=" + $AadClientId
    $body += "&client_secret=" + [Uri]::EscapeDataString($AadClientSecret)
    $body += "&resource=" + [Uri]::EscapeDataString("https://vault.azure.net")
    $headers = @{}

    $response = Invoke-RestMethod -Method POST -Uri $uri -Headers $headers -Body $body

    $access_token = $response.access_token

    Write-Host "Got Auth Token successfully"

    ##############################
    # Get KEK info
    ##############################

    $uri = $KeyEncryptionKey.Id + "?api-version=" + $apiversion
    $headers = @{"Authorization" = "Bearer " + $access_token}

    $response = Invoke-RestMethod -Method GET -Uri $uri -Headers $headers

    $keyid = $response.key.kid

    Write-Host "Got KEK info successfully"

    ##############################
    # Encrypt passphrase by using a KEK
    ##############################

    $passphraseB64 = [Convert]::ToBase64String([System.Text.Encoding]::ASCII.GetBytes($Passphrase))
    $uri = $keyid + "/encrypt?api-version=" + $apiversion
    $headers = @{"Authorization" = "Bearer " + $access_token; "Content-Type" = "application/json"}
    $bodyObj = @{"alg" = "RSA-OAEP"; "value" = $passphraseB64}
    $body = $bodyObj | ConvertTo-Json

    $response = Invoke-RestMethod -Method POST -Uri $uri -Headers $headers -Body $body

    $wrappedSecret = $response.value

    Write-Host "Encrypted passphrase successfully"

    ##############################
    # Store secret
    ##############################

    $secretName = [guid]::NewGuid().ToString()
    $uri = $KeyVault.VaultUri + "/secrets/" + $secretName + "?api-version=" + $apiversion
    $secretAttributes = @{"enabled" = $true}
    $secretTags = @{"DiskEncryptionKeyEncryptionAlgorithm" = "RSA-OAEP"; "DiskEncryptionKeyFileName" = "LinuxPassPhraseFileName"}
    $headers = @{"Authorization" = "Bearer " + $access_token; "Content-Type" = "application/json"}
    $bodyObj = @{"value" = $wrappedSecret; "attributes" = $secretAttributes; "tags" = $secretTags}
    $body = $bodyObj | ConvertTo-Json

    $response = Invoke-RestMethod -Method PUT -Uri $uri -Headers $headers -Body $body

    Write-Host "Stored secret successfully"

    $secretUrl = $response.id
Use $KeyEncryptionKey and $secretUrl in the next step for attaching the OS disk by using a KEK.
Specify a secret URL when you attach an OS disk
Without using a KEK
While you attach the OS disk, pass $secretUrl. The URL is generated in the "Disk-encryption secret not encrypted with a KEK" section.
    Set-AzVMOSDisk `
            -VM $VirtualMachine `
            -Name $OSDiskName `
            -SourceImageUri $VhdUri `
            -VhdUri $OSDiskUri `
            -Windows `
            -CreateOption FromImage `
            -DiskEncryptionKeyVaultId $KeyVault.ResourceId `
            -DiskEncryptionKeyUrl $SecretUrl
Using a KEK
When you attach the OS disk, pass $KeyEncryptionKey and $secretUrl. The URL is generated in the "Disk encryption secret encrypted with a KEK" section.
    Set-AzVMOSDisk `
            -VM $VirtualMachine `
            -Name $OSDiskName `
            -SourceImageUri $CopiedTemplateBlobUri `
            -VhdUri $OSDiskUri `
            -Windows `
            -CreateOption FromImage `
            -DiskEncryptionKeyVaultId $KeyVault.ResourceId `
            -DiskEncryptionKeyUrl $SecretUrl `
            -KeyEncryptionKeyVaultId $KeyVault.ResourceId `
            -KeyEncryptionKeyURL $KeyEncryptionKey.Id