Note
Access to this page requires authorization. You can try signing in or changing directories.
Access to this page requires authorization. You can try changing directories.
You can run Micro Focus Enterprise Server 5.0 in a Docker container on Azure. This tutorial shows you how. It uses the Windows CICS (Customer Information Control System) acctdemo demonstration for Enterprise Server.
Docker adds portability and isolation to applications. For example, you can export a Docker image from one Windows virtual machine (VM) to run on another, or from a repository to a Windows server with Docker. The Docker image runs in the new location with the same configuration—without having to install Enterprise Server. It’s part of the image. Licensing considerations still apply.
This tutorial installs the Windows 2016 Datacenter with Containers VM from the Azure Marketplace. This VM includes Docker 18.09.0. The steps that follow show you how to deploy the container, run it, and then connect to it with a 3270 emulator.
Prerequisites
Before getting started, check out these prerequisites:
An Azure subscription. If you don't have one, create a free account before you begin.
The Micro Focus software and a valid license (or trial license). If you're an existing Micro Focus customer, contact your Micro Focus representative. Otherwise, request a trial.
Note
The Docker demonstration files are included with Enterprise Server 5.0. This tutorial uses ent_server_dockerfiles_5.0_windows.zip. Access it from the same place that you accessed the Enterprise Server installation file or go to Micro Focus to get started.
The documentation for Enterprise Server and Enterprise Developer.
Create a VM
Secure the media from the ent_server_dockerfiles_5.0_windows.zip file. Secure the ES-Docker-Prod-XXXXXXXX.mflic licensing file (required to build the Docker images).
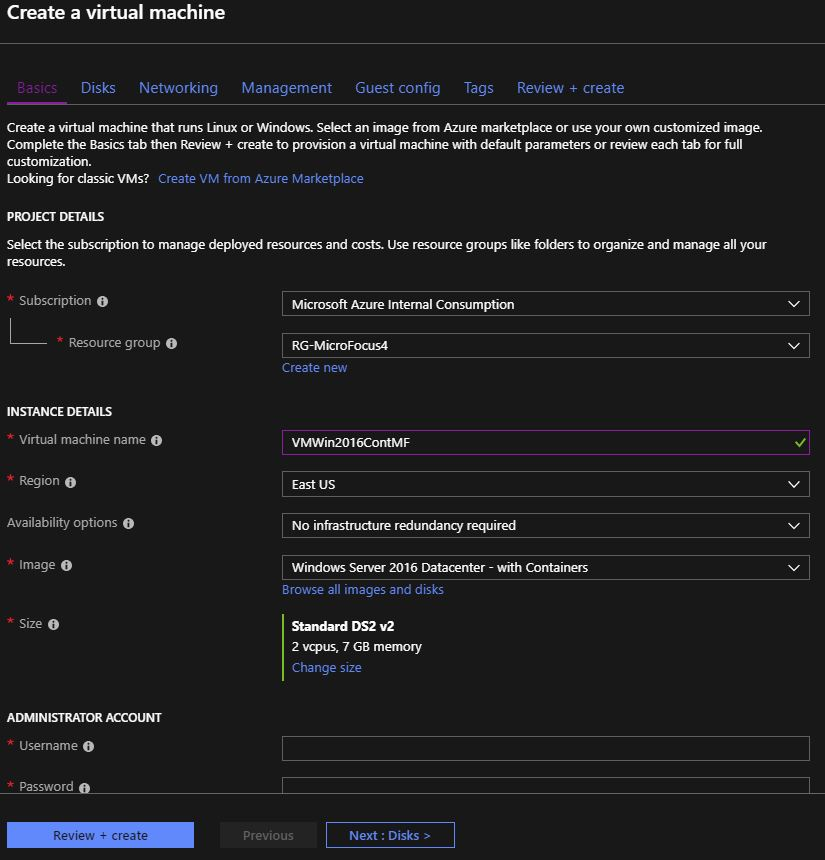
Create the VM. To do this, open Azure portal, select Create a resource from the top left menu, and filter by windows server operating system. In the results, select Windows Server. In the next screen, select Windows Server 2016 Datacenter – with Containers.

To configure the properties for the VM, choose instance details:
Choose a VM size. For this tutorial, consider using a Standard DS2_v3 VM with 2 vCPUs and 16 GB of memory.
Select the Region and Resource Group to which you would like to deploy.
For Availability options, use the default setting.
For Username, type the administrator account you want to use and the password.
Make sure port 3389 RDP is open. Only this port needs to be publicly exposed, so you can sign in to the VM. Then, accept all the default values and click Review + create.
Wait for the deployment to finish (a couple of minutes). A message states that your VM has been created.
Select Go to Resource to go to the Overview blade for your VM.
On the right, select Connect. The Connect to virtual machine options appear on the right.
Select the Download RDP File button to download the remote desktop protocol (RDP) file that allows you to attach to the VM.
After the file has finished downloading, open it and type in the username and password you created for the VM.
Note
Do not use your corporate credentials to sign in. (The RDP client assumes you may want to use these. You do not.)
Select More Choices, then select your VM credentials.
At this point, the VM is running and attached via RDP. You're signed in and ready for the next step.
Create a sandbox directory and upload the zip file
Create a directory on the VM where you can upload the demo and license files. For example, C:\Sandbox.
Upload ent_server_dockerfiles_5.0_windows.zip and the ES-Docker-Prod-XXXXXXXX.mflic file to the directory you created.
Extract the contents of the zip file to the ent_server_dockerfiles_5.0_windows directory created by the extract process. This directory includes a readme file (as .html and .txt file) and two subdirectories, EnterpriseServer and Examples.
Copy ES-Docker-Prod-XXXXXXXX.mflic to the C:\Sandbox\ent_server_dockerfiles_5.0_windows\EnterpriseServer and C:\Sandbox\ent_server_dockerfiles_5.0_windows\Examples\CICS directories.
Note
Make sure you copy the licensing file to both directories. They are required for the Docker build step to make sure the images are properly licensed.
Check Docker version and create base image
Important
Creating the appropriate Docker image is a two-step process. First, create the Enterprise Server 5.0 base image. Then create another image for the x64 platform. Although you can create a x86 (32-bit) image, use the 64-bit image.
Open a command prompt.
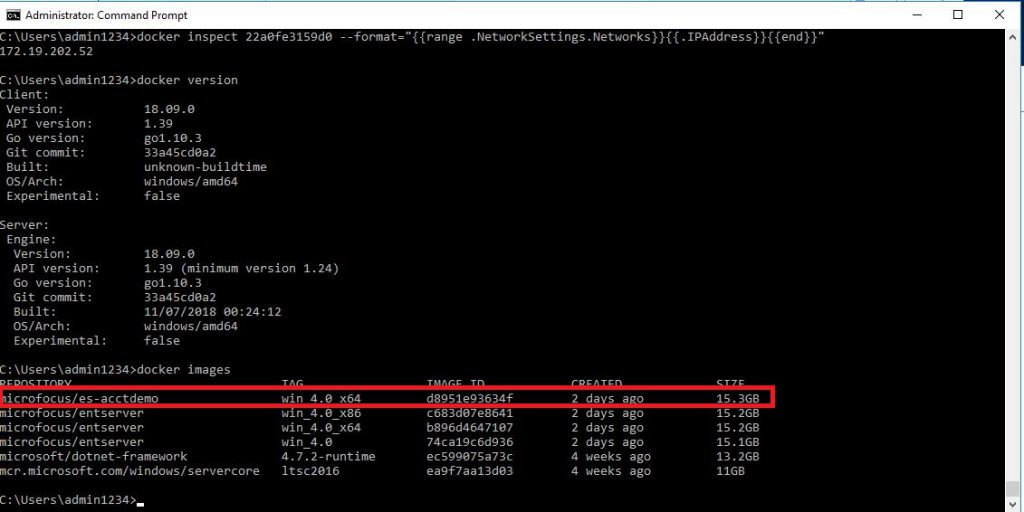
Check that Docker is installed. At the command prompt, type: docker version
For example, the version was 18.09.0 when this was written.To change the directory, type:
cd \Sandbox\ent_server_dockerfiles_5.0_windows\EnterpriseServer.Type bld.bat IacceptEULA to begin the build process for the initial base image. Wait a few minutes for this process to run. In the results, notice the two images that have been created—one for x64 and one for x86:
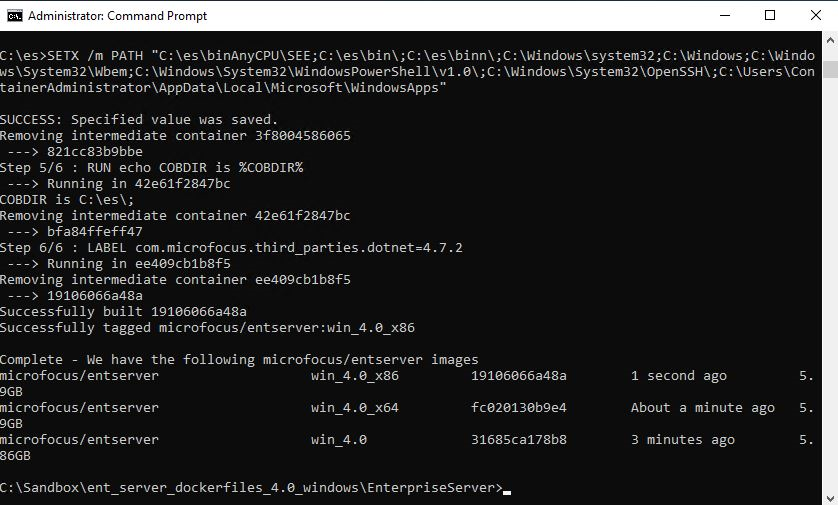
To create the final image for the CICS demonstration, switch to the CICS directory by typing cd\Sandbox\ent_server_dockerfiles_5.0_windows\Examples\CICS.
To create the image, type bld.bat x64. Wait a few minutes for the process to run and the message saying that the image was created.
Type docker images to display a list of all of the Docker images installed on the VM. Make sure microfocus/es-acctdemo is one of them.
Run the image
To launch Enterprise Server 5.0 and the acctdemo application, at the command prompt type:
**docker run -p 16002:86/tcp -p 16002:86/udp -p 9040-9050:9040-9050 -p 9000-9010:9000-9010 -ti --network="nat" --rm microfocus/es-acctdemo:win\_5.0\_x64Install a 3270 terminal emulator such as x3270 and use it to attach, via port 9040, to the image that’s running.
Get the IP address of the acctdemo container so Docker can act as a Dynamic Host Configuration Protocol (DHCP) server for the containers it manages:
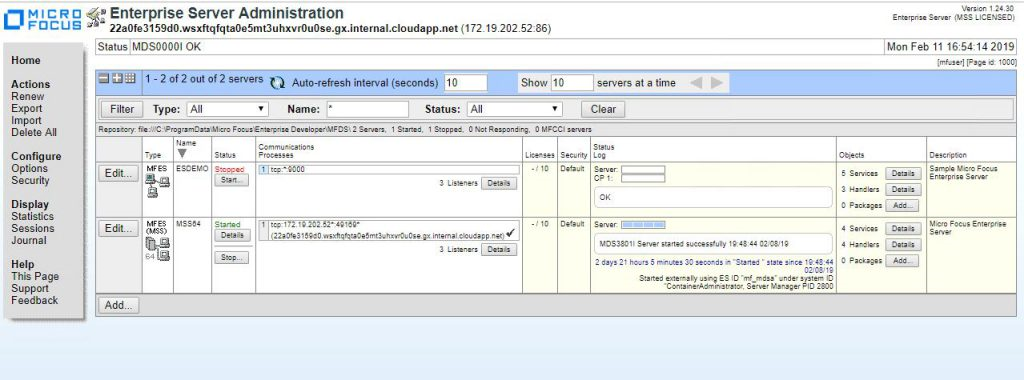
Get the ID of the running container. Type Docker ps at the command prompt and note the ID (22a0fe3159d0 in this example). Save it for the next step.
To get the IP address for the acctdemo container, use the container ID from the previous step as follows:
docker inspect \<containerID\> --format="{{range.NetworkSettings.Networks}}{{.IPAddress}}{{end}}"For example:
docker inspect 22a0fe3159d0 --format="{{range.NetworkSettings.Networks}}{{.IPAddress}}{{end}}"Note the IP address for the acctdemo image. For example, the address in the following output is 172.19.202.52.

Mount the image using the emulator. Configure the emulator to use the address of the acctdemo image and port 9040. Here, it’s 172.19.202.52:9040. Yours will be similar. The Sign on to CICS screen opens.
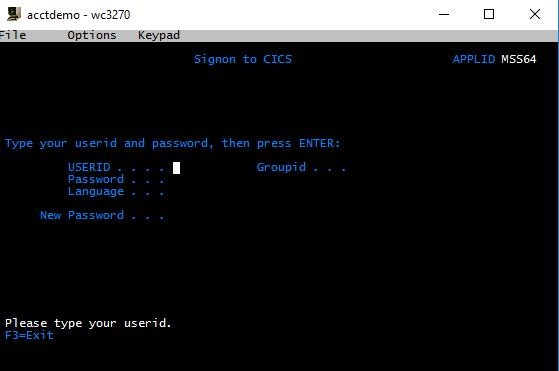
Sign in to the CICS Region by entering SYSAD for the USERID and SYSAD for the Password.
Clear the screen using the emulator’s keymap. For x3270, select the Keymap menu option.
To launch the acctdemo application, type ACCT. The initial screen for the application is displayed.
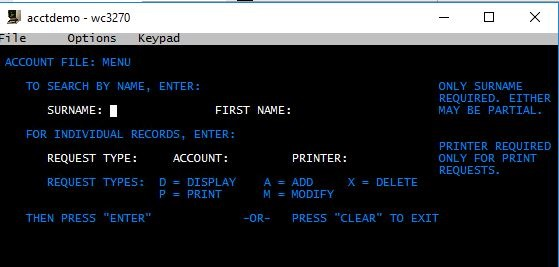
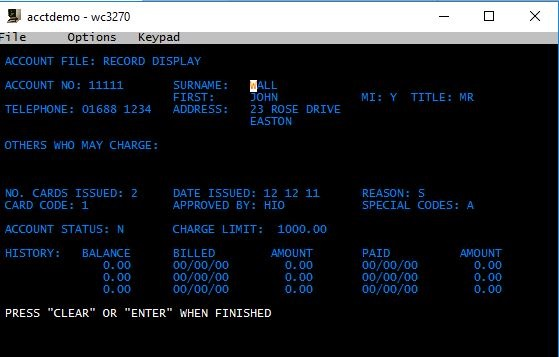
Experiment with display account types. For example, type D for the Request and 11111 for the ACCOUNT. Other account numbers to try are 22222, 33333, and so on.
To display the Enterprise Server Administration console, go to the command prompt and type start http:172.19.202.52:86.
That's it! Now you're running and managing a CICS application in a Docker container.