Quickstart: Deploy JBoss EAP Server on an Azure virtual machine using the Azure portal
This article shows you how to quickly deploy JBoss EAP Server on an Azure virtual machine (VM) using the Azure portal.
Prerequisites
- If you don't have an Azure subscription, create an Azure free account before you begin.
- Install Azure CLI.
- Install a Java SE implementation version 8 or later - for example, Microsoft build of OpenJDK.
- Install Maven, version 3.5.0 or higher.
- Ensure the Azure identity you use to sign in has either the Contributor role or the Owner role in the current subscription. For an overview of Azure roles, see What is Azure role-based access control (Azure RBAC)?
Deploy JBoss EAP Server on Azure VM
The steps in this section direct you to deploy JBoss EAP Server on Azure VMs.

The following steps show you how to find the JBoss EAP Server on Azure VM offer and fill out the Basics pane:
In the search bar at the top of the Azure portal, enter JBoss EAP. In the search results, in the Marketplace section, select JBoss EAP standalone on RHEL VM. In the drop-down menu, ensure that PAYG is selected.
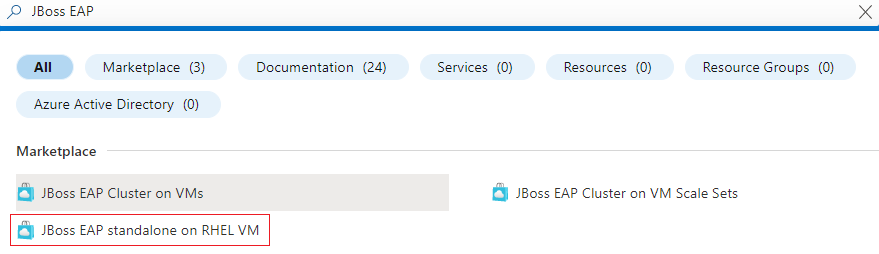
Alternatively, you can go directly to the JBoss EAP standalone on RHEL VM offer. In this case, the correct plan is already selected for you.
In either case, this offer deploys JBoss EAP by providing your Red Hat subscription at deployment time, and runs it on Red Hat Enterprise Linux using a pay-as-you-go payment configuration for the base VM.
On the offer page, select Create.
On the Basics pane, ensure the value shown in the Subscription field is the same one that has the roles listed in the prerequisites section.
You must deploy the offer in an empty resource group. In the Resource group field, select Create new and fill in a value for the resource group. Because resource groups must be unique within a subscription, pick a unique name. An easy way to have unique names is to use a combination of your initials, today's date, and some identifier. For example,
ejb0823jbosseapvm.Under Instance details, select the region for the deployment.
Leave the default VM size for Virtual machine size.
Leave the default option OpenJDK 8 for JDK version.
Leave the default value jbossuser for Username.
Leave the default option Password for Authentication type.
Fill in password for Password. Use the same value for Confirm password.
Under Optional Basic Configuration, leave the default option Yes for Accept defaults for optional configuration.
Scroll to the bottom of the Basics pane and notice the helpful links for Report issues, get help, and share feedback.
Select Next: JBoss EAP Settings.

The following steps show you how to fill out JBoss EAP Settings pane and start the deployment.
- Leave the default value jbossadmin for JBoss EAP Admin username.
- Fill in JBoss EAP password for JBoss EAP password. Use the same value for Confirm password. Write down the value for later use.
- Leave the default option No for Connect to an existing Red Hat Satellite Server?.
- Select Review + create. Ensure the green Validation Passed message appears at the top. If the message doesn't appear, fix any validation problems, then select Review + create again.
- Select Create.
- Track the progress of the deployment on the Deployment is in progress page.
Depending on network conditions and other activity in your selected region, the deployment might take up to 6 minutes to complete. After that, you should see text Your deployment is complete displayed on the deployment page.
Optional: Verify the functionality of the deployment
Open the resource group you just created in the Azure portal.
Select the VM resource named
jbosieapVm.In the Overview pane, note the Public IP address assigned to the network interface.
Copy the public IP address.
Paste the public IP address in an Internet-connected web browser, append
:9990, and press Enter. You should see the familiar Red Hat JBoss Enterprise Application Platform management console sign-in screen, as shown in the following screenshot:
Fill in the value of JBoss EAP Admin username which is jbossadmin. Fill in the value of JBoss EAP password you specified before for Password. Select Sign in.
You should see the familiar Red Hat JBoss Enterprise Application Platform management console welcome page as shown in the following screenshot.


Note
You can also follow the guide Connect to environments privately using Azure Bastion host and jumpboxes and visit the Red Hat JBoss Enterprise Application Platform management console with the URL http://<private-ip-address-of-vm>:9990.
Optional: Deploy the app to the JBoss EAP Server
The following steps show you how to create a "Hello World" application and then deploy it on JBoss EAP:
Use the following steps to create a Maven project:
Open a terminal or command prompt.
Navigate to the directory where you want to create your project.
Run the following Maven command to create a new Java web application. Be sure to replace
<package-name>with your desired package name and<project-name>with your project name.mvn archetype:generate -DgroupId=<package-name> -DartifactId=<project-name> -DarchetypeArtifactId=maven-archetype-webapp -DinteractiveMode=false
Use the following steps to update the project structure:
Navigate to the newly created project directory - for example, helloworld.
The project directory has the following structure:
helloworld
├── src
│   └── main
│       ├── java
│       └── webapp
│           └── WEB-INF
│               └── web.xml
└── pom.xml
Use the following steps to add a servlet class:
In the src/main/java directory, create a new package - for example,
com.example.Inside this package, create a new Java class named HelloWorldServlet.java with the following content:
package com.example;

import java.io.IOException;
import javax.servlet.ServletException;
import javax.servlet.annotation.WebServlet;
import javax.servlet.http.HttpServlet;
import javax.servlet.http.HttpServletRequest;
import javax.servlet.http.HttpServletResponse;

@WebServlet("/hello")
public class HelloWorldServlet extends HttpServlet {
    protected void doGet(HttpServletRequest request, HttpServletResponse response) throws ServletException, IOException {
        response.getWriter().print("Hello World!");
    }
}
Use the following steps to update the pom.xml file:
Add dependencies for Java EE APIs to your pom.xml file to ensure that you have the necessary libraries to compile the servlet:
<dependencies>
    <dependency>
        <groupId>javax.servlet</groupId>
        <artifactId>javax.servlet-api</artifactId>
        <version>4.0.1</version>
        <scope>provided</scope>
    </dependency>
</dependencies>
Build the project by running
mvn packagein the root directory of your project. This command generates a .war file in the target directory.Use the following steps to deploy the application on JBoss EAP:
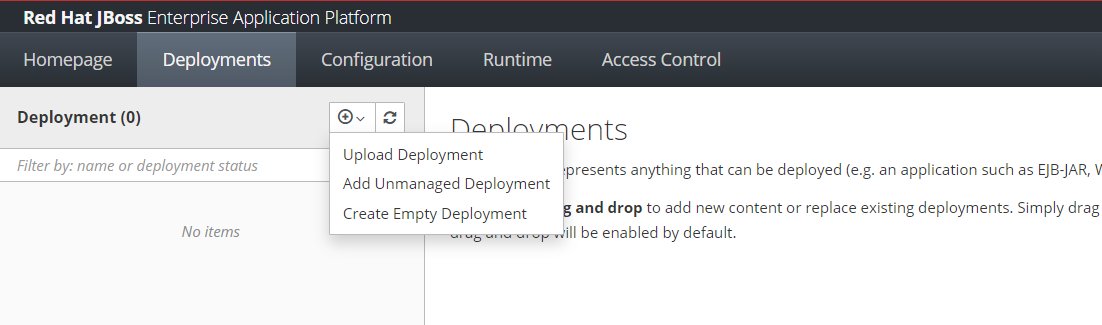
Open the JBoss EAP admin console at
http://<public-ip-address-of-ipconfig1>:9990.Deploy the .war file using the admin console by uploading the file in the Deployments section.
After deployment, access your "Hello World" application by navigating to
http://<public-ip-address-of-ipconfig1>:8080/helloworld/helloin your web browser.

Clean up resources
To avoid Azure charges, you should clean up unnecessary resources. Run the following command to remove the resource group, VM, network interface, virtual network, and all related resources.
az group delete --name <resource-group-name> --yes --no-wait
Next steps
Learn more about migrating JBoss EAP applications to JBoss EAP on Azure VMs by following these links:
Feedback
Coming soon: Throughout 2024 we will be phasing out GitHub Issues as the feedback mechanism for content and replacing it with a new feedback system. For more information see: https://aka.ms/ContentUserFeedback.
Submit and view feedback for