Note
Access to this page requires authorization. You can try signing in or changing directories.
Access to this page requires authorization. You can try changing directories.
The Azure CNI plugin enables per container/pod networking for stand-alone docker hosts and Kubernetes clusters. In this article, you learn how to install and configure the CNI plugin for a standalone Windows Docker host.
Prerequisites
- An Azure account with an active subscription. Create an account for free.
Create a virtual network and an Azure Bastion host
The following procedure creates a virtual network with a resource subnet, an Azure Bastion subnet, and a Bastion host:
In the portal, search for and select Virtual networks.
On the Virtual networks page, select + Create.
On the Basics tab of Create virtual network, enter, or select the following information:
Setting Value Project details Subscription Select your subscription. Resource group Select Create new.
Enter test-rg for the name.
Select OK.Instance details Name Enter vnet-1. Region Select East US 2. 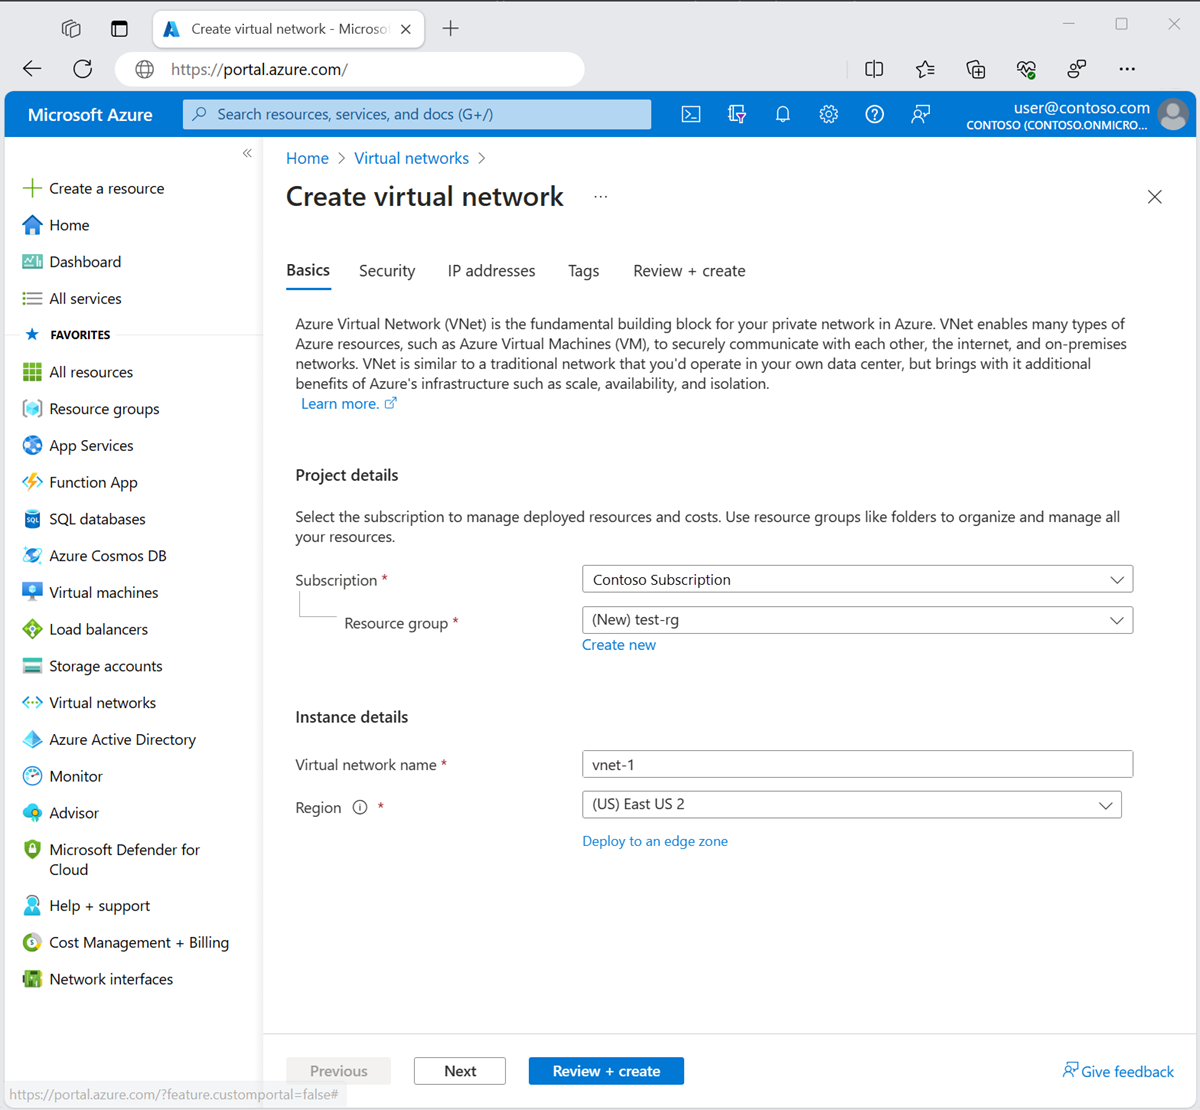
Select Next to proceed to the Security tab.
In the Azure Bastion section, select Enable Azure Bastion.
Bastion uses your browser to connect to VMs in your virtual network over Secure Shell (SSH) or Remote Desktop Protocol (RDP) by using their private IP addresses. The VMs don't need public IP addresses, client software, or special configuration. For more information, see What is Azure Bastion?.
In Azure Bastion, enter or select the following information:
Setting Value Azure Bastion host name Enter bastion. Azure Bastion public IP address Select Create a public IP address.
Enter public-ip-bastion in Name.
Select OK.
Select Next to proceed to the IP Addresses tab.
In the address space box in Subnets, select the default subnet.
In Edit subnet, enter or select the following information:
Setting Value Subnet purpose Leave the default of Default. Name Enter subnet-1. IPv4 IPv4 address range Leave the default of 10.0.0.0/16. Starting address Leave the default of 10.0.0.0. Size Leave the default of /24 (256 addresses). 
Select Save.
Select Review + create at the bottom of the window. When validation passes, select Create.

It can take a few minutes for the network and Bastion host to deploy. Continue with the next steps when the deployment is complete or the virtual network creation is complete.
Create test virtual machine
The following procedure creates a test virtual machine (VM) named vm-1 in the virtual network.
In the portal, search for and select Virtual machines.
In Virtual machines, select + Create, then Azure virtual machine.
On the Basics tab of Create a virtual machine, enter or select the following information:
Setting Value Project details Subscription Select your subscription. Resource group Select test-rg. Instance details Virtual machine name Enter vm-1. Region Select East US 2. Availability options Select No infrastructure redundancy required. Security type Leave the default of Standard. Image Select Windows Server 2022 Datacenter - x64 Gen2. VM architecture Leave the default of x64. Size Select a size. Administrator account Authentication type Select Password. Username Enter azureuser. Password Enter a password. Confirm password Reenter the password. Inbound port rules Public inbound ports Select None. Select the Networking tab at the top of the page.
Enter or select the following information in the Networking tab:
Setting Value Network interface Virtual network Select vnet-1. Subnet Select subnet-1 (10.0.0.0/24). Public IP Select None. NIC network security group Select Advanced. Configure network security group Select Create new.
Enter nsg-1 for the name.
Leave the rest at the defaults and select OK.Leave the rest of the settings at the defaults and select Review + create.
Review the settings and select Create.
Note
Virtual machines in a virtual network with a bastion host don't need public IP addresses. Bastion provides the public IP, and the VMs use private IPs to communicate within the network. You can remove the public IPs from any VMs in bastion hosted virtual networks. For more information, see Dissociate a public IP address from an Azure VM.
Note
Azure provides a default outbound access IP for VMs that either aren't assigned a public IP address or are in the backend pool of an internal basic Azure load balancer. The default outbound access IP mechanism provides an outbound IP address that isn't configurable.
The default outbound access IP is disabled when one of the following events happens:
- A public IP address is assigned to the VM.
- The VM is placed in the backend pool of a standard load balancer, with or without outbound rules.
- An Azure NAT Gateway resource is assigned to the subnet of the VM.
VMs that you create by using virtual machine scale sets in flexible orchestration mode don't have default outbound access.
For more information about outbound connections in Azure, see Default outbound access in Azure and Use Source Network Address Translation (SNAT) for outbound connections.
Add IP configuration
The Azure CNI plugin allocates IP addresses to containers based on a pool of IP addresses you create on the virtual network interface of the virtual machine. For every container on the host, an IP configuration must exist on the virtual network interface. If the number of containers on the server outnumber the IP configurations on the virtual network interface, the container starts but doesn't have an IP address.
In this section, you add an IP configuration to the virtual network interface of the virtual machine you created previously.
In the search box at the top of the portal, enter Virtual machine. Select Virtual machines in the search results.
Select vm-1.
In Settings, select Networking.
Select the name of the network interface next to Network Interface:. The network interface is named vm-1 with a random number.
In Settings of the network interface, select IP configurations.
in IP configurations, select ipconfig1 in Name.
In the ipconfig1 settings, change the assignment of the private IP address from Dynamic to Static.
Select Save.
Return to IP configurations.
Select + Add.
Enter or select the following information for Add IP configuration:
Setting Value Name Enter ipconfig-2. Private IP address settings Allocation Select Static. IP address Enter 10.0.0.5. Select OK.
Verify ipconfig2 has been added as a secondary IP configuration.
Repeat steps 1 through 13 to add as many configurations as containers you wish to deploy on the container host.
Configure IP addresses in Windows
To assign multiple IP addresses to a Windows virtual machine, the IP addressees must be added to the network interface in Windows. In this section, you'll sign-in to the virtual machine and configure the IP configurations you created in the previous section.
In the search box at the top of the portal, enter Virtual machine. Select Virtual machines in the search results.
Select vm-1.
In the Overview of vm-1, select Connect then Bastion.
Enter the username and password you created when you deployed the virtual machine in the previous steps.
Select Connect.
Open the network connections configuration on the virtual machine. Select Start -> Run and enter
ncpa.cpl.Select OK.
Select the network interface of the virtual machine, then Properties:

In Ethernet Properties, select Internet Protocol Version 4 (TCP/IPv4), then Properties.
Enter or select the following information in the General tab:
Setting Value Select Use the following IP address: IP address: Enter 10.0.0.4 Subnet mask: Enter 255.255.255.0 Default gateway Enter 10.0.0.1 Select Use the following DNS server addresses: Preferred DNS server: Enter 168.63.129.16 This IP is the DHCP assigned IP address for the default Azure DNS Select Advanced....
in IP addresses, select Add....
Enter or select the following information:
Setting Value TCP/IP Address IP address: Enter 10.0.0.5 Subnet mask: Enter 255.255.255.0 Select Add.
To add more IP addresses that correspond with any extra IP configurations created previously, select Add.
Select OK.
Select OK.
Select OK.
The Bastion connection drops for a few seconds as the network configuration is applied. Wait a few seconds then attempt to reconnect. Continue when a reconnection is successful.
Install Docker
The Docker container engine must be installed and configured on the virtual machine you created previously.
Sign-in to the virtual machine you created previously with the Azure Bastion host you deployed with the virtual network.
In the search box at the top of the portal, enter Virtual machine. Select Virtual machines in the search results.
Select vm-1.
In the Overview of vm-1, select Connect then Bastion.
Enter the username and password you created when you deployed the virtual machine in the previous steps.
Select Connect.
Open Windows PowerShell on vm-1.
The following example installs Docker CE/Moby:
Invoke-WebRequest -UseBasicParsing "https://raw.githubusercontent.com/microsoft/Windows-Containers/Main/helpful_tools/Install-DockerCE/install-docker-ce.ps1" -o install-docker-ce.ps1

.\install-docker-ce.ps1
The virtual machine reboots to install the container support in Windows. Reconnect to the virtual machine and the Docker install continues.
For more information about Windows containers, see, Get started: Prep Windows for containers.
After Docker is installed on your virtual machine, continue with the steps in this article.
Install CNI plugin and jq
The Azure CNI plugin is maintained as a GitHub project and is available for download from the project's GitHub page. For this article, you download the CNI plugin repository within the virtual machine and then install and configure the plugin.
For more information about the Azure CNI plugin, see Microsoft Azure Container Networking.
In the search box at the top of the portal, enter Virtual machine. Select Virtual machines in the search results.
Select vm-1.
In the Overview of vm-1, select Connect then Bastion.
Enter the username and password you created when you deployed the virtual machine in the previous steps.
Select Connect.
Use the following example to download and extract the CNI plugin to a temporary folder in the virtual machine:
Invoke-WebRequest -Uri https://github.com/Azure/azure-container-networking/archive/refs/heads/master.zip -OutFile azure-container-networking.zip

Expand-Archive azure-container-networking.zip -DestinationPath azure-container-networking
To install the CNI plugin, change to the scripts directory of the CNI plugin folder you downloaded in the previous step. The install script command requires a version number for the CNI plugin. At the time of the writing of this article, the newest version is
v1.4.39. To obtain the latest version number of the plugin or previous versions, see Releases.cd .\azure-container-networking\azure-container-networking-master\scripts\ .\Install-CniPlugin.ps1 v1.4.39The CNI plugin comes with a built-in network configuration file for the plugin. Use the following example to copy the file to the network configuration directory:
Copy-Item -Path "c:\k\azurecni\bin\10-azure.conflist" -Destination "c:\k\azurecni\netconf"
Install jq
The script that creates the containers with the Azure CNI plugin requires the application jq. For more information and download location, see Download jq.
Open a web browser in the virtual machine and download the jq application.
The download is a self-contained executable for the application. Copy the executable
jq-win64.exeto theC:\Windowsdirectory.
Create test container
To start a container with the CNI plugin, you must use a special script that comes with the plugin to create and start the container. The following example creates a Windows Server container with the CNI plugin script:
cd .\azure-container-networking\azure-container-networking-master\scripts\
.\docker-exec.ps1 vnetdocker1 default mcr.microsoft.com/windows/servercore/iis add
It can take a few minutes for the image for the container to download for the first time. When the container starts and initializes the network, the Bastion connection disconnects. Wait a few seconds and the connection reestablish.
To verify that the container received the IP address you previously configured, connect to the container and view the IP:
docker exec -it vnetdocker1 powershellUse the
ipconfigcommand in the following example to verify the IP address was assigned to the container:ipconfig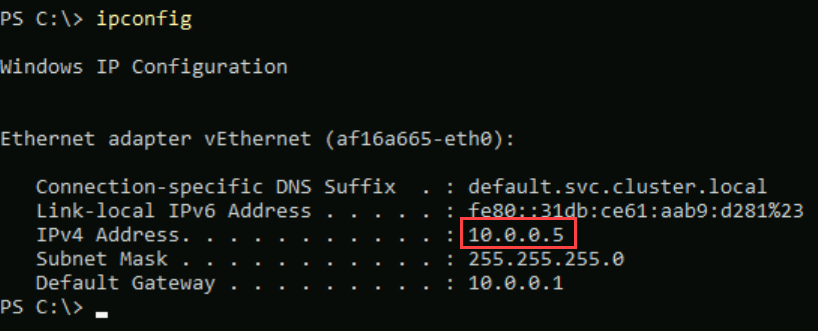
Exit the container and close the Bastion connection to vm-1.
When you finish using the resources that you created, you can delete the resource group and all its resources.
In the Azure portal, search for and select Resource groups.
On the Resource groups page, select the test-rg resource group.
On the test-rg page, select Delete resource group.
Enter test-rg in Enter resource group name to confirm deletion, and then select Delete.
Next steps
In this article, you learned how to install the Azure CNI plugin and create a test container.
For more information about Azure container networking and Azure Kubernetes service, see: