Manage a public IP address with an Azure Virtual Machine

Public IP addresses are available in two SKUs; standard, and basic. The selection of SKU determines the features of the IP address. The SKU determines the resources that the IP address can be associated with.

Azure Virtual Machines is the main compute service in Azure. Customers can create Linux or Windows virtual machines. A public IP address can be assigned to a virtual machine for inbound connections to the virtual machine.

A virtual machine doesn't require a public IP address for its configuration.

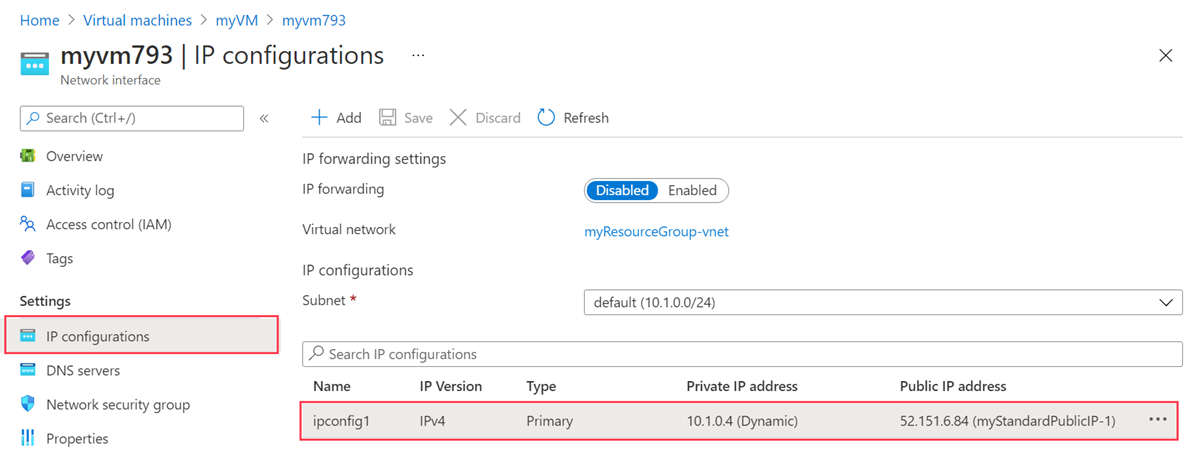
In this article, you'll learn how to create an Azure Virtual Machine using an existing public IP in your subscription. You'll learn how to add a public IP address to a virtual machine. You'll change the IP address. Finally, you'll learn how to remove the public IP.

Prerequisites

There are three itmes required:

  • Two standard SKU public IP addresses in your subscription. The IP address can't be associated with any resources. For more information on creating a standard SKU public IP address, see Create a public IP - Azure portal. For the examples in this article, name the new public IP addresses myStandardPublicIP-1 and myStandardPublicIP-2.

Create virtual machine existing public IP

In this section, you'll create a virtual machine. You'll select the IP address you created in the prerequisites as the public IP for the virtual machine.

  1. Sign in to the Azure portal.

  2. In the search box at the top of the portal, enter Virtual machine.

  3. In the search results, select Virtual machines.

  4. Select + Add then + Virtual machine.

  5. In Create a virtual machine, enter or select the following information.

    Setting Value
    Project details
    Subscription Select your subscription.
    Resource group Select Create new.
    Enter myResourceGroupVM.
    Select OK.
    Instance details
    Virtual machine name Enter myVM.
    Region Select (US) West US 2.
    Availability options Select No infrastructure redundancy required.
    Image Select Windows Server 2019 Datacenter - Gen1.
    Azure Spot instance Leave the default of unchecked.
    Size Select a size for the virtual machine
    Administrator account
    Username Enter a username.
    Password Enter a password.
    Confirm password Confirm the password.
    Inbound port rules
    Public inbound ports Leave the default of Allow selected ports.
    Select inbound ports Leave the default of RDP (3389).
  6. Select the Networking tab, or select Next: Disks then Next: Networking.

  7. In the Networking tab, enter or select the following information.

    Setting Value
    Network interface
    Virtual network Leave the default of (new) myResourceGroupVM-vnet.
    Subnet Leave the default of (new) default (10.1.0.0/24).
    Public IP Select myStandardPublicIP-1.
    NIC network security group Leave the default of Basic.
    Public inbound ports Leave the default of Allow selected ports.
    Select inbound ports Leave the default of RDP (3389).
  8. Select the Review + create tab, or select the blue Review + create button.

  9. Select Create.

    Note

    This is a simple deployment of Azure Virtual Machine. For advanced configuration and setup, see Quickstart: Create a Windows virtual machine in the Azure portal

    For more information on Azure Virtual Machines, see Windows virtual machines in Azure

Change public IP address

In this section, you'll change the public IP address associated with the default public IP configuration of the virtual machine.

  1. In the search box at the top of the portal, enter Virtual machine.

  2. In the search results, select Virtual machines.

  3. Select myVM in Virtual machines.

  4. Select Networking in Settings in myVM.

  5. In Networking, select the Network interface of the VM. The name of the NIC will be prefixed with the name of the VM and end with a random number. In this example, it's myvm793.

    Select network interface.

  6. In Settings of the network interface, select IP configurations.

  7. Select ipconfig1 in IP configurations.

    Select the ipconfig to change the IP address.

  8. Select myStandardPublicIP-2 in Public IP address of ipconfig1.

  9. Select Save.

Add public IP configuration

In this section, you'll add a public IP configuration to the virtual machine.

For more information on adding multiple IP addresses, see Assign multiple IP addresses to virtual machines using the Azure portal.

For more information for using both types of routing preference, see Configure both routing preference options for a virtual machine.

  1. In the search box at the top of the portal, enter Virtual machine.

  2. In the search results, select Virtual machines.

  3. Select myVM in Virtual machines.

  4. Select Networking in Settings in myVM.

  5. In Networking, select the Network interface of the VM. The name of the NIC will be prefixed with the name of the VM and end with a random number. In this example, it's myvm793.

    Select network interface.

  6. In Settings of the network interface, select IP configurations.

  7. In IP configurations, select + Add.

  8. Enter ipconfig2 in Name.

  9. In Public IP address, select Associate.

  10. Select myStandardPublicIP-3 in Public IP address.

  11. Select OK.

Remove public IP address association

In this section, you'll remove the public IP address from the network interface. The virtual machine after this process will be unavailable to external connections.

  1. In the search box at the top of the portal, enter Virtual machine.

  2. In the search results, select Virtual machines.

  3. Select myVM in Virtual machines.

  4. Select Networking in Settings in myVM.

  5. In Networking, select the Network interface of the VM. The name of the NIC will be prefixed with the name of the VM and end with a random number. In this example, it's myvm793.

    Select network interface.

  6. In Settings of the network interface, select IP configurations.

  7. Select ipconfig1 in IP configurations.

    Select the ipconfig to change the IP address.

  8. Select Disassociate in Public IP address settings.

  9. Select Save.

Next step