Learn how to create an Azure Virtual Network (VNet) using the Azure portal, Azure CLI, Azure PowerShell, Azure Resource Manager (ARM) template, Bicep template, and Terraform. Two virtual machines and an Azure Bastion host are deployed to test connectivity between the virtual machines in the same virtual network. The Azure Bastion host facilitates secure and seamless RDP and SSH connectivity to the virtual machines directly in the Azure portal over SSL.
A virtual network is the fundamental building block for private networks in Azure. Azure Virtual Network enables Azure resources such as virtual machines to securely communicate with each other and the internet.
Sign in to Azure
Sign in to the Azure portal with your Azure account.
Create a virtual network and an Azure Bastion host
The following procedure creates a virtual network with a resource subnet, an Azure Bastion subnet, and a Bastion host:
In the portal, search for and select Virtual networks.
On the Virtual networks page, select + Create.
On the Basics tab of Create virtual network, enter, or select the following information:
| Setting |
Value |
| Project details |
|
| Subscription |
Select your subscription. |
| Resource group |
Select Create new.
Enter test-rg for the name.
Select OK. |
| Instance details |
|
| Name |
Enter vnet-1. |
| Region |
Select East US 2. |
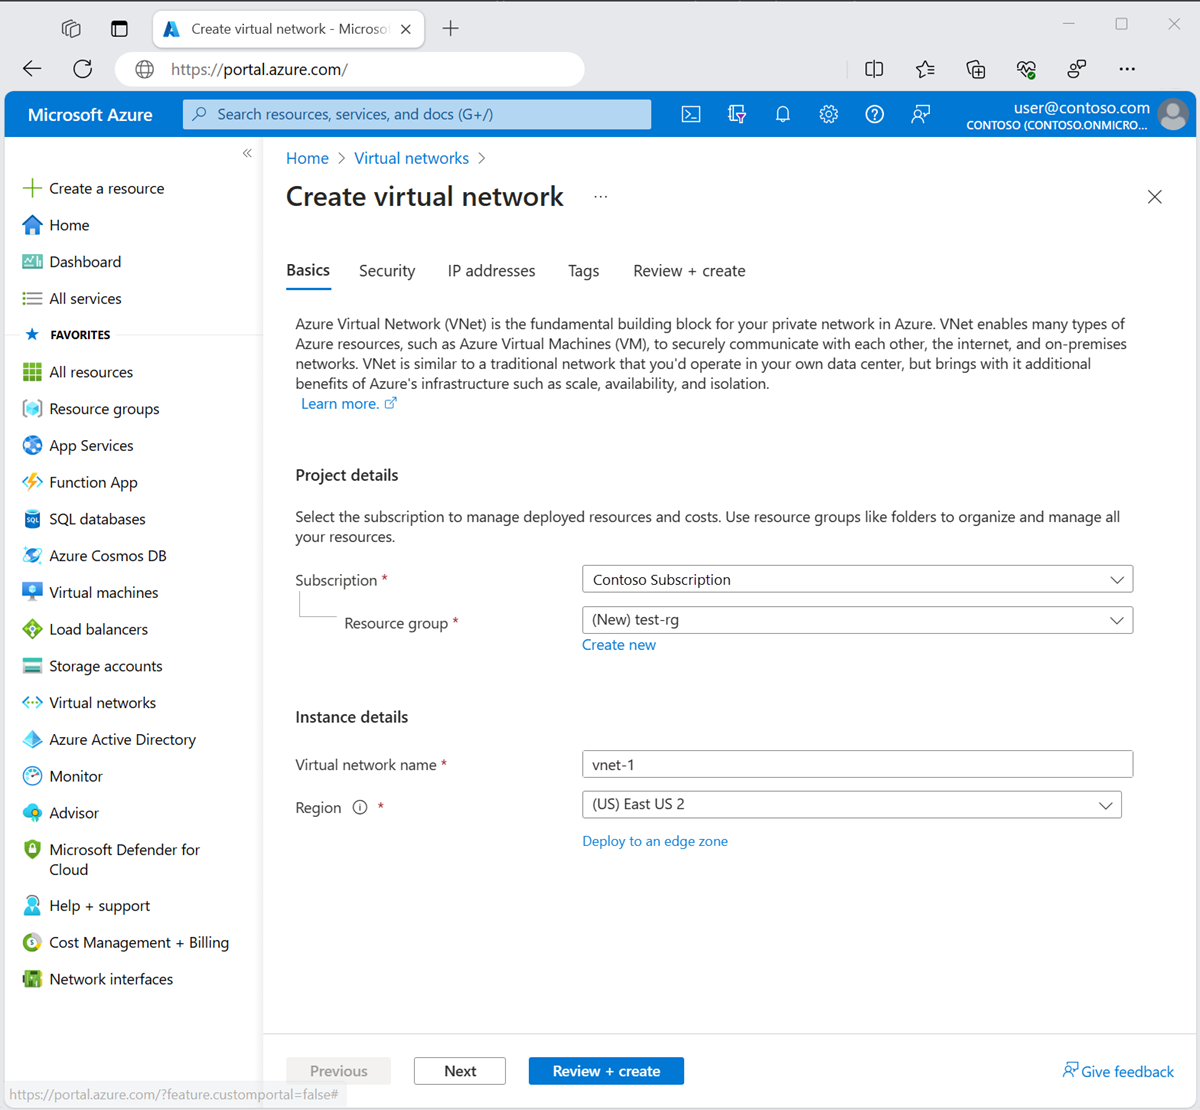
Select Next to proceed to the Security tab.
In the Azure Bastion section, select Enable Azure Bastion.
Bastion uses your browser to connect to VMs in your virtual network over Secure Shell (SSH) or Remote Desktop Protocol (RDP) by using their private IP addresses. The VMs don't need public IP addresses, client software, or special configuration. For more information, see What is Azure Bastion?.
Note
Hourly pricing starts from the moment that Bastion is deployed, regardless of outbound data usage. For more information, see Pricing and SKUs. If you're deploying Bastion as part of a tutorial or test, we recommend that you delete this resource after you finish using it.
In Azure Bastion, enter or select the following information:
| Setting |
Value |
| Azure Bastion host name |
Enter bastion. |
| Azure Bastion public IP address |
Select Create a public IP address.
Enter public-ip-bastion in Name.
Select OK. |

Select Next to proceed to the IP Addresses tab.
In the address space box in Subnets, select the default subnet.
In Edit subnet, enter or select the following information:
| Setting |
Value |
| Subnet purpose |
Leave the default of Default. |
| Name |
Enter subnet-1. |
| IPv4 |
|
| IPv4 address range |
Leave the default of 10.0.0.0/16. |
| Starting address |
Leave the default of 10.0.0.0. |
| Size |
Leave the default of /24 (256 addresses). |

Select Save.
Select Review + create at the bottom of the window. When validation passes, select Create.
Create virtual machines
The following procedure creates two VMs named vm-1 and vm-2 in the virtual network:
In the portal, search for and select Virtual machines.
In Virtual machines, select + Create, and then select Azure virtual machine.
On the Basics tab of Create a virtual machine, enter or select the following information:
| Setting |
Value |
| Project details |
|
| Subscription |
Select your subscription. |
| Resource group |
Select test-rg. |
| Instance details |
|
| Virtual machine name |
Enter vm-1. |
| Region |
Select East US 2. |
| Availability options |
Select No infrastructure redundancy required. |
| Security type |
Leave the default of Standard. |
| Image |
Select Ubuntu Server 22.04 LTS - x64 Gen2. |
| VM architecture |
Leave the default of x64. |
| Size |
Select a size. |
| Administrator account |
|
| Authentication type |
Select Password. |
| Username |
Enter azureuser. |
| Password |
Enter a password. |
| Confirm password |
Reenter the password. |
| Inbound port rules |
|
| Public inbound ports |
Select None. |
Select the Networking tab. Enter or select the following information:
| Setting |
Value |
| Network interface |
|
| Virtual network |
Select vnet-1. |
| Subnet |
Select subnet-1 (10.0.0.0/24). |
| Public IP |
Select None. |
| NIC network security group |
Select Advanced. |
| Configure network security group |
Select Create new.
Enter nsg-1 for the name.
Leave the rest at the defaults and select OK. |
Leave the rest of the settings at the defaults and select Review + create.
Review the settings and select Create.
Wait for the first virtual machine to deploy then repeat the previous steps to create a second virtual machine with the following settings:
| Setting |
Value |
| Virtual machine name |
Enter vm-2. |
| Virtual network |
Select vnet-1. |
| Subnet |
Select subnet-1 (10.0.0.0/24). |
| Public IP |
Select None. |
| NIC network security group |
Select Advanced. |
| Configure network security group |
Select nsg-1. |
Note
Virtual machines in a virtual network with an Azure Bastion host don't need public IP addresses. Bastion provides the public IP, and the VMs use private IPs to communicate within the network. You can remove the public IPs from any VMs in Bastion-hosted virtual networks. For more information, see Dissociate a public IP address from an Azure VM.
Note
Azure provides a default outbound access IP for VMs that either aren't assigned a public IP address or are in the backend pool of an internal basic Azure load balancer. The default outbound access IP mechanism provides an outbound IP address that isn't configurable.
The default outbound access IP is disabled when one of the following events happens:
- A public IP address is assigned to the VM.
- The VM is placed in the backend pool of a standard load balancer, with or without outbound rules.
- An Azure NAT Gateway resource is assigned to the subnet of the VM.
VMs that you create by using virtual machine scale sets in flexible orchestration mode don't have default outbound access.
For more information about outbound connections in Azure, see Default outbound access in Azure and Use Source Network Address Translation (SNAT) for outbound connections.
Create a resource group
Use New-AzResourceGroup to create a resource group to host the virtual network. Run the following code to create a resource group named test-rg in the eastus2 Azure region:
$rg = @{
    Name = 'test-rg'
    Location = 'eastus2'
}
New-AzResourceGroup @rg
Create a virtual network
Use New-AzVirtualNetwork to create a virtual network named vnet-1 with IP address prefix 10.0.0.0/16 in the test-rg resource group and eastus2 location:
$vnet = @{
    Name = 'vnet-1'
    ResourceGroupName = 'test-rg'
    Location = 'eastus2'
    AddressPrefix = '10.0.0.0/16'
}
$virtualNetwork = New-AzVirtualNetwork @vnet
Azure deploys resources to a subnet within a virtual network. Use Add-AzVirtualNetworkSubnetConfig to create a subnet configuration named subnet-1 with address prefix 10.0.0.0/24:
$subnet = @{
    Name = 'subnet-1'
    VirtualNetwork = $virtualNetwork
    AddressPrefix = '10.0.0.0/24'
}
$subnetConfig = Add-AzVirtualNetworkSubnetConfig @subnet
Associate the subnet configuration to the virtual network by using Set-AzVirtualNetwork:
$virtualNetwork | Set-AzVirtualNetwork
Deploy Azure Bastion
Azure Bastion uses your browser to connect to virtual machines in your virtual network over Secure Shell (SSH) or Remote Desktop Protocol (RDP) by using their private IP addresses. The virtual machines don't need public IP addresses, client software, or special configuration. For more information about Azure Bastion, see What is Azure Bastion?.
Hourly pricing starts from the moment that Bastion is deployed, regardless of outbound data usage. For more information, see Pricing and SKUs. If you're deploying Bastion as part of a tutorial or test, we recommend that you delete this resource after you finish using it.
Configure a Bastion subnet for your virtual network. This subnet is reserved exclusively for Bastion resources and must be named AzureBastionSubnet.
$subnet = @{
    Name = 'AzureBastionSubnet'
    VirtualNetwork = $virtualNetwork
    AddressPrefix = '10.0.1.0/26'
}
$subnetConfig = Add-AzVirtualNetworkSubnetConfig @subnet
Set the configuration:
$virtualNetwork | Set-AzVirtualNetwork
Create a public IP address for Bastion. The Bastion host uses the public IP to access SSH and RDP over port 443.
$ip = @{
        ResourceGroupName = 'test-rg'
        Name = 'public-ip'
        Location = 'eastus2'
        AllocationMethod = 'Static'
        Sku = 'Standard'
        Zone = 1,2,3
}
New-AzPublicIpAddress @ip
Use the New-AzBastion command to create a new Standard SKU Bastion host in AzureBastionSubnet:
$bastion = @{
    Name = 'bastion'
    ResourceGroupName = 'test-rg'
    PublicIpAddressRgName = 'test-rg'
    PublicIpAddressName = 'public-ip'
    VirtualNetworkRgName = 'test-rg'
    VirtualNetworkName = 'vnet-1'
    Sku = 'Basic'
}
New-AzBastion @bastion
It takes about 10 minutes to deploy the Bastion resources. You can create virtual machines in the next section while Bastion deploys to your virtual network.
Create virtual machines
Use New-AzVM to create two virtual machines named vm-1 and vm-2 in the subnet-1 subnet of the virtual network. When you're prompted for credentials, enter usernames and passwords for the virtual machines.
To create the first virtual machine, use the following code:
# Set the administrator and password for the virtual machine. ##
$cred = Get-Credential

## Place the virtual network into a variable. ##
$vnet = Get-AzVirtualNetwork -Name 'vnet-1' -ResourceGroupName 'test-rg'

## Create a network interface for the virtual machine. ##
$nic = @{
    Name = "nic-1"
    ResourceGroupName = 'test-rg'
    Location = 'eastus2'
    Subnet = $vnet.Subnets[0]
}
$nicVM = New-AzNetworkInterface @nic

## Create a virtual machine configuration. ##
$vmsz = @{
    VMName = "vm-1"
    VMSize = 'Standard_DS1_v2'
}
$vmos = @{
    ComputerName = "vm-1"
    Credential = $cred
}
$vmimage = @{
    PublisherName = 'Canonical'
    Offer = '0001-com-ubuntu-server-jammy'
    Skus = '22_04-lts-gen2'
    Version = 'latest'
}
$vmConfig = New-AzVMConfig @vmsz `
    | Set-AzVMOperatingSystem @vmos -Linux `
    | Set-AzVMSourceImage @vmimage `
    | Add-AzVMNetworkInterface -Id $nicVM.Id

## Create the virtual machine. ##
$vm = @{
    ResourceGroupName = 'test-rg'
    Location = 'eastus2'
    VM = $vmConfig
}
New-AzVM @vm
To create the second virtual machine, use the following code:
# Set the administrator and password for the virtual machine. ##
$cred = Get-Credential

## Place the virtual network into a variable. ##
$vnet = Get-AzVirtualNetwork -Name 'vnet-1' -ResourceGroupName 'test-rg'

## Create a network interface for the virtual machine. ##
$nic = @{
    Name = "nic-2"
    ResourceGroupName = 'test-rg'
    Location = 'eastus2'
    Subnet = $vnet.Subnets[0]
}
$nicVM = New-AzNetworkInterface @nic

## Create a virtual machine configuration. ##
$vmsz = @{
    VMName = "vm-2"
    VMSize = 'Standard_DS1_v2'
}
$vmos = @{
    ComputerName = "vm-2"
    Credential = $cred
}
$vmimage = @{
    PublisherName = 'Canonical'
    Offer = '0001-com-ubuntu-server-jammy'
    Skus = '22_04-lts-gen2'
    Version = 'latest'
}
$vmConfig = New-AzVMConfig @vmsz `
    | Set-AzVMOperatingSystem @vmos -Linux `
    | Set-AzVMSourceImage @vmimage `
    | Add-AzVMNetworkInterface -Id $nicVM.Id

## Create the virtual machine. ##
$vm = @{
    ResourceGroupName = 'test-rg'
    Location = 'eastus2'
    VM = $vmConfig
}
New-AzVM @vm
Tip
You can use the -AsJob option to create a virtual machine in the background while you continue with other tasks. For example, run New-AzVM @vm1 -AsJob. When Azure starts creating the virtual machine in the background, you get something like the following output:
Id     Name            PSJobTypeName   State         HasMoreData     Location             Command
--     ----            -------------   -----         -----------     --------             -------
1      Long Running... AzureLongRun... Running       True            localhost            New-AzVM
Azure takes a few minutes to create the virtual machines. When Azure finishes creating the virtual machines, it returns the output to PowerShell.
Note
Virtual machines in a virtual network with a Bastion host don't need public IP addresses. Bastion provides the public IP, and the virtual machines use private IPs to communicate within the network. You can remove the public IPs from any virtual machines in Bastion-hosted virtual networks. For more information, see Dissociate a public IP address from an Azure VM.
Note
Azure provides a default outbound access IP for VMs that either aren't assigned a public IP address or are in the backend pool of an internal basic Azure load balancer. The default outbound access IP mechanism provides an outbound IP address that isn't configurable.
The default outbound access IP is disabled when one of the following events happens:
- A public IP address is assigned to the VM.
- The VM is placed in the backend pool of a standard load balancer, with or without outbound rules.
- An Azure NAT Gateway resource is assigned to the subnet of the VM.
VMs that you create by using virtual machine scale sets in flexible orchestration mode don't have default outbound access.
For more information about outbound connections in Azure, see Default outbound access in Azure and Use Source Network Address Translation (SNAT) for outbound connections.
Create a resource group
Use az group create to create a resource group to host the virtual network. Use the following code to create a resource group named test-rg in the eastus2 Azure region:
az group create \
    --name test-rg \
    --location eastus2
Create a virtual network and subnet
Use az network vnet create to create a virtual network named vnet-1 with a subnet named subnet-1 in the test-rg resource group:
az network vnet create \
    --name vnet-1 \
    --resource-group test-rg \
    --address-prefix 10.0.0.0/16 \
    --subnet-name subnet-1 \
    --subnet-prefixes 10.0.0.0/24
Deploy Azure Bastion
Azure Bastion uses your browser to connect to virtual machines in your virtual network over Secure Shell (SSH) or Remote Desktop Protocol (RDP) by using their private IP addresses. The virtual machines don't need public IP addresses, client software, or special configuration.
Hourly pricing starts from the moment that Bastion is deployed, regardless of outbound data usage. For more information, see Pricing and SKUs. If you're deploying Bastion as part of a tutorial or test, we recommend that you delete this resource after you finish using it. For more information about Azure Bastion, see What is Azure Bastion?.
Use az network vnet subnet create to create a Bastion subnet for your virtual network. This subnet is reserved exclusively for Bastion resources and must be named AzureBastionSubnet.
az network vnet subnet create \
    --name AzureBastionSubnet \
    --resource-group test-rg \
    --vnet-name vnet-1 \
    --address-prefix 10.0.1.0/26
Create a public IP address for Bastion. This IP address is used to connect to the Bastion host from the internet. Use az network public-ip create to create a public IP address named public-ip in the test-rg resource group:
az network public-ip create \
    --resource-group test-rg \
    --name public-ip \
    --sku Standard \
    --location eastus2 \
    --zone 1 2 3
Use az network bastion create to create a Bastion host in AzureBastionSubnet for your virtual network:
az network bastion create \
    --name bastion \
    --public-ip-address public-ip \
    --resource-group test-rg \
    --vnet-name vnet-1 \
    --location eastus2
It takes about 10 minutes to deploy the Bastion resources. You can create virtual machines in the next section while Bastion deploys to your virtual network.
Create virtual machines
Use az vm create to create two virtual machines named vm-1 and vm-2 in the subnet-1 subnet of the virtual network. When you're prompted for credentials, enter usernames and passwords for the virtual machines.
To create the first virtual machine, use the following command:
az vm create \
    --resource-group test-rg \
    --admin-username azureuser \
    --authentication-type password \
    --name vm-1 \
    --image Ubuntu2204 \
    --public-ip-address ""
To create the second virtual machine, use the following command:
az vm create \
    --resource-group test-rg \
    --admin-username azureuser \
    --authentication-type password \
    --name vm-2 \
    --image Ubuntu2204 \
    --public-ip-address ""
Tip
You can also use the --no-wait option to create a virtual machine in the background while you continue with other tasks.
The virtual machines take a few minutes to create. After Azure creates each virtual machine, the Azure CLI returns an output similar to the following message:
    {
      "fqdns": "",
      "id": "/subscriptions/00000000-0000-0000-0000-000000000000/resourceGroups/test-rg/providers/Microsoft.Compute/virtualMachines/vm-2",
      "location": "eastus2",
      "macAddress": "00-0D-3A-23-9A-49",
      "powerState": "VM running",
      "privateIpAddress": "10.0.0.5",
      "publicIpAddress": "",
      "resourceGroup": "test-rg"
      "zones": ""
    }
Note
Virtual machines in a virtual network with a Bastion host don't need public IP addresses. Bastion provides the public IP, and the virtual machines use private IPs to communicate within the network. You can remove the public IPs from any virtual machines in Bastion-hosted virtual networks. For more information, see Dissociate a public IP address from an Azure VM.
Note
Azure provides a default outbound access IP for VMs that either aren't assigned a public IP address or are in the backend pool of an internal basic Azure load balancer. The default outbound access IP mechanism provides an outbound IP address that isn't configurable.
The default outbound access IP is disabled when one of the following events happens:
- A public IP address is assigned to the VM.
- The VM is placed in the backend pool of a standard load balancer, with or without outbound rules.
- An Azure NAT Gateway resource is assigned to the subnet of the VM.
VMs that you create by using virtual machine scale sets in flexible orchestration mode don't have default outbound access.
For more information about outbound connections in Azure, see Default outbound access in Azure and Use Source Network Address Translation (SNAT) for outbound connections.
Review the template
The template that you use in this quickstart is from Azure Quickstart Templates.
{
  "$schema": "https://schema.management.azure.com/schemas/2019-04-01/deploymentTemplate.json#",
  "contentVersion": "1.0.0.0",
  "metadata": {
    "_generator": {
      "name": "bicep",
      "version": "0.6.18.56646",
      "templateHash": "10806234693722113459"
    }
  },
  "parameters": {
    "vnetName": {
      "type": "string",
      "defaultValue": "VNet1",
      "metadata": {
        "description": "VNet name"
      }
    },
    "vnetAddressPrefix": {
      "type": "string",
      "defaultValue": "10.0.0.0/16",
      "metadata": {
        "description": "Address prefix"
      }
    },
    "subnet1Prefix": {
      "type": "string",
      "defaultValue": "10.0.0.0/24",
      "metadata": {
        "description": "Subnet 1 Prefix"
      }
    },
    "subnet1Name": {
      "type": "string",
      "defaultValue": "Subnet1",
      "metadata": {
        "description": "Subnet 1 Name"
      }
    },
    "subnet2Prefix": {
      "type": "string",
      "defaultValue": "10.0.1.0/24",
      "metadata": {
        "description": "Subnet 2 Prefix"
      }
    },
    "subnet2Name": {
      "type": "string",
      "defaultValue": "Subnet2",
      "metadata": {
        "description": "Subnet 2 Name"
      }
    },
    "location": {
      "type": "string",
      "defaultValue": "[resourceGroup().location]",
      "metadata": {
        "description": "Location for all resources."
      }
    }
  },
  "resources": [
    {
      "type": "Microsoft.Network/virtualNetworks",
      "apiVersion": "2021-08-01",
      "name": "[parameters('vnetName')]",
      "location": "[parameters('location')]",
      "properties": {
        "addressSpace": {
          "addressPrefixes": [
            "[parameters('vnetAddressPrefix')]"
          ]
        },
        "subnets": [
          {
            "name": "[parameters('subnet1Name')]",
            "properties": {
              "addressPrefix": "[parameters('subnet1Prefix')]"
            }
          },
          {
            "name": "[parameters('subnet2Name')]",
            "properties": {
              "addressPrefix": "[parameters('subnet2Prefix')]"
            }
          }
        ]
      }
    }
  ]
}
The template defines the following Azure resources:
Deploy the template
Deploy the Resource Manager template to Azure:
Select Deploy to Azure to sign in to Azure and open the template. The template creates a virtual network with two subnets.

In the portal, on the Create a Virtual Network with two Subnets page, enter or select the following values:
- Resource group: Select Create new, enter CreateVNetQS-rg for the resource group name, and then select OK.
- Virtual Network Name: Enter a name for the new virtual network.
Select Review + create, and then select Create.
When deployment finishes, select the Go to resource button to review the resources that you deployed.
Review deployed resources
Explore the resources that you created with the virtual network by browsing through the settings panes for VNet1:
To learn about the JSON syntax and properties for a virtual network in a template, see Microsoft.Network/virtualNetworks.
Create the virtual network and virtual machines
This quickstart uses the Two VMs in VNET Bicep template from Azure Resource Manager Quickstart Templates to create the virtual network, resource subnet, and virtual machines. The Bicep template defines the following Azure resources:
Review the Bicep file:
@description('Admin username')
param adminUsername string

@description('Admin password')
@secure()
param adminPassword string

@description('Prefix to use for VM names')
param vmNamePrefix string = 'BackendVM'

@description('Location for all resources.')
param location string = resourceGroup().location

@description('Size of the virtual machines')
param vmSize string = 'Standard_D2s_v3'

var availabilitySetName = 'AvSet'
var storageAccountType = 'Standard_LRS'
var storageAccountName = uniqueString(resourceGroup().id)
var virtualNetworkName = 'vNet'
var subnetName = 'backendSubnet'
var loadBalancerName = 'ilb'
var networkInterfaceName = 'nic'
var subnetRef = resourceId('Microsoft.Network/virtualNetworks/subnets', virtualNetworkName, subnetName)
var numberOfInstances = 2

resource storageAccount 'Microsoft.Storage/storageAccounts@2023-01-01' = {
  name: storageAccountName
  location: location
  sku: {
    name: storageAccountType
  }
  kind: 'StorageV2'
}

resource availabilitySet 'Microsoft.Compute/availabilitySets@2023-09-01' = {
  name: availabilitySetName
  location: location
  sku: {
    name: 'Aligned'
  }
  properties: {
    platformUpdateDomainCount: 2
    platformFaultDomainCount: 2
  }
}

resource virtualNetwork 'Microsoft.Network/virtualNetworks@2023-09-01' = {
  name: virtualNetworkName
  location: location
  properties: {
    addressSpace: {
      addressPrefixes: [
        '10.0.0.0/16'
      ]
    }
    subnets: [
      {
        name: subnetName
        properties: {
          addressPrefix: '10.0.2.0/24'
        }
      }
    ]
  }
}

resource networkInterface 'Microsoft.Network/networkInterfaces@2023-09-01' = [for i in range(0, numberOfInstances): {
  name: '${networkInterfaceName}${i}'
  location: location
  properties: {
    ipConfigurations: [
      {
        name: 'ipconfig1'
        properties: {
          privateIPAllocationMethod: 'Dynamic'
          subnet: {
            id: subnetRef
          }
          loadBalancerBackendAddressPools: [
            {
              id: resourceId('Microsoft.Network/loadBalancers/backendAddressPools', loadBalancerName, 'BackendPool1')
            }
          ]
        }
      }
    ]
  }
  dependsOn: [
    virtualNetwork
    loadBalancer
  ]
}]

resource loadBalancer 'Microsoft.Network/loadBalancers@2023-09-01' = {
  name: loadBalancerName
  location: location
  sku: {
    name: 'Standard'
  }
  properties: {
    frontendIPConfigurations: [
      {
        properties: {
          subnet: {
            id: subnetRef
          }
          privateIPAddress: '10.0.2.6'
          privateIPAllocationMethod: 'Static'
        }
        name: 'LoadBalancerFrontend'
      }
    ]
    backendAddressPools: [
      {
        name: 'BackendPool1'
      }
    ]
    loadBalancingRules: [
      {
        properties: {
          frontendIPConfiguration: {
            id: resourceId('Microsoft.Network/loadBalancers/frontendIpConfigurations', loadBalancerName, 'LoadBalancerFrontend')
          }
          backendAddressPool: {
            id: resourceId('Microsoft.Network/loadBalancers/backendAddressPools', loadBalancerName, 'BackendPool1')
          }
          probe: {
            id: resourceId('Microsoft.Network/loadBalancers/probes', loadBalancerName, 'lbprobe')
          }
          protocol: 'Tcp'
          frontendPort: 80
          backendPort: 80
          idleTimeoutInMinutes: 15
        }
        name: 'lbrule'
      }
    ]
    probes: [
      {
        properties: {
          protocol: 'Tcp'
          port: 80
          intervalInSeconds: 15
          numberOfProbes: 2
        }
        name: 'lbprobe'
      }
    ]
  }
  dependsOn: [
    virtualNetwork
  ]
}

resource vm 'Microsoft.Compute/virtualMachines@2023-09-01' = [for i in range(0, numberOfInstances): {
  name: '${vmNamePrefix}${i}'
  location: location
  properties: {
    availabilitySet: {
      id: availabilitySet.id
    }
    hardwareProfile: {
      vmSize: vmSize
    }
    osProfile: {
      computerName: '${vmNamePrefix}${i}'
      adminUsername: adminUsername
      adminPassword: adminPassword
    }
    storageProfile: {
      imageReference: {
        publisher: 'MicrosoftWindowsServer'
        offer: 'WindowsServer'
        sku: '2019-Datacenter'
        version: 'latest'
      }
      osDisk: {
        createOption: 'FromImage'
      }
    }
    networkProfile: {
      networkInterfaces: [
        {
          id: networkInterface[i].id
        }
      ]
    }
    diagnosticsProfile: {
      bootDiagnostics: {
        enabled: true
        storageUri: storageAccount.properties.primaryEndpoints.blob
      }
    }
  }
}]

output location string = location
output name string = loadBalancer.name
output resourceGroupName string = resourceGroup().name
output resourceId string = loadBalancer.id
Deploy the Bicep template
Save the Bicep file to your local computer as main.bicep.
Deploy the Bicep file by using either the Azure CLI or Azure PowerShell:
CLI
az group create \
    --name TestRG \
    --location eastus

az deployment group create \
    --resource-group TestRG \
    --template-file main.bicep
PowerShell
 $rgParams = @{
     Name     = 'TestRG'
     Location = 'eastus'
 }
 New-AzResourceGroup @rgParams

 $deploymentParams = @{
     ResourceGroupName = 'TestRG'
     TemplateFile      = 'main.bicep'
 }
 New-AzResourceGroupDeployment @deploymentParams
When the deployment finishes, a message indicates the deployment succeeded.
Deploy Azure Bastion
Bastion uses your browser to connect to virtual machines in your virtual network over Secure Shell (SSH) or Remote Desktop Protocol (RDP) by using their private IP addresses. The virtual machines don't need public IP addresses, client software, or special configuration. For more information about Azure Bastion, see What is Azure Bastion?.
Note
Hourly pricing starts from the moment that Bastion is deployed, regardless of outbound data usage. For more information, see Pricing and SKUs. If you're deploying Bastion as part of a tutorial or test, we recommend that you delete this resource after you finish using it.
Use the Azure Bastion as a Service Bicep template from Azure Resource Manager Quickstart Templates to deploy and configure Bastion in your virtual network. This Bicep template defines the following Azure resources:
Review the Bicep file:
@description('Name of new or existing vnet to which Azure Bastion should be deployed')
param vnetName string = 'vnet01'

@description('IP prefix for available addresses in vnet address space')
param vnetIpPrefix string = '10.1.0.0/16'

@description('Specify whether to provision new vnet or deploy to existing vnet')
@allowed([
  'new'
  'existing'
])
param vnetNewOrExisting string = 'new'

@description('Bastion subnet IP prefix MUST be within vnet IP prefix address space')
param bastionSubnetIpPrefix string = '10.1.1.0/26'

@description('Name of Azure Bastion resource')
param bastionHostName string

@description('Azure region for Bastion and virtual network')
param location string = resourceGroup().location

var publicIpAddressName = '${bastionHostName}-pip'
var bastionSubnetName = 'AzureBastionSubnet'

resource publicIp 'Microsoft.Network/publicIPAddresses@2022-01-01' = {
  name: publicIpAddressName
  location: location
  sku: {
    name: 'Standard'
  }
  properties: {
    publicIPAllocationMethod: 'Static'
  }
}

// if vnetNewOrExisting == 'new', create a new vnet and subnet
resource newVirtualNetwork 'Microsoft.Network/virtualNetworks@2022-01-01' = if (vnetNewOrExisting == 'new') {
  name: vnetName
  location: location
  properties: {
    addressSpace: {
      addressPrefixes: [
        vnetIpPrefix
      ]
    }
    subnets: [
      {
        name: bastionSubnetName
        properties: {
          addressPrefix: bastionSubnetIpPrefix
        }
      }
    ]
  }
}

// if vnetNewOrExisting == 'existing', reference an existing vnet and create a new subnet under it
resource existingVirtualNetwork 'Microsoft.Network/virtualNetworks@2022-01-01' existing = if (vnetNewOrExisting == 'existing') {
  name: vnetName
}
resource subnet 'Microsoft.Network/virtualNetworks/subnets@2022-01-01' = if (vnetNewOrExisting == 'existing') {
  parent: existingVirtualNetwork
  name: bastionSubnetName
  properties: {
    addressPrefix: bastionSubnetIpPrefix
  }
}

resource bastionHost 'Microsoft.Network/bastionHosts@2022-01-01' = {
  name: bastionHostName
  location: location
  dependsOn: [
    newVirtualNetwork
    existingVirtualNetwork
  ]
  properties: {
    ipConfigurations: [
      {
        name: 'IpConf'
        properties: {
          subnet: {
            id: subnet.id
          }
          publicIPAddress: {
            id: publicIp.id
          }
        }
      }
    ]
  }
}
Deploy the Bicep template
Save the Bicep file to your local computer as bastion.bicep.
Use a text or code editor to make the following changes in the file:
- Line 2: Change
param vnetName string from 'vnet01' to 'VNet'.
- Line 5: Change
param vnetIpPrefix string from '10.1.0.0/16' to '10.0.0.0/16'.
- Line 12: Change
param vnetNewOrExisting string from 'new' to 'existing'.
- Line 15: Change
param bastionSubnetIpPrefix string from '10.1.1.0/26' to '10.0.1.0/26'.
- Line 18: Change
param bastionHostName string to param bastionHostName = 'VNet-bastion'.
The first 18 lines of your Bicep file should now look like this example:
@description('Name of new or existing vnet to which Azure Bastion should be deployed')
param vnetName string = 'VNet'

@description('IP prefix for available addresses in vnet address space')
param vnetIpPrefix string = '10.0.0.0/16'

@description('Specify whether to provision new vnet or deploy to existing vnet')
@allowed([
  'new'
  'existing'
])
param vnetNewOrExisting string = 'existing'

@description('Bastion subnet IP prefix MUST be within vnet IP prefix address space')
param bastionSubnetIpPrefix string = '10.0.1.0/26'

@description('Name of Azure Bastion resource')
param bastionHostName = 'VNet-bastion'
Save the bastion.bicep file.
Deploy the Bicep file by using either the Azure CLI or Azure PowerShell:
CLI
az deployment group create \
     --resource-group TestRG \
     --template-file bastion.bicep
PowerShell
$deploymentParams = @{
    ResourceGroupName = 'TestRG'
    TemplateFile      = 'bastion.bicep'
}
New-AzResourceGroupDeployment @deploymentParams
When the deployment finishes, a message indicates the deployment succeeded.
Note
Virtual machines in a virtual network with a Bastion host don't need public IP addresses. Bastion provides the public IP, and the virtual machines use private IPs to communicate within the network. You can remove the public IPs from any virtual machines in Bastion-hosted virtual networks. For more information, see Dissociate a public IP address from an Azure VM.
Review deployed resources
Use the Azure CLI, Azure PowerShell, or the Azure portal to review the deployed resources:
CLI
az resource list --resource-group TestRG
PowerShell
Get-AzResource -ResourceGroupName TestRG
Portal
In the Azure portal, search for and select resource groups. On the Resource groups page, select TestRG from the list of resource groups.
On the Overview page for TestRG, review all the resources that you created, including the virtual network, the two virtual machines, and the Bastion host.
Select the VNet virtual network. On the Overview page for VNet, note the defined address space of 10.0.0.0/16.
On the left menu, select Subnets. On the Subnets page, note the deployed subnets of backendSubnet and AzureBastionSubnet with the assigned values from the Bicep files.


