Note
Access to this page requires authorization. You can try signing in or changing directories.
Access to this page requires authorization. You can try changing directories.
This article helps you configure virtual hub routing using Azure portal. You can also configure virtual hub routing using the Azure PowerShell steps.
A virtual hub can contain multiple gateways such as a site-to-site VPN gateway, ExpressRoute gateway, point-to-site gateway, and Azure Firewall. The routing capabilities in the virtual hub are provided by a router that manages all routing, including transit routing, between the gateways using Border Gateway Protocol (BGP). The virtual hub router also provides transit connectivity between virtual networks that connect to a virtual hub and can support up to an aggregate throughput of 50 Gbps. These routing capabilities apply to customers using Standard Virtual WANs. For more information, see About virtual hub routing.
Create a route table
The following steps help you create a route table and a route.
In the Azure portal, go to the virtual hub.
On the Virtual HUB page, in the left pane, select Route Tables to open the Route Tables page. Notice the route tables that are propagated to this virtual hub.
Select + Create route table to open the Create Route Table page.
On the Basics tab, complete the following fields, then click Labels to move to the Labels page.

- Name: Name the route table instance.
- Route name: Name the route.
- Destination type: Select from the dropdown.
- Destination prefix: You can aggregate prefixes. For example: VNet 1: 10.1.0.0/24 and VNet 2: 10.1.1.0/24 can be aggregated as 10.1.0.0/16. Branch routes apply to all connected VPN sites, ExpressRoute circuits, and User VPN connections.
- Next hop: A list of virtual network connections, or Azure Firewall.
- Next Hop IP: If you select a virtual network connection for Next hop, you'll see Configure static routes when you click Configure. This is an optional configuration setting. For more information, see Configuring static routes.
On the Labels page, configure label names. Labels provide a mechanism to logically group route tables. Configure any required labels, then move to the Associations page.
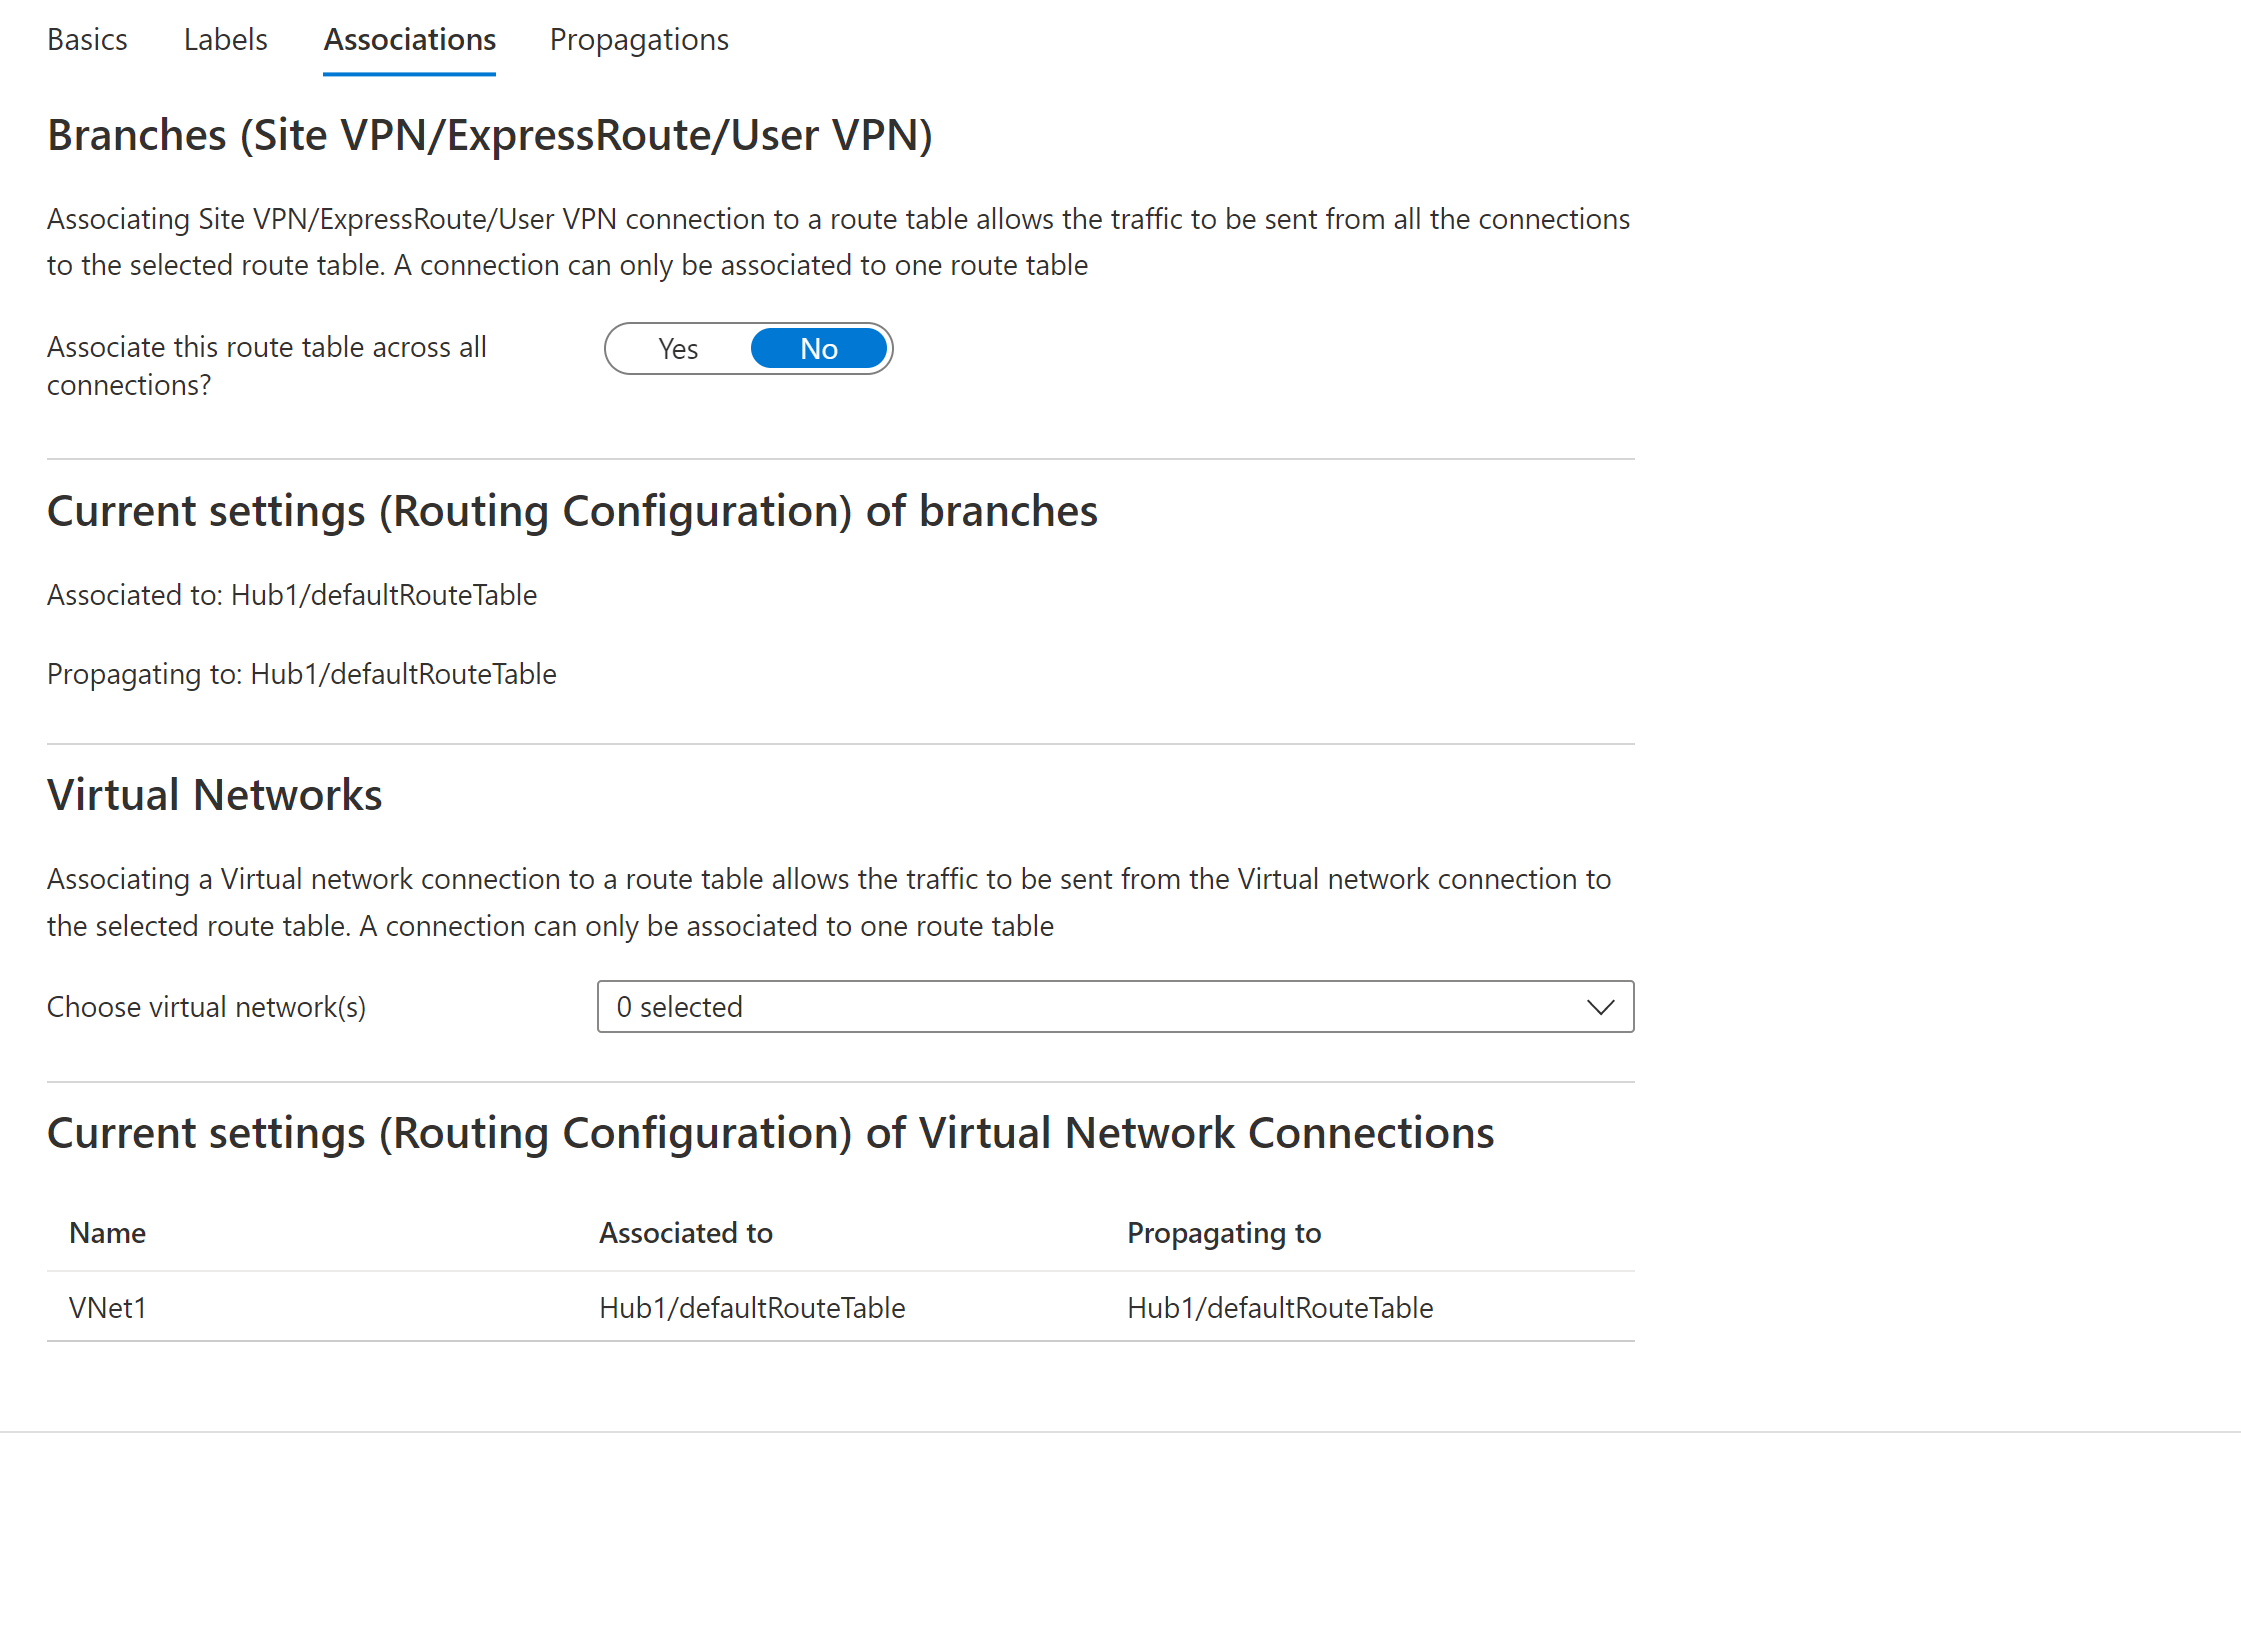
On the Associations page, associate connections to the route table. You'll see Branches, Virtual Networks, and the Current settings of the connections. After configuring settings, move to the Propagations page.
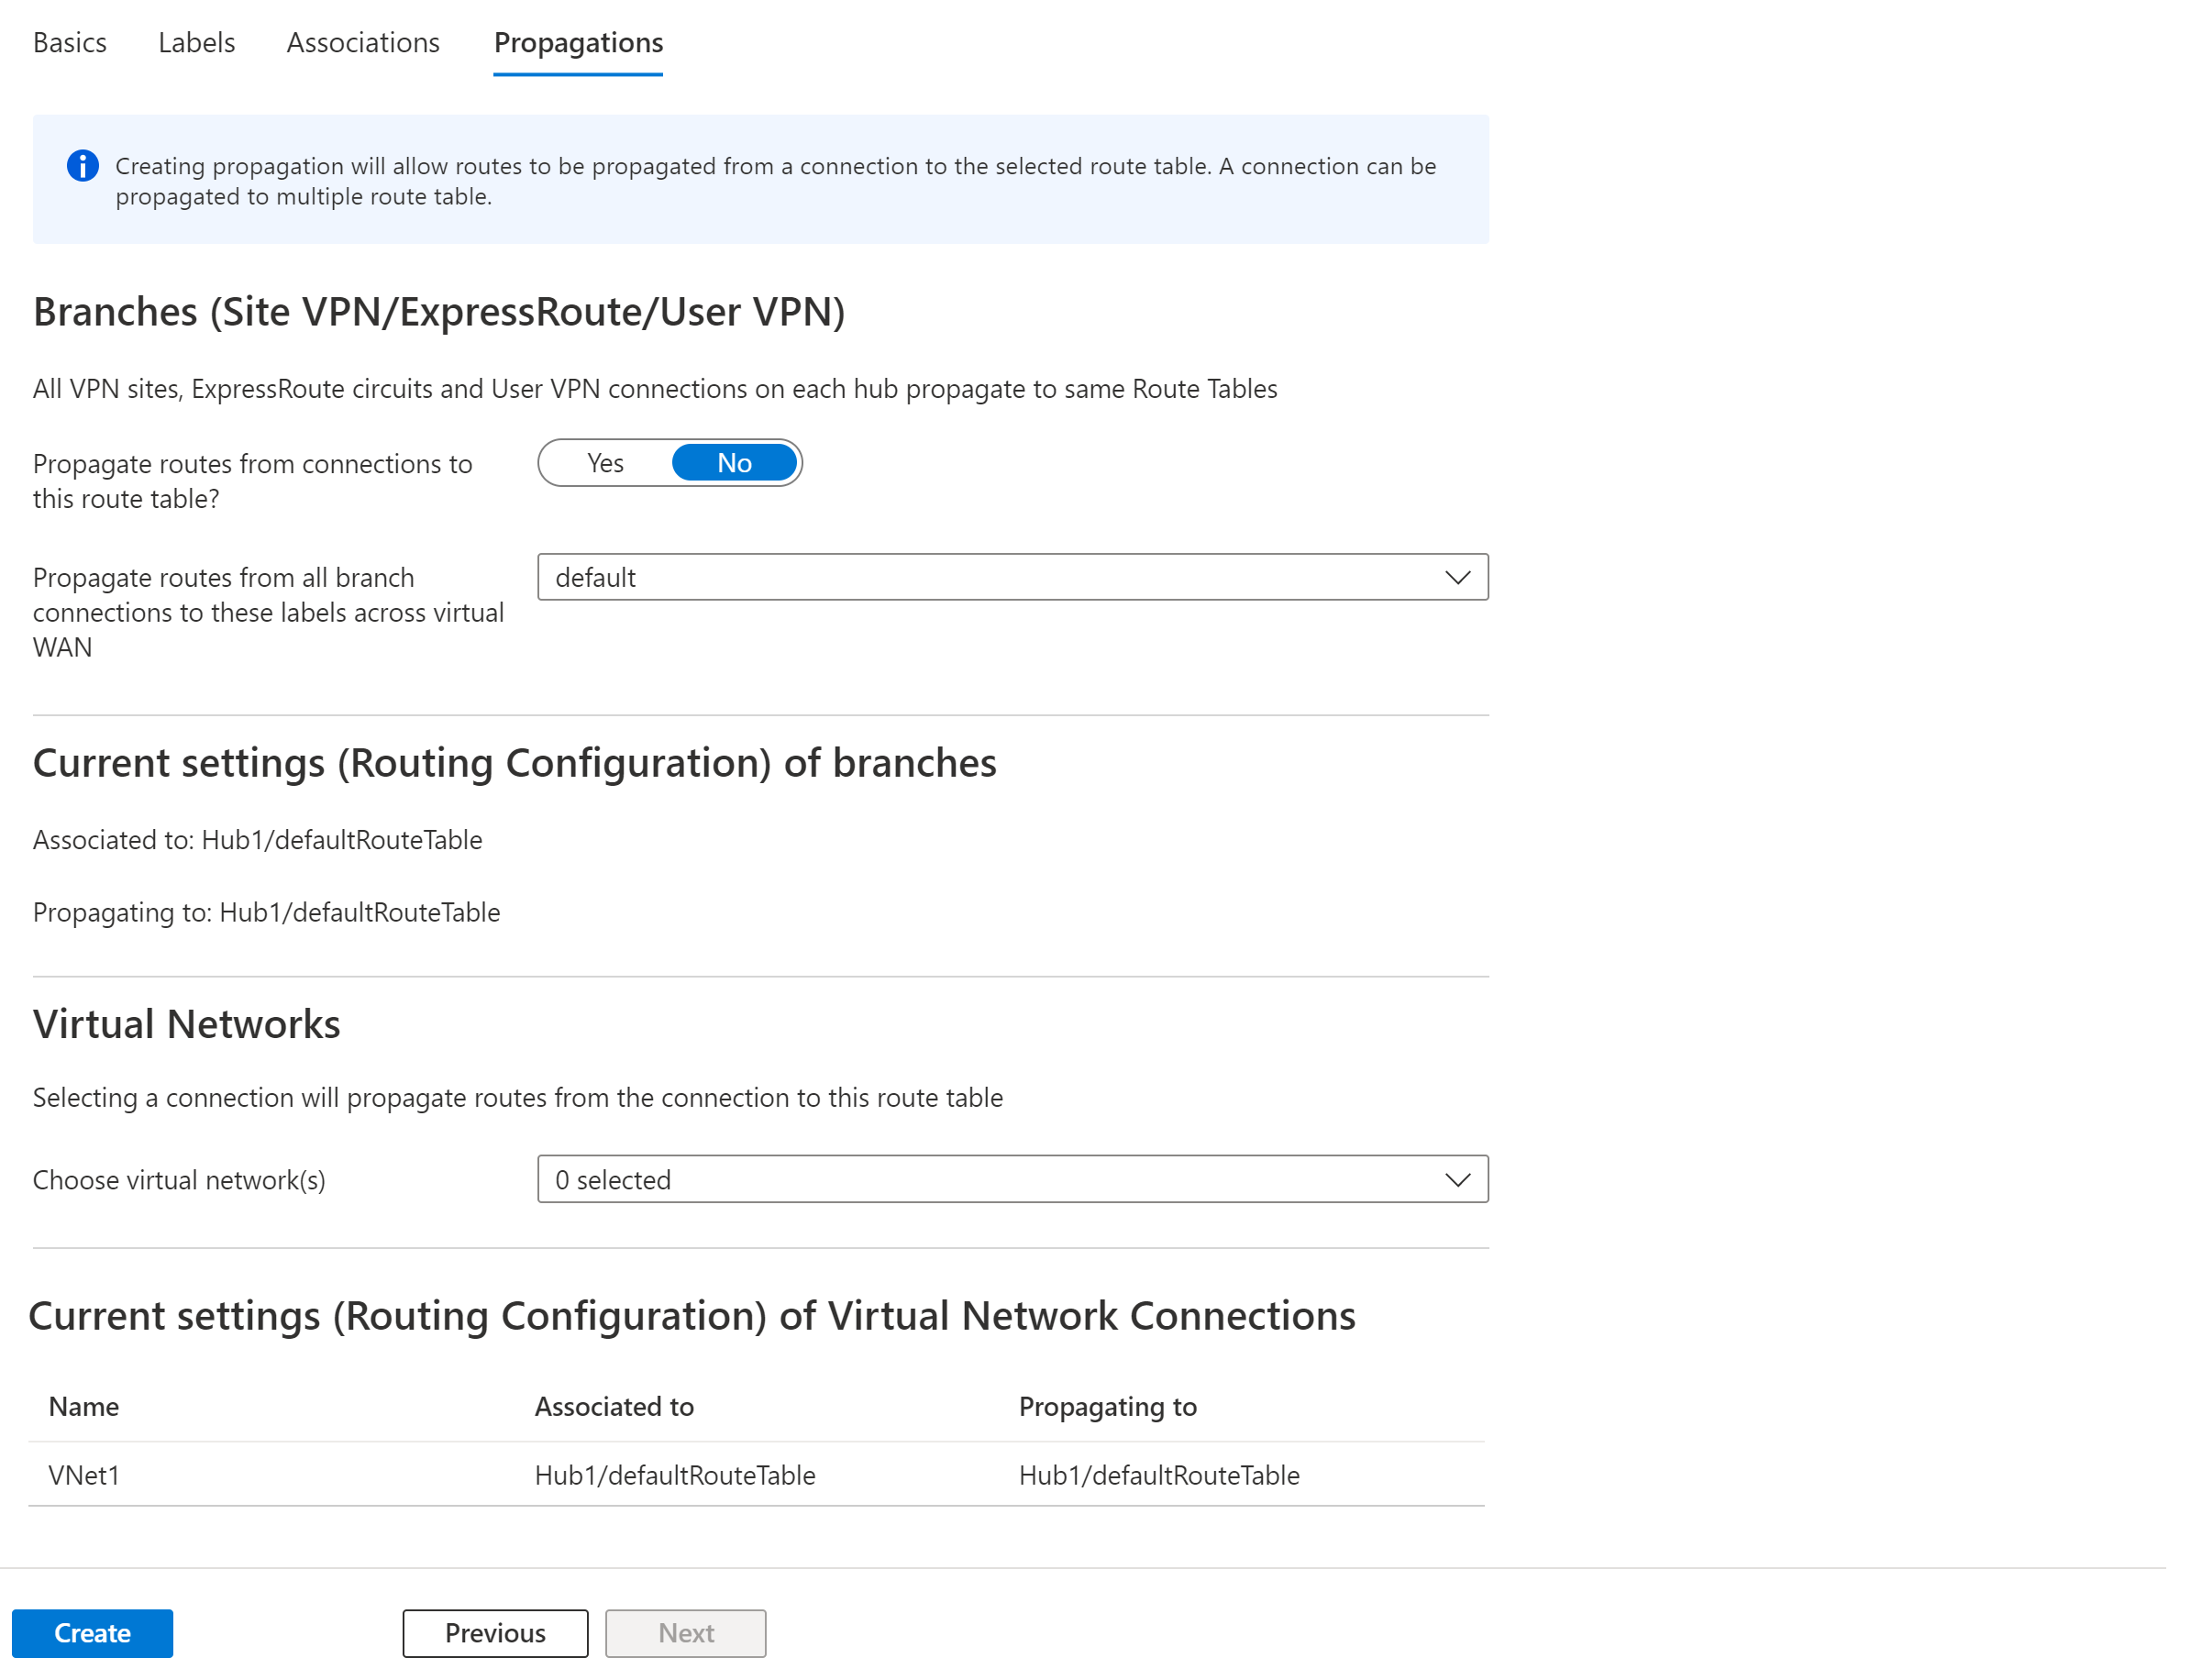
On the Propagations page, select the settings to propagate routes from connections to the route table.
Select Create to create the route table.


Edit a route table
- Go to the virtual hub and, in the left pane, click Route Tables. On the Route Tables page, click the name of the route table you want to edit.
- On the Edit route table page, on each tab, edit the values that you want to change.
- On the Propagations page, click Create to update the route table with new route information.
Edit a route
- Go to the virtual hub and, in the left pane, click Route Tables. On the Route Tables page, click the name of the route table that contains the route you want to edit.
- On the Edit route table page, locate the route from the list and make the applicable changes. Then, click Review + create.
- On the Propagations page, make any additional changes (if necessary), then click Create to update the route table with new route information.
- As long as no errors occur, the route is updated.
Delete a route
- Go to the virtual hub and, in the left pane, click Route Tables. On the Route Tables page, click the name of the route table that contains the route you want to edit.
- On the Edit route table page, locate the route from the list. Use the scroll bar to navigate to the right. You'll see an ellipsis (three dots) at the end of the line for the route. Click the ellipsis to reveal the Remove button. Click Remove.
- At the bottom of the page, click Review + Create, and then Create.
- As long as no errors occur, the route is removed.
Delete a route table
You can't delete a Default or None route table. However, you can delete all custom route tables.
- Go to the virtual hub and, in the left pane, click Route Tables. On the Route Tables page, select the checkbox for the route table that you want to delete (don't click the name).
- On the right side of the line that the route table is on, you'll see an ellipsis (three dots). Click the ellipsis, then select Delete from the dropdown list.
- On the Delete page, confirm that you want to delete the route table, then click Delete.
- As long as no errors occur, the route table is deleted.
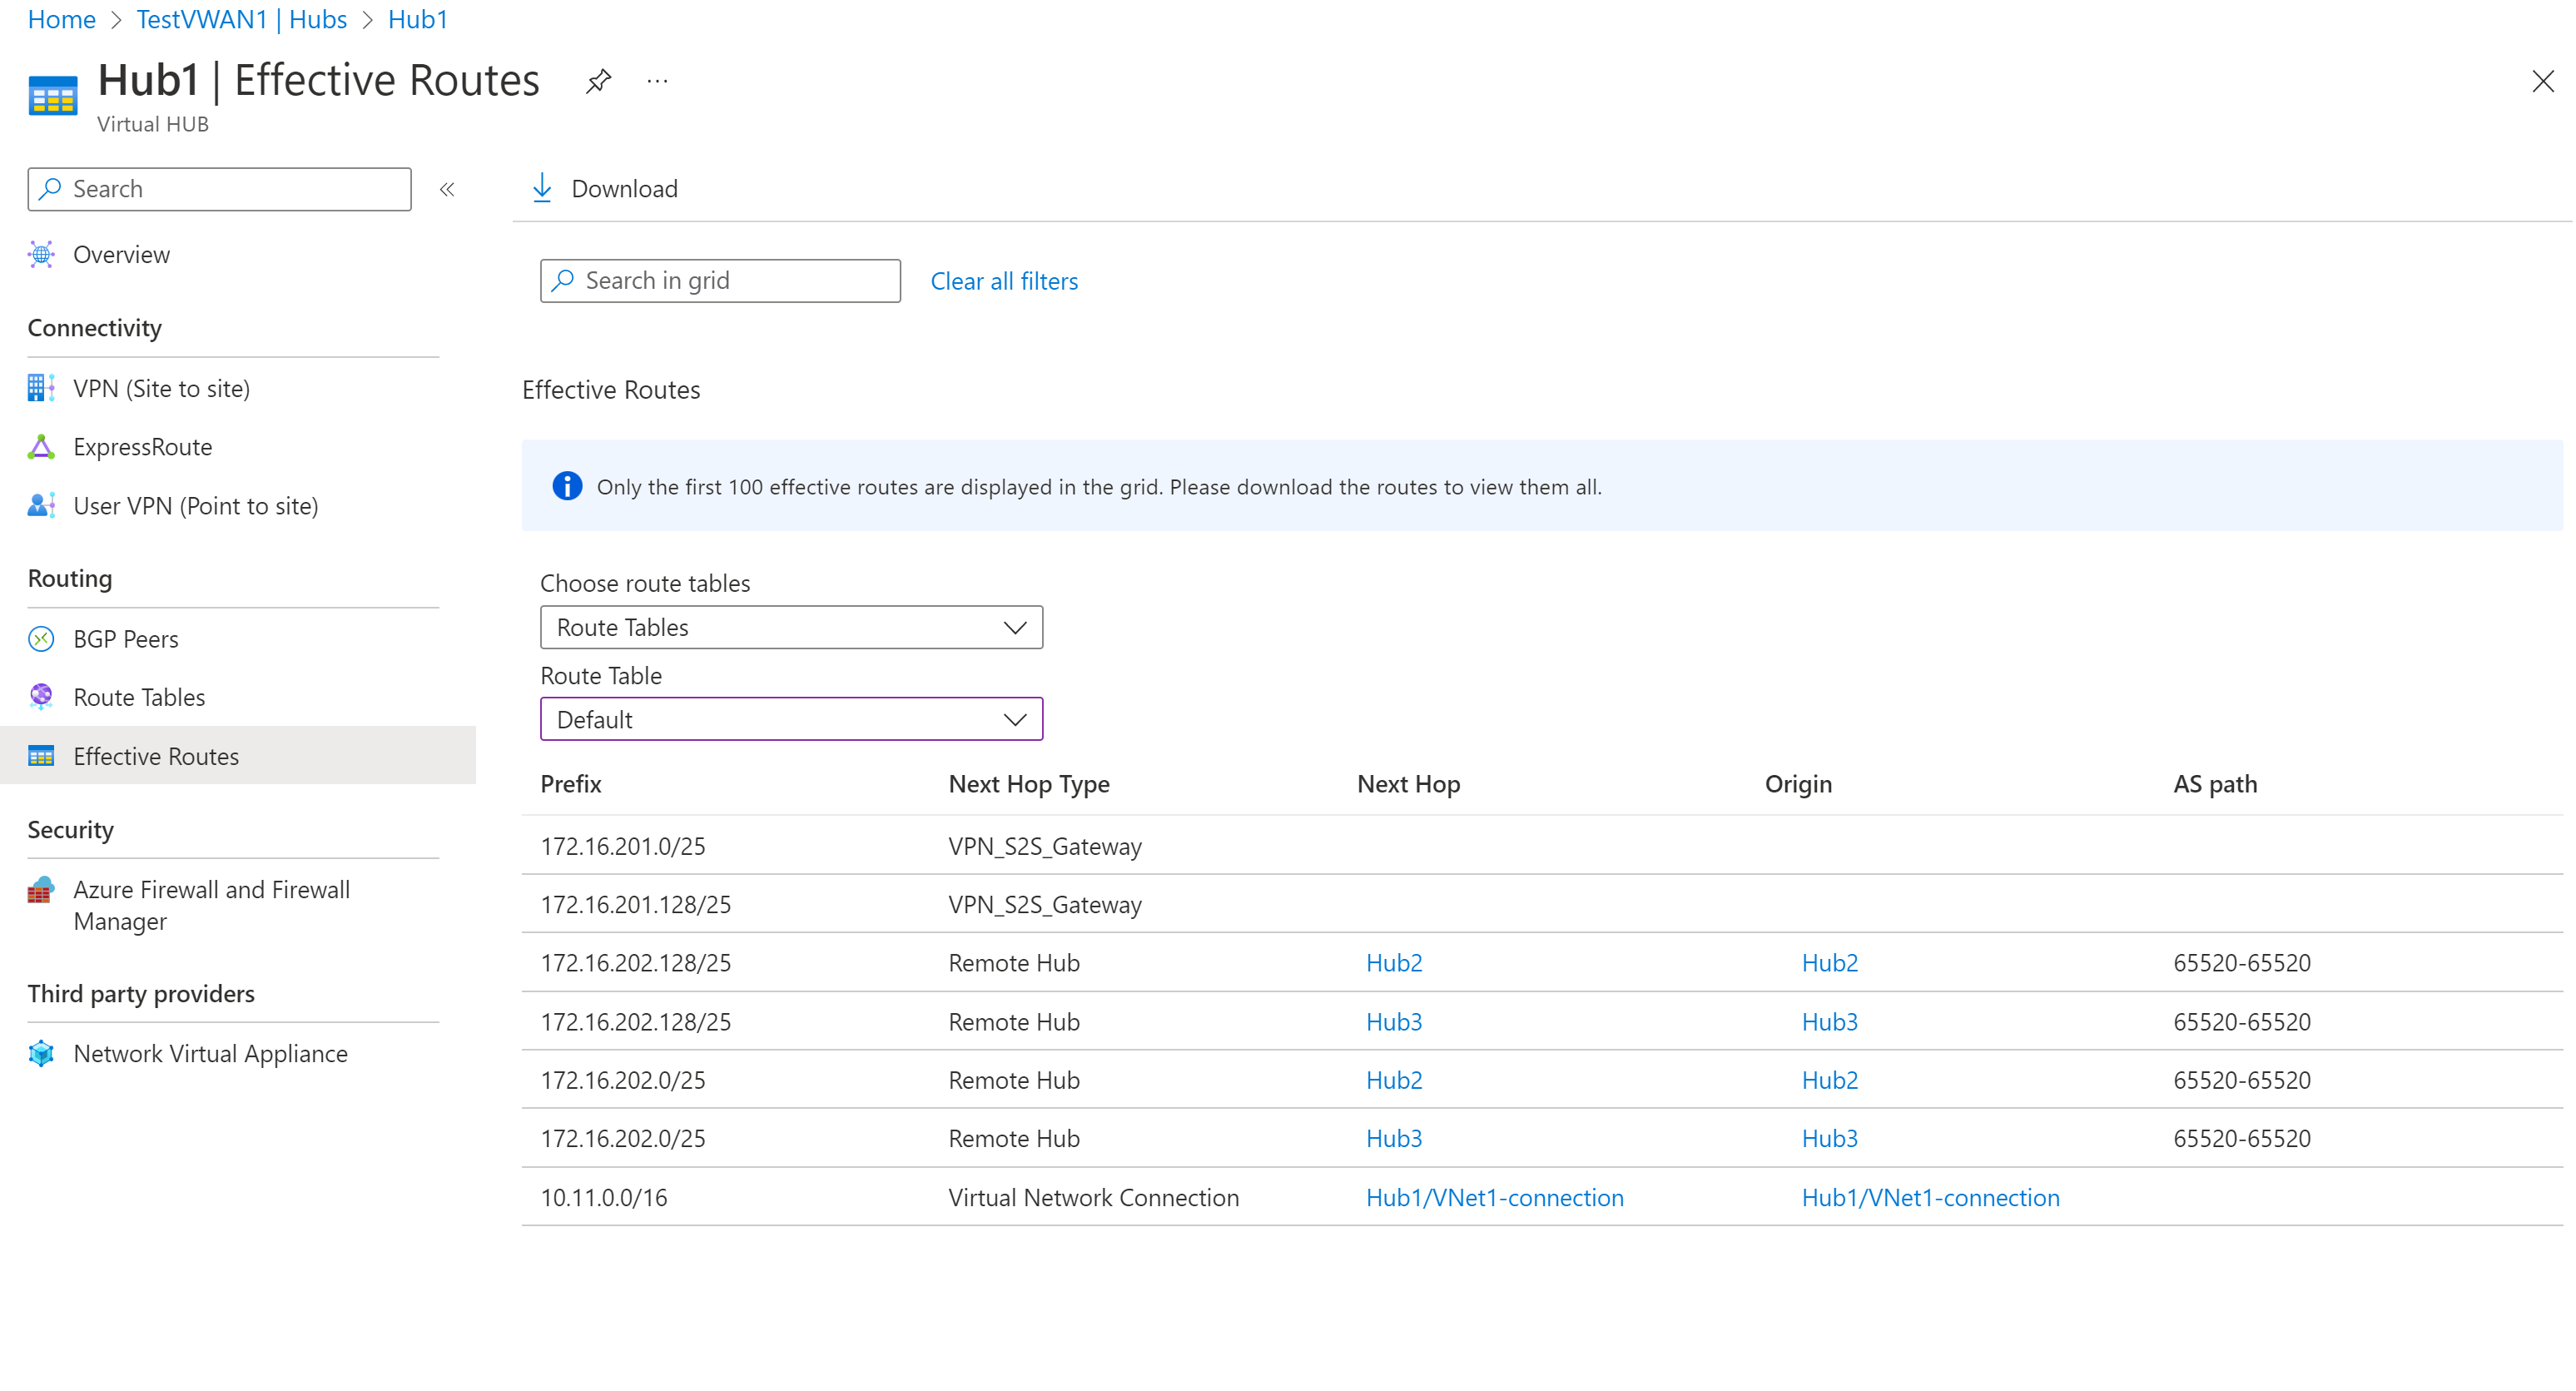
View effective routes
In the Azure portal, go to your Virtual HUB -> Effective Routes page.
From the dropdowns, select the route table to view routes learned by the selected route table. Propagated routes from the connection to the route table are automatically populated in Effective Routes of the route table. For more information, see About effective routes.
To download this information to a csv file, click Download at the top of the page.

Configure routing for a virtual network connection
In the Azure portal, go to your Virtual WAN In the left pane, select Virtual network connections.
On the Virtual network connections page, select + Add connection.
On the Add connection page, configure the connection settings. For information about routing settings, see About routing.
- Connection name: Name your connection.
- Hubs: Select the hub you want to associate with this connection.
- Subscription: Verify the subscription.
- Resource group: Select the resource group that contains the virtual network to which you want to connect.
- Virtual network: Select the virtual network you want to connect to this hub. The virtual network you select can't have an already existing virtual network gateway.
- Propagate to none: This is set to No by default. Changing the switch to Yes makes the configuration options for Propagate to Route Tables and Propagate to labels unavailable for configuration.
- Associate Route Table: From the dropdown, you can select a route table that you want to associate.
- Propagate to labels: Labels are a logical group of route tables. For this setting, select from the dropdown.
- Static routes: Configure static routes, if necessary. Configure static routes for Network Virtual Appliances (if applicable). Virtual WAN supports a single next hop IP for static route in a virtual network connection. For example, if you have a separate virtual appliance for ingress and egress traffic flows, it would be best to have the virtual appliances in separate VNets and attach the VNets to the virtual hub.
- Bypass Next Hop IP for workloads within this VNet: This setting lets you deploy NVAs and other workloads into the same VNet without forcing all the traffic through the NVA. This setting can only be configured when you're configuring a new connection. If you want to use this setting for a connection you've already created, delete the connection, then add a new connection.
- Propagate static route: This setting lets you propagate static routes defined in the Static routes section to route tables specified in Propagate to Route Tables. Additionally, routes will be propagated to route tables that have labels specified as Propagate to labels. These routes can be propagated inter-hub, except for the default route 0/0.
Once you've completed the settings you want to configure, select Create to create the connection.
Next steps
- For more information about virtual hub routing, see About virtual hub routing.
- For more information about Virtual WAN, see the Virtual WAN FAQ.