Note
Access to this page requires authorization. You can try signing in or changing directories.
Access to this page requires authorization. You can try changing directories.
P2S User VPNs provide the capability to assign users IP addresses from specific address pools based on their identity or authentication credentials by creating User Groups. This article helps you configure user groups, group members, and prioritize groups. For more information about working with user groups, see About user groups.
Prerequisites
Before beginning, make sure you've configured a virtual WAN that uses one or more authentication methods. For steps, see Tutorial: Create a Virtual WAN User VPN P2S connection.
Workflow
This article uses the following workflow to help you set up user groups and IP address pools for your P2S VPN connection.
Consider configuration requirements
Choose an authentication mechanism
Create a User Group
Configure gateway settings
Step 1: Consider configuration requirements
This section lists configuration requirements and limitations for user groups and IP address pools.
Maximum Groups: A single P2S VPN gateway can reference up to 90 groups.
Maximum Members: The total number of policy/group members across all groups assigned to a gateway is 390.
Multiple Assignments: If a group is assigned to multiple connection configurations on the same gateway, it and its members are counted multiple times. Example: A policy group with 10 members assigned to three VPN connection configurations counts as three groups with 30 members, not one group with 10 members.
Concurrent Users: The total number of concurrent users is determined by the gateway’s scale unit and the number of IP addresses allocated to each user group. It is not determined by the number of policy/group members associated with the gateway.
Once a group has been created as part of a VPN server configuration, the name and default setting of a group can't be modified.
Group names should be distinct.
Groups that have lower numerical priority are processed prior to groups with higher numerical priority. If a connecting user is a member of multiple groups, the gateway considers them to be a member of the group with lower numerical priority for purposes of assigning IP addresses.
Groups that are being used by existing point-to-site VPN gateways can't be deleted.
You can reorder the priorities of your groups by clicking on the up-down arrow buttons corresponding to that group.
Address pools can't overlap with address pools used in other connection configurations (same or different gateways) in the same virtual WAN.
Address pools also can't overlap with virtual network address spaces, virtual hub address spaces, or on-premises addresses.
Address pools can't be smaller than /24. For example, you can't assign a range of /25 or /26.
Step 2: Choosing authentication mechanism
The following sections list available authentication mechanisms that can be used while creating user groups.
Microsoft Entra groups
To create and manage Active Directory groups, see Manage Microsoft Entra groups and group membership.
- The Microsoft Entra group object ID (and not the group name) needs to be specified as part of the Virtual WAN point-to-site User VPN configuration.
- Microsoft Entra users can be assigned to be part of multiple Active Directory groups, but Virtual WAN considers users to be part of the Virtual WAN user/policy group that has the lowest numerical priority.
RADIUS - NPS vendor-specific attributes
For Network Policy Server (NPS) vendor-specific attributes configuration information, see RADIUS - configure NPS for vendor-specific attributes.
Certificates
To generate self-signed certificates, see Generate and export certificates for User VPN P2S connections: PowerShell. To generate a certificate with a specific Common Name, change the Subject parameter to the appropriate value (example, xx@domain.com) when running the New-SelfSignedCertificate PowerShell command. For example, you can generate certificates with the following Subject:
| Digital certificate field | Value | description |
|---|---|---|
| Subject | CN= cert@marketing.contoso.com | digital certificate for Marketing department |
| Subject | CN= cert@sale.contoso.com | digital certificate for Sale department |
| Subject | CN= cert@engineering.contoso.com | digital certificate for Engineering department |
| Subject | CN= cert@finance.contoso.com | digital certificate for Finance department |
Note
The multiple address pool feature with digital certificate authentication applies to a specific user group based on the Subject field. The selection criteria do not work with Subject Alternative Name (SAN) certificates. If a customer wants to specify a SAN in their certificates, it must be the same as the Subject for the multipool feature to function correctly. Discrepancy between the Subject and SAN will result in issues.
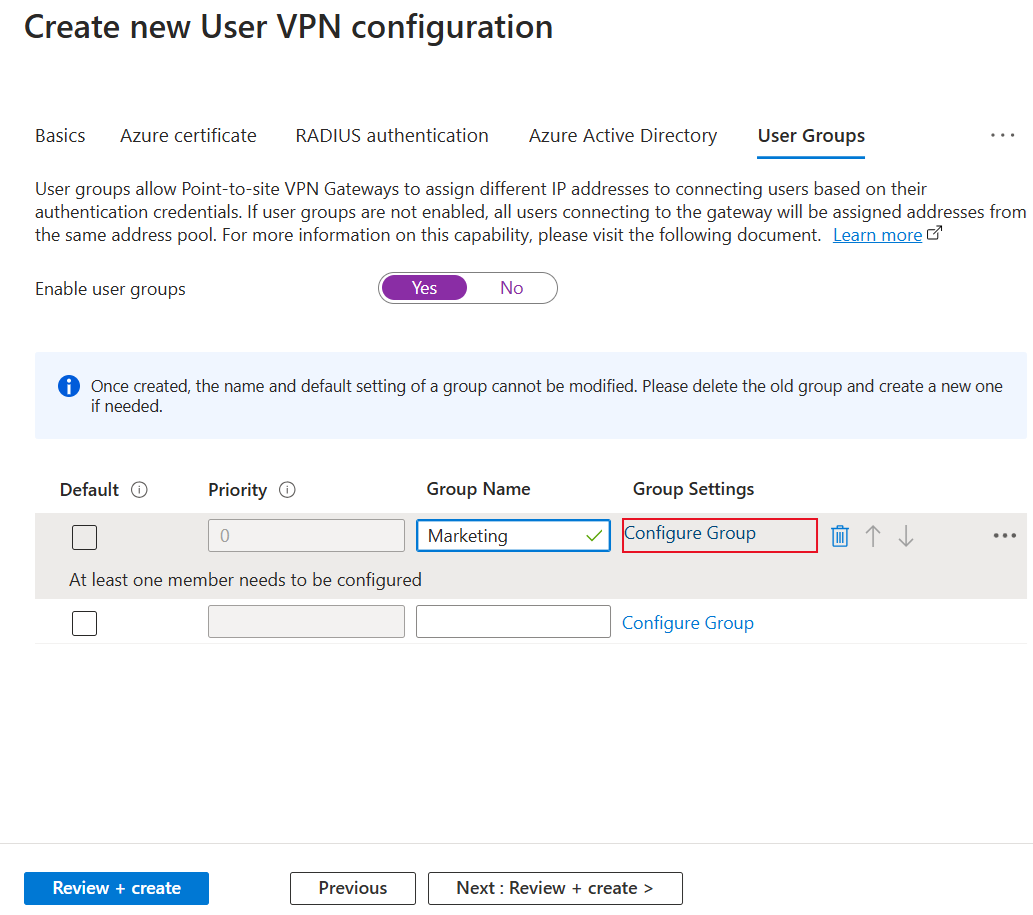
Step 3: Create a user group
Use the following steps to create a user group.
In the Azure portal, go to your Virtual WAN -> User VPN configurations page.
On the User VPN configurations page, select the User VPN Configuration that you want to edit, then select Edit configuration.
On the Edit User VPN configuration page, open the User Groups tab.

Select Yes to enable user groups. When this server configuration is assigned to a P2S VPN gateway, users who are part of the same user groups are assigned IP addresses from the same address pools. Users who are part of different groups are assigned IP addresses from different groups. When you use this feature, you must select Default group for one of the groups that you create.
To begin creating a new User Group, fill out the name parameter with the name of the first group.
Next to the Group Name, select Configure Group to open the Configure Group Settings page.
On the Configure Group Settings page, fill in the values for each member that you want to include in this group. A group can contain multiple group members.
Create a new member by filling in the Name field.
Select the Authentication: Setting Type from the dropdown. The dropdown is automatically populated based on the selected authentication methods for the User VPN configuration.
Type the Value. For valid values, see About user groups.

When you're finished creating the settings for the group, select Add and Okay.
Create any additional groups.
Select at least one group as default. Users who aren't part of any group specified on a gateway will be assigned to the default group on the gateway. Also note that you can't modify the "default" status of a group after the group has been created.

Select the arrows to adjust the group priority order.

Select Review + create to create and configure. After you create the User VPN configuration, configure the gateway server configuration settings to use the user groups feature.


Step 4: Configure gateway settings
In the portal, go to your virtual hub and select User VPN (Point to site).
On the point to site page, select the Gateway scale units link to open the Edit User VPN gateway. Adjust the Gateway scale units value from the dropdown to determine gateway throughput.
For Point to site server configuration, select the User VPN configuration that you configured for user groups. If you haven't yet configured these settings, see Create a user group.
Create a new point to site configuration by typing a new Configuration Name.
Select one or more groups to be associated with this configuration. All the users who are part of groups that are associated with this configuration will be assigned IP addresses from the same IP address pools.
Across all configurations for this gateway, you must have exactly one default user group selected.

For Address Pools, select Configure to open the Specify Address Pools page. On this page, associate new address pools with this configuration. Users who are members of groups associated to this configuration will be assigned IP addresses from the specified pools. Based on the number of Gateway Scale Units associated to the gateway, you might need to specify more than one address pool. Address pools can't be smaller than /24. For example you can't assign a range of /25 or /26 if you want to have a smaller address pool range for the user groups. The minimum prefix is /24. Select Add and Okay to save your address pools.

You need one configuration for each set of groups that should be assigned IP addresses from different address pools. Repeat the steps to create more configurations. See Step 1 for requirements and limitations regarding address pools and groups.
After you've created the configurations that you need, select Edit, and then Confirm to save your settings.


Troubleshooting
- Verify packets have the right attributes?: Wireshark or another packet capture can be run in NPS mode and decrypt packets using shared key. You can validate packets are being sent from your RADIUS server to the point-to-site VPN gateway with the right RADIUS VSA configured.
- Are users getting wrong IP assigned?: Set up and check NPS Event logging for authentication whether or not users are matching policies.
- Having issues with address pools? Every address pool is specified on the gateway. Address pools are split into two address pools and assigned to each active-active instance in a point-to-site VPN gateway pair. These split addresses should show up in the effective route table. For example, if you specify "10.0.0.0/24", you should see two "/25" routes in the effective route table. If this isn't the case, try changing the address pools defined on the gateway.
- P2S client not able to receive routes? Make sure all point-to-site VPN connection configurations are associated to the defaultRouteTable and propagate to the same set of route tables. This should be configured automatically if you're using portal, but if you're using REST, PowerShell or CLI, make sure all propagations and associations are set appropriately.
- Not able to enable Multipool using Azure VPN client? If you're using the Azure VPN client, make sure the Azure VPN client installed on user devices is the latest version. You need to download the client again to enable this feature.
- All users getting assigned to Default group? If you're using Microsoft Entra authentication, make sure the tenant URL input in the server configuration
(https://login.microsoftonline.com/<tenant ID>)doesn't end in a\. If the URL is input to end with\, the gateway won't be able to properly process Microsoft Entra user groups, and all users are assigned to the default group. To remediate, modify the server configuration to remove the trailing\and modify the address pools configured on the gateway to apply the changes to the gateway. This is a known issue. - Trying to invite external users to use Multipool feature? If you're using Microsoft Entra authentication and you plan to invite users who are external (users who aren't part of the Microsoft Entra domain configured on the VPN gateway) to connect to the Virtual WAN Point-to-site VPN gateway, make sure that the user type of the external user is "Member" and not "Guest". Also, make sure that the "Name" of the user is set to the user's email address. If the user type and name of the connecting user isn't set correctly as described above, or you can't set an external member to be a "Member" of your Microsoft Entra domain, the connecting user is assigned to the default group and assigned an IP from the default IP address pool.
Next steps
- For more information about user groups, see About user groups and IP address pools for P2S User VPNs.