How to configure BGP for Azure VPN Gateway
This article helps you enable BGP on cross-premises site-to-site (S2S) VPN connections and VNet-to-VNet connections using the Azure portal. You can also create this configuration using the Azure CLI or PowerShell steps.
BGP is the standard routing protocol commonly used in the Internet to exchange routing and reachability information between two or more networks. BGP enables the VPN gateways and your on-premises VPN devices, called BGP peers or neighbors, to exchange "routes" that will inform both gateways on the availability and reachability for those prefixes to go through the gateways or routers involved. BGP can also enable transit routing among multiple networks by propagating routes a BGP gateway learns from one BGP peer to all other BGP peers.
For more information about the benefits of BGP and to understand the technical requirements and considerations of using BGP, see About BGP and Azure VPN Gateway.
Getting started
Each part of this article helps you form a basic building block for enabling BGP in your network connectivity. If you complete all three parts (configure BGP on the gateway, S2S connection, and VNet-to-VNet connection) you build the topology as shown in Diagram 1. You can combine parts together to build a more complex, multi-hop, transit network that meets your needs.
Diagram 1
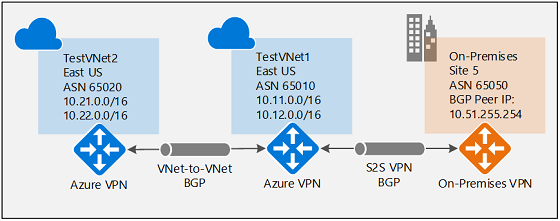
For context, referring to Diagram 1, if BGP were to be disabled between TestVNet2 and TestVNet1, TestVNet2 wouldn't learn the routes for the on-premises network, Site5, and therefore couldn't communicate with Site 5. Once you enable BGP, all three networks will be able to communicate over the S2S IPsec and VNet-to-VNet connections.
Prerequisites
Verify that you have an Azure subscription. If you don't already have an Azure subscription, you can activate your MSDN subscriber benefits or sign up for a free account.
Enable BGP for the VPN gateway
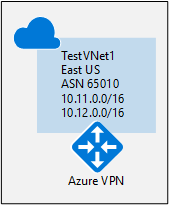
This section is required before you perform any of the steps in the other two configuration sections. The following configuration steps set up the BGP parameters of the VPN gateway as shown in Diagram 2.
Diagram 2
1. Create TestVNet1
In this step, you create and configure TestVNet1. Use the steps in the Create a gateway tutorial to create and configure your Azure virtual network and VPN gateway.
Virtual network example values:
- Resource Group: TestRG1
- VNet: TestVNet1
- Location/Region: EastUS
- Address space: 10.11.0.0/16, 10.12.0.0/16
- Subnets:
- FrontEnd: 10.11.0.0/24
- BackEnd: 10.12.0.0/24
- GatewaySubnet: 10.12.255.0/27
2. Create TestVNet1 gateway with BGP
In this step, you create a VPN gateway with the corresponding BGP parameters.
Use the steps in Create and manage a VPN gateway to create a gateway with the following parameters:
Instance Details:
- Name: VNet1GW
- Region: EastUS
- Gateway type: VPN
- VPN type: Route-based
- SKU: VpnGW1 or higher
- Generation: select a generation
- Virtual network: TestVNet1
Public IP address
- Public IP address Type: Basic or Standard
- Public IP address: Create new
- Public IP address name: VNet1GWIP
- Enable active-active: Disabled
- Configure BGP: Enabled
In the highlighted Configure BGP section of the page, configure the following settings:
Select Configure BGP - Enabled to show the BGP configuration section.
Fill in your ASN (Autonomous System Number).
The Azure APIPA BGP IP address field is optional. If your on-premises VPN devices use APIPA address for BGP, you must select an address from the Azure-reserved APIPA address range for VPN, which is from 169.254.21.0 to 169.254.22.255.
If you're creating an active-active VPN gateway, the BGP section will show an additional Second Custom Azure APIPA BGP IP address. Each address you select must be unique and be in the allowed APIPA range (169.254.21.0 to 169.254.22.255). Active-active gateways also support multiple addresses for both Azure APIPA BGP IP address and Second Custom Azure APIPA BGP IP address. Additional inputs will only appear after you enter your first APIPA BGP IP address.
Important
By default, Azure assigns a private IP address from the GatewaySubnet prefix range automatically as the Azure BGP IP address on the VPN gateway. The custom Azure APIPA BGP address is needed when your on premises VPN devices use an APIPA address (169.254.0.1 to 169.254.255.254) as the BGP IP. VPN Gateway will choose the custom APIPA address if the corresponding local network gateway resource (on-premises network) has an APIPA address as the BGP peer IP. If the local network gateway uses a regular IP address (not APIPA), VPN Gateway will revert to the private IP address from the GatewaySubnet range.
The APIPA BGP addresses must not overlap between the on-premises VPN devices and all connected VPN gateways.
When APIPA addresses are used on VPN gateways, the gateways do not initiate BGP peering sessions with APIPA source IP addresses. The on-premises VPN device must initiate BGP peering connections.
Select Review + create to run validation. Once validation passes, select Create to deploy the VPN gateway. Creating a gateway can often take 45 minutes or more, depending on the selected gateway SKU. You can see the deployment status on the Overview page for your gateway.
3. Get the Azure BGP Peer IP addresses
Once the gateway is created, you can obtain the BGP Peer IP addresses on the VPN gateway. These addresses are needed to configure your on-premises VPN devices to establish BGP sessions with the VPN gateway.
On the virtual network gateway Configuration page, you can view the BGP configuration information on your VPN gateway: ASN, Public IP address, and the corresponding BGP peer IP addresses on the Azure side (default and APIPA). You can also make the following configuration changes:
- You can update the ASN or the APIPA BGP IP address if needed.
- If you have an active-active VPN gateway, this page will show the Public IP address, default, and APIPA BGP IP addresses of the second VPN gateway instance.
To get the Azure BGP Peer IP address:
- Go to the virtual network gateway resource and select the Configuration page to see the BGP configuration information.
- Make a note of the BGP Peer IP address.
To configure BGP on cross-premises S2S connections
The instructions in this section apply to cross-premises site-to-site configurations.
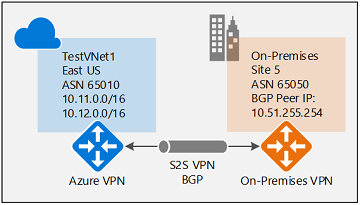
To establish a cross-premises connection, you need to create a local network gateway to represent your on-premises VPN device, and a connection to connect the VPN gateway with the local network gateway as explained in Create site-to-site connection. The following sections contain the additional properties required to specify the BGP configuration parameters, as shown in Diagram 3.
Diagram 3
Before proceeding, make sure you have enabled BGP for the VPN gateway.
1. Create a local network gateway
Configure a local network gateway with BGP settings.
- For information and steps, see the local network gateway section in the site-to-site connection article.
- If you already have a local network gateway, you can modify it.To modify a local network gateway, go to the local network gateway resource Configuration page and make any necessary changes.
When you create the local network gateway, for this exercise, use the following values:
- Name: Site5
- IP address: The IP address of the gateway endpoint you want to connect to. Example: 128.9.9.9
- Address spaces: If BGP is enabled, no address space is required.
To configure BGP settings, go to the Advanced page. Use the following example values (shown in Diagram 3). Modify any values necessary to match your environment.
- Configure BGP settings: Yes
- Autonomous system number (ASN): 65050
- BGP peer IP address: The address of the on-premise VPN Device. Example: 10.51.255.254
Click Review + create to create the local network gateway.
Important configuration considerations
- The ASN and the BGP peer IP address must match your on-premises VPN router configuration.
- You can leave the Address space empty only if you're using BGP to connect to this network. Azure VPN gateway will internally add a route of your BGP peer IP address to the corresponding IPsec tunnel. If you're NOT using BGP between the VPN gateway and this particular network, you must provide a list of valid address prefixes for the Address space.
- You can optionally use an APIPA IP address (169.254.x.x) as your on-premises BGP peer IP if needed. But you'll also need to specify an APIPA IP address as described earlier in this article for your VPN gateway, otherwise the BGP session can't establish for this connection.
- You can enter the BGP configuration information during the creation of the local network gateway, or you can add or change BGP configuration from the Configuration page of the local network gateway resource.
2. Configure an S2S connection with BGP enabled
In this step, you create a new connection that has BGP enabled. If you already have a connection and you want to enable BGP on it, you can update it.
To create a connection
- To create a new connection, go to your virtual network gateway Connections page.
- Select +Add to open the Add a connection page.
- Fill in the necessary values.
- Select Enable BGP to enable BGP on this connection.
- Select OK to save changes.
To update an existing connection
- Go to your virtual network gateway Connections page.
- Select the connection you want to modify.
- Go to the Configuration page for the connection.
- Change the BGP setting to Enabled.
- Save your changes.
On-premises device configuration
The following example lists the parameters you enter into the BGP configuration section on your on-premises VPN device for this exercise:
- Site5 ASN            : 65050
- Site5 BGP IP         : 10.51.255.254
- Prefixes to announce : (for example) 10.51.0.0/16
- Azure VNet ASN       : 65010
- Azure VNet BGP IP    : 10.12.255.30
- Static route         : Add a route for 10.12.255.30/32, with nexthop being the VPN tunnel interface on your device
- eBGP Multihop        : Ensure the "multihop" option for eBGP is enabled on your device if needed
To enable BGP on VNet-to-VNet connections
The steps in this section apply to VNet-to-VNet connections.
To enable or disable BGP on a VNet-to-VNet connection, you use the same steps as the S2S cross-premises steps in the previous section. You can enable BGP when creating the connection, or update the configuration on an existing VNet-to-VNet connection.
Note
A VNet-to-VNet connection without BGP will limit the communication to the two connected VNets only. Enable BGP to allow transit routing capability to other S2S or VNet-to-VNet connections of these two VNets.
Next steps
For more information about BGP, see About BGP and VPN Gateway.