Configure an Always On VPN device tunnel
The Always On feature was introduced in the Windows 10 VPN client. Always On is the ability to maintain a VPN connection. With Always On, the active VPN profile can connect automatically and remain connected based on triggers, such as user sign-in, network state change, or device screen active.
You can use gateways with Always On to establish persistent user tunnels and device tunnels to Azure.
Always On VPN connections include either of two types of tunnels:
Device tunnel: Connects to specified VPN servers before users sign in to the device. Pre-sign-in connectivity scenarios and device management use a device tunnel.
User tunnel: Connects only after users sign in to the device. By using user tunnels, you can access organization resources through VPN servers.
Device tunnels and user tunnels operate independent of their VPN profiles. They can be connected at the same time, and they can use different authentication methods and other VPN configuration settings, as appropriate.
This article helps you configure an Always On VPN device tunnel. For information about configuring a user tunnel, see Configure an Always On VPN user tunnel.
Configure the gateway
Configure the VPN gateway to use IKEv2 and certificate-based authentication using the Configure a Point-to-Site VPN connection article.
Configure the device tunnel
The following requirements must be met in order to successfully establish a device tunnel:
- The device must be a domain joined computer running Windows 10 Enterprise or Education version 1809 or later.
- The tunnel is only configurable for the Windows built-in VPN solution and is established using IKEv2 with computer certificate authentication.
- Only one device tunnel can be configured per device.
- Install client certificates on the Windows 10 or later client using the point-to-site VPN client article. The certificate needs to be in the Local Machine store.
- Create a VPN Profile and configure device tunnel in the context of the LOCAL SYSTEM account using these instructions.
Configuration example for device tunnel
After you have configured the virtual network gateway and installed the client certificate in the Local Machine store on the Windows 10 or later client, use the following examples to configure a client device tunnel:
Copy the following text and save it as devicecert.ps1.
Param( [string]$xmlFilePath, [string]$ProfileName ) $a = Test-Path $xmlFilePath echo $a $ProfileXML = Get-Content $xmlFilePath echo $XML $ProfileNameEscaped = $ProfileName -replace ' ', '%20' $Version = 201606090004 $ProfileXML = $ProfileXML -replace '<', '<' $ProfileXML = $ProfileXML -replace '>', '>' $ProfileXML = $ProfileXML -replace '"', '"' $nodeCSPURI = './Vendor/MSFT/VPNv2' $namespaceName = "root\cimv2\mdm\dmmap" $className = "MDM_VPNv2_01" $session = New-CimSession try { $newInstance = New-Object Microsoft.Management.Infrastructure.CimInstance $className, $namespaceName $property = [Microsoft.Management.Infrastructure.CimProperty]::Create("ParentID", "$nodeCSPURI", 'String', 'Key') $newInstance.CimInstanceProperties.Add($property) $property = [Microsoft.Management.Infrastructure.CimProperty]::Create("InstanceID", "$ProfileNameEscaped", 'String', 'Key') $newInstance.CimInstanceProperties.Add($property) $property = [Microsoft.Management.Infrastructure.CimProperty]::Create("ProfileXML", "$ProfileXML", 'String', 'Property') $newInstance.CimInstanceProperties.Add($property) $session.CreateInstance($namespaceName, $newInstance) $Message = "Created $ProfileName profile." Write-Host "$Message" } catch [Exception] { $Message = "Unable to create $ProfileName profile: $_" Write-Host "$Message" exit } $Message = "Complete." Write-Host "$Message"Copy the following text and save it as VPNProfile.xml in the same folder as devicecert.ps1. Edit the following text to match your environment.
<Servers>azuregateway-1234-56-78dc.cloudapp.net</Servers> <= Can be found in the VpnSettings.xml in the downloaded profile zip file<Address>192.168.3.5</Address> <= IP of resource in the vnet or the vnet address space<Address>192.168.3.4</Address> <= IP of resource in the vnet or the vnet address space
<VPNProfile>
  <NativeProfile>
<Servers>azuregateway-1234-56-78dc.cloudapp.net</Servers>
<NativeProtocolType>IKEv2</NativeProtocolType>
<Authentication>
  <MachineMethod>Certificate</MachineMethod>
</Authentication>
<RoutingPolicyType>SplitTunnel</RoutingPolicyType>
 <!-- disable the addition of a class based route for the assigned IP address on the VPN interface -->
<DisableClassBasedDefaultRoute>true</DisableClassBasedDefaultRoute>
  </NativeProfile>
  <!-- use host routes(/32) to prevent routing conflicts -->
  <Route>
<Address>192.168.3.5</Address>
<PrefixSize>32</PrefixSize>
  </Route>
  <Route>
<Address>192.168.3.4</Address>
<PrefixSize>32</PrefixSize>
  </Route>
<!-- need to specify always on = true -->
  <AlwaysOn>true</AlwaysOn>
<!-- new node to specify that this is a device tunnel -->
 <DeviceTunnel>true</DeviceTunnel>
<!--new node to register client IP address in DNS to enable manage out -->
<RegisterDNS>true</RegisterDNS>
</VPNProfile>
Download PsExec from Sysinternals and extract the files to C:\PSTools.
From an Admin CMD prompt, launch PowerShell by running:
For 32-bit Windows:
PsExec.exe -s -i powershellFor 64-bit Windows:
PsExec64.exe -s -i powershell
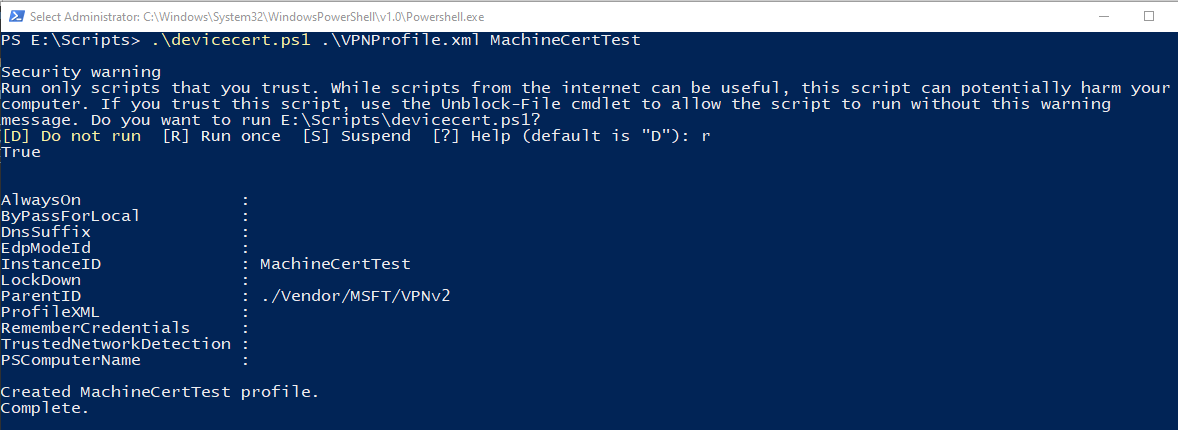
In PowerShell, switch to the folder where devicecert.ps1 and VPNProfile.xml are located, and run the following command:
.\devicecert.ps1 .\VPNProfile.xml MachineCertTest
Run rasphone.

Look for the MachineCertTest entry and click Connect.

If the connection succeeds, reboot the computer. The tunnel will connect automatically.
To remove a profile
To remove the profile, run the following command:

Next steps
For troubleshooting, see Azure point-to-site connection problems