Note
Access to this page requires authorization. You can try signing in or changing directories.
Access to this page requires authorization. You can try changing directories.
The Azure Web Application Firewall rate-limit rule for Azure Front Door controls the number of requests allowed from a particular source IP address to the application during a rate-limit duration. For more information about rate limiting, see What is rate limiting for Azure Front Door?.
This article shows how to configure a web application firewall (WAF) rate-limit rule on Azure Front Door Standard and Premium tiers.
Scenario
Suppose you're responsible for a public website. You've just added a page with information about a promotion your organization is running. You're concerned that if clients visit that page too often, some of your back-end services might not scale quickly and the application might have performance issues.
You decide to create a rate-limit rule that restricts each source IP address to a maximum of 1,000 requests per minute. You only apply this rule to requests that contain */promo* in the request URL.
Tip
If you don't have an Azure subscription, create a free account before you begin.
Create an Azure Front Door profile and WAF policy
In the Azure portal, select Create a resource.
Search for Front Door, and select Front Door and CDN profiles.
Select Create.
Select Continue to create a Front Door to use the quick create portal creation process.
Enter the information required on the Basics page:
- Resource group: Select an existing resource group, or create a new resource group for the Azure Front Door and WAF resources.
- Name: Enter the name of your Azure Front Door profile.
- Tier: Select Standard or Premium. For this scenario, both tiers support rate limiting.
- Endpoint name: Provide a unique name for your endpoint because Azure Front Door endpoints must have globally unique names.
- Origin type and Origin host name: Select the origin application that you want to protect with your rate-limit rule.
Next to WAF policy, select Create new.
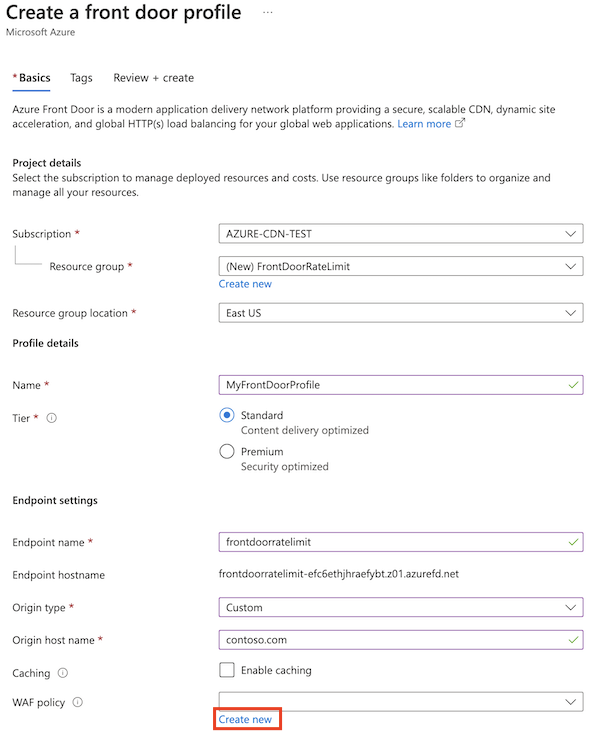
Enter the name of a WAF policy and select Create.
Select Review + create > Create.
After the deployment is finished, select Go to resource.
Create a rate-limit rule
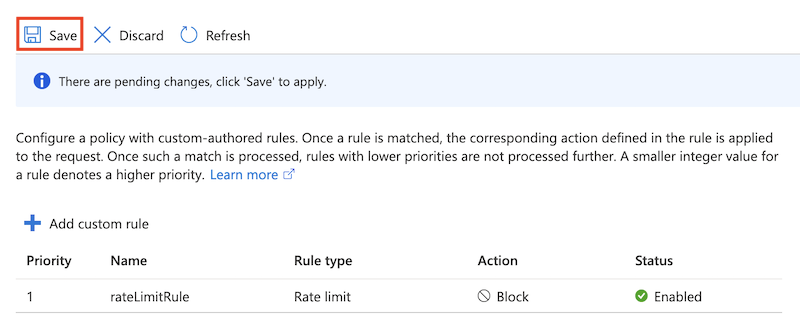
Select Custom rules > Add custom rule.
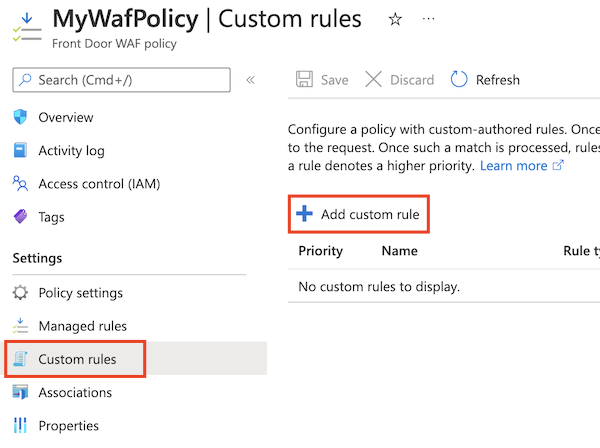
Enter the information required to create a rate-limit rule:
- Custom rule name: Enter the name of the custom rule, such as rateLimitRule.
- Rule type: Select Rate limit.
- Priority: Enter the priority of the rule, such as 1.
- Rate limit duration: Select 1 minute.
- Rate limit threshold (requests): Enter 1000.
In Conditions, enter the information required to specify a match condition to identify requests where the URL contains the string
*/promo*:- Match type: Select String.
- Match variable: Enter RequestUri.
- Operation: Select is.
- Operator: Select Contains.
- Match values: Enter /promo.
For Action, select Log or Block.
Rate-limit rules only support
LogandBlockactions.Allowisn't supported.
Select Add.
Select Save.
Use prevention mode on the WAF
By default, the Azure portal creates WAF policies in detection mode. This setting means that the WAF doesn't block requests. For more information, see WAF modes.
Tune your WAF before you use prevention mode. Tuning helps to avoid false positive detections. It also helps to prevent your WAF from blocking legitimate requests.
Here you reconfigure the WAF to use prevention mode.
Open the WAF policy.
Notice that Policy mode is set at Detection.
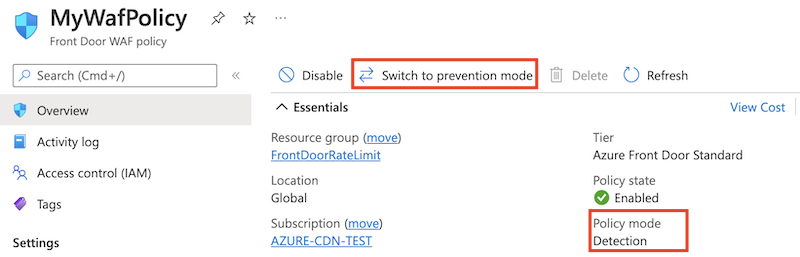
Select Switch to prevention mode.
Prerequisites
Before you begin to set up a rate-limit policy, set up your PowerShell environment and create an Azure Front Door profile.
Set up your PowerShell environment
Azure PowerShell provides a set of cmdlets that use the Azure Resource Manager model for managing your Azure resources.
You can install Azure PowerShell on your local machine and use it in any PowerShell session. Here you sign in with your Azure credentials and install the Azure PowerShell module for Azure Front Door Standard or Premium.
Connect to Azure with an interactive dialog for sign-in
Sign in to Azure by running the following command:
Connect-AzAccount
Install PowerShellGet
Ensure that the current version of PowerShellGet is installed. Run the following command:
Install-Module PowerShellGet -Force -AllowClobber
Then, restart PowerShell to ensure that you use the latest version.
Install the Azure Front Door PowerShell modules
Install the Az.FrontDoor and Az.Cdn PowerShell modules to work with Azure Front Door Standard or Premium from PowerShell.
Install-Module -Name Az.FrontDoor
Install-Module -Name Az.Cdn
You use the Az.Cdn module to work with Azure Front Door Standard or Premium resources. Use the Az.FrontDoor module to work with WAF resources.
Create a resource group
Use the New-AzResourceGroup cmdlet to create a new resource group for your Azure Front Door profile and WAF policy. Update the resource group name and location for your own requirements:
$resourceGroupName = 'FrontDoorRateLimit'

New-AzResourceGroup -Name $resourceGroupName -Location 'westus'
Create an Azure Front Door profile
Use the New-AzFrontDoorCdnProfile cmdlet to create a new Azure Front Door profile.
In this example, you create an Azure Front Door standard profile named MyFrontDoorProfile:
$frontDoorProfile = New-AzFrontDoorCdnProfile `
  -Name 'MyFrontDoorProfile' `
  -ResourceGroupName $resourceGroupName `
  -Location global `
  -SkuName Standard_AzureFrontDoor
Create an Azure Front Door endpoint
Use the New-AzFrontDoorCdnEndpoint cmdlet to add an endpoint to your Azure Front Door profile.
Azure Front Door endpoints must have globally unique names, so update the value of the $frontDoorEndpointName variable to something unique.
$frontDoorEndpointName = '<unique-front-door-endpoint-name>'

$frontDoorEndpoint = New-AzFrontDoorCdnEndpoint `
  -EndpointName $frontDoorEndpointName `
  -ProfileName $frontDoorProfile.Name `
  -ResourceGroupName $frontDoorProfile.ResourceGroupName `
  -Location $frontDoorProfile.Location
Define a URL match condition
Use the New-AzFrontDoorWafMatchConditionObject cmdlet to create a match condition to identify requests that should have the rate limit applied.
The following example matches requests where the RequestUri variable contains the string /promo:
$promoMatchCondition = New-AzFrontDoorWafMatchConditionObject `
  -MatchVariable RequestUri `
  -OperatorProperty Contains `
  -MatchValue '/promo'
Create a custom rate-limit rule
Use the New-AzFrontDoorWafCustomRuleObject cmdlet to create the rate-limit rule, which includes the match condition you defined in the previous step and the request threshold.
The following example sets the limit to 1000:
$promoRateLimitRule = New-AzFrontDoorWafCustomRuleObject `
  -Name 'rateLimitRule' `
  -RuleType RateLimitRule `
  -MatchCondition $promoMatchCondition `
  -RateLimitThreshold 1000 `
  -Action Block `
  -Priority 1
When any source IP address sends more than 1,000 requests within one minute, the WAF blocks subsequent requests until the next minute starts.
Create a WAF policy
Use the New-AzFrontDoorWafPolicy cmdlet to create a WAF policy, which includes the custom rule you created.
$wafPolicy = New-AzFrontDoorWafPolicy `
  -Name 'MyWafPolicy' `
  -ResourceGroupName $frontDoorProfile.ResourceGroupName `
  -Sku Standard_AzureFrontDoor `
  -CustomRule $promoRateLimitRule
Configure a security policy to associate your Azure Front Door profile with your WAF policy
Use the New-AzFrontDoorCdnSecurityPolicy cmdlet to create a security policy for your Azure Front Door profile. A security policy associates your WAF policy with domains that you want to be protected by the WAF rule.
In this example, you associate the endpoint's default hostname with your WAF policy:
$securityPolicyAssociation = New-AzFrontDoorCdnSecurityPolicyWebApplicationFirewallAssociationObject `
  -PatternsToMatch @("/*") `
  -Domain @(@{"Id"=$($frontDoorEndpoint.Id)})

$securityPolicyParameters = New-AzFrontDoorCdnSecurityPolicyWebApplicationFirewallParametersObject `
  -Association $securityPolicyAssociation `
  -WafPolicyId $wafPolicy.Id

$frontDoorSecurityPolicy = New-AzFrontDoorCdnSecurityPolicy `
  -Name 'MySecurityPolicy' `
  -ProfileName $frontDoorProfile.Name `
  -ResourceGroupName $frontDoorProfile.ResourceGroupName `
  -Parameter $securityPolicyParameters
Prerequisites
Before you begin to set up a rate-limit policy, set up your Azure CLI environment and create an Azure Front Door profile.
Set up your Azure CLI environment
The Azure CLI provides a set of commands that use the Azure Resource Manager model for managing your Azure resources.
You can install the Azure CLI on your local machine and use it in any shell session. Here you sign in with your Azure credentials and install the Azure CLI extension for Azure Front Door Standard or Premium.
Connect to Azure with an interactive dialog for sign-in
Sign in to Azure by running the following command:
az login
Install the Azure Front Door extension for the Azure CLI
Install the front-door extension to work with the Azure Front Door WAF from the Azure CLI:
az extension add --name front-door
You use the az afd commands to work with Azure Front Door Standard or Premium resources. Use the az network front-door waf-policy commands to work with WAF resources.
Create a resource group
Use the az group create command to create a new resource group for your Azure Front Door profile and WAF policy. Update the resource group name and location for your own requirements:
resourceGroupName='FrontDoorRateLimit'

az group create \
  --name $resourceGroupName \
  --location westus
Create an Azure Front Door profile
Use the az afd profile create command to create a new Azure Front Door profile.
In this example, you create an Azure Front Door standard profile named MyFrontDoorProfile:
frontDoorProfileName='MyFrontDoorProfile'

az afd profile create \
  --profile-name $frontDoorProfileName \
  --resource-group $resourceGroupName \
  --sku Standard_AzureFrontDoor
Create an Azure Front Door endpoint
Use the az afd endpoint create command to add an endpoint to your Azure Front Door profile.
Azure Front Door endpoints must have globally unique names, so update the value of the frontDoorEndpointName variable to something unique.
frontDoorEndpointName='<unique-front-door-endpoint-name>'

az afd endpoint create \
  --endpoint-name $frontDoorEndpointName \
  --profile-name $frontDoorProfileName \
  --resource-group $resourceGroupName \
Create a WAF policy
Use the az network front-door waf-policy create command to create a WAF policy:
wafPolicyName='MyWafPolicy'

az network front-door waf-policy create \
  --name $wafPolicyName \
  --resource-group $resourceGroupName \
  --sku Standard_AzureFrontDoor
Prepare to add a custom rate-limit rule
Use the az network front-door waf-policy rule create command to create a custom rate-limit rule. The following example sets the limit to 1,000 requests per minute.
Rate-limit rules must contain a match condition, which you create in the next step. In this command, you include the --defer argument, which tells the Azure CLI not to submit the rule to Azure yet.
az network front-door waf-policy rule create \
  --name rateLimitRule \
  --policy-name $wafPolicyName \
  --resource-group $resourceGroupName \
  --rule-type RateLimitRule \
  --rate-limit-duration 1 \
  --rate-limit-threshold 1000 \
  --action Block \
  --priority 1 \
  --defer
When any source IP address sends more than 1,000 requests within one minute, the WAF blocks subsequent requests until the next minute starts.
Add a match condition
Use the az network front-door waf-policy rule match-condition add command to add a match condition to your custom rule. The match condition identifies requests that should have the rate limit applied.
The following example matches requests where the RequestUri variable contains the string /promo:
az network front-door waf-policy rule match-condition add \
  --match-variable RequestUri \
  --operator Contains \
  --values '/promo' \
  --name rateLimitRule \
  --policy-name $wafPolicyName \
  --resource-group $resourceGroupName
When you submit this command, the Azure CLI creates the rate-limit rule and match condition together.
Configure a security policy to associate your Azure Front Door profile with your WAF policy
Use the az afd security-policy create command to create a security policy for your Azure Front Door profile. A security policy associates your WAF policy with domains that you want to be protected by the WAF rule.
In this example, you associate the endpoint's default hostname with your WAF policy:
securityPolicyName='MySecurityPolicy'

wafPolicyResourceId=$(az network front-door waf-policy show --name $wafPolicyName --resource-group $resourceGroupName --query id --output tsv)
frontDoorEndpointResourceId=$(az afd endpoint show --endpoint-name $frontDoorEndpointName --profile-name $frontDoorProfileName --resource-group $resourceGroupName --query id --output tsv)

az afd security-policy create \
  --security-policy-name $securityPolicyName \
  --profile-name $frontDoorProfileName \
  --resource-group $resourceGroupName \
  --domains $frontDoorEndpointResourceId \
  --waf-policy $wafPolicyResourceId
The preceding code looks up the Azure resource identifiers for the WAF policy and Azure Front Door endpoint so that it can associate them with your security policy.
Note
Whenever you make changes to your WAF policy, you don't need to re-create the Azure Front Door security policy. WAF policy updates are automatically applied to the Azure Front Door domains.
Quickstart
To create an Azure Front Door profile with a rate-limit rule by using Bicep, see the Azure Front Door Standard or Premium with rate limit Bicep quickstart.
Next steps
Learn more about Azure Front Door.