Encrypt Defender for Cloud Apps data at rest with your own key (BYOK)
This article describes how to configure Defender for Cloud Apps to use your own key to encrypt the data it collects, whilst it's at rest. If you are looking for documentation about applying encryption to data stored in cloud apps, see Azure Information Protection integration.
Defender for Cloud Apps takes your security and privacy seriously. Therefore, once Defender for Cloud Apps starts collecting data, it uses its own managed keys to protect your data in accordance with our data security and privacy policy. Additionally, Defender for Cloud Apps allows you to further protect your data at rest by encrypting it with your own Azure Key Vault key.
Important
If there is a problem accessing your Azure Key Vault key, Defender for Cloud Apps will fail to encrypt your data and your tenant will be lock down within an hour. When your tenant is locked down, all access to it will be blocked until the cause has been resolved. Once your key is accessible again, full access to your tenant will be restored.
This procedure is available only on the Microsoft Defender portal, and cannot be performed on the classic Microsoft Defender for Cloud Apps portal.
Prerequisites
You must register the Microsoft Defender for Cloud Apps - BYOK app in your tenant's Microsoft Entra ID associated with your Defender for Cloud Apps tenant.
To register the app
Install Microsoft Graph PowerShell.
Open a PowerShell terminal and run the following commands:
Connect-MgGraph -Scopes "Application.ReadWrite.All"

# Create a new service principal
New-MgServicePrincipal -AppId 6a12de16-95c8-4e42-a451-7dbbc34634cd

# Update Service Principal
$servicePrincipalId = Get-MgServicePrincipal -Filter "AppId eq '6a12de16-95c8-4e42-a451-7dbbc34634cd'" | Select Id
$params = @{
	accountEnabled = $true
}

Update-MgServicePrincipal -ServicePrincipalId $servicePrincipalId.Id -BodyParameter $params
Where ServicePrincipalId is the ID returned by the previous command (
New-MgServicePrincipal).
Note
- Defender for Cloud Apps encrypts data at rest for all new tenants.
- Any data that resides in Defender for Cloud Apps for more than 48 hours will be encrypted.
Deploy your Azure Key Vault key
Create a new Key Vault with the Soft-delete and Purge protection options enabled.
In the new generated Key Vault, open the Access policies pane and then select +Add Access Policy.
Select Key permissions and choose the following permissions from the dropdown menu:
Section Required permissions Key Management Operations - List Cryptographic Operations - Wrap key
- Unwrap key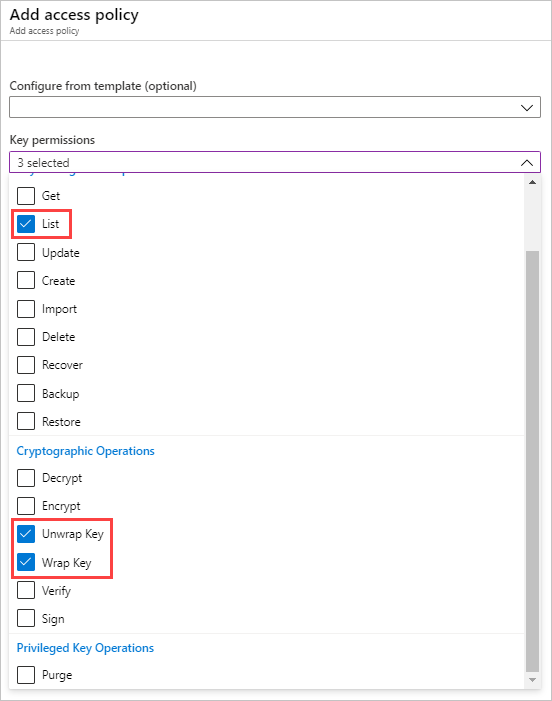
Under Select principal, choose Microsoft Defender for Cloud Apps - BYOK or Microsoft Cloud App Security - BYOK.
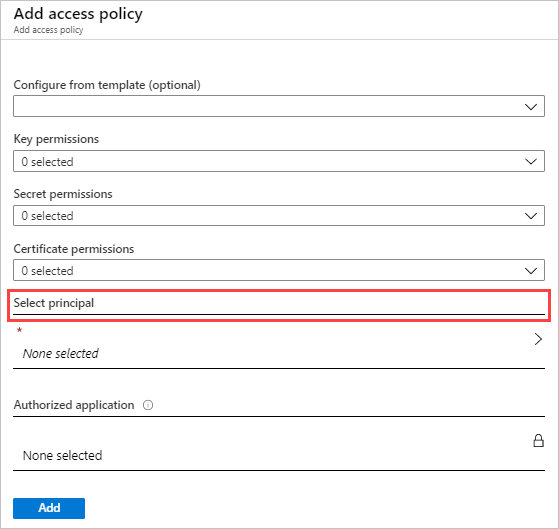
Select Save.
Create a new RSA key and do the following:
Note
Only RSA keys are supported.
After creating the key, select the new generated key, select the current version and then you'll see Permitted operations.
Under Permitted operations, make sure the following options are enabled:
- Wrap key
- Unwrap key
Copy the Key Identifier URI. You'll need it later.

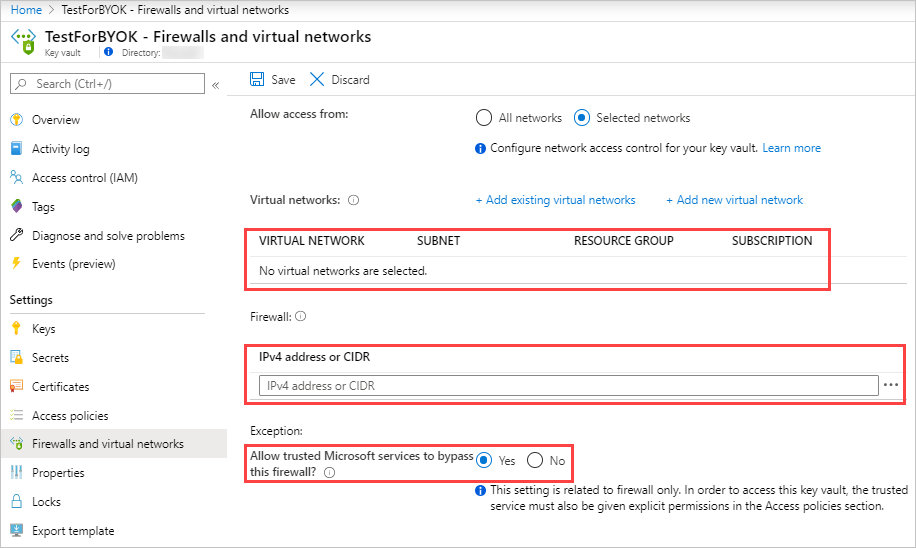
Optionally, if using a firewall for a selected network, configure the following firewall settings to give Defender for Cloud Apps access to the specified key, and then click Save:
- Make sure no virtual networks are selected.
- Add the following IP addresses:
- 13.66.200.132
- 23.100.71.251
- 40.78.82.214
- 51.105.4.145
- 52.166.166.111
- 13.72.32.204
- 52.244.79.38
- 52.227.8.45
- Select Allow trusted Microsoft services to bypass this firewall.
Enable data encryption in Defender for Cloud Apps
When you enable data encryption, Defender for Cloud Apps immediately uses your Azure Key Vault key to encrypt data at rest. Since your key is essential to the encryption process, it is important to ensure that your designated Key Vault and key are accessible at all times.
To enable data encryption
In the Microosft Defender portal, select Settings > Cloud Apps > Data encryption > Enable data encryption.
In the Azure Key Vault key URI box, paste the key identifier URI value you copied earlier. Defender for Cloud Apps always uses the latest key version, regardless of the key version specified by the URI.
Once the URI validation has completed, select Enable.
Note
When you disable data encryption, Defender for Cloud Apps removes the encryption with your own key from the data at rest. However, your data remains encrypted by Defender for Cloud Apps managed keys.
To disable data encryption: Go to the Data encryption tab and click Disable data encryption.
Key roll handling
Whenever you create new versions of the key configured for data encryption, Defender for Cloud Apps automatically rolls to the latest version of the key.
How to handle data encryption failures
If there is a problem accessing your Azure Key Vault key, Defender for Cloud Apps will fail to encrypt your data and your tenant will be lock down within an hour. When your tenant is locked down, all access to it will be blocked until the cause has been resolved. Once your key is accessible again, full access to your tenant will be restored. For information about handling data encryption failures, see Troubleshooting data encryption with your own key.
Feedback
Coming soon: Throughout 2024 we will be phasing out GitHub Issues as the feedback mechanism for content and replacing it with a new feedback system. For more information see: https://aka.ms/ContentUserFeedback.
Submit and view feedback for