Note
Access to this page requires authorization. You can try signing in or changing directories.
Access to this page requires authorization. You can try changing directories.
APPLIES TO: Composer v2.x
The Orchestrator recognizer can be used to recognize intents in Composer bots. The engine allows developers to recognize intents for free, and without the need of a large training data set. This article explains how to create a basic menu order options bot that uses the Orchestrator intent recognizer.
Prerequisites
- Knowledge of dialogs, language understanding, Orchestrator, and natural language processing.
- Install Composer.
- A basic bot created with Composer.
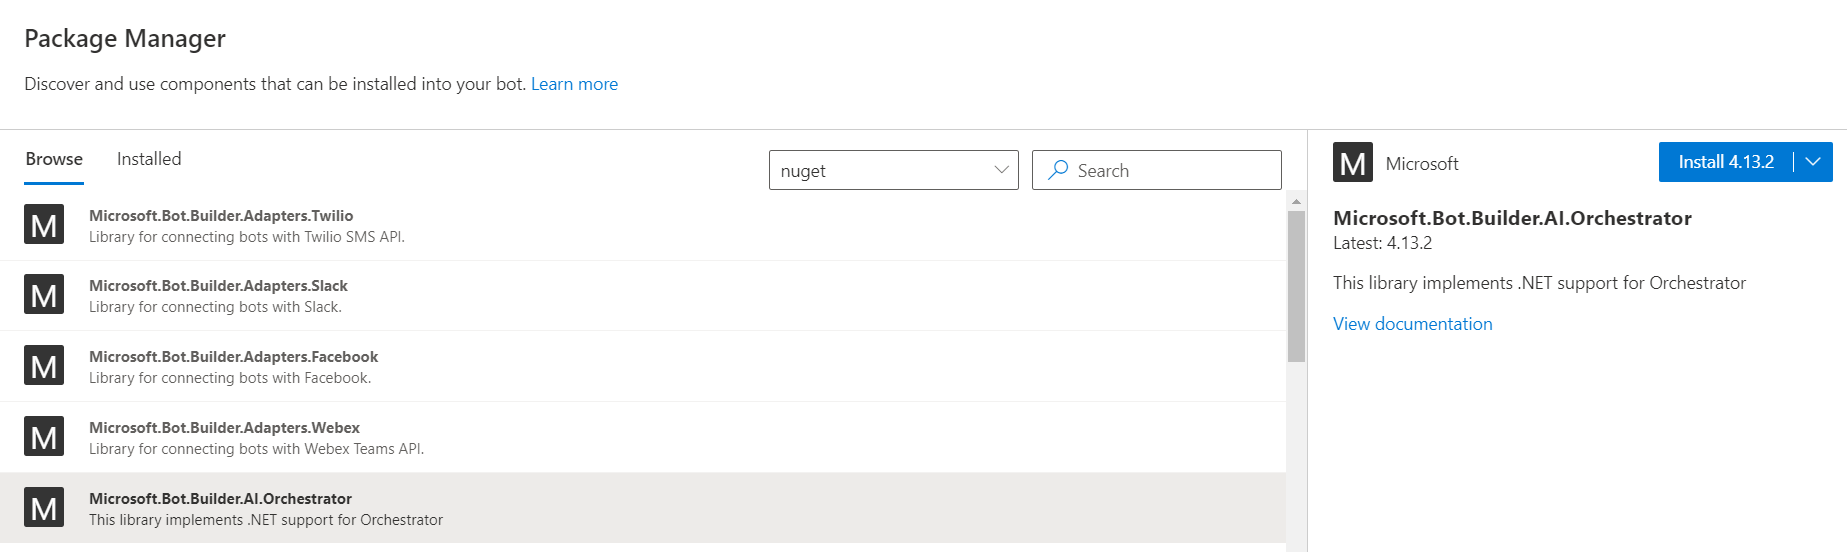
Add Orchestrator in Package manager
Orchestrator isn't a default feature in Composer. To use Orchestrator, first add the Orchestrator package to your bot. Composer will download the latest Orchestrator model and make it available to your bot.
Open the Package manager, select the NuGet feed, and search for Orchestrator in the search bar.
Install the latest version by selecting the Install button on the right
Once installed, open the Create page and select your main dialog.
In the properties pane, select Change under Recognizer/Dispatch type.
On the Choose a recognizer type page, select Orchestrator (Intents only) and select Done to change the recognizer.
Your main dialog is now configured to use Orchestrator for intent recognition.
Add intent recognized triggers
To use Orchestrator, you need to add data that Orchestrator will use to figure out a user's intent. In this section, you'll learn how to add Cancel and OrderOptions triggers and a dialog that all use Orchestrator data.
Create the cancel intent
It's a best practice to give users the ability to cancel their interactions with the bot.
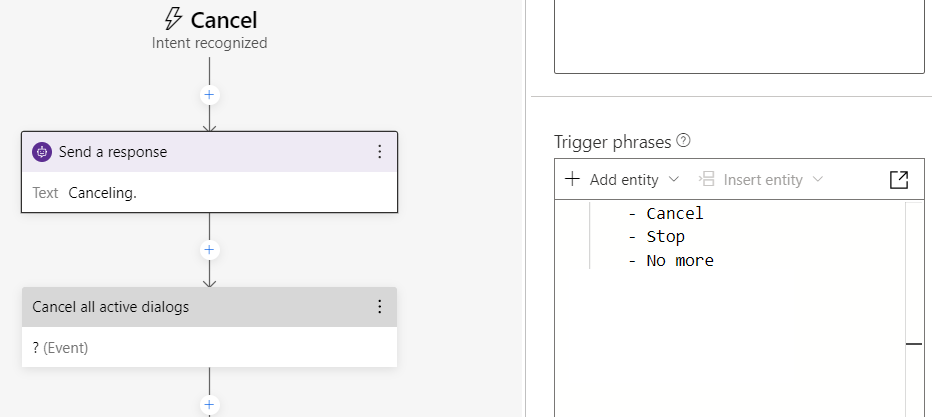
Select the more options button next to your root dialog (MenuBot dialog in this example) and select Add new trigger. Name the trigger Cancel and add the following Trigger phrases:
- Cancel
- Stop
- No more
Orchestrator will use this data to build a model that recognizes the cancel intent.
After entering the trigger phrases select Submit on the bottom right.
On the authoring canvas, select + (add) underneath the Cancel intent recognized trigger. Select Send a response.
Enter Canceling. as a response variation.
Select + (add) after the send a response action and select Dialog management > Cancel all active dialogs.
Below is a screenshot of what the Cancel trigger should look like:
Create the menu dialog
Now add a menu dialog to show users their order options and ask them to select one.
Go to the authoring canvas. To the right of your MenuBot bot, select more options (…) and select Add a dialog.
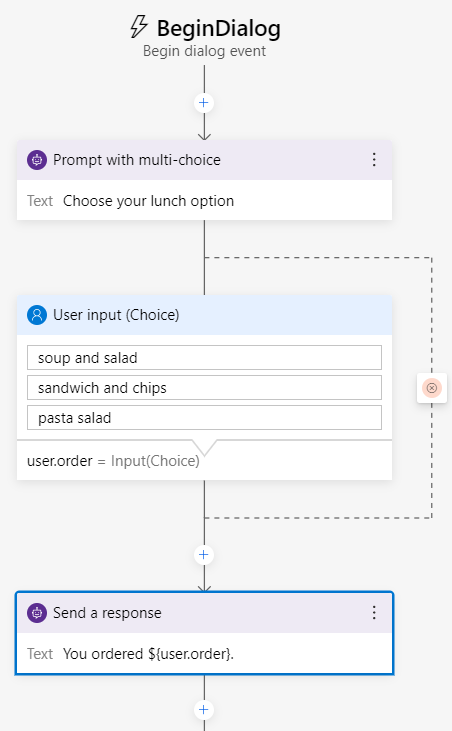
For the Name, enter
OrderOptions. In the Description box, enterAsks the user to select from menu order options. Then select OK on the bottom right.Select BeginDialog under the newly created OrderOptions. Then select the + add button, hover over Ask a question, and select Multi-choice.
Enter Choose order from the options below under Responses. Then select the User input tab.
Under Property enter user.order. Then scroll down to the section called Choice options. Enter the following options, selecting Add new each time you want to add a new one:
soup and salad
sandwich and chips
pasta salad
Select the + add button under the User Input (Choice) prompt. Then select Send a response and enter the following response alternative:
You ordered ${user.order}.Below is a screenshot of the menu order options bot logic:
Create the menu trigger
Now add the trigger to recognize when the user wants to display the menu options.
Select the more options button next to the OrderOptions dialog and then select Add new trigger. Name the trigger OrderOptions and add the following Trigger phrases:
- show menu
- what can I order
- menu options
Orchestrator will use this data to build a model that recognizes the menu intent.
After entering the trigger phrases, select Submit on the bottom right.
On the authoring canvas select the + add button underneath the OrderOptions intent recognized trigger. Hover over Dialog management and select Begin a new dialog.
In the properties pane, from the Dialog name list, select OrderOptions, the name of the dialog you just created.
Finally, select the OrderOption dialog from the navigation pane. In the properties pane under Recognizer/Dispatch type, select Change. Select Orchestrator (Intents only) and then select Done. If you notice any warnings in Composer, repeat the same process with the root bot dialog.
Your intent driven Orchestrator menu options bot is now ready to test!
Test your bot
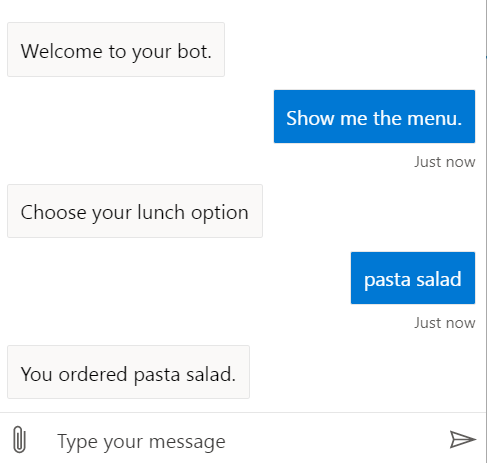
Select Start bot on the top right. Once your bot's ready, select Open Web Chat.
Send the bot a message that includes something from your OrderOptions trigger, like "menu" or "show me the options". Follow the prompt to see the full bot flow.
Tip
The bot responds with the multi-choice prompt in the OrderOptions dialog. This is because the intent driven trigger OrderOptions was recognized and the flow in the associated dialog begins. Additionally, entering any of the Cancel trigger phrases will cause that trigger to fire and cancel all active dialogs.