How to publish a skill to Azure from Composer
APPLIES TO: Composer v1.x and v2.x
Composer lets you export a bot as a skill, which allows it to provide conversational logic to other bots. For example, the Enterprise Assistant Bot template uses a root bot connected to multiple skills. This article describes how to publish a skill as an Azure Web App.
As part of this process:
- Composer publishes your bot to Azure, along with a skill manifest. The manifest allows your bot to be used as a skill.
- You can update your bot's allowed callers list, the app IDs of bots that are allowed to use your bot as a skill.
You can use the steps in this article to publish any existing bot as a skill.
Prerequisites
- A subscription to Microsoft Azure.
- A bot built using Composer v1.4 or later.
- A Recommended operating system and architecture.
Create a local skill or start with an existing bot
If you don't have a local skill to publish, use the instructions in how to Create and test a local skill to create one.
Generate a skill manifest and publish your skill
Export your skill
Open the project that contains the bot to publish as a skill.
Go to the Create page.
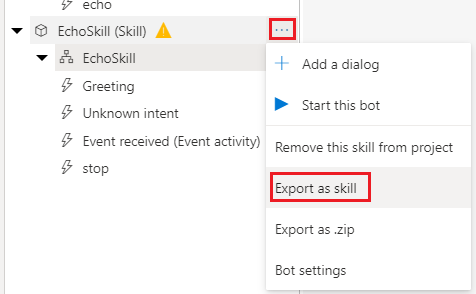
In the bot explorer
To the right of your skill bot, select more options (...).
Then, select Export as a skill from the menu.

On the Export your skill page:
Describe your skill. Composer will add this information when it creates your skill's manifest.
Category Type Required Description Manifest Version String Required The skill manifest schema version to use. Name String Required The name of the skill. Version String Required The version of the skill the manifest describes. Publisher Name String Required The name of the skill publisher. Description String Optional A human-readable description of the skill. Privacy Url String Optional The URI of the privacy description for the skill. Copyright String Optional The copyright notice for the skill. License String Optional The license agreement for the skill. Icon Url String Optional The URL of the icon to show for the skill. Tags String Optional A set of tags for the skill. If present, each tag must be unique. Tip
For tables describing the full schema of the Bot Framework skill manifest, read How to write a skill manifest in the Bot Framework SDK documentation.
Select Next.
On the Select dialogs page, select the dialogs that will be accessible to consumer bots—For the EchoSkill bot, this is the EchoSkill dialog.
- Select Next.
On the Select triggers page, select the triggers to include that can start a task.
- Don't select any of the triggers. Your skill is expecting an
eventactivity named "startSkill" as the initial activity sent by a root bot to the skill. By default, all new skill manifests include an event activity as an initial activity. However, you'll later need to edit the manifest and republish the skill. - Select Next.
- Don't select any of the triggers. Your skill is expecting an
On the Which bots can connect to this skill? page, select Next.
- Don't add allowed callers at this time. It's not needed for this article. You can add allowed callers and republish the skill later.
- To restrict callers to specific bots, you would add the app ID of each allowed caller.
If you already have a publishing profile for this bot, Composer will use that.
- If the skill doesn't have a publishing profile yet, Composer displays the Create a publish profile to continue page and prompts you to create a new publishing profile.
Select Create new publish profile to continue.
Follow the instructions and create the publishing profile. Composer will provision resources for your skill bot. For detailed instructions, see how to Publish a bot.
- Publish to Azure.
- Create new resources.
- No optional resources are required for the echo skill.
Composer then provisions and publishes your skill to Azure, which can take a minute or two.
When it completes, it displays a notification that your skill is ready to be shared.
Copy the skill manifest URL. You use the skill manifest URL to connect a consumer bot to the deployed skill.

- If the skill doesn't have a publishing profile yet, Composer displays the Create a publish profile to continue page and prompts you to create a new publishing profile.
Edit the skill manifest and republish
The skill manifest describes the capabilities of the skill.
The skill manifest is located in the skill's project folder, in the manifests subdirectory.
This directory also contains a language model (.lu) file for the skill. The language model for this echo skill will be empty.
Edit the skill manifest locally, outside of Composer.
- Review the
endpointsarray.- Important: if there are any empty objects in the endpoints array, remove them. Other bots can't consume a poorly formed skill manifest.
- For more information about the skill manifest format, see How to write a skill manifest in the Bot Framework SDK documentation.
- In the manifest, change
activities.EchoSkill.namefromEchoSkilltostartSkill, the name of the event that the echo skill is designed to receive. - Make any other changes to the manifest that you want to make.
- Save your changes.
- Review the
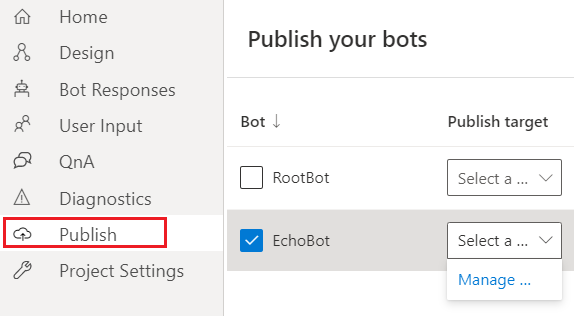
Back in Composer, go to the Publish view and republish the echo skill from its profile.
Once Composer finishes, open the skill's manifest URL to verify that the correct manifest was published.
The manifest should look something like:
{
  "$schema": "https://schemas.botframework.com/schemas/skills/v2.2/skill-manifest.json",
  "$id": "<the-ID-for-your-skill-manifest>",
  "endpoints": [
    {
      "protocol": "BotFrameworkV3",
      "name": "<unique-name-for-this-endpoint>",
      "endpointUrl": "<the-uri-endpoint-for-your-skill>",
      "description": "<a-description-of-this-endpoint>",
      "msAppId": "<ms-appID for-your-skill>"
    }
  ],
  "name": "<the-name-of-your-skill>",
  "version": "<the-version-of-your-skill-the-manifest-describes>",
  "publisherName": "<the-name-of-the-skill-publisher>",
  "description": "<a-description-of-the-skill>",
  "activities": {
    "EchoSkill": {
      "type": "event",
      "name": "startSkill"
    }
  }
}
Now your remote skill is ready!
You can test your skill as a root bot directly in Azure. To do so, use Azure's Test in Web Chat feature. Since you're accessing the bot directly, it behaves as a root bot, and doesn't behave like a skill.
Additional information
A skill's manifest can include dispatch and language model information. This information describes the intents and questions the skill is designed to respond to. It can also provide language models for multiple locales.
- When you publish your skill, Composer can add dispatch and language model information to the skill's manifest. It uses the language models from the skill bot to do so.
- When you create a bot that consumes a skill, Composer can use the skill's manifest to generate triggers in the root bot to invoke the skill.
For more information, see About skills in Composer and reuse of conversation logic between bots.
Next steps
- To access the published skill bot as a skill, see how to connect to a skill.
- For information on creating a skill bot, see how to create a skill.

