Note
Access to this page requires authorization. You can try signing in or changing directories.
Access to this page requires authorization. You can try changing directories.
APPLIES TO: Composer v2.x
This article shows how to create a bot using the Azure Bot resource.
Note
The nightly builds include pre-release features and may change how some operations are performed. The Composer documentation supports the latest stable release of Composer, and some aspects of the nightly builds may not work as described in the documentation. For more information about nightly builds, see Application settings.
Prerequisites
Create an Azure Bot resource
The Azure Bot resource provides the infrastructure that allows a bot to access secured resources. It also allows the user to communicate with the bot via several channels such as Web Chat.
Go to the Azure portal.
In the right pane, select Create a resource.
In the search box enter bot, then press Enter.
Select the Azure Bot card.
Select Create.
Enter the required values.
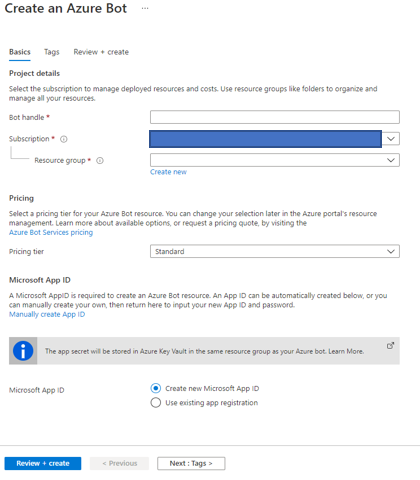
Select Review + create.
If the validation passes, select Create. You should see the Azure Bot and the related key vault resources listed in the resource group you selected.
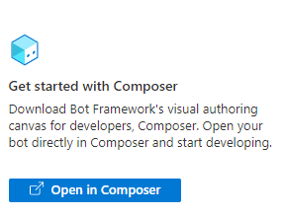
Select Open in Composer.
The Composer application opens. It the application isn't installed, you'll be asked to install it before you can proceed with the next steps.
In the pop-up window, select Create a new bot.
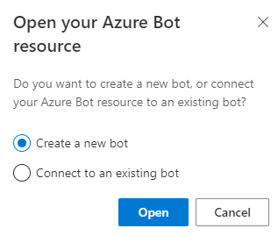
Select Open.
Azure Key Vault
When Azure creates the Azure Bot resource, it also generates an app ID and an app password and stores the password in Azure Key Vault.
Key Vault is a service that provides centralized secrets management, with full control over access policies and audit history. For more information, see Use Key Vault references for App Service and Azure Functions. You're charged a small fee for using the service. For more information, see Key Vault pricing.
Create a bot
Create a bot by following the steps described below.
Create a bot from a template
- Open Composer.
- Select Create New (+) on the homepage.
- Composer shows a list of templates. The templates provide a starting point for your new bot. For the purposes of this quick-start, select the Empty bot template under the C# section. This template creates a bot containing a root dialog, initial greeting dialog, and an unknown intent handler. Then select Next.
- Fill in the Name for the bot as Menu_bot. Then select Azure Web App from the Runtime type, and a location for your bot on your machine.
- Select OK. It will take a few moments for Composer to create your bot from the template.
Add bot functionality
The bot created from the Empty bot template contains an unknown intent trigger. This acts as a fallback whenever your bot doesn't know how to respond. When your bot doesn't recognize the intent of user input, it will send a response letting the user know.
This section describes how to add basic bot functionality to your empty bot template. You'll add:
- A dialog called Menu that displays a text message with menu items.
- A trigger for the Menu dialog. This makes it possible for your bot to recognize the intent, and connects the menu dialog above.
Add a dialog
Now you can add functionality for intents that you want your bot to recognize.
Dialogs are a convenient way to organize conversational logic. This section shows you how to add a dialog. In the next section, you add a trigger to the bot's main dialog to call the new dialog.
Click the three dots next to your bot project, Menu_bot, and select + Add a dialog.
In the Name field, enter Menu, and in the Description field, enter A dialog that shows the menu.. Then select OK.
Select BeginDialog underneath the Menu dialog.
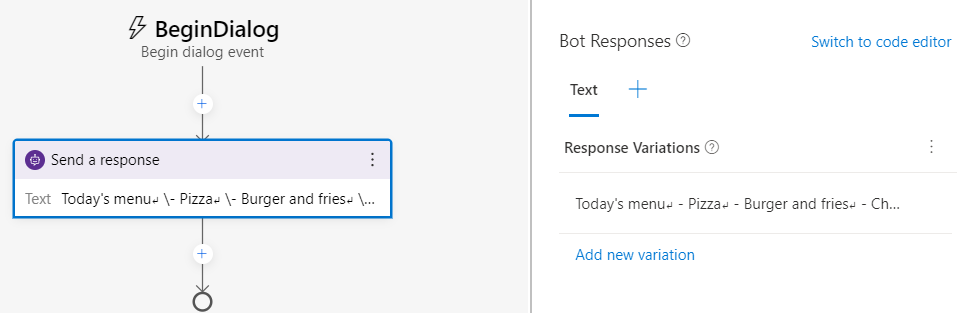
In the authoring canvas, select the + button under BeginDialog. Then select Send a response.
Enter the following menu text in the response editor on the right.
Today's menu
 - Pizza
 - Burger and fries
 - Chicken sandwich
Your authoring canvas should look like the following.
Create a trigger to recognize the menu intent
Now that your dialog is ready to send a response of menu options, you need to create a trigger so that your bot recognizes when users want the menu item displayed.
Select your bot project, Menu_bot.
On the right, select the Regular expression recognizer for the Recognizer type. This recognizer provides a simple example without adding natural language understanding. For a real-world bot, explore language understanding.
Now, add a trigger to the Menu_bot dialog.
- The default trigger type is Intent recognized.
- Enter
Menuin the What is the name of this trigger (RegEx) field. - Enter
menuin the Please input regEx pattern field. - Select Submit. This creates a trigger, named Menu, which will fire when the user sends a menu message to the bot.
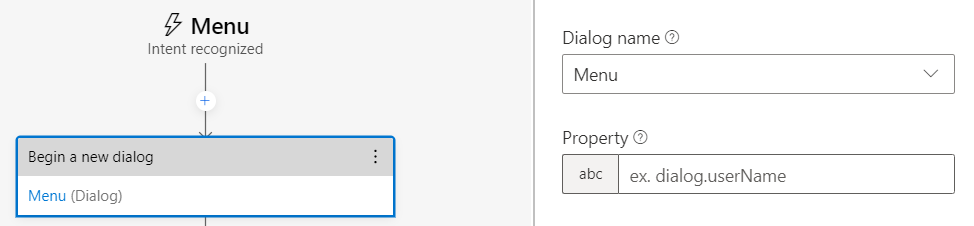
Now you need to start the Menu dialog you created previously from the trigger. Select the + under the Menu trigger on the authoring canvas. Go to Dialog management and select Begin a new dialog.
Go to the right and select the box underneath Dialog name. You should see the Menu dialog you created previously; select it. Your authoring canvas should look like the following.
Your menu bot is now ready to test!