Note
Access to this page requires authorization. You can try signing in or changing directories.
Access to this page requires authorization. You can try changing directories.
Use this property page to tell Visual Studio which directories to use when building the currently selected project. To set directories for multiple projects in a solution, use a custom property sheet as described in Share or reuse Visual Studio C++ project settings.
For the Linux version of this page, see VC++ Directories (Linux C++).
To access the VC++ Directories property page:
If the Solution Explorer window isn't visible, choose View > Solution Explorer on the main menu.
Right-click on a project node (not the top-level solution) and choose Properties to open the Property Pages dialog box.
Select the Configuration Properties > VC++ Directories property page.
VC++ Directories properties apply to a project, not the top-level solution node. If you don't see VC++ Directories under Configuration Properties, select a C++ project node in the Solution Explorer window:

In the property pages dialog, Configuration properties > VC++ directories is selected. The various C++ directories are listed, such as: executable directories, include directories, library directories, source directories, and so on.
The VC++ Directories property page for cross-platform projects looks different. For information specific to Linux C++ projects, see VC++ Directories (Linux C++).
If you're not familiar with project properties in Visual Studio, you might find it helpful to first read Set C++ compiler and build properties in Visual Studio.
The default settings for VC++ Directories properties depend on project type. For desktop projects, they include the C++ tools locations for a particular Platform Toolset and the Windows SDK location. You can change the Platform Toolset and Windows SDK version on the Configuration Properties > General page.
To view the values for any of the directories:
- Select one of the properties in the VC++ Directories page. For example, choose Library Directories.
- Choose the down-arrow button at the end of the property value field.
- In the drop-down menu, choose Edit.

You now see a dialog box like this:

The library directories dialog has a library directories area and an evaluated value area that shows the path values after all macros have been expanded. There's an inherited values area that shows the macro values inherited from the parent or the project. There's a checkbox, checked, that says Inherit from parent or project defaults. There's a macros button and an OK and Cancel button.
Use this dialog to view the current directories. However, if you want to change or add a directory, it's better to use Property Manager to create a property sheet or modify the default user property sheet. For more information, see Share or reuse Visual Studio C++ project settings.
As shown earlier, many of the inherited paths are provided as macros. To examine the current value of a macro, choose the Macros button in the lower right corner of the dialog box. Many macros depend on the configuration type. A macro in a debug build might evaluate to a different path than the same macro in a release build, for example. For information about examining macros values, see Common macros for build commands and properties.
You can search for partial or complete matches of a macro in the edit box. The following screenshot shows all the macros that contain the string "WindowsSDK". It also shows the current path that each macro evaluates to:
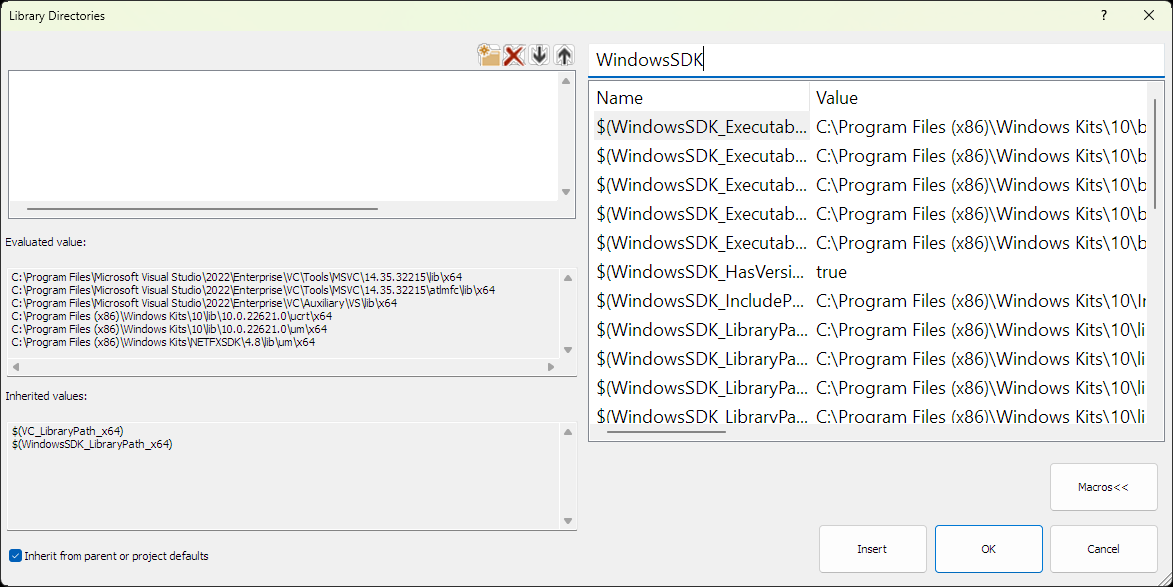
The Library Directories dialog is shown, and a filtered list of macros. Results include macros that contain the string "WindowsSDK", such as $ ( Windows SDK _ Executable Path ), $ ( Windows SDK _ Include Path ), $ ( Windows SDK _ Library Path ), and more. There's an inherited values area that shows which macro values are inherited from a parent or project. There's an evaluated value area that shows the path values after all macros have been expanded. There's a checkbox, checked, that says Inherit from parent or project defaults. There's a macros button and an Insert, OK, and Cancel button.
This list is populated as you type. Don't press Enter.
For more information about macros and why you should use them instead of hard-coded paths whenever possible, see Set C++ compiler and build properties in Visual Studio.
For information about examining the values of the macros, see Common macros for build commands and properties. That topic also lists commonly used macros.
You can define your own macros in two ways:
Set environment variables in a developer command prompt. All environment variables are treated as MSBuild properties/macros.
Define user macros in a
.propsfile. For more information, see Property page macros.
For more information, see Property inheritance in Visual Studio projects, and these blog posts: VC++ Directories, Visual Studio 2010 C++ Project Upgrade Guide.
General
You can also specify other directories, as follows.
Executable Directories
Directories in which to search for executable files. Corresponds to the PATH environment variable.
Include Directories
Directories in which to search for include files that are referenced in the source code. Corresponds to the INCLUDE environment variable.
External Include Directories
Paths for include files to treat as external or system files during compilation. These files are skipped in build up-to-date checks. These paths are also used by the External Includes properties. For more information on how to set these options in the IDE, see the /external compiler option.
Reference Directories
Directories in which to search for assembly and module (metadata) files that are referenced in the source code by the #using directive. Corresponds to the LIBPATH environment variable.
Library Directories
Directories to search for library (.lib) files. This search includes run-time libraries. Corresponds to the LIB environment variable. This setting doesn't apply to .obj files; to link to an .obj file, on the Configuration Properties > Linker > General property page, select Additional Library Dependencies and then specify the relative path of the file. For more information, see Linker property pages.
Library WinRT Directories
Directories to search for WinRT library files for use in Universal Windows Platform (UWP) apps.
Source Directories
Directories in which to search for source files to use for IntelliSense.
Exclude Directories
Before each compilation, Visual Studio queries the timestamp on all files to determine whether any have been modified since the previous compilation. If your project has large stable libraries, you can potentially speed up build times by excluding those directories from the timestamp check.
Public Project Content
Public Include Directories
One or more directories to automatically add to the include path in projects that reference this project.
All Header Files are Public
Specifies whether to automatically add public directories or all project header files to the include path in projects that reference this project.
Public C++ Module Directories
One or more directories that contain C++ module or header unit sources to make available automatically to projects that reference this project.
All Modules are Public
Specifies whether to make all project modules and header units available automatically to projects that reference this project.
Sharing the settings
You can share project properties with other users or across multiple computers. For more information, see Set C++ compiler and build properties in Visual Studio.