Note
Access to this page requires authorization. You can try signing in or changing directories.
Access to this page requires authorization. You can try changing directories.
This walkthrough shows how to import C++ Standard Template Library (STL) libraries as header units in Visual Studio. For an even faster and more robust way to import the standard library, see Tutorial: Import the C++ standard library using modules.
Importing an STL header as a header unit is simpler than using precompiled header files. Header units are easier to set up and use, are substantially smaller on disk, provide similar performance benefits, and are more flexible than a shared PCH.
For more detailed information about what header units are and the benefits they provide, see What is a header unit?. To contrast header units with other ways to import the standard library, see Compare header units, modules, and precompiled headers.
Prerequisites
To use header units, use Visual Studio 2022 or later, or Visual Studio 2019 version 16.11 or later. The /std:c++20 option (or later) is required to use header units.
Two approaches to import STL headers as header units
Before you can import an STL header, it must be compiled into a header unit. A header unit is a binary representation of a header file. It has an .ifc extension.
The recommended approach is to create a static library that contains the built header units for the STL headers you want to use. Then reference that library and import its header units. This approach can result in faster builds and better reuse. To try out this approach, see Approach 1: Create a static library of STL library header units.
Another approach is to have Visual Studio scan for the STL headers you #include in your project, compile them into header units, and import rather than #include those headers. This approach is useful if you have a large codebase, because you don't have to change your source code. This approach is less flexible than the static library approach, because it doesn't lend itself to reusing the built header units in other projects. But, you still get the performance advantage of importing individual STL libraries as header units. To try out this approach, see Approach 2: Scan includes for STL headers to import.
Approach 1: Create a static library of STL library header units
The recommended way to consume STL libraries as header units is to create one or more static library projects. These projects should consist of the STL library header units that you want to use. Then, reference the library projects to consume those STL header units. It's similar to using shared precompiled headers, but easier.
Header units (and modules) built in a static library project are automatically available to referencing projects because the project system automatically adds the appropriate /headerUnit command-line option to the compiler so that referencing projects can import the header units.
This approach ensures that the header unit for a particular header is built only once. It allows you to import some or all of the header units, which isn't possible with a PCH. You can include header units in any order.
In the following example, you create a static library project consisting of the <iostream> and <vector> header units. After the solution is built, you'll reference this shared header unit project from another C++ project. Everywhere import <iostream>; or import <vector>; is found, the built header unit for that library is used instead of translating the header with the preprocessor. It improves build performance, like PCH files do, when the same header is included in multiple files. The header won't have to be processed over and over by the files that include it. Instead, the already processed compiled header unit is imported.
To create a static library that contains the STL libraries <iostream> and <vector>, follow these steps:
Create an empty C++ project. Name it SharedPrj.
Select Empty Project for C++ from the project types available in the Create a new project window: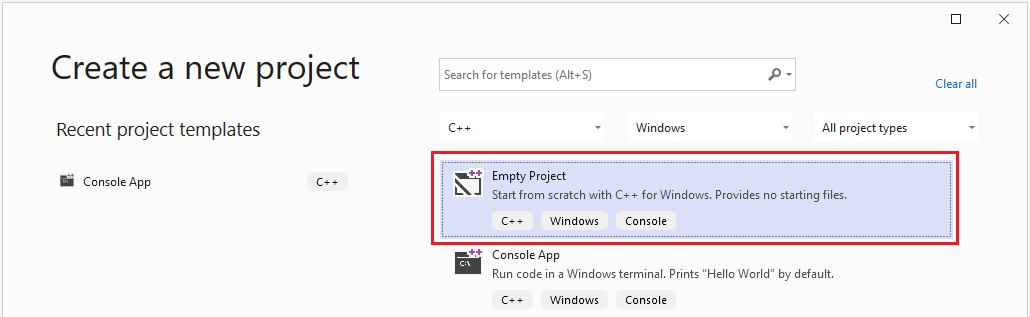
Add a new C++ file to the project. Change the file's content to:
import <iostream>;
import <vector>;
Set project properties
Set project properties to share the header units from this project:
- On the Visual Studio main menu, select Project > SharedPrj Properties to open the project Property Pages dialog:
- Select All Configurations in the Configuration dropdown list, and then select All Platforms in the Platform dropdown list. These settings ensure that your changes apply whether you're building for debug or release.
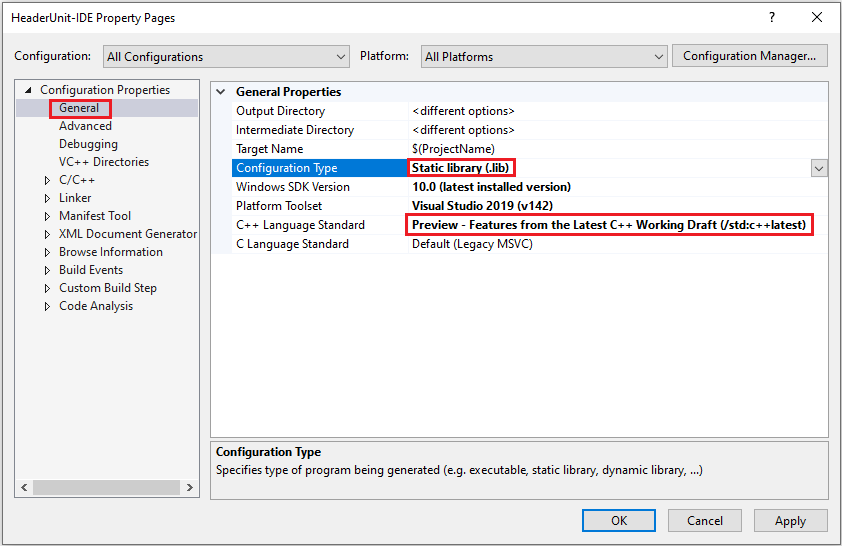
- In the left pane of the project Property Pages dialog, select Configuration Properties > General.
- Change the Configuration Type option to Static library (.lib).
- Change C++ Language Standard to ISO C++20 Standard (/std:c++20) (or later).
- In the left pane of the project Property Pages dialog, select Configuration Properties > C/C++ > General.
- In the Scan Sources for Module Dependencies dropdown list, select Yes. (This option causes the compiler to scan your code for dependencies that can be built into header units):

- Choose OK to close the project Property Pages dialog. Build the solution by selecting Build > Build Solution on the main menu.
Reference the header unit library
To import <iostream> and <vector> as header units from the static library, create a project that references the static library as follows:
With the current solution still open, on the Visual Studio menu, select File > Add > New Project.
In the Create a new project wizard, select the C++ Console App template and choose Next.
Name the new project Walkthrough. Change the Solution dropdown to Add to solution. Choose Create to create the project and add it to your solution.
Change the content of the Walkthrough.cpp source file as follows:
import <iostream>;
import <vector>;

int main()
{
    std::vector<int> numbers = {0, 1, 2};
    std::cout << numbers[1];
}
Header units require the /std:c++20 option (or later). Set the language standard by using the following steps:
- In Solution Explorer, right-click the Walkthrough project and select Properties to open the project Property Pages dialog:
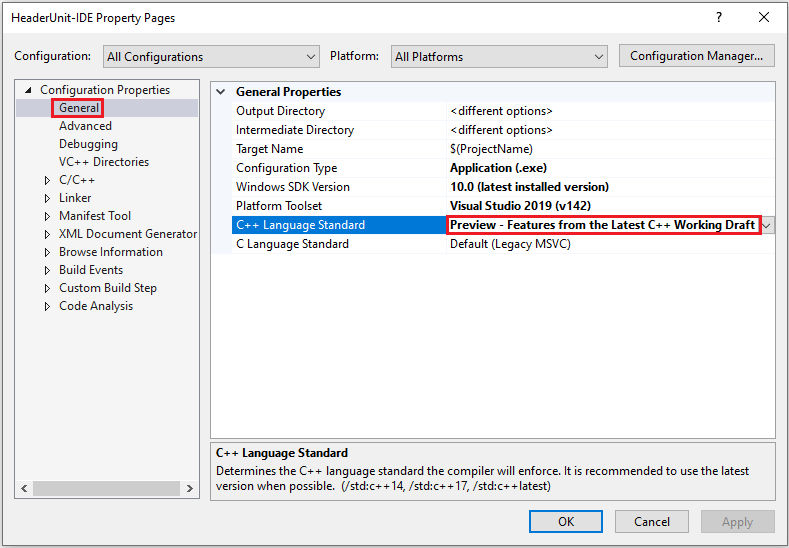
- In the left pane of the Walkthrough project Property Pages dialog, select Configuration Properties > General.
- In the C++ Language Standard dropdown, select ISO C++20 Standard (/std:c++20) (or later).
- Choose OK to close the project Property Pages dialog.
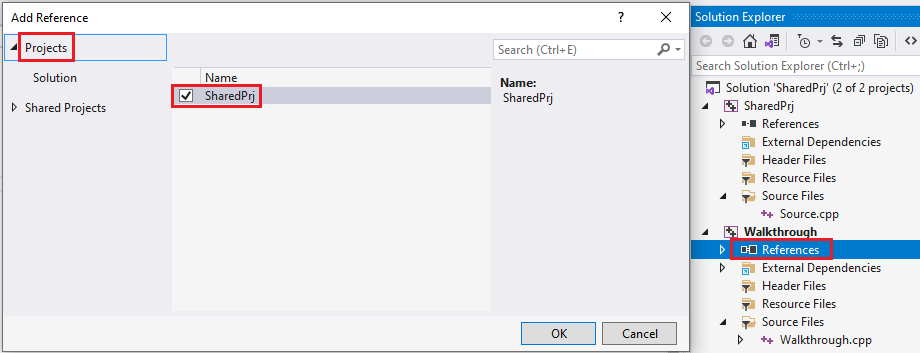
In the Walkthrough project, add a reference to the SharedPrj project with the following steps:
- In the Walkthrough project, select the References node, and then select Add Reference. Select SharedPrj in the list of projects:
 Adding this reference causes the build system to use the header units built by SharedPrj whenever an
 importin the Walkthrough project matches one of the built header units in SharedPrj. - Choose OK to close the Add Reference dialog.
- Right-click the Walkthrough project and select Set as Startup Project.
- Build the solution. (Use Build > Build Solution on the main menu.) Run it to see that it produces the expected output:
1
The advantage of this approach is that you can reference the static library project from any project to reuse the header units in it. In this example, the static library contains the <vector> and <iostream> header units.
You can make a monolithic static library project that contains all the commonly used STL headers that you want to import from your various projects. Or you can create smaller shared library projects for the different groupings of STL libraries that you want to import as header units. Then reference those shared header unit projects as needed.
The result should be increased build throughput because importing a header unit significantly reduces the work the compiler must do.
When you use this approach with your own projects, build the static library project with compiler options that are compatible with the project that references it. For example, STL projects should be built with the /EHsc compiler option to turn on exception handling, and so should the projects that reference the static library project.
Use /translateInclude
The /translateInclude compiler option (available in the project Property Pages dialog under C/C++ > General > Translate Includes to Imports) makes it easier for you to use a header unit library in older projects that #include the STL libraries. It makes it unnecessary to change #include directives to import in your project, while still giving you the advantage of importing the header units instead of including them.
For example, if you have #include <vector> in your project and you reference a static library that contains a header unit for <vector>, you don't need to manually change #include <vector> to import <vector>; in your source code. Instead, the compiler automatically treats #include <vector> as import <vector>;. For more information in detail on this approach, see Approach 2: Scan includes for STL headers to import. Not all STL header files can be compiled to a header unit. The header-units.json shipped with Visual Studio lists which STL header files can be compiled into header units. A header that relies on macros to specify its behavior often can't be compiled into a header unit.
An #include statement that doesn't refer to a header unit is treated as a normal #include.
Reuse header units among projects
Header units built by a static library project are automatically available to all directly and indirectly referencing projects. There are project settings that allow you to select which header units should be automatically available to all referencing projects. The settings are in project settings under VC++ Directories.
- In Solution Explorer, right-click the project and select Properties to open the project Property Pages dialog.
- In the left pane of the dialog, select Configuration Properties > VC++ Directories:
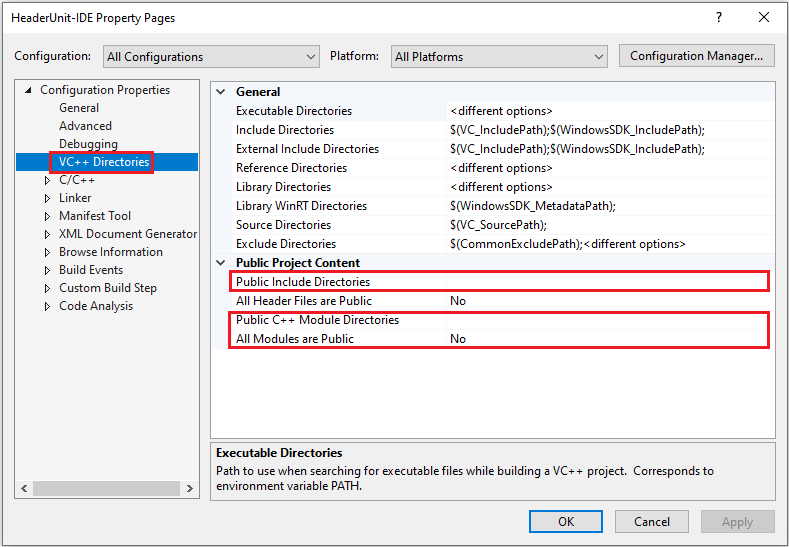
The following properties control the visibility of header units to the build system:
- Public Include Directories specifies project directories for header units that should be automatically added to the include path in referencing projects.
- Public C++ Module Directories specifies which project directories contain header units that should be available to referencing projects. This property allows you to make some header units public. It's visible to other projects, so put header units that you want to share here. If you use this setting, for convenience, specify Public Include Directories to automatically add your public headers to the Include path in referencing projects.
- All Modules are Public: when you use header units built as a part of a DLL project, the symbols have to be exported from the DLL. To export module symbols automatically, set this property to Yes.
Use a prebuilt module file
Typically, the easiest way to reuse header units among solutions is to reference a shared header unit project from each solution.
If you must use a built header unit that you don't have the project for, you can specify where the built .ifc file is so you can import it in your solution. To access this setting:
- On the main menu, select Project > Properties to open the project Property Pages dialog.
- In the left pane of the dialog, select Configuration Properties > C/C++ > General.
- In Additional Module Dependencies, add the modules to reference, separated by semicolons. Here's an example of the format to use for Additional Module Dependencies:
ModuleName1=Path\To\ModuleName1.ifc; ModuleName2=Path\To\ModuleName2.ifc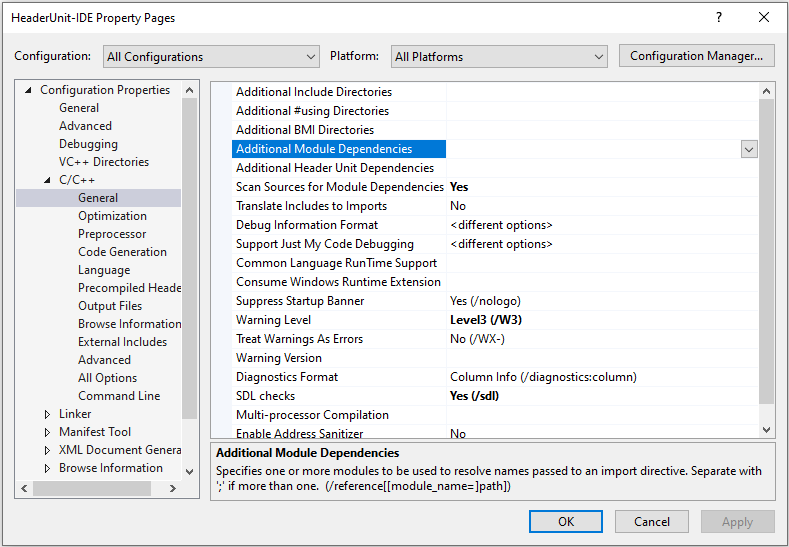
Select among multiple copies of a header unit
If you reference projects that build multiple header units, either with the same name or for the same header file, you must specify which one to use. You might have different versions of the header unit built with different compiler settings, for example, and must specify the one that matches your project settings.
Use the project's Additional Header Unit Dependencies property to resolve collisions by specifying which header unit to use. Otherwise, it isn't possible to predict which one is picked.
To set the Additional Header Unit Dependencies property:
- On the main menu, select Project > Properties to open the project Property Pages dialog.
- In the left pane of the dialog, select Configuration Properties > C/C++ > General.
- Specify which modules or header unit files to use in Additional Header Unit Dependencies to resolve collisions. Use this format for Additional Header Unit Dependencies:
Path\To\Header1.h= Path\To\HeaderUnit1.ifc;Path\To\Header2.h= Path\To\ HeaderUnit2.ifc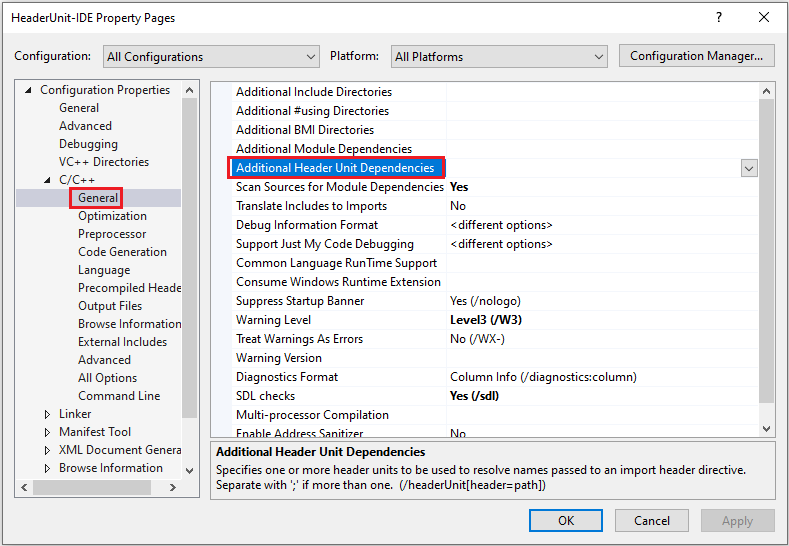
Important
Ensure that projects that share header units are built with compatible compilation options. If you use compilation options when you implement the header unit that are different from the ones you used when you created it, the compiler will issue warnings.
Note
To use header units built as a part of a DLL project, set All Modules are Public to Yes.
Approach 2: Scan includes for STL headers to import
Another way to import STL libraries is to have Visual Studio scan for the STL headers you #include in your project and compile them into header units. The compiler then imports rather than includes those headers.
This option is convenient when your project includes many STL header files across many files, or when build throughput isn't critical. This option doesn't guarantee that a header unit for a particular header file is built only once. However, it's useful if you have a large codebase: You don't have to change your source code to take advantage of the benefits of header units for many of the STL libraries you use.
This approach is less flexible than the static library approach, because it doesn't lend itself towards reusing the built header units in other projects. This approach might not be appropriate for larger projects: It doesn't guarantee an optimal build time, since all of the sources must be scanned for #include statements.
Not all header files can be automatically converted to header units. For example, headers that depend on conditional compilation via macros shouldn't be converted to header units. There's an allowlist in the form of a header-units.json file for the STL headers that the compiler uses when /translateInclude is specified. It determines which STL headers can be compiled into header units. The header-units.json file is under the installation directory for Visual Studio. For example, %ProgramFiles%\Microsoft Visual Studio\2022\Enterprise\VC\Tools\MSVC\14.30.30705\include\header-units.json. If the STL header file isn't on the list, it's treated as a normal #include instead of importing it as a header unit. Another advantage of the header-units.json file is that it prevents symbol duplication in the built header units. That is, if compiling a header unit brings in another library header multiple times, the symbols won't be duplicated.
To try out this approach, create a project that includes two STL libraries. Then, change the project's properties so that it imports the libraries as header units instead of including them, as described in the next section.
Create a C++ console app project
Follow these steps to create a project that includes two STL libraries: <iostream> and <vector>.
In Visual Studio, create a new C++ console app project.
Replace the contents of the source file as follows:
#include <iostream>
#include <vector>

int main()
{
    std::vector<int> numbers = {0, 1, 2};
    std::cout << numbers[1];
}
Set project options and run the project
The following steps set the option that causes the compiler to scan for included headers to translate into header units. They also set the option that causes the compiler to treat #include as if you had written import for header files that can be treated as header units.
- On the main menu, select Project > Properties to open the project Property Pages dialog.
- Select All Configurations in the Configuration dropdown list, and then select All Platforms in the Platform dropdown list. These settings ensure that your changes apply whether you're building for debug or release, and other configurations.
- In the left pane of the dialog, select Configuration Properties > C/C++ > General.
- Set Scan Sources for Module Dependencies to Yes. This setting ensures that all compatible header files compile into header units.
- Set Translate Includes to Imports to Yes. This setting compiles the STL header files listed in the
header-unit.jsonfile as header units, and then imports them instead of using the preprocessor to#includethem.
- Choose OK to save your changes and close the project Property Pages dialog.
The /std:c++20 option or later is required to use header units. To change the C++ language standard used by the compiler:
- On the main menu, select Project > Properties to open the project Property Pages dialog.
- Select All Configurations in the Configuration dropdown list, and then select All Platforms in the Platform dropdown list. These settings ensure that your changes apply whether you're building for debug or release, and other configurations.
- In the left pane of the project Property Pages dialog, select Configuration Properties > General.
- In the C++ Language Standard dropdown list, select ISO C++20 Standard (/std:c++20) (or later).
- Choose OK to save your changes and close the project Property Pages dialog.
- From the main menu, build the solution by selecting Build > Build Solution.
Run the solution to verify that it produces the expected output: 1
The main consideration for whether to use this approach is the balance between convenience and the cost of scanning all your files to determine which header files to build as header units.
See also
Compare header units, modules, and precompiled headers
Tutorial: Import the C++ standard library using modules
Walkthrough: Build and import header units in your Visual C++ projects
/translateInclude