Note
Access to this page requires authorization. You can try signing in or changing directories.
Access to this page requires authorization. You can try changing directories.
In the Visual Studio IDE, you can view and edit the properties needed to compile and build a project. This information includes the application name, extension (such as DLL, LIB, EXE), compiler options, linker options, debugger settings, and custom build steps.
You can view and modify these properties by using property pages. To access the property pages, choose Project > project-name Properties from the main menu, or right-click on the project node in Solution Explorer and choose Properties.
Default properties
When you create a project, the system assigns values for various properties. The defaults vary somewhat depending on the kind of project and what options you choose in the app wizard. For example, an Active Template Library (ATL) project has properties related to Microsoft Interface Definition Language (MIDL) files, but these properties are absent in a basic console application. The default properties are shown in the Advanced pane in the Property Pages window:

Apply properties to build configurations and target platforms
Some properties, such as the application name, apply to all build variations and target platforms, whether it's a debug or release build. But most properties are configuration-dependent. To generate the correct code, the compiler has to know both the specific platform the program runs on and which specific compiler options to use. So when you set a property, it's important to pay attention to which configuration and platform the new value should apply to. Should it apply only to Debug Win32 builds, or should it also apply to Debug ARM64 and Debug x64? For example, the Optimization property, by default, is set to Maximize Speed (/O2) in a Release configuration, but is disabled in the Debug configuration.
You can always see and change the configuration and platform a property value should apply to. The following illustration shows the property pages with the configuration and platform information controls at the top. When the Optimization property is set here, it only applies to Debug x64 builds, the currently active configuration, as shown by the red arrows.
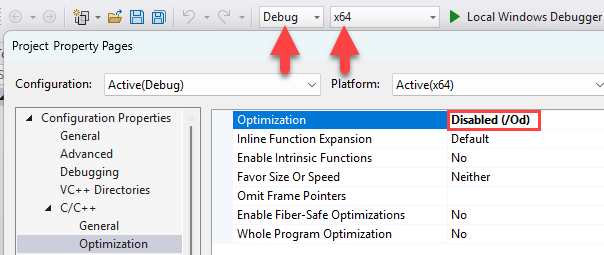
The page is open to C/C++, Optimization. The Optimization setting is set to Disabled (/Od), which is called out. An arrow calls out the relationship between the Configuration setting in the project property page, which is set to Active(Debug), and the setting in the Solution configuration dropdown on the toolbar, which is set to Debug. Another arrow calls out the relationship between the Platform setting in the project property page, which is set to Active(x64), and the setting in the Solutions platform dropdown on the toolbar, which is set to x64.
The following illustration shows the same project property page, but the configuration has been changed to Release. Note the different value for the Optimization property. Also note that the active configuration is still Debug. You can set properties for any configuration here; it doesn't have to be the active one.

Target platforms
Target platform refers to the kind of device and operating system that the executable runs on. You can build a project for more than one platform. The available target platforms for C++ projects depend on the kind of project. They include but aren't limited to Win32, x64, ARM, ARM64, Android, and iOS. The x86 target platform that you might see in Configuration Manager is identical to Win32 in native C++ projects. Win32 means 32-bit Windows and x64 means 64-bit Windows. For more information about these two platforms, see Running 32-bit applications.
The Any CPU target platform value that you might see in Configuration Manager has no effect on native C++ projects. It's only relevant for C++/CLI and other .NET project types. For more information, see /CLRIMAGETYPE (Specify Type of CLR Image).
For more information about setting properties for a Debug build, see:
- Project settings for a C++ debug configuration
- Debugger Settings and Preparation
- Debugging Preparation: Microsoft C++ Project Types
- Specify symbol (.pdb) and source files in the Visual Studio debugger
C++ compiler and linker options
C++ compiler and linker options are located under the C/C++ and Linker nodes in the left pane under Configuration Properties. These options translate directly to command-line options that are passed to the compiler. To read documentation about a specific option, select the option in the center pane and press F1. Or, you can browse documentation for all the options at MSVC compiler options and MSVC linker options.
The Property Pages dialog box shows only the property pages that are relevant to the current project. For example, if the project doesn't have an .idl file, the MIDL property page isn't displayed. For more information about the settings on each property page, see Property Pages (C++).
Directory and path values
MSBuild supports the use of compile-time constants for certain string values, such as include directories and paths, called macros. A macro can refer to a value that's defined by Visual Studio or the MSBuild system, or to a user-defined value. Macros look like $(macro-name) or %(item-macro-name). They're exposed in the property pages, where you can refer to and modify them by using the Property Editor. Use macros instead of hard-coded values such as directory paths. Macros make it easier to share property settings between machines and between versions of Visual Studio. You can also better ensure that your project settings participate correctly in property inheritance.
The following illustration shows the property pages for a Visual Studio C++ project. In the left pane, the VC++ Directories rule is selected, and the right pane lists the properties that are associated with that rule. The property values are often macros, such as $(VC_SourcePath):
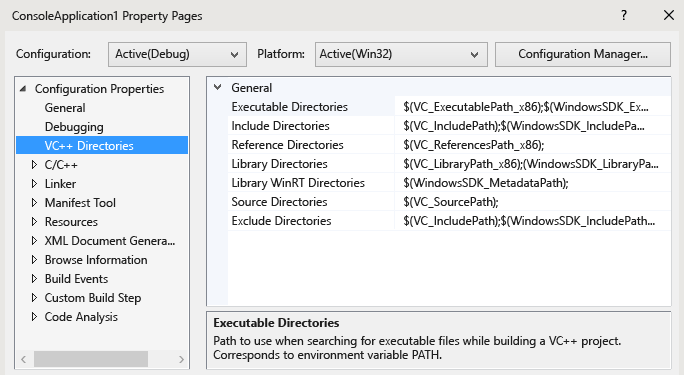
The VC plus plus Directories page is open, which has properties for the VC++ Directories rules. An example rule is Source directories, which is set to $(VC_SourcePath). There are rules for the include directories, library directories, executable directories, and so on.
You can use the Property Editor to view the values of all available macros.
Predefined macros
Global macros
Global macros apply to all items in a project configuration. A global macro has the syntax$(name). An example of a global macro is$(VCInstallDir), which stores the root directory of your Visual Studio installation. A global macro corresponds to aPropertyGroupin MSBuild.Item macros
Item macros have the syntax%(name). For a file, an item macro applies only to that file. For example, you can use%(AdditionalIncludeDirectories)to specify include directories that apply only to a particular file. This kind of item macro corresponds to anItemGroupmetadata in MSBuild. When used in the context of a project configuration, an item macro applies to all files of a certain type. For example, the C/C++ Preprocessor Definitions configuration property can take a%(PreprocessorDefinitions)item macro that applies to all .cpp files in the project. This kind of item macro corresponds to anItemDefinitionGroupmetadata in MSBuild. For more information, see Item definitions.
User-defined macros
You can create user-defined macros to use as variables in project builds. For example, you could create a user-defined macro that provides a value to a custom build step or a custom build tool. A user-defined macro is a name-value pair. In a project file, use the $(name) notation to access the value.
A user-defined macro is stored in a property sheet. If your project doesn't already contain a property sheet, you can create one by following the steps under Share or reuse Visual Studio project settings.
To create a user-defined macro
Open the Property Manager window. On the menu bar, select View > Other Windows > Property Manager. Open the shortcut menu for a property sheet (its name ends in
.user) and then choose Properties. The Property Pages dialog box for that property sheet opens.In the left pane of the dialog box, select User Macros. In the right pane, choose the Add Macro button to open the Add User Macro dialog box.
In the dialog box, specify a name and value for the macro. Optionally, select the Set this macro as an environment variable in the build environment check box.
Property Editor
You can use the Property Editor to modify certain string properties and select macros as values. To access the Property Editor, select a property on a property page and then choose the down arrow button on the right. If the drop-down list contains <Edit>, then you can choose it to display the Property Editor for that property.
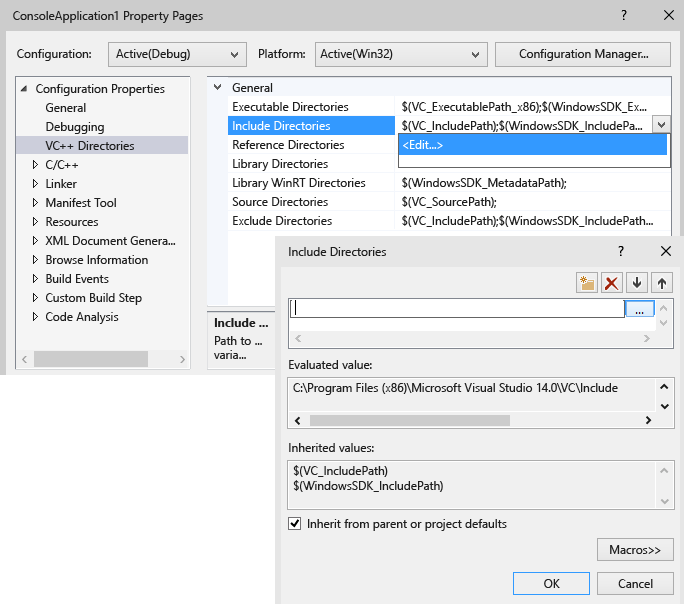
The Property Editor for the Include Directories setting is open. It shows the evaluated value for the Include Directories, which is C:\Program Files(x86)\Microsoft Visual Studio 14.0\VC\Include. It shows the two inherited values: $(VC_IncludePath) and $(WindowsSDK_IncludePath). A checkbox for 'Inherit from parent or project defaults' is selected.
In the Property Editor, you can choose the Macros button to view the available macros and their current values. The following illustration shows the Property Editor for the Additional Include Directories property after the Macros button was chosen. When the Inherit from parent or project defaults check box is selected and you add a new value, it's appended to any values that are currently being inherited. If you clear the check box, your new value replaces the inherited values. In most cases, leave the check box selected.
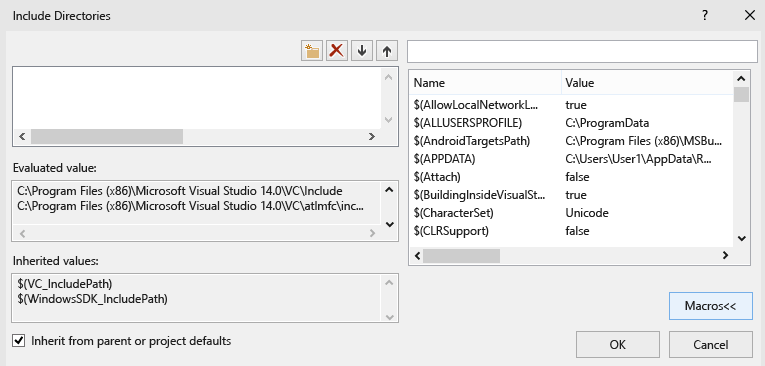
The property editor for Include Directories is open. The evaluated value is displayed along with the inherited values. A listbox contains various macros and their values, such as $(CharacterSet) which is set to Unicode.
Add an include directory to the set of default directories
When you add an include directory to a project, it's important not to override all the default directories. The correct way to add a directory is to append the new path, for example C:\MyNewIncludeDir\, and then to append the $(IncludePath) macro to the property value.
Quickly browse and search all properties
The All Options property page (under the Configuration Properties > C/C++ node in the Property Pages dialog box) provides a quick way to browse and search the properties that are available in the current context. It has a special search box and a simple syntax to help you filter results:
No prefix: Search in property names only (case-insensitive substring).
'
/' or '-': Search only in compiler switches (case-insensitive prefix).v: Search only in values (case-insensitive substring).
Set environment variables for a build
The MSVC compiler (cl.exe) recognizes certain environment variables, specifically LIB, LIBPATH, PATH, and INCLUDE. When you build with the IDE, the properties that are set in the VC++ Directories Property Page are used to set those environment variables. If LIB, LIBPATH, and INCLUDE values have already been set, for example by a Developer Command Prompt, they're replaced with the values of the corresponding MSBuild properties. The build then prepends the value of the VC++ Directories executable directories property to PATH. You can set a user-defined environment variable by creating a user-defined macro and then checking the box that says Set this macro as an environment variable in the build environment.
Set environment variables for a debugging session
In the left pane of the project's Property Pages dialog box, expand Configuration Properties and then select Debugging.
In the right pane, modify the Environment or Merge Environment project settings and then choose the OK button.
Articles in this section
- Share or reuse Visual Studio project settings
- Property inheritance in Visual Studio projects
- Modify C++ project properties and targets without changing the project file