Note
Access to this page requires authorization. You can try signing in or changing directories.
Access to this page requires authorization. You can try changing directories.
Important
Starting with Visual Studio 2026 (version 18.0), the Mobile development with C++ workload for iOS and Android, as well as the Embedded and IoT tools (RTOS Viewer, Serial Monitor, Peripheral Viewer, and ST Project Import), are no longer supported and will be removed in a future update. The Android NDKs included in the Mobile development with C++ workload remain supported.
You can use Visual Studio with the cross-platform Mobile development with C++ tools to edit, debug, and deploy iOS code to the iOS Simulator or to an iOS device. But, because of licensing restrictions, the code must be built and run remotely on a Mac. To build and run iOS apps using Visual Studio, you need to set up and configure the remote agent, vcremote, on your Mac. The vcremote remote agent handles build requests from Visual Studio and runs the app on an iOS device connected to the Mac, or in the iOS Simulator on the Mac.
Note
For information on using cloud-hosted Mac services instead of a Mac, see Configure Visual Studio to connect to your cloud hosted Mac. The instructions are for building using Visual Studio Tools for Apache Cordova. To use the instructions to build using C++, substitute vcremote for remotebuild.
Once you've installed the tools to build using iOS, refer to this article again. It describes ways to quickly configure and update vcremote for iOS development in Visual Studio and on your Mac.
Prerequisites
To install and use the vcremote remote agent to develop code for iOS, you must first have these prerequisites:
A Mac computer running macOS Mojave version 10.14 or later
An Apple ID
An active Apple Developer Program account
You can get a free account that allows sideloading apps to an iOS device for testing only but not for distribution.
Xcode version 10.2.1 or later
Xcode can be downloaded from the App Store.
Xcode command-line tools
To install the Xcode command-line tools, open the Terminal app on your Mac and enter the following command:
xcode-select --installAn Apple ID account configured in Xcode as a signing identity to sign apps
To see or set your signing identity in Xcode, open the Xcode menu and choose Preferences. Select Accounts and choose your Apple ID, and then choose the View Details button. See Add your Apple ID account for detailed instructions.
For detailed information on signing requirements, see What is app signing.
If you're using an iOS device for development, a provisioning Profile configured in Xcode for your device
Xcode provides automatic signing, where it creates signing certificates for you as needed. For detailed information about Xcode automatic signing, see automatic signing.
If you want to do manual signing, you need to create a provisioning Profile for your app. For detailed information on creating provisioning Profiles, see Create a development provisioning profile.
Node.js version 18.12.1 and npm version 8.19.2
Install version 18.12.1 of Node.js on your Mac. If you install the Node.js package, it should come with npm version 8.19.2. Other versions of Node.js and npm may not support some modules used in vcremote, which can cause vcremote installation to fail. We recommend you install Node.js by using a package manager such as Node Version Manager. Avoid using the command
sudoto install Node.js, as some modules can fail to install when using sudo.
Install vcremote for iOS
When you install the Mobile development with C++ workload, Visual Studio can communicate with the vcremote remote agent running on your Mac to transfer files, build and run your iOS app, and send debugging commands.
Before you install vcremote, make sure you've satisfied the Prerequisites and completed the installation steps in Install cross-platform mobile development with C++.
To download and install vcremote
From the Terminal app on your Mac, verify that the Node.js version currently in use is the required version 18.12.1. To verify the version, run the command:
node -vIf it's not the right version, you may need to follow the Node.js installation instructions in the prerequisites. Then, restart Node.js.
After verifying the required Node.js is in use, run this command to install vcremote under that Node.js version:
npm install -g --unsafe-perm vcremoteThe global installation (-g) switch is recommended, but not required. If you don't use the global installation switch, vcremote gets installed under the current active path in the Terminal app.
During the installation,
vcremoteis installed and developer mode is activated on your Mac. Homebrew and two npm packages,vcremote-libandvcremote-utils, are also installed. When installation completes, it's safe to ignore any warnings about skipped optional dependencies.Note
To install Homebrew, you must have sudo (administrator) access. If you need to install vcremote without sudo, you can install Homebrew manually in a
usr/locallocation and add itsbinfolder to your path. For more information, see the Homebrew documentation. To manually enable developer mode, enter this command in the Terminal app:DevToolsSecurity -enable
If you update to a new version of Visual Studio, you must update to the current version of vcremote as well. To update vcremote, repeat the steps to download and install the remote agent.
Start vcremote
The vcremote remote agent must be running for Visual Studio to build and run your iOS code. Visual Studio must be paired with vcremote before it can communicate. By default, vcremote runs in secured connection mode, which requires the transferring of client and server certificates between the Visual Studio and Mac machines.
Note
Version 1.0.19 or later of vcremote requires at least Visual Studio 2022 version 17.5.0 Preview 1 or later. If you're using Visual Studio 2022 version 17.4 or an earlier version, install vcremote version 1.0.17.
To start vcremote
From the Terminal app on your Mac, enter:
vcremoteThis command starts the remote agent with a default build directory of
~/vcremote. For more configuration options, see Configure vcremote on the Mac.
The first time you start vcremote, and every time you create a new server certificate, you're provided with the required information to configure the connection in Visual Studio. The information includes the host name and the port. If you intend to configure the remote agent in Visual Studio using the host name, ping the Mac from Windows using the host name to verify that it's reachable. Otherwise, you may need to use the IP address instead.
You can use the remote agent in unsecured mode. In unsecured mode, the remote agent can be paired to Visual Studio using a simple HTTP connection that doesn't encrypt data. Use unsecured mode at your own risk. We recommend you use a secure mode to connect:
Visual Studio 2022 version 17.5 and later with vcremote 1.0.19 and later:
In vcremote 1.0.19 and later, vcremote reports the path to a server-cert.pem certificate file, which must be uploaded to Visual Studio.
Visual Studio 2022 version 17.4 and earlier versions with vcremote 1.0.17 and earlier:
Version 1.0.17 and older versions of vcremote generate a PIN for secure communication with versions of Visual Studio through Visual Studio 2022 version 17.4.
The generated PIN is for one time use, and is only valid for a limited time. If you don't pair Visual Studio with the remote agent before the time expires, you'll need to generate a new PIN. For more information, see Generate a new security PIN.
To disable secured connection mode
To disable secured connection mode in vcremote, enter this command in the Terminal app on your Mac:
vcremote --secure false
To enable secured connection mode
To enable secured connection mode, enter this command:
vcremote --secure true
Once you've started the remote agent, you can use it from Visual Studio until you stop it.
To stop the remote agent
- In the Terminal window vcremote is running in, enter Control+C.
Configure vcremote in Visual Studio
To connect to the vcremote remote agent from Visual Studio, you must specify the remote configuration in the Visual Studio options. Visual Studio uses the same information to connect to the remote agent on your Mac each time you use it. You don't need to pair Visual Studio with the remote agent again unless you generate a new security certificate on your Mac, or its hostname or IP address changes.
To configure vcremote from Visual Studio 2022 version 17.5 and later
If the agent isn't already running on your Mac, follow the steps in Start the remote agent. Your Mac must be running vcremote for Visual Studio to successfully pair, connect, and build your project.
On your Mac, get the host name or IP address of your Mac.
You can get the IP address by using the ifconfig command in a Terminal window. Use the
inetaddress listed under the active network interface.On the Visual Studio menu bar, choose Tools > Options.
In the Options dialog box, expand Cross Platform > C++ > iOS.
In the Host Name and Port fields, enter the values specified by the remote agent when you started it. The host name can be the DNS name or IP address of your Mac. The default port is 3030.
Note
If you can't ping the Mac using the host name, you may need to use the IP address.
If you use the remote agent in the default secured connection mode, check the Secure checkbox, and transfer the
server-cert.pemfile from the Mac to Visual Studio for uploading. Next, choose the Generate button to generate a newclient-cert.pemfile, which should appear on the desktop. Then, transfer the client certificate to the Mac under/vcremote/certs/Authorized-Clients. (You may transfer multiple client certificate files to this directory, so multiple authorized Visual Studio machines can send requests to this Mac.)Note
If you're using a USB drive to transfer certificates, delete the certificates from the USB drive after the transfer is complete.
Choose Pair to enable the pairing.
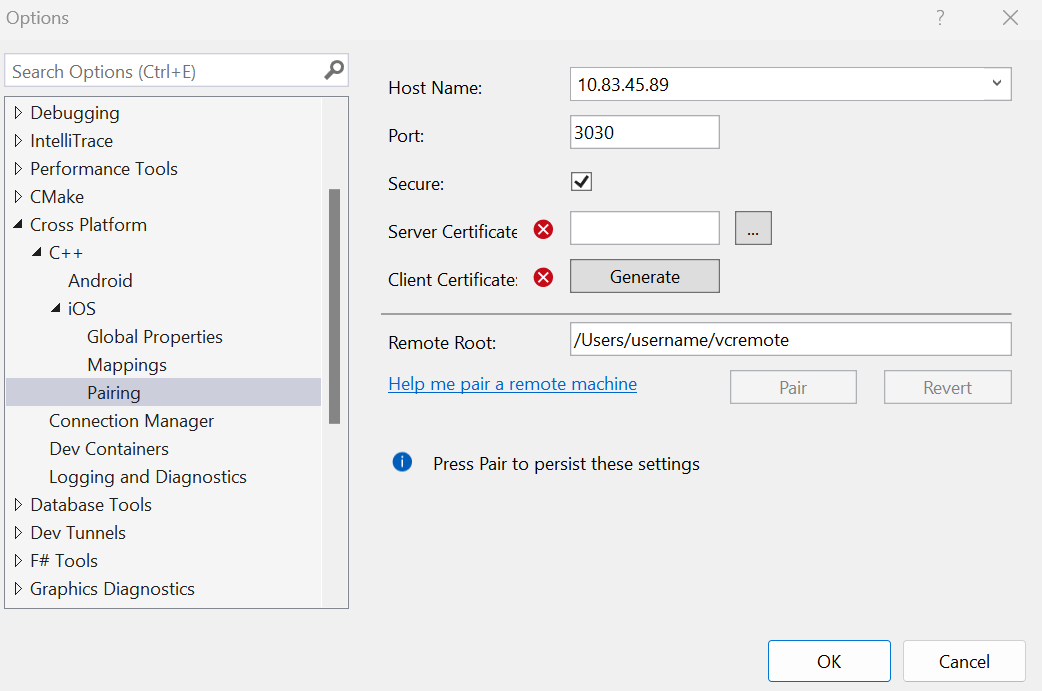
The pairing persists until you change the host name, port, or generate a new server or client certificate. If you change the host name or port in the Options dialog box, you can choose the Revert button to undo the change and revert to the previous pairing.
If the pairing doesn't succeed, verify that the remote agent is running by following the steps in Start the remote agent. Follow the steps to Generate a new server certificate and Generate a new client certificate. If you're using the host name of your Mac, try using the IP address in the Host Name field instead.
Update the folder name in the Remote Root field to specify the folder used by the remote agent in your home (
~) directory on the Mac. By default, the remote agent uses/Users/<username>/vcremoteas the remote root.Choose OK to save the remote pairing connection settings.
To configure vcremote from versions before Visual Studio 2022 version 17.5
If the agent isn't already running on your Mac, follow the steps in Start the remote agent. Your Mac must be running vcremote for Visual Studio to successfully pair, connect, and build your project.
On your Mac, get the host name or IP address of your Mac.
You can get the IP address by using the ifconfig command in a Terminal window. Use the
inetaddress listed under the active network interface.On the Visual Studio menu bar, choose Tools > Options.
In the Options dialog box, expand Cross Platform > C++ > iOS.
In the Host Name and Port fields, enter the values specified by the remote agent when you started it. The host name can be the DNS name or IP address of your Mac. The default port is 3030.
Note
If you cannot ping the Mac using the host name, you may need to use the IP address.
If you use the remote agent in the default secured connection mode, check the Secure checkbox, then enter the PIN value specified by the remote agent in the Pin field. If you use the remote agent in unsecured connection mode, clear the Secure checkbox and leave the Pin field blank.
Choose Pair to enable the pairing.
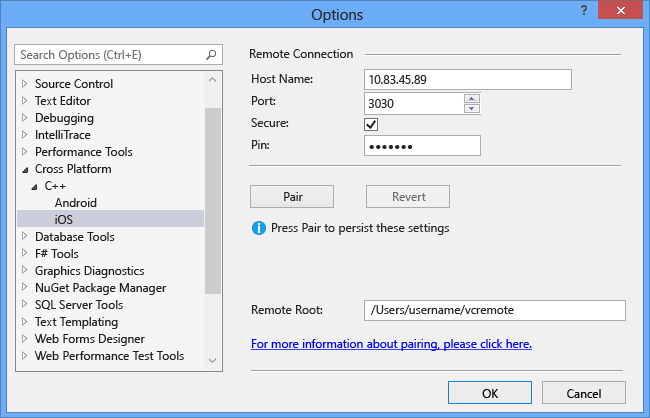
The pairing persists until you change the host name or port. If you change the host name or port in the Options dialog box, to undo the change, choose the Revert button to revert to the previous pairing.
If the pairing doesn't succeed, verify that the remote agent is running by following the steps in Start the remote agent. If too much time has passed since the remote agent PIN was generated, follow the steps in Generate a new security PIN. Then try again. If you're using the host name of your Mac, try using the IP address in the Host Name field instead.
Update the folder name in the Remote Root field to specify the folder used by the remote agent in your home (
~) directory on the Mac. By default, the remote agent uses/Users/<username>/vcremoteas the remote root.Choose OK to save the remote pairing connection settings.
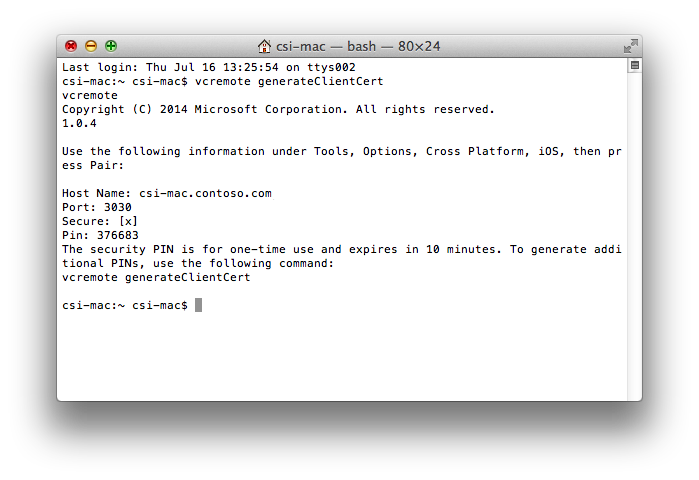
Generate a new security PIN
Applies to: Visual Studio 2022 version 17.4 and earlier versions, using vcremote version 1.0.17 and earlier.
When you start the remote agent the first time, the generated PIN is valid for a limited amount of time—by default, 10 minutes. If you don't pair Visual Studio to the remote agent before the time expires, you'll need to generate a new PIN.
To generate a new PIN
Stop the agent, or open a second Terminal app window on your Mac and use that to enter the command.
Enter this command in the Terminal app:
vcremote generateClientCertThe remote agent generates a new temporary PIN. To pair Visual Studio by using the new PIN, repeat the steps in Configure the remote agent in Visual Studio.
Generate a new client certificate
Applies to: Visual Studio 2022 version 17.5 and later versions, using vcremote version 1.0.19 and later.
When you pair on Visual Studio, you'll generate a new client-cert.pem file. Transfer the certificate file to the Mac build machine under /vcremote/certs/Authorized-Clients. This certificate allows the Mac to authorize requests that come from your Visual Studio machine.
Generate a new server certificate
Applies to: Visual Studio 2022 version 17.5 and later versions, using vcremote version 1.0.19 and later.
For security purposes, the server certificates that pair Visual Studio with the remote agent are tied to the IP address or host name of your Mac. If these values change, you must generate a new server certificate, and then reconfigure Visual Studio with the new values.
To generate a new server certificate
Stop the
vcremoteagent.Enter this command in the Terminal app:
vcremote resetServerCertWhen prompted for confirmation, enter
Y.To pair Visual Studio with the Mac, transfer the newly generated
server-cert.pemfile from the Mac and upload it to Visual Studio, repeating the steps in Configure the remote agent in Visual Studio.
Configure vcremote on the Mac
You can configure the remote agent using various command-line options. For example, you can specify the port to listen for build requests and specify the maximum number of builds to maintain on the file system. By default, the limit is 10 builds. The remote agent will remove builds that exceed the maximum on shutdown.
To configure the remote agent
To see a complete list of remote agent commands, in the Terminal app, enter:
vcremote --helpTo disable secure mode and enable simple HTTP-based connections, enter:
vcremote --secure falseWhen you use this option, clear the Secure checkbox.
To specify a location for remote agent files, enter:
vcremote --serverDir directory_pathReplace
directory_pathwith the location on your Mac to place log files, builds, and server certificates. By default, this location is/Users/<username>/vcremote. Builds are organized by build number in this location.To use a background process to capture
stdoutandstderrto a file namedserver.log, enter:vcremote > server.log 2>&1 &The
server.logfile can help troubleshooting build issues.To run the agent by using a configuration file instead of command-line parameters, enter:
vcremote --config config_file_pathReplace
config_file_pathwith the path to a configuration file in JSON format. The startup options and their values must not include dashes.
Troubleshoot the remote agent
Debugging on an iOS device
If debugging on an iOS device doesn't work, there could be issues with the ideviceinstaller tool, which is used to communicate with an iOS device. This tool is typically installed from Homebrew during the installation of vcremote. Follow the next steps as a workaround:
Open the Terminal app and update ideviceinstaller and its dependencies by running the following commands in order:
Ensure Homebrew is updated
brew updateUninstall
libimobiledeviceandusbmuxdbrew uninstall --ignore-dependencies libimobiledevicebrew uninstall --ignore-dependencies usbmuxdInstall the latest version of
libimobiledeviceandusbmuxdbrew install --HEAD usbmuxdbrew unlink usbmuxdbrew link usbmuxdbrew install --HEAD libimobiledeviceUninstall and reinstall
ideviceinstallerbrew uninstall ideviceinstallerbrew install ideviceinstaller
Verify that ideviceinstaller can communicate with the device by trying to list the apps installed on the device:
ideviceinstaller -l
If ideviceinstaller reports an error that it can't access the folder /var/db/lockdown, change the privilege on the folder using this command:
sudo chmod 777 /var/db/lockdown
Then verify again if ideviceinstaller can communicate with the device.