Note
Access to this page requires authorization. You can try signing in or changing directories.
Access to this page requires authorization. You can try changing directories.
Microsoft Security Exposure Management helps you to manage your company's attack surface and exposure risk effectively. By combining assets and techniques, attack paths illustrate the end-to-end paths that attackers can use to move from an entry point within your organization to your critical assets. Microsoft Defender for Cloud Apps observed an increase in attackers using OAuth applications to access sensitive data in business-critical applications like Microsoft Teams, SharePoint, Outlook, and more. To support investigation and mitigation, these applications are integrated into the attack path and attack surface map views in Microsoft Security Exposure Management.
Prerequisites
To get started with OAuth application attack path features in Exposure Management, make sure you meet the following requirements.
A Microsoft Defender for Cloud Apps license with App Governance enabled.
Microsoft 365 app connector must be activated. For information about connecting and about which of the app connectors provide security recommendations, see Connect apps to get visibility and control with Microsoft Defender for Cloud Apps.
Optional: To get full access to attack path data, we recommend having an E5 security license, Defender for Endpoint or Defender for Identity license.
Required roles and permissions
To access all Exposure Management experiences, you need either a Unified Role-Based-Access-Control (RBAC) role or an Entra ID role. Only one is required.
- Exposure Management (read) (Unified RBAC)
Alternatively, you can use one of the following Entra ID roles:
| Permission | Actions |
|---|---|
| Security Admin | (read and write permissions) |
| Security Operator | (read and limited write permissions) |
| Global Reader | (read permissions) |
| Security Reader | (read permissions) |
Note
Currently available in commercial cloud environments only. Microsoft Security Exposure Management data and capabilities are currently unavailable in U.S Government clouds - GCC, GCC High, DoD, and China Gov.
Critical Asset Management - Service Principals
Service principals are identities that Microsoft Entra ID assigns to applications so they can authenticate and access resources on behalf of the application rather than a user. Microsoft Defender for Cloud Apps defines a set of critical privilege OAuth permissions. OAuth applications with these permissions are considered high-value assets. If compromised, an attacker can gain high privileges to SaaS applications. To reflect this risk, attack paths treat service principals with these permissions as target goals.
View permissions for critical assets
To view the full list of permissions, go to the Microsoft Defender portal and navigate to Settings > Microsoft Defender XDR > Rules > Critical asset management.

Investigation user flow: View attack paths involving OAuth applications
Once you understand which permissions represent high-value targets, use the following steps to investigate how these applications appear in your environment’s attack paths. For smaller organizations with a manageable number of attack paths, we recommend following this structured approach to investigate each attack path:
Note
OAuth apps show in the attack path surface map only when specific conditions are detected.
For example, an OAuth app might appear in the attack path if a vulnerable component with an easily exploitable entry point is detected. This entry point allows lateral movement to service principals with high privileges.
Go to Exposure Management > Attack surface > Attack paths.
Filter by 'Target type: AAD Service principal'
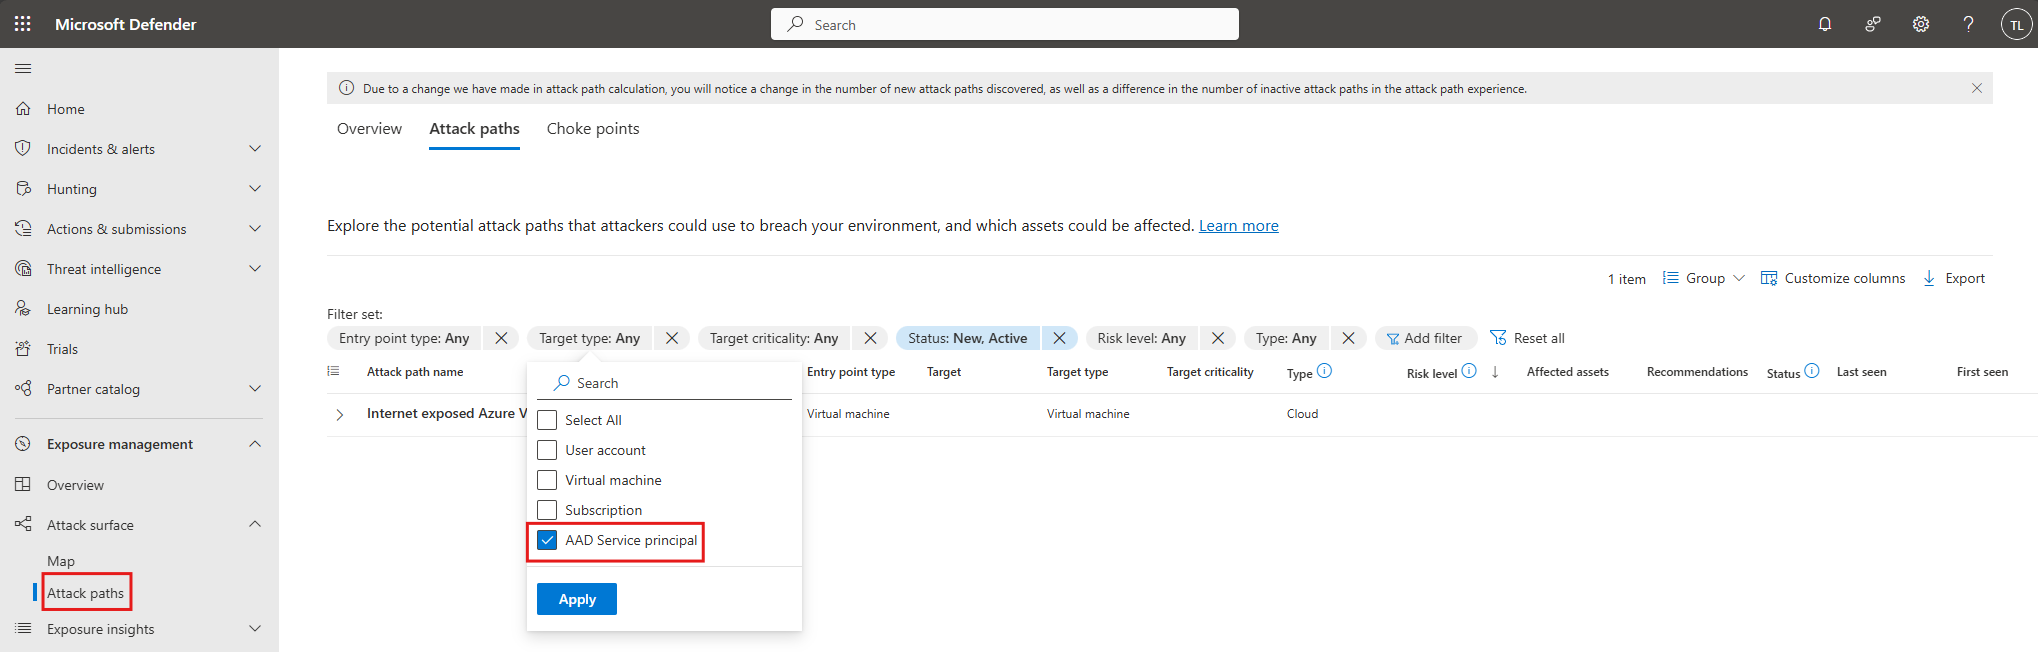
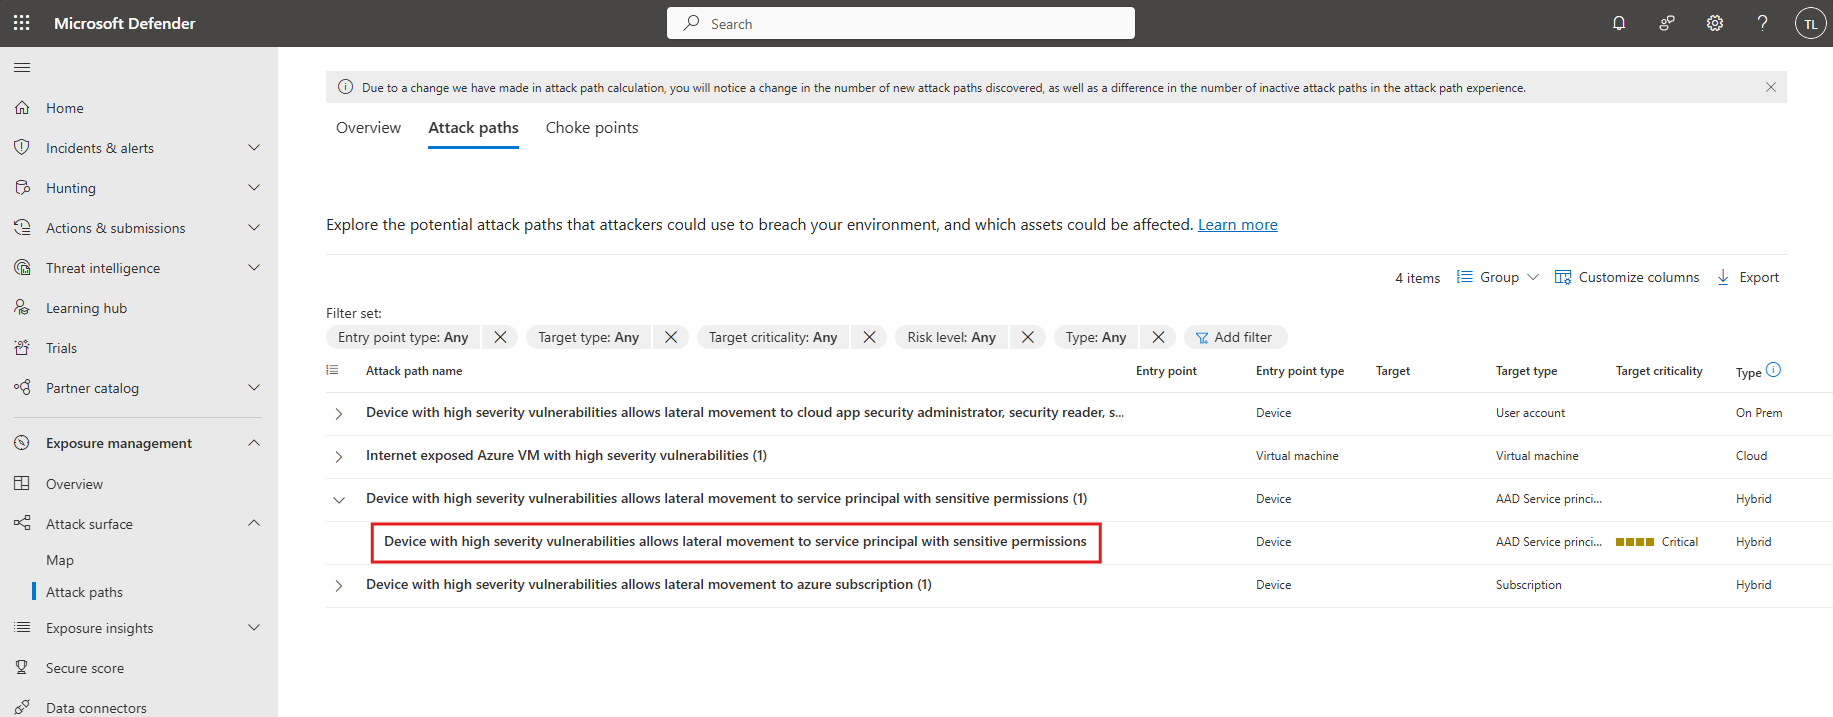
Select the attack path titled: "Device with high severity vulnerabilities allows lateral movement to service principal with sensitive permissions"
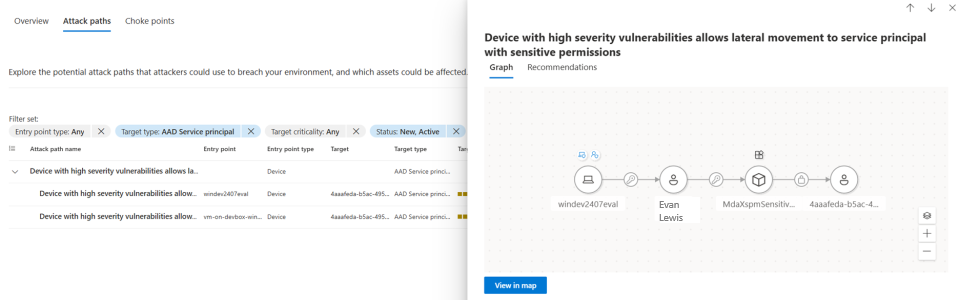
Click the View in map button to see the attack path.
Select the + sign to expand nodes and view detailed connections.
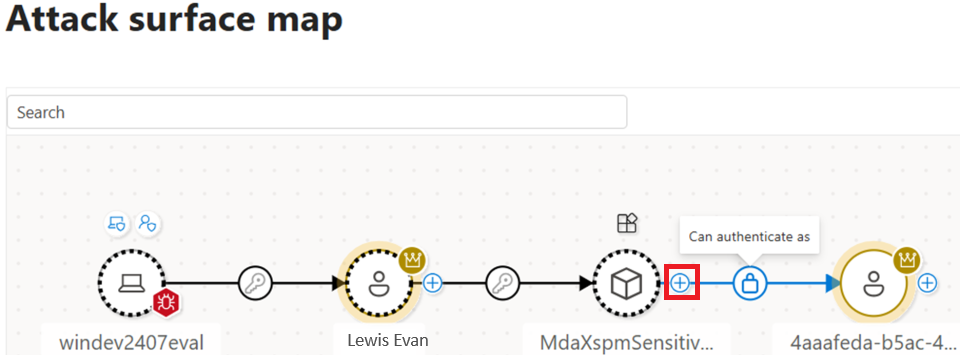
Hover or select nodes and edges to explore extra data such as which permissions this OAuth app has.
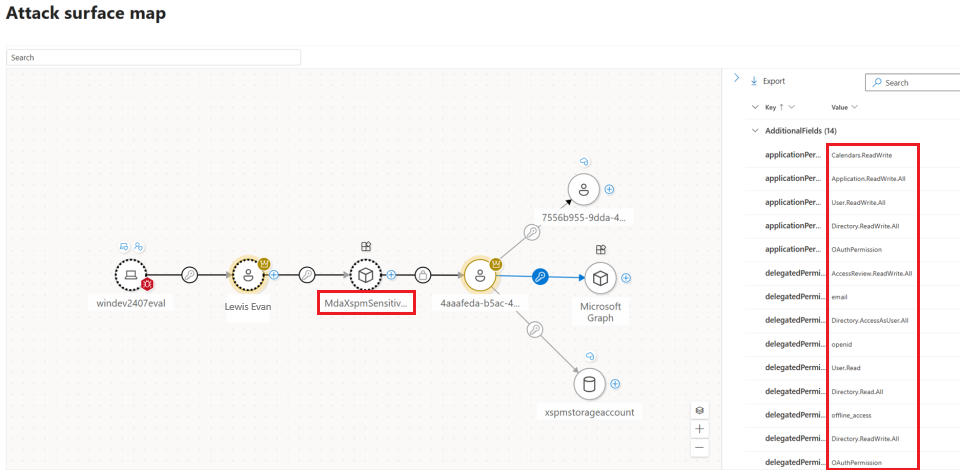
Copy the OAuth application's name and paste it into the search bar in the Applications page.
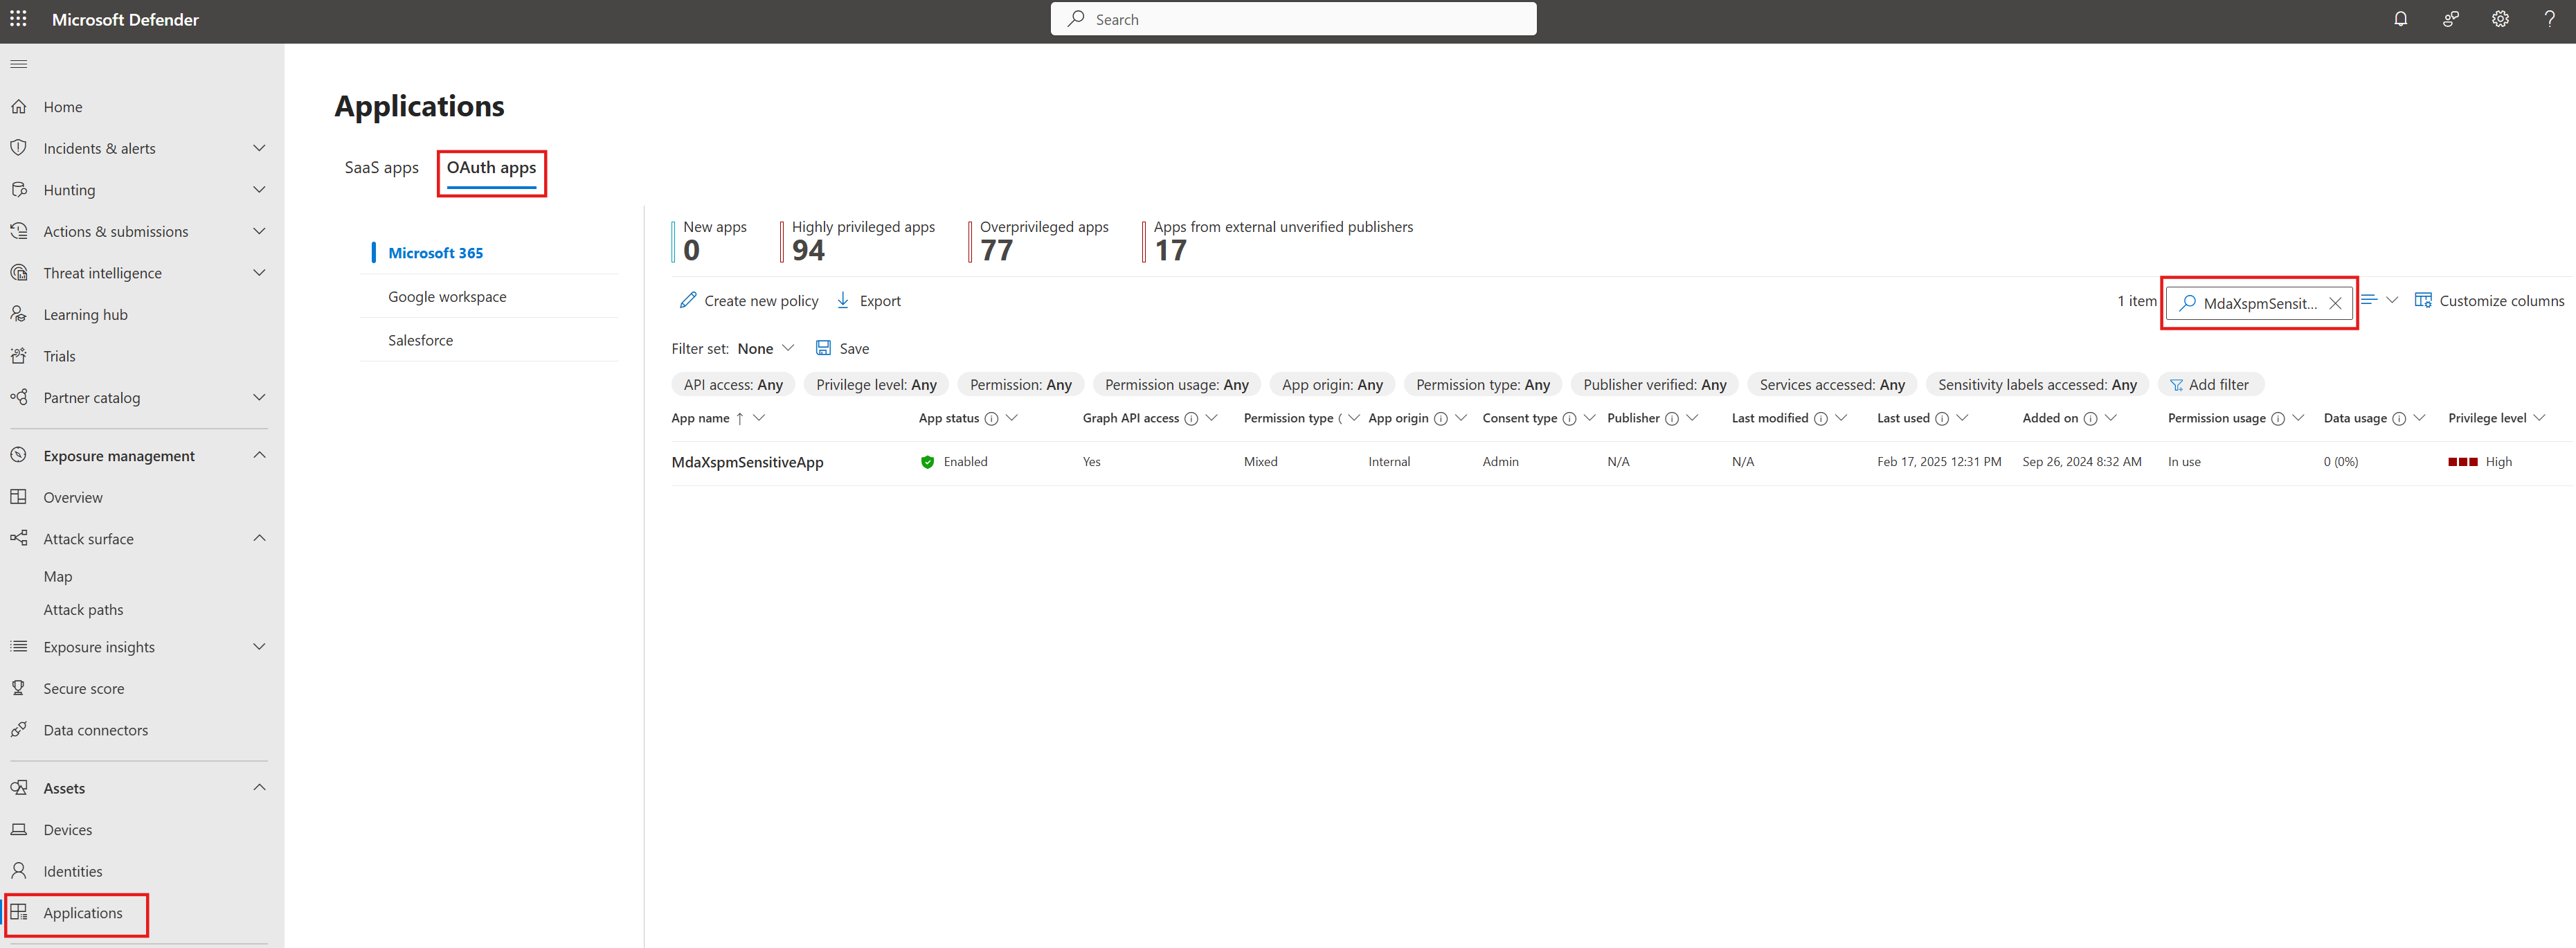
Select the app name to review assigned permissions and usage insights, including whether high-privilege permissions are actively used.

Optional: If you determine the OAuth application should be disabled, you can disable it from the Applications page.


Decision maker user flow: Prioritize attack path using choke points
For larger organizations with numerous attack paths that can't be manually investigated, we recommend using attack path data and utilizing the Choke Points experience as a prioritization tool. This approach allows you to:
- Identify assets connected with the most attack paths.
- Make informed decisions on which assets to prioritize for investigation.
- Filter by Microsoft Entra OAuth app to see which OAuth apps are involved in the most attack paths.
- Decide which OAuth applications to apply least privilege permissions to.
To get started:
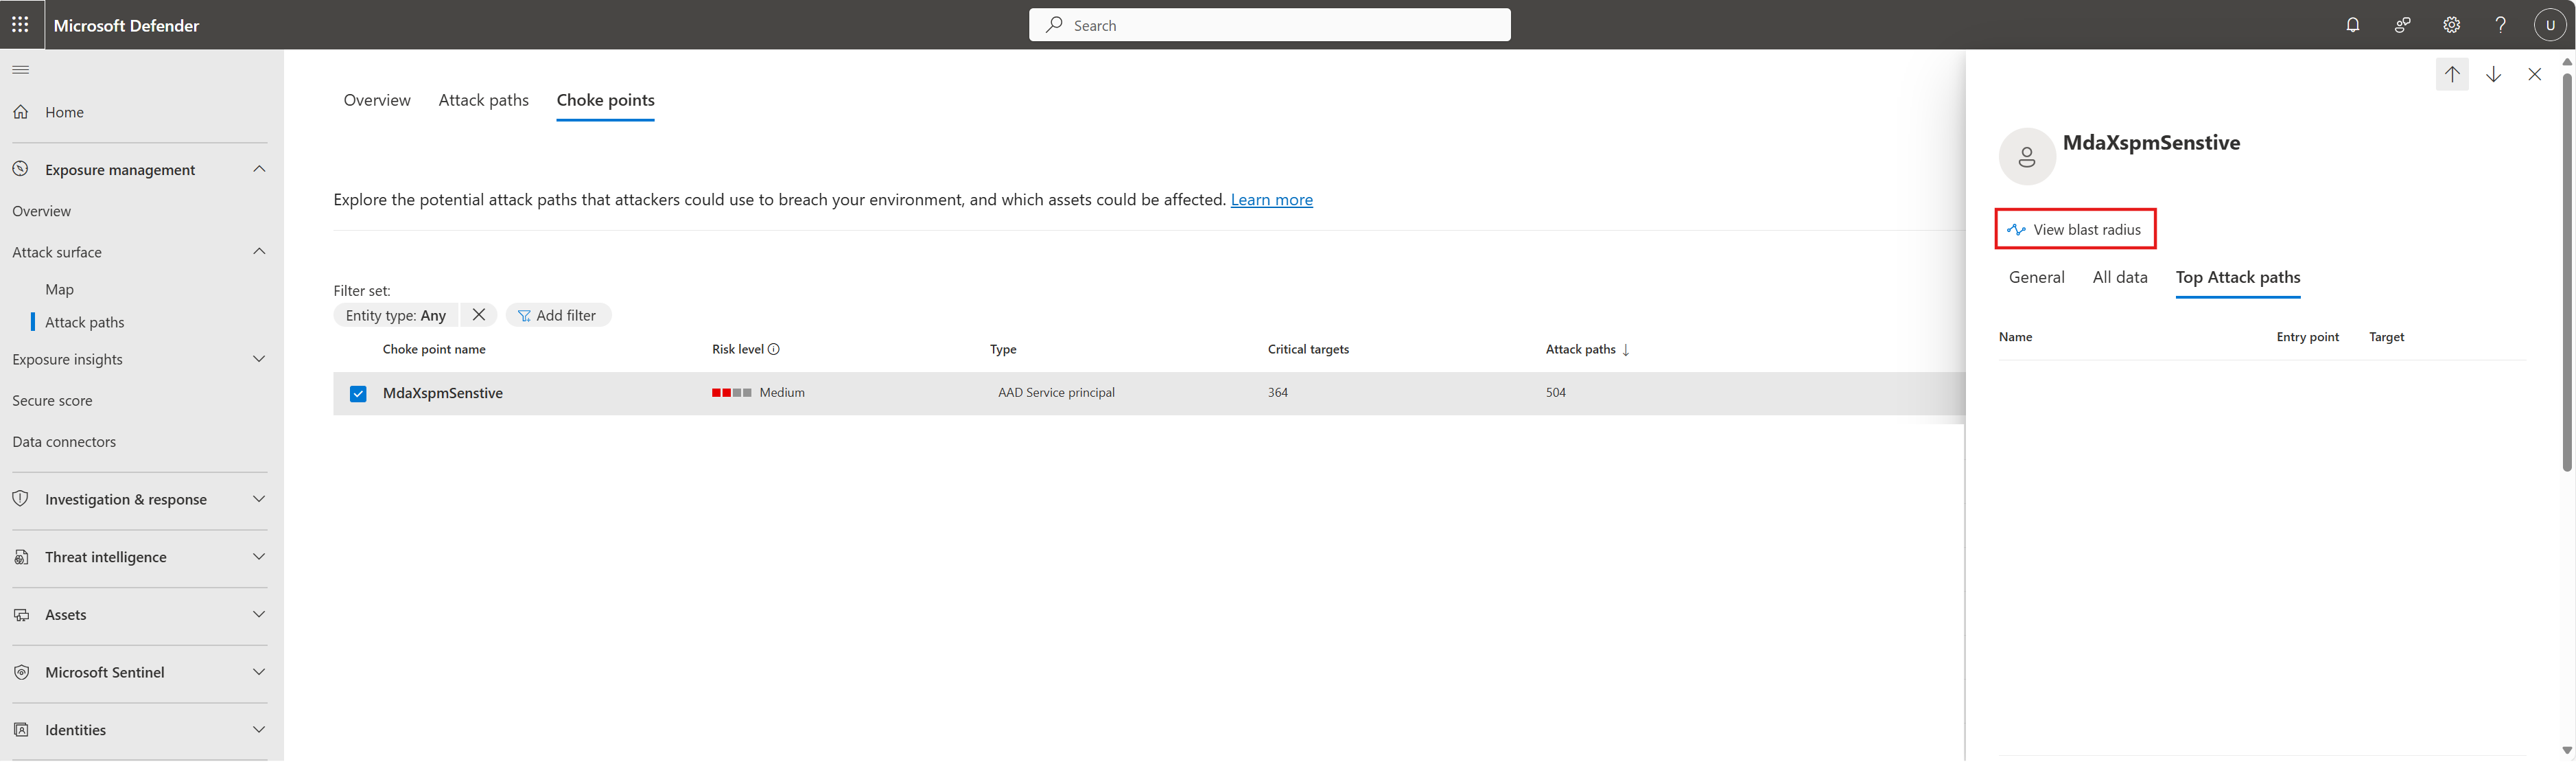
Go to the Attack Paths > Choke Points page.
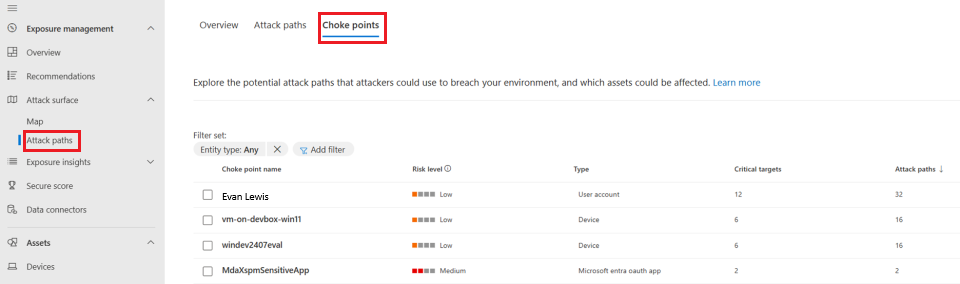
Select a choke point name to see more details about the top attack paths such as the name, entry point, and target.
Click View blast radius to further investigate the choke point in the Attack Surface Map.


If the choke point is an OAuth application, continue the investigation by searching for the app by name in the Applications page, reviewing its assigned permissions and usage insights, and optionally disabling the app if appropriate.
Analyze attack surface map and hunt with queries
In the Attack surface map, you can see connections from user-owned apps, OAuth apps, and service principals. This relationship data is available in:
ExposureGraphEdges table (shows connections)
ExposureGraphNodes table (includes node properties like permissions)
Use the following Advanced Hunting query to identify all OAuth applications with critical permissions. This query joins the ExposureGraphNodes and ExposureGraphEdges tables to find Microsoft Entra OAuth app registrations that can authenticate as service principals classified as critical (criticality level 0) and that hold permissions to Microsoft Graph. Use it to discover which OAuth apps in your tenant have high-privilege access and to prioritize them for review:
let RelevantNodes = ExposureGraphNodes
| where NodeLabel == "Microsoft Entra OAuth App" or NodeLabel == "serviceprincipal"
| project NodeId, NodeLabel, NodeName, NodeProperties;
ExposureGraphEdges
| where EdgeLabel == "has permissions to" or EdgeLabel == "can authenticate as"
| make-graph SourceNodeId --> TargetNodeId with RelevantNodes on NodeId
| graph-match (AppRegistration)-[canAuthAs]->(SPN)-[hasPermissionTo]->(Target)
        where AppRegistration.NodeLabel == "Microsoft Entra OAuth App" and
        canAuthAs.EdgeLabel == "can authenticate as" and
        SPN.NodeLabel == "serviceprincipal" and
        SPN.NodeProperties["rawData"]["criticalityLevel"]["criticalityLevel"] == 0 and
        hasPermissionTo.EdgeLabel == @"has permissions to" and
        Target.NodeLabel == "Microsoft Entra OAuth App" and
        Target.NodeName == "Microsoft Graph"
        project AppReg=AppRegistration.NodeLabel,
         canAuthAs=canAuthAs.EdgeLabel, SPN.NodeLabel, DisplayName=SPN.NodeProperties["rawData"]["accountDisplayName"],
         Enabled=SPN.NodeProperties["rawData"]["accountEnabled"], AppTenantID=SPN.NodeProperties["rawData"]["appOwnerOrganizationId"],
         hasPermissionTo=hasPermissionTo.EdgeLabel, Target=Target.NodeName,
         AppPerm=hasPermissionTo.EdgeProperties["rawData"]["applicationPermissions"]["permissions"]
| mv-apply AppPerm on (summarize AppPerm = make_list(AppPerm.permissionValue))
| project AppReg, canAuthAs, DisplayName, Enabled, AppTenantID, hasPermissionTo, Target, AppPerm
Next steps
For more information, see: