Note
Access to this page requires authorization. You can try signing in or changing directories.
Access to this page requires authorization. You can try changing directories.
To easily identify known IP addresses, such as your physical office IP addresses, you need to set IP address ranges. IP address ranges allow you to tag, categorize, and customize the way logs and alerts are displayed and investigated. Each group of IP ranges can be categorized based on a preset list of IP categories. You're also able to create custom IP tags for your IP ranges. Additionally, you can override public geolocation information based on your internal network knowledge. Both IPv4 and IPv6 are supported.
Defender for Cloud Apps comes preconfigured with built-in IP ranges for popular cloud providers such as Azure and Microsoft 365. Additionally, we have built-in tagging based on Microsoft threat intelligence including anonymous proxy, Botnet, and Tor. You can see the full list in the drop-down on the IP address ranges page.
Note
- To use these built-in tags as part of a search, refer to their ID in the Defender for Cloud Apps API documentation.
- You can add IP ranges in bulk by creating a script using the IP address ranges API.
- You can't add IP ranges with overlapping IP addresses.
- To view the API documentation, go to API documentation.
Built-in IP address tags and custom IP tags are considered hierarchically. Custom IP tags take precedence over built-in IP tags. For instance, if an IP address is tagged as Risky based on threat intelligence but there's a custom IP tag that identifies it as Corporate, the custom category and tags take precedence.
Create an IP address range
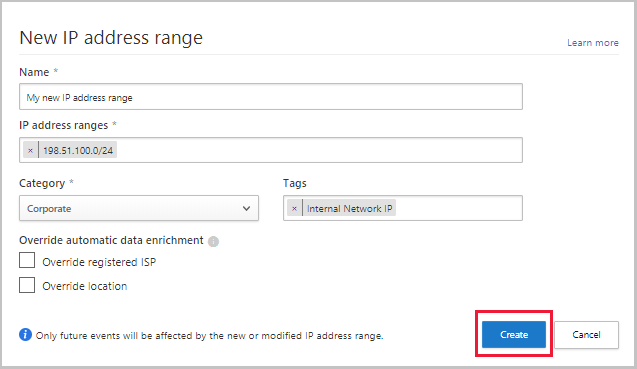
In the Microsoft Defender Portal, select Settings. Then choose Cloud Apps. Under System, select IP address ranges. Select Add IP address range to add IP address ranges and set the following fields:
Name your IP range. The name doesn't appear in the activities log. It's only used to manage your IP range.
Enter each IP address range you wish to configure. You can add as many IP addresses and subnets as you want using network prefix notation (also known as CIDR notation), for example 192.168.1.0/32.
Categories are used to easily recognize activities from important IP addresses in your logs and alerts. Categories are available in the portal. However, they typically require user configuration to determine which IP addresses are included in each category. The exception to this configuration is the Risky category, which includes two IP tags - Anonymous proxy and Tor.
The following categories are available:
Administrative: These IPs should be all the IP addresses used by your admins.
Cloud provider: These IPs should be the IP addresses used by your cloud provider. Apply this category if your cloud provider isn't automatically identified.
Corporate: These IPs should be all the public IP addresses of your internal network, your branch offices, and your Wi-Fi roaming addresses.
Risky: These IPs should be any IP addresses that you consider risky. They can include suspicious IP addresses you've seen in the past, IP addresses in your competitors' networks, and so on. It is suggested to be cautious with applying automatic governance actions only based on risky IP, since there are some cases when IPs that serve malicious actors are also being in use by legitimate employees, hence our recommendation is to examine each case by itself.
VPN: These IPs should be any IP addresses you use for remote workers. By using this category, you can avoid raising impossible travel alerts when employees connect from their home locations via the corporate VPN.
To include the IP range in a category, select a category from the drop-down menu.
To Tag the activities from these IP addresses enter a tag. Entering a word into the box creates the tag. After you already have a configured tag, you can easily add it to additional IP ranges by choosing it from the list. You can add more than one IP tag for each range. IP tags can be used when building policies. Along with IP tags you configure, Defender for Cloud Apps has built-in tags that aren't configurable. You can see the list of tags under the IP tags filter.
Note
- IP tags are added to the activity without overriding data.
- Multiple tags can be applied on the same IP range.
To Override registered ISP or Override the location or for these addresses, select the relevant checkbox. For example, if you have an IP address that is considered publicly to be in Ireland, but you know the IP is in the US. You'll override the location for that IP address range. Or if you don't want an IP address range to be associated with a registered ISP, you can override the registered ISP.
When you're done, select Create.

Next steps
If you run into any problems, we're here to help. To get assistance or support for your product issue, please open a support ticket.