Note
Access to this page requires authorization. You can try signing in or changing directories.
Access to this page requires authorization. You can try changing directories.
This article describes how to configure advanced options for Defender for Cloud Apps cloud discovery log collectors.
Defender for Cloud Apps cloud discovery continues to focus on base firewall formats. Changes to the logs being forwarded at the firewall level may not continue to work, or may cause issues with parsing. If you find errors of this sort, we recommend that you continue to use the base firewall format, or use options with the custom log collector. For more information, see Use a custom log parser.
This article describes how to modify the configuration for your Defender for Cloud Apps cloud discovery Docker.
Modify the log collector FTP configuration
Use these steps in the following sections to modify the configuration for your Defender for Cloud Apps cloud discovery Docker.
Verify the log collector version
To verify the version of the log collector currently installed on your system, connect to the log collector host and run:
cat /var/adallom/versions | grep columbus-
Change the FTP password
This procedure describes how to change the password used to access log collector files:
Connect to the log collector host and run:
docker exec -it <collector name> pure-pw passwd <ftp user>Enter your new password, and then enter it again to confirm.
Run the following command to apply the change:
docker exec -it <collector name> pure-pw mkdb
You should be able to view the following contents:
run_logsssl_updateconfig.json
Add certificate files
This procedure describes how to add the required certificate files used for secure connections to the cloud discovery Docker instance.
Open an FTP client and connect to the log collector host.
Navigate to the
ssl_updatedirectory and upload the new certificate files, including the following files:Receiver type Required files FTP - pure-ftpd.pem: Includes the key and certificate data Syslog - ca.pem: The certificate authority's certificate that was used to sign the client’s certificate.
- server-key.pem and server-cert.pem: The log collector's certificate and key
Syslog messages are sent over TLS to the log collector, which requires mutual TLS authentication, including authenticating both the client and server certificates.
Files are mandatory. If any of the files for the receiver type are missing, the update fails.
In a terminal window, run:
docker exec -t <collector name> update_certsThe output should appear similar to the following code:
root@DockerPlayground:~# docker exec -t columbus update_certs
rsyslog: stopped
rsyslog: started
ftpd: stopped
ftpd: started
root@DockerPlayground:~#
In a terminal window, run:
docker exec <collector name> chmod -R 700 /etc/ssl/private/
Enable the log collector behind a proxy
If you're running behind a proxy, the log collector might have issues sending data to Defender for Cloud Apps. For example, this might happen because the log collector doesn't trust the proxy's root certificate authority and isn't able to connect to Microsoft Defender for Cloud Apps to retrieve its configuration or upload the received logs.
The following procedures describe how to enable your log collector behind a proxy.
Tip
You might also want to change the certificates used by the log collector for Syslog or FTP, or resolve connectivity issues from the firewalls and proxies to the log collector. For more information, see Modify the log collector FTP configuration.
Set up the log collector behind a proxy
Make sure you that you've performed the necessary steps to run Docker on a Windows or Linux machine and have successfully downloaded the Defender for Cloud Apps Docker image onto your host machine.
For more information, see Configure automatic log upload for continuous reports.
Validate Docker log collector container creation
Verify that the container was created and is running. In the shell, run:
docker ps
You should see something similar to the following output:

Copy the proxy root CA certificate to the container
From your virtual machine, copy the CA certificate to the Defender for Cloud Apps container. In the following example, the container is named Ubuntu-LogCollector and the CA certificate is named Proxy-CA.crt.
The following command copies the certificate to a folder in the running container. Run the command on the Ubuntu host:
docker cp Proxy-CA.crt Ubuntu-LogCollector:/var/adallom/ftp/discovery
Set the configuration to work with the CA certificate
Go into the container. Run the following command to open bash in the log collector container:
docker exec -it Ubuntu-LogCollector /bin/bashFrom a bash window inside the container, go to the Java
jrefolder. To avoid a version-related path error, use the following command:cd "$(find /opt/jdk/*/jre -name "bin" -printf '%h' -quit)" cd binImport the root certificate that you copied earlier, from the discovery folder into the Java KeyStore and define a password.
The default password is
changeit. For more information, see Change the Java KeyStore password../keytool --import --noprompt --trustcacerts --alias SelfSignedCert --file /var/adallom/ftp/discovery/Proxy-CA.crt --keystore ../lib/security/cacerts --storepass <password>Verify that the certificate was imported correctly into the CA keystore. Run the following command to search for the alias you provided during the import (SelfSignedCert):
./keytool --list --keystore ../lib/security/cacerts | grep selfYour imported proxy CA certificate is displayed.
Restrict IP addresses sending syslog messages to the log collector on Linux
To secure the docker image and ensure that only one IP address is allowed to send the syslog messages to the log collector, create an IP table rule on the host machine to allow input traffic and drop the traffic coming over specific ports, such as TCP/601 or UDP/514, depending on the deployment.
The following command shows an example of how to create an IP table rule that can be added to the host machine. This table rule allows the IP address 1.2.3.4 to connect to the log collector container over TCP port 601, and drop all other connections coming from other IP addresses over the same port.
iptables -I DOCKER-USER \! --src 1.2.3.4 -m tcp -p tcp --dport 601 -j DROP
Set the log collector to run with the new configuration
The container is now ready.
Run the collector_config command using the API token that you used during the creation of your log collector. For example:

When you run the command, specify your own API token, such as collector_config abcd1234abcd1234abcd1234abcd1234 ${CONSOLE} ${COLLECTOR}
For example:

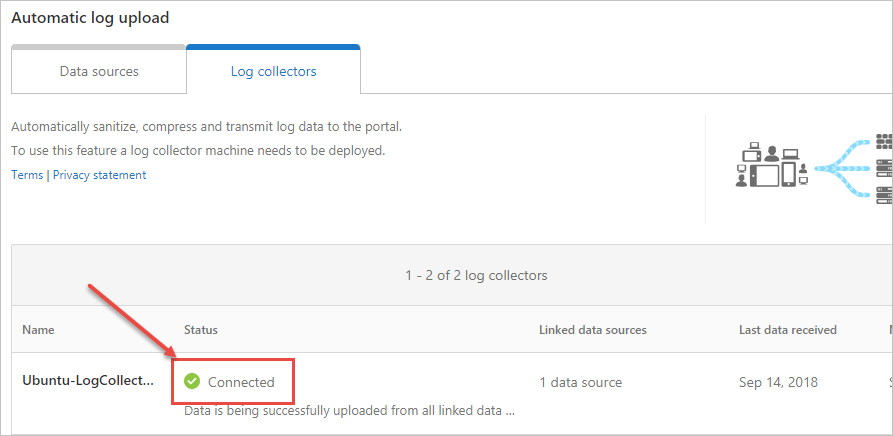
The log collector is now able to communicate with Defender for Cloud Apps. After sending data to Defender for Cloud Apps, the log collector's status changes from Healthy to Connected. For example:
Note
If you have to update the configuration of the log collector, to add or remove a data source for example, you normally have to delete the container and perform the previous steps again.
To avoid this, you can re-run the collector_config tool with the new API token generated in the Defender for Cloud Apps.
Change the Java KeyStore password
Stop the Java KeyStore server.
Open a bash shell inside the container and go to the appdata/conf folder.
To change the server KeyStore password, run:
keytool -storepasswd -new newStorePassword -keystore server.keystore
-storepass changeit
The default server password is
changeit.To change the certificate password, run:
keytool -keypasswd -alias server -keypass changeit -new newKeyPassword -keystore server.keystore -storepass newStorePasswordThe default server alias is server.
In a text editor, open the server-install\conf\server\secured-installed.properties file. Add the following lines of code, and then save the changes:
- Specify the new Java KeyStore password for the server:
server.keystore.password=newStorePassword - Specify the new Certificate password for the server:
server.key.password=newKeyPassword
- Specify the new Java KeyStore password for the server:
Start the server.
Move the log collector to a different data partition on Linux
Many companies have the requirement to move data to a separate partition. This procedure describes how to move your Defender for Cloud Apps Docker log collector images to a data partition on your Linux host.
This procedure describes moving data to a partition called datastore and assumes you have already mounted the partition. For example:
Adding and configuring a new partition on your Linux host isn't in the scope of this guide.
To move your log collector to a different partition:
Stop the Docker service. Run:
service docker stopMove the log collector data to the new partition. Run:
mv /var/lib/docker /datastore/dockerRemove the old Docker storage directory (/var/lib/docker) and create a symbolic link to the new directory (/datastore/docker). Run:
rm -rf /var/lib/docker && ln -s /datastore/docker /var/lib/Start the Docker service. Run:
service docker startOptionally, verify the status of your log collector. Run:
docker ps
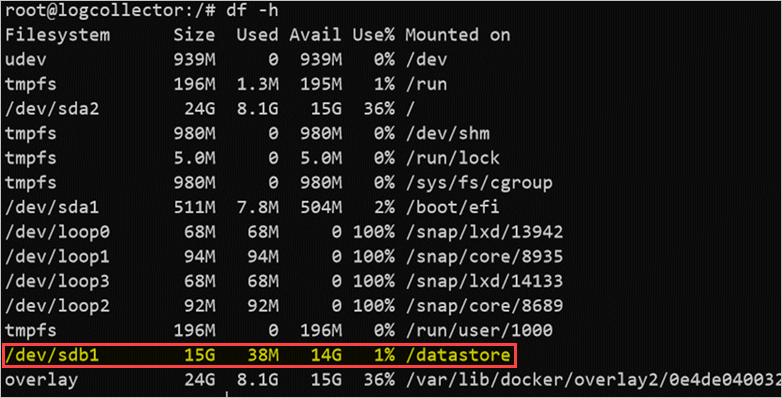
Inspect the log collector disk usage on Linux
This procedure describes how to review your log collector disk usage and location.
Identify the path to the directory where the log collector data is stored. Run:
docker inspect <collector_name> | grep WorkDirFor example:

Get the size on disk of the log collector using the identified path without the "/work" suffix. Run:
du -sh /var/lib/docker/overlay2/<log_collector_id>/
Note
If you only need to know the size on disk, you can use the following command instead:
docker ps -s


Move the log collector to an accessible host
In regulated environments, access to Docker Hubs where the log collector image is hosted may be blocked. This prevents Defender for Cloud Apps from importing the data from the log collector and can be resolved my moving the log collector image to an accessible host.
This procedure describes how to download the log collector image using a computer that has access to Docker Hub and import it to your destination host.
The downloaded image can be imported either in your private repository or directly on your host. This procedure describes how to download your log collector image to your Windows computer and then use WinSCP to move the log collector to your destination host.
Prerequisites
Make sure that you have Docker installed on your host. For example, use one of the following downloads:
After the download, use Docker's offline installation guide to install your operating system.
Start the process by exporting the log collector image and then import the image to your destination host.
Export the log collector image from your Docker Hub
The following procedures describe how to export the log collector image, using Linux or Windows.
Export the image on Linux
On a Linux computer that has access to the Docker Hub, run the following command to install Docker and download the log collector image.
curl -o /tmp/MCASInstallDocker.sh https://adaprodconsole.blob.core.windows.net/public-files/MCASInstallDocker.sh && chmod +x /tmp/MCASInstallDocker.sh; /tmp/MCASInstallDocker.shExport the log collector image. Run:
docker save --output /tmp/mcasLC.targ mcr.microsoft.com/mcas/logcollector
chmod +r /tmp/mcasLC.tar
Important
Make sure to use the output parameter to write to a file instead of STDOUT.
Download the log collector image to your Windows computer under
C:\mcasLogCollector\using WinSCP. For example: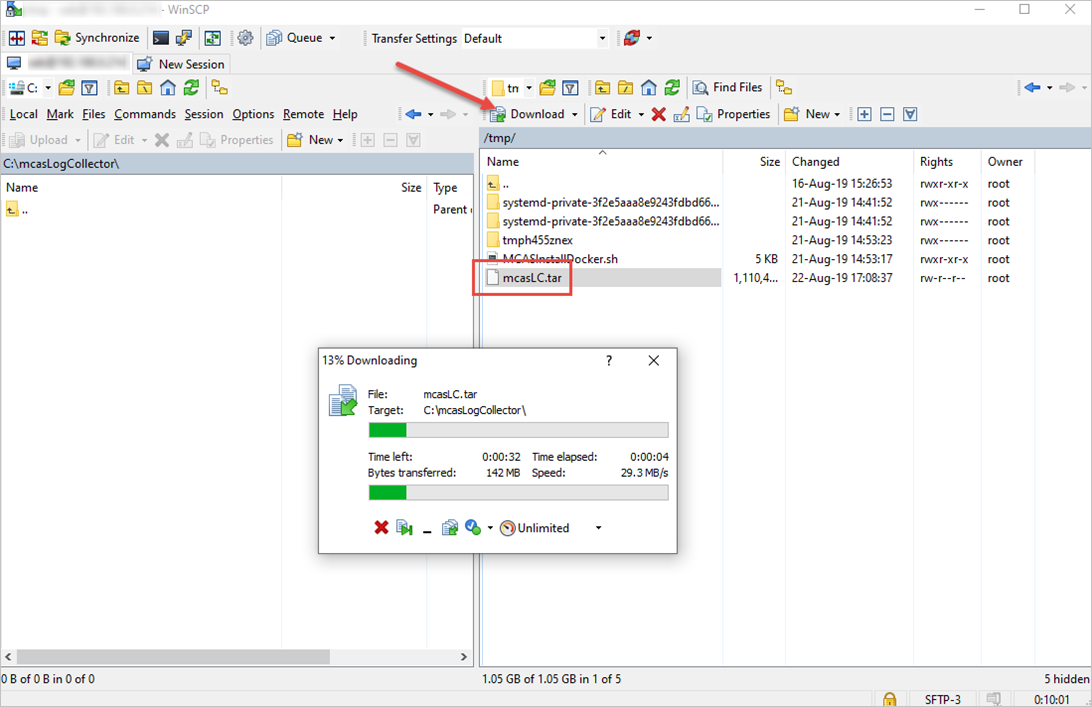
Export the image on Windows
On a Windows 10 computer that has access to the Docker Hub, install Docker Desktop.
Download the log collector image. Run:
docker login -u caslogcollector -p C0llector3nthusiast
docker pull mcr.microsoft.com/mcas/logcollector
Export the log collector image. Run:
docker save --output C:\mcasLogCollector\mcasLC.targ mcr.microsoft.com/mcas/logcollectorImportant
Make sure to use the output parameter to write to a file instead of STDOUT.
Import and load the log collector image to your destination host
This procedure describes how to transfer the exported image to your destination host.
Upload the log collector image to your destination host under
/tmp/. For example: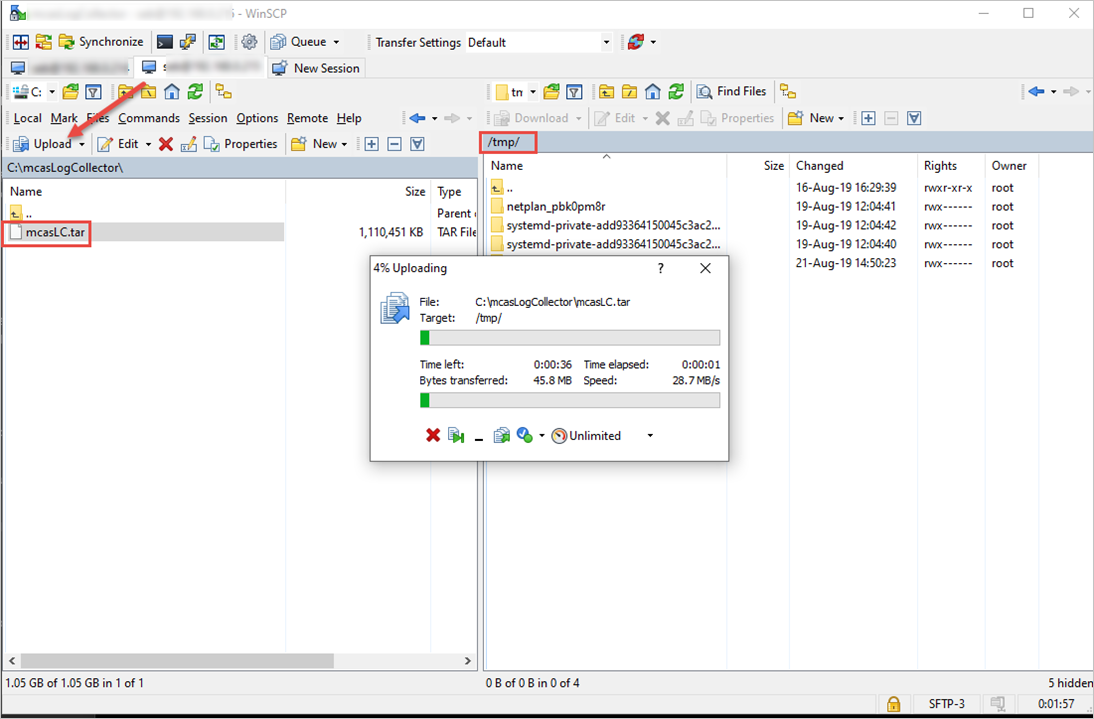
On the destination host, import the log collector image to the Docker images repository. Run:
docker load --input /tmp/mcasLC.tarFor example:
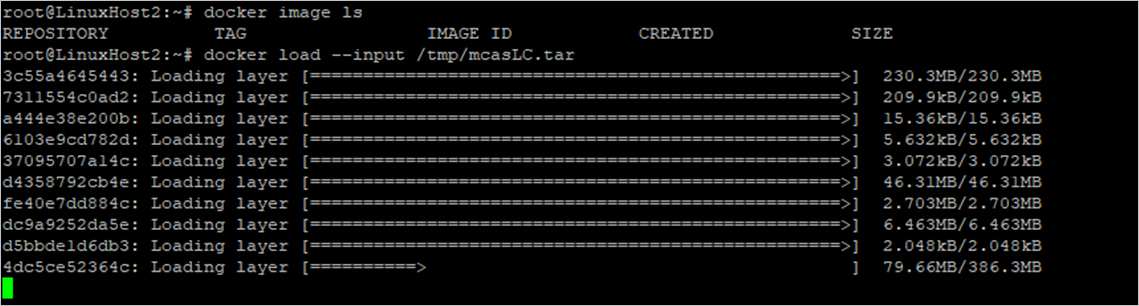
Optionally, verify that the import completed successfully. Run:
docker image lsFor example:

You can now proceed to create your log collector using the image from the destination host.

Define custom ports for Syslog and FTP receivers for log collectors on Linux
Some organizations have a requirement to define custom ports for Syslog and FTP services.
When you add a data source, Defender for Cloud Apps log collectors uses specific port numbers to listen for traffic logs from one or more data sources.
The following table lists of the default listening ports for receivers:
| Receiver type | Ports |
|---|---|
| Syslog | * UDP/514 - UDP/51x * TCP/601 - TCP/60x |
| FTP | * TCP/21 |
Use the following steps to define custom ports:
In the Microsoft Defender Portal, select Settings. Then choose Cloud Apps.
Under Cloud Discovery, select Automatic log upload. Then select the Log collectors tab.
On the Log collectors tab, add or edit a log collector and after updating the data sources, copy the run command from the dialog. For example:
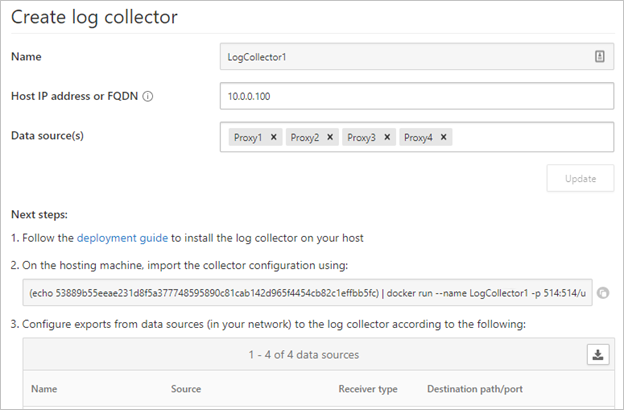
If used as provided, the wizard-provided command configures the log collector to use ports 514/udp and 515/udp. For example:
(echo <credentials>) | docker run --name LogCollector1 -p 514:514/udp -p 515:515/udp -p 21:21 -p 20000-20099:20000-20099 -e "PUBLICIP='10.0.0.100'" -e "PROXY=" -e "SYSLOG=true" -e "CONSOLE=machine.us2.portal.cloudappsecurity.com" -e "COLLECTOR=LogCollector1" --security-opt apparmor:unconfined --cap-add=SYS_ADMIN --restart unless-stopped -a stdin -i mcr.microsoft.com/mcas/logcollector starterFor example:

Before using the command on your host machine, modify the command to use your custom ports. For example, to configure the log collector to use UDP ports 414 and 415, change the command as follows:
(echo <credentials>) | docker run --name LogCollector1 -p 414:514/udp -p 415:515/udp -p 21:21 -p 20000-20099:20000-20099 -e "PUBLICIP='10.0.0.100'" -e "PROXY=" -e "SYSLOG=true" -e "CONSOLE=machine.us2.portal.cloudappsecurity.com" -e "COLLECTOR=LogCollector1" --security-opt apparmor:unconfined --cap-add=SYS_ADMIN --restart unless-stopped -a stdin -i mcr.microsoft.com/mcas/logcollector starterFor example:

Note
Only the Docker mapping is modified. The internally assigned ports are not changed enabling you to choose any listening port on the host.


Validate the traffic and log format received by log collector on Linux
Occasionally, you may need to investigate issues such as the following:
- Log collectors are receiving data: Validate that log collectors are receiving Syslog messages from your appliances and aren't blocked by firewalls.
- Received data is in the correct log format: Validate the log format to help you troubleshoot parsing errors by comparing the log format expected by Defender for Cloud Apps and the one sent by your appliance.
Use the following steps to verify that traffic is received by log collectors:
Sign in to your server hosting the Docker container.
Validate that the log collector is receiving Syslog messages using any of the following methods:
Use tcpdump, or a similar command to analyze network traffic on port 514:
tcpdump -Als0 port 514If everything is correctly configured, you should see network traffic from your appliances. For example:

Use netcat, or a similar command to analyze network traffic on the host machine:
Install netcat and wget.
Download a sample log file from Microsoft Defender XDR. If needed, unzip the log file.
In Microsoft Defender XDR, under Cloud Apps select Cloud Discovery > Actions > Create Cloud Discovery snapshot report.
Select the Data source from which you want to upload the log files.
Select View and verify then right-click Download sample log and copy the URL address link.
Select Close > Cancel.
Run:
wget <URL_address_to_sample_log>Run
netcatto stream the data to the log-collector.cat <path_to_downloaded_sample_log>.log | nc -w 0 localhost <datasource_port>
If the collector is correctly configured, the log data is present in the messages file and shortly after that it's uploaded to Defender for Cloud Apps.
Inspect relevant files within the Defender for Cloud Apps Docker container:
Sign in to the container. Run:
docker exec -it <Container Name> bashDetermine if Syslog messages are being written to the messages file. Run:
cat /var/adallom/syslog/<your_log_collector_port>/messages
If everything is correctly configured, you should see network traffic from your appliances. For example:

Note
This file will continue to be written to until it reaches 40 KB in size. For example:
Review the logs that were uploaded to Defender for Cloud Apps in the
/var/adallom/discoverylogsbackupdirectory. For example:
Validate the log format received by the log collector by comparing the messages stored in
/var/adallom/discoverylogsbackupto the sample log format provided in the Defender for Cloud Apps Create log collector wizard.


Write output of the messages file to a local file
If you want to use your own sample log but don't have access to the appliance, use the following commands to write the output of the messages file, located in the log collector's syslog directory, to a local file on the host:
docker exec CustomerLogCollectorName tail -f -q /var/adallom/syslog/<datasource_port>/messages > /tmp/log.log
Compare the output file (/tmp/log.log) to the messages stored in the /var/adallom/discoverylogsbackup directory.
Update the log collector version
When updating your log collector:
- Before installing the new version, make sure to stop your log collector and remove the current image.
- After installing the new version, update your certificate files.
Next steps
If you run into any problems, we're here to help. To get assistance or support for your product issue, please open a support ticket.