Note
Access to this page requires authorization. You can try signing in or changing directories.
Access to this page requires authorization. You can try changing directories.
This article describes different ways to see how device control works. Beginning with default settings, each section describes how to configure device control to achieve certain objectives.
Explore the default state of device control
By default, device control is disabled and there are no restrictions on which devices can be added. The auditing of basic device control events is enabled for devices that are onboarded to Defender for Endpoint. This activity can be seen in the device control report. Filtering on the built-in PnP Audit Policy shows devices that are connected to the endpoints in the environment.
Device control in Defender for Endpoint identifies a device based on its properties. Device properties are visible by selecting an entry in the report.
The Device ID, Vendor ID (VID), Serial number, and Bus type can all be used to identify a device (see Device control policies in Microsoft Defender for Endpoint). Data is also available in Advanced Hunting, by searching for the Plug and Play Device Connected action (PnPDeviceConnected), as shown in the following example query:
DeviceEvents
| where ActionType == "PnpDeviceConnected"
| extend parsed=parse_json(AdditionalFields)
| extend MediaClass = tostring(parsed.ClassName)
| extend MediaDeviceId = tostring(parsed.DeviceId)
| extend MediaDescription = tostring(parsed.DeviceDescription)
| extend MediaSerialNumber = tostring(parsed.SerialNumber)
| project Timestamp, DeviceId, DeviceName, AccountName, AccountDomain, MediaClass, MediaDeviceId, MediaDescription, MediaSerialNumber, parsed
| order by Timestamp desc
The status of device control (enabled/disabled, default enforcement, and last policy update) is available on a device via Get-MpComputerStatus, as illustrated in the following snippet:
DeviceControlDefaultEnforcement   :
DeviceControlPoliciesLastUpdated  : 1/3/2024 12:51:56 PM
DeviceControlState                : Disabled
Change the device control state to be enabled on a test device. Make sure the policy is applied by checking Get-MpComputerStatus, as illustrated in the following snippet:
DeviceControlDefaultEnforcement   : DefaultAllow
DeviceControlPoliciesLastUpdated  : 1/4/2024 10:27:06 AM
DeviceControlState                : Enabled
In the test device, insert a USB drive. There are no restrictions; all types of access (read, write, execute, and print) are allowed. A record is created to show that a USB device was connected. You can use the following example advanced hunting query to see it:
DeviceEvents
| where ActionType == "PnpDeviceConnected"
| extend parsed=parse_json(AdditionalFields)
| extend MediaClass = tostring(parsed.ClassName)
| extend MediaDeviceId = tostring(parsed.DeviceId)
| extend MediaDescription = tostring(parsed.DeviceDescription)
| extend MediaSerialNumber = tostring(parsed.SerialNumber)
| where MediaClass == "USB"
| project Timestamp, DeviceId, DeviceName, AccountName, AccountDomain, MediaClass, MediaDeviceId, MediaDescription, MediaSerialNumber, parsed
| order by Timestamp desc
This example query filters the events by MediaClass. The default behavior can be changed to deny all devices, or to exclude families of devices from device control. Change the default behavior to deny, and then set device control only to apply to removable storage.
For Intune, use a custom profile to set the device control settings, as follows:
- Set
./Vendor/MSFT/Defender/Configuration/DeviceControlEnabledto1 - Set
./Vendor/MSFT/Defender/Configuration/DefaultEnforcementto2 - Set
./Vendor/MSFT/Defender/Configuration/SecuredDevicesConfigurationtoRemovableMediaDevices
Deploy your policy to the test device. Use Get-MpComputerStatus to confirm that the default enforcement is set to Deny, as illustrated in the following snippet:
DeviceControlDefaultEnforcement  : DefaultDeny
DeviceControlPoliciesLastUpdated : 1/4/2024 10:27:06 AM
DeviceControlState               : Enabled
Remove, and reinsert the USB device in the test machine. Try to open the drive. The drive isn't accessible, and a message appears which indicates that access is denied.
Note
Samples and instructions and examples are available here.
Step 1: Deny all removable media
In order to customize the behavior, device control uses policies that are a combination of groups and rules. Start by deploying a policy that denies all access to all removable storage devices, and audits the event by sending a notification to the portal and the user. The following image summarizes these settings:
For the purposes of controlling access, devices are organized into Groups. This policy uses a group called All removable media devices. Once this policy is deployed to the test device, reinsert the USB. A notification appears, indicating that device access is restricted.
The event also appears within 15 minutes in advanced hunting. You can use the following example query to view the results:
DeviceEvents
| where ActionType == "RemovableStoragePolicyTriggered"
| extend parsed=parse_json(AdditionalFields)
| extend RemovableStorageAccess = tostring(parsed.RemovableStorageAccess)
| extend RemovableStoragePolicyVerdict = tostring(parsed.RemovableStoragePolicyVerdict)
| extend MediaBusType = tostring(parsed.BusType)
| extend MediaClassGuid = tostring(parsed.ClassGuid)
| extend MediaClassName = tostring(parsed.ClassName)
| extend MediaDeviceId = tostring(parsed.DeviceId)
| extend MediaInstanceId = tostring(parsed.DeviceInstanceId)
| extend MediaName = tostring(parsed.MediaName)
| extend RemovableStoragePolicy = tostring(parsed.RemovableStoragePolicy)
| extend MediaProductId = tostring(parsed.ProductId)
| extend MediaVendorId = tostring(parsed.VendorId)
| extend MediaSerialNumber = tostring(parsed.SerialNumber)
|project Timestamp, DeviceId, DeviceName, InitiatingProcessAccountName, ActionType, RemovableStorageAccess, RemovableStoragePolicyVerdict, MediaBusType, MediaClassGuid, MediaClassName, MediaDeviceId, MediaInstanceId, MediaName, RemovableStoragePolicy, MediaProductId, MediaVendorId, MediaSerialNumber, FolderPath, FileSize
| order by Timestamp desc
Note
You can view up to 300 events per device per day with advanced hunting.
Selecting the event to view information about the policy and the device.
Step 2: Allow access for authorized USB devices
To grant access to set of authorized USBs devices, set up a group to identify those devices. We call our group Authorized USBs, and used the settings depicted in the following image:
In our example, the authorized USBs group contains a single device identified by its InstancePathId. Before deploying the sample, you can change the value to the InstancePathId for a test device. See Using Windows Device Manager to determine device properties and Using reports and advanced hunting to determine properties of devices for details on how to find the correct value.
Notice that the authorized USB group is excluded from the deny-all policy. This ensures that those devices are evaluated for the other policies. Policies aren't evaluated in order, so each policy should be correct if evaluated independently. Once the policy is deployed, reinsert the approved USB device. You should see that there's full access to the device. Insert another USB, and confirm that access is blocked for that device.
Device control has lots of ways to group devices based on properties. For more information, see Device control policies in Microsoft Defender for Endpoint.
Step 3: Allow different levels of access for different types of devices
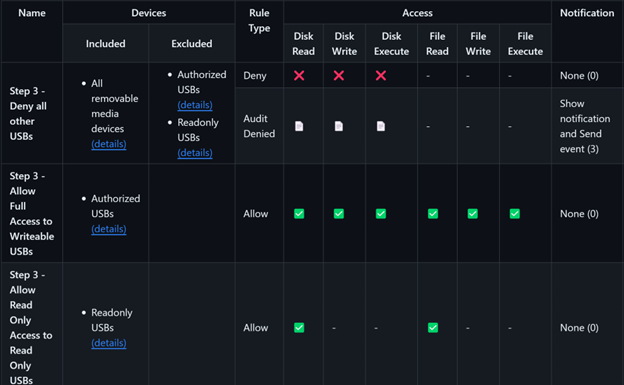
To create different behaviors for different devices, place them into separate groups. In our example, we use a group called Read Only USBs. The following image shows the settings we used:
In our example, the Read Only USB group contains a single device identified by its VID_PID. Before deploying the sample, you can change the value of VID_PID to that of a second test device.
Once the policy is deployed, insert an authorized USB. You should see that full access is allowed. Now insert the second test device (Read Only USB). You can access the device with read-only permissions. Attempt to create a new file, or make changes to a file, and you should see that device control blocks it.
If you insert any other USB device, it should be blocked due to the "Deny all other USBs" policy.
Step 4: Allow different levels of access to devices for specific users or groups
Device control allows you to further restrict access using conditions. The simplest condition is a user condition. In device control, users and groups are identified by their Security Identified (SID).
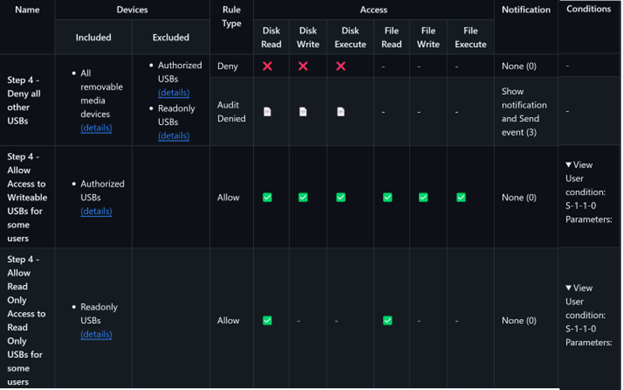
The following screenshot shows the settings we used for our example:
By default, the sample uses the Global SID of S-1-1-0. Before deploying the policy, you can change the SID associated with the authorized USBs (writeable USBs) to User1 and change the SID associated with the Read Only USBs to User2.
Once the policy is deployed, only User 1 has write access to the Authorized USBs, and only User 2 has read access to the ReadOnly USBs.
Device control also supports group SIDs. Change the SID in the read-only policy to a group that contains User2. Once the policy is redeployed, the rules are the same for User 2 or any other user in that group.
Note
For groups that are stored in Microsoft Entra, use the object id instead of the SID to identify groups of users.


