Note
Access to this page requires authorization. You can try signing in or changing directories.
Access to this page requires authorization. You can try changing directories.
Not all devices discovered in your network require the same level of security attention. Some devices appear briefly on the network (guests, test devices), while others are permanently out of scope for vulnerability management (isolated labs, decommissioned systems). Managing device scope with transient device tagging and device exclusions keeps your security team focused on relevant devices, ensures accurate exposure and secure scores, and produces cleaner reports that reflect your true production environment.
Use tags or exclusions
Defender for Endpoint provides two complementary mechanisms for managing device relevance. Use the following table to determine which approach fits your situation.
| Situation | Approach | How it works | Impact |
|---|---|---|---|
| Devices appear and disappear frequently (guests, test VMs, short-lived containers) | Transient device tagging (automatic) | An internal algorithm detects intermittent network patterns and tags matching devices. Servers, network devices, printers, industrial and smart-facility devices are never tagged as transient. | Transient devices are filtered out of the default inventory view but remain visible if you change the filter. Exposure score, secure score, vulnerability reports, and advanced hunting still include these devices. |
| Permanent lab or sandbox environment | Device exclusion (manual) | You exclude devices individually or in bulk with a documented justification. | Excluded devices don't appear in vulnerability management pages or reports, and don't contribute to exposure or secure scores. They remain in the device inventory but are marked as excluded. |
| Devices scheduled for decommissioning | Device exclusion (manual) | Exclude with a justification and note about the planned retirement date. | Same as above. Historical records remain in the inventory. |
| Duplicate entries after reimaging | Device exclusion (manual) | Exclude the obsolete entries with a "Duplicate device" justification; keep the active device in scope. | Cleans up inventory and ensures accurate device counts. |
| Devices offline for extended periods | Check if already transient-tagged; if not, consider exclusion | Transient tagging might already handle this. Exclude manually only if the device won't return. | Depends on chosen approach. |
| Active devices you want to ignore temporarily | Device filters or custom tags | Use inventory filters or device tags to create targeted views. | Full visibility is maintained. Never exclude active devices—that creates blind spots. |
| Devices managed by a different team | Device filters or custom tags | Use device tags and filters to scope views per team. | Full visibility is maintained across the organization. |
Important
Review transient-tagged and excluded devices regularly. Always add meaningful notes when excluding devices. Never exclude active, network-connected devices—exclusion only affects vulnerability management visibility, not actual risk.
View and manage transient devices
Transient device tagging is automatic and can't be disabled. You control visibility through filters.
View transient devices in the inventory
- In the Microsoft Defender portal, go to Assets > Devices.
- Select the Filter icon.
- In the Transient device filter, select Yes to view only transient devices, or select No to exclude them from the list.
You can also add the Transient device column to your inventory view to see the transient status alongside other device details.
How transient tagging works
- Automatic detection: An internal algorithm identifies transient devices based on network appearance patterns.
- Excluded device types: Servers, network devices, printers, industrial devices, surveillance equipment, smart facility devices, and smart appliances are never tagged as transient.
- Default filtering: Transient devices are filtered out of the device inventory by default.
- No manual override: You can't manually tag or untag a device as transient. Adjust filter settings to control visibility.
Exclude devices
Device exclusion lets you manually remove specific devices from vulnerability management visibility. Excluded devices remain in the device inventory (marked as excluded) but don't appear in vulnerability management pages or reports, and don't contribute to exposure or secure scores.
Warning
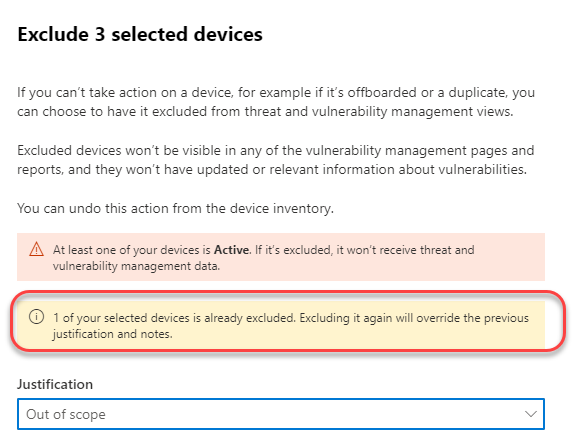
Excluded devices remain connected to the network and can still present security risks. Device exclusion only affects vulnerability management visibility—it doesn't prevent attacks or reduce actual risk. If you attempt to exclude an active device, Defender for Endpoint displays a warning and asks for confirmation.
Exclude a single device
- In the Microsoft Defender portal, go to Assets > Devices.
- Select the device you want to exclude.
- In the device flyout or on the device page, select Exclude.
- Select a justification:
- Inactive device
- Duplicate device
- Device doesn't exist
- Out of scope
- Other
- Type a note explaining the reason for exclusion.
- Select Exclude device.

Exclude multiple devices
- In the Device inventory, select multiple devices using the checkboxes.
- From the action bar, select Exclude.
- Choose a justification and add a note.
- Select Exclude devices.
If you select devices with mixed exclusion statuses, the dialog shows how many are already excluded. You can re-exclude devices, but the new justification overrides previous values.
Note
It can take up to 10 hours for devices to be fully excluded from vulnerability management views and data.
View and manage excluded devices
- In the Device inventory, select the Filter icon.
- Use the Exclusion state filter to view:
- Not excluded: Normal devices
- Excluded: Devices removed from vulnerability management
You can also add the Exclusion state column to your inventory view.
Stop excluding a device
To restore a device to active vulnerability management:
- In the Device inventory, select the excluded device.
- In the device flyout, select Exclusion details.
- Select Stop exclusion.
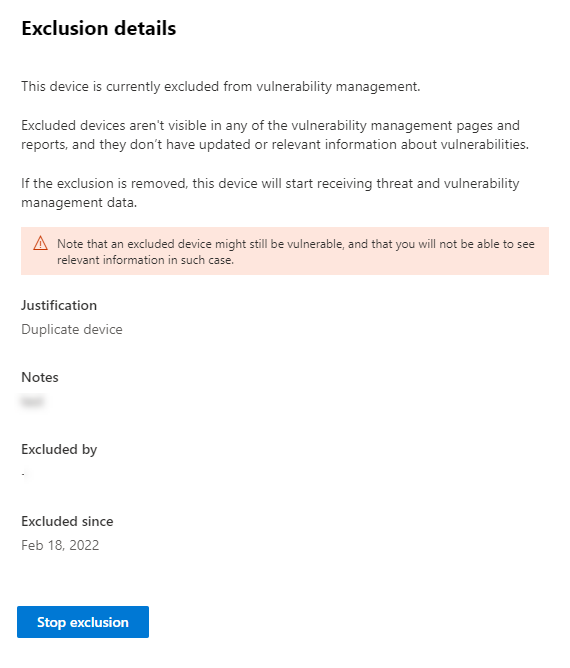
Once you stop exclusion, vulnerability data reappears in vulnerability management pages, reports, and advanced hunting. Changes can take up to 8 hours to take effect.
Next steps
- Create and manage device tags to organize devices into meaningful groups
- View your device inventory with appropriate filters applied
- Target devices for security actions using tags and device groups