Note
Access to this page requires authorization. You can try signing in or changing directories.
Access to this page requires authorization. You can try changing directories.
Important
This feature is in preview. Preview features aren't meant for production use and might have restricted functionality. These features are available before an official release so that customers can get early access and provide feedback.
Manual incident and alert creation lets your security operations center (SOC) team create incidents and alerts as needed in the Microsoft Defender portal. Use it to track investigations, tips from other teams, or operational work in the unified incident queue, even if no automatic detection has triggered.
This article describes how to manually create an incident or alert from the Defender portal. After you create an incident, manage it like any other incident in the queue.
What you can do with manual creation
- Create a new incident with an initial alert, or attach an alert to an existing incident.
- Provide full incident metadata, including title, description, severity, category, MITRE ATT&CK techniques, impacted assets, and evidence.
- Decide whether the incident participates in correlation, or keep it standalone.
- Send incident and alert data through the same portal pages, advanced hunting tables, and APIs as automatically generated incidents, so your existing IT service management (ITSM) and reporting integrations can use it.
Prerequisites
Before you can create an incident or alert manually, make sure that:
- Your tenant is onboarded to Microsoft Defender.
- You have one of the following Microsoft Defender unified role-based access control (RBAC) roles or equivalent permissions:
- Detection tuning – Manage
- Microsoft Sentinel Responder (for Microsoft Sentinel customers)
- Microsoft Sentinel Contributor (for Microsoft Sentinel customers)
- You can only create alerts for assets that are in your assigned RBAC scope. Assets outside of your scope aren't available in the impacted assets picker.
For more information about roles, see Microsoft Defender Unified role-based access control (RBAC).
Create an incident or alert from the portal
Manually create an incident or alert from the Incidents queue in the Microsoft Defender portal.
Step 1: Create the incident or alert
In the Microsoft Defender portal, go to Investigation & response > Incidents & alerts.
Select the Incidents tab or Alerts tab, depending on what you want to create.
On the queue toolbar, select Create.
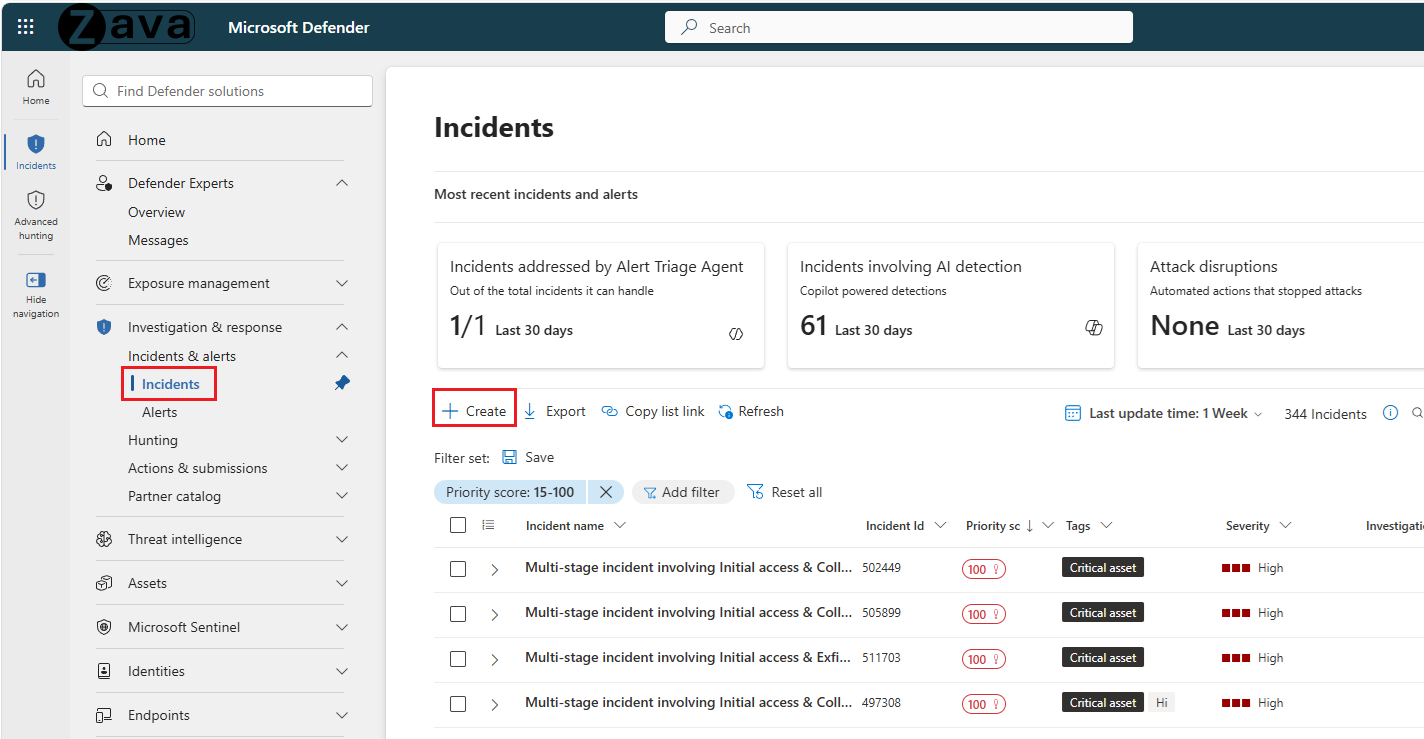
The Create new wizard opens.

Step 2: Select workspace (Microsoft Sentinel only)
In the Preparation step, Microsoft Sentinel customers select the workspace scope for this incident. If you don't see the workspace you want, you can add it by selecting Add workspace.

Step 3: Provide alert details
On the Alert details step, choose whether to create a new incident or to attach the alert to an existing one, set the correlation behavior, and enter the alert metadata.

| Field | Required | Notes |
|---|---|---|
| Create a new incident or correlate alert with an existing incident | Yes | Select Create a new incident to open a new incident. Select Correlate alert with an existing incident and provide the incident ID to attach the alert to that incident. |
| Enable incident correlation for this alert | No | When selected, the incident participates in standard Defender correlation logic and might merge with related incidents. Clear the checkbox to keep the incident standalone. |
| Alert title | Yes | Short, descriptive name for the alert. |
| Severity | Yes | High, medium, low, or informational. |
| Category | Yes | Maps to the Defender alert category taxonomy. |
| MITRE ATT&CK techniques | No | One or more technique IDs that describe the activity. |
| Description | Yes | Explanation of what the alert represents. For new incidents, the description of the first attached alert becomes the default incident description. |
| Recommended actions | No | Free-text guidance for responders. |
| Sentinel workspace | Yes (Microsoft Sentinel customers only) | The Microsoft Sentinel workspace that receives the alert and incident. |
Note
Manually created alerts are tagged with Service source: Microsoft Defender XDR, Detection source: Manual, and Product name: Microsoft Defender XDR, so you can filter for them in the alert queue and in advanced hunting.
Select Next to continue.
Step 4: Select entities
On the Select entities step, attach the assets and evidence the alert applies to.

- Impacted assets (required): Add at least one asset. Use search and autocomplete to find devices, identities, mailboxes, IP addresses, or other supported entity types by name or unique identifier. Impacted assets are prioritized for incident context.
- Related evidence (optional): Add files, processes, URLs, IP addresses, or other supporting evidence.
You can only add assets that are within your RBAC scope.
Select Next to continue.
Step 5: Related incident
Select if you want to create a new incident or correlate the alert with an existing incident. If you choose to correlate with an existing incident, provide the incident ID.

Select Next to continue.
Step 6: Review and create
On the Review and create step, review the alert and incident details, and then select Create.
After you create the incident, the wizard confirms creation and provides links to the new incident and alert.
After the incident is created, you can set the owner and tag fields from the Manage incident pane.
Where manually created incidents and alerts appear
After creation, manually generated content flows through the same surfaces as automatically generated content:
- Incident and alert queues in the Microsoft Defender portal, including incident details, the alert page, and the activity log.
- Entity pages for the impacted assets and any related evidence.
- Advanced hunting tables, including
AlertInfo,AlertEvidence,SecurityAlert, andSecurityIncident. - APIs, including the Microsoft Graph security incidents and alerts APIs and Azure Resource Manager (ARM) APIs that your ITSM and reporting integrations use.
All create and update actions on a manually generated incident appear in the incident Activity log, the alert comments and history, and the Microsoft 365 audit log, so you can audit who did what and when.